


Troubleshooting 10
0020181589_04 auroCOMPACT Installation and maintenance instructions
41
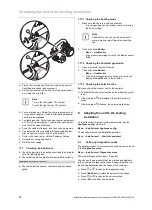
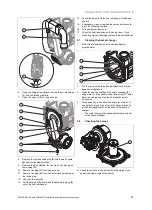
1
2
4
5
3
1.
Remove the air intake pipe.
2.
Remove the plugs
(3)
from the gas valve.
3.
Remove the plug from the sensor on the Venturi
(1)
by
pushing in the latching lug.
4.
Undo the two cap nuts
(5)
and
(2)
on the gas valve.
Hold on to the gas valve when loosening the cap nuts.
5.
Loosen the gas valve's fixing screw
(4)
from the
bracket.
6.
Remove the gas valve from the retainer.
7.
Reinstall the new gas valve in the reverse order. Use
new seals for this.
8.
Hold on to the gas valve when tightening the cap nuts.
9.
After the new gas valve has been installed, carry
out a leak-tightness check (Leak-tightness check
(
→
Page 28)), check the type of gas and set the gas
ratio.
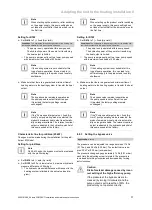
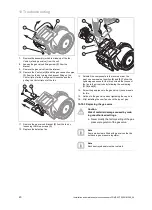
10.10.4 Replacing the Venturi
2
1
3
1.
Remove the air intake pipe.
2.
Remove the plug from the sensor on the Venturi jet
(2)
by pressing on the locking lug.
3.
Undo the cap nut
(3)
for the gas connection pipe
(1)
on
the gas valve.
4.
Remove the Venturi jet and the gas connection pipe
from the fan by turning the bayonet fitting on the Venturi
jet as far as it will go anti-clockwise and then pulling the
Venturi jet out of the fan.
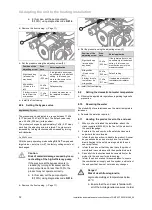
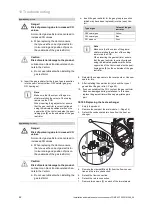
1
7
6
5
4
2
3
5.
Remove the gas connection pipe
(1)
from the Venturi
(3)
by removing the clamp
(4)
and pulling the gas con-
nection pipe out vertically. Dispose of the seal
(7)
.
6.
Pull the burner jet
(6)
straight off and keep it for re-use.
7.
Check whether the Venturi is free of residue at the gas
inlet side.


