


4 Set-up
10
Installation and maintenance instructions auroCOMPACT 0020181589_04
Danger!
Risk of injury due to repeated use of the
carrying handles.
Due to material ageing, the carrying handles
are not designed to be reused during any
subsequent transportation.
▶
Never reuse the carrying handles.
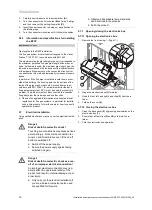
1.
Remove the front casing. (
→
Page 11)
Conditions
: The unit is too bulky or heavy for transport.
7
10
11
6
4
2
3
1
5
1
7
8
7
9
7
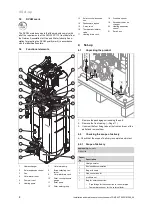
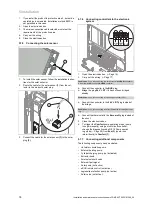
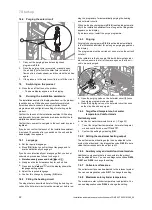
Disassembling for transport
▶
Remove the side panels
(1)
to be able to use the carry-
ing handles
(2)
.
▶
Undo the nut
(4)
on the domestic hot water pump.
▶
Remove the insulating elements
(3)
and
(5)
.
▶
Undo the nut
(9)
on the domestic hot water cylinder.
▶
Remove the upper hose from the condensate trap.
▶
Remove the power plug from the cylinder temperature
sensor.
▶
Remove the two power plugs 2 of the domestic hot wa-
ter pump.
▶
Remove the 2 power plugs of the solar PCB
(10)
from
the unit's main PCB.
▶
Undo the nuts
(6)
and
(8)
.
▶
Undo the nuts
(11)
of the solar circuit.
▶
Remove the four screws
(7)
.
▶
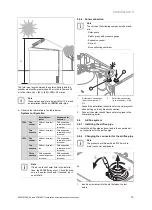
When assembling the unit, carry out the steps described
above in reverse.
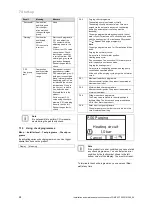
0
▶
Install the cylinder temperature sensor as shown in the
figure.
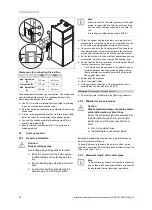
2.
To transport the unit safely, use the two carrying
handles on the two front feet of the unit.
1
5
7
3
3.
Turn the carrying handles under the unit so that they
face forwards.
4.
Ensure that the feet are screwed in fully so that the car-
rying handles are held properly.
5.
Always transport the unit as illustrated above.


