background image

26

•   “Resin Type” provides different default values for different resin type.
•  "Preference": Each resin can define multiple preference to memorize frequently-used printing 

parameter, including: Layer Thickness, Exposure Time, Cool Down Time, Pixel Shrink, LED Power, 
Motor Speed, Rise Height, Infill, UDP Mode. Right click on  button, popup “Preference Editor” 
dialog. In “Preference Editor”, click “Add” to create a new preference and click “Remove” to 
delete the selected preference. Note: Preference values are obtained directly from the slice 
parameters interface and there are not editable; Only the self-defined preference is deletable.

•  “Thickness” is the layer thickness, which is related to Z resolution.
•  “Exposure Time” is the exposure time of a layer in a particular segment segment, and it may 

vary due to a different layer thickness setting or different resin types, i.e. zWax resin takes about 
2x exposure time per layer compare to zABS.

•  “UDP” option will be added into the slice parameters when users choose the printers with UDP 

function. Users need to check this box when printing UDP model. The Cool Down Time, the 

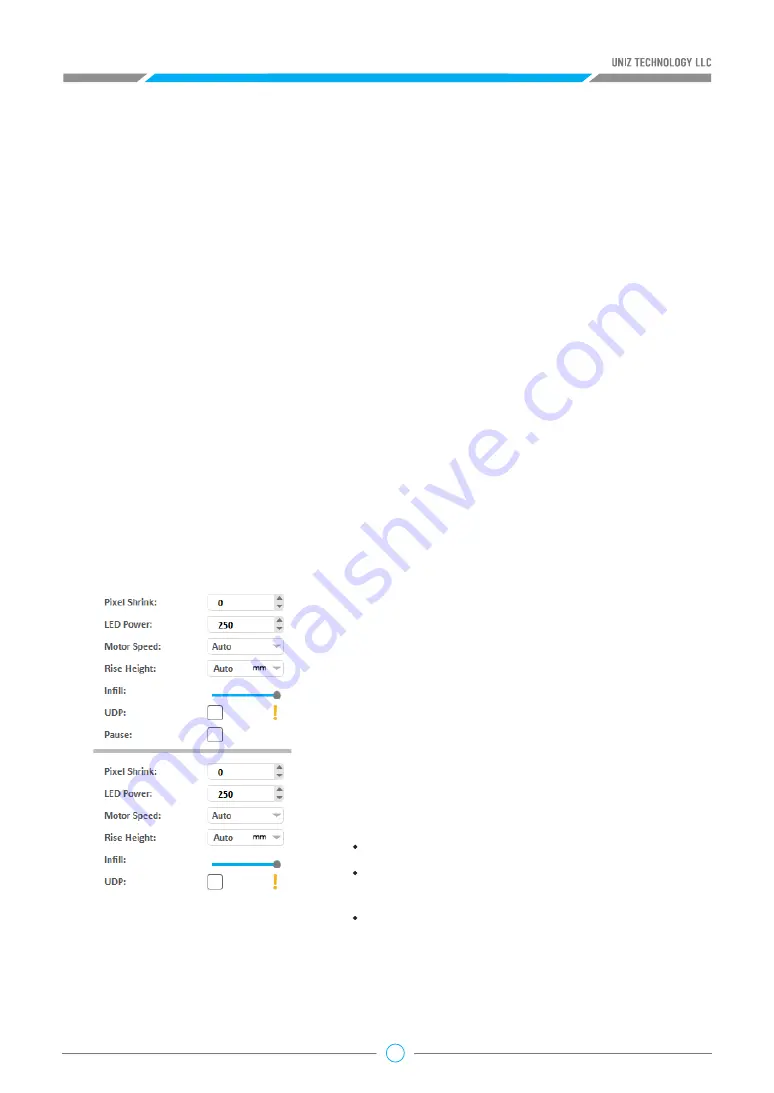
•  “Pixel Shrink”: Shrink or expand the slice polygons. 

If value is zero do nothing; If positive shrink slice, if 
negative, then expand. The unit is pixels.

•  “LED Power” sets the power to the UV LEDS and will 

have an impact on curing of the resin Power of LED 
module. 150-250 is suggested.

•  “Motor Speed” defines the speed of electric motor that 

controls the peel motion of the platform.

•  “Rise Height” defines the travel height of the peel 

motion. 

•  “Infill”: drag the slider horizontally to modify the infill 

ratio ranging from 0% to 100%. The model will be

:

           hollowed but not filled when the ratio is 0%;
           hollowed and filled by the ratio when the ratio is 
among 10% to 90%;
           filled but not hollowed when the ratio is 100%;

•  “Cool Down Time” is the time to cool down the exposed layer to protect the polymer film from 

overheating. To prolong the lifetime of the resin tank film, it is recommended to keep the film 
temperature under 50 degrees Celsius. Overheating the film can cause it to warp, delaminate 
and break.

Pressing the “Advanced” Button will open following sub menu.

View the Advanced Settings for the hollowing wall thickness and infill type. 

Tips:     

Avoid exposing the same spot or area over and over; try to orient the model’s walls or pillars in 
oblique angle so the exposure area changes on subsequent layers.

Содержание Slash DJ2

Страница 1: ...UNIZ DESKTOP 3D PRINTER USER MANUAL APPLICABLE TO SLASH OL SLASH PLUS SLASH PLUS UDP SLASH PRO OL SLASH PRO SLASH PRO UDP SLASH J UDP SLASH DJ2...

Страница 2: ...ods used for assembling handling storage use or disposal of the device are beyond the control of UNIZ Technology LLC For this and other reasons UNIZ does not assume responsibility and expressly discla...

Страница 3: ...ATION APPENDIX SLASH SERIES 3D PRINTER DESIGN RULE TROUBLE SHOOTING ROHS AUTHENTICATION TECHNICAL SPECIFICATIONS UNBOXING PRODUCT DESCRIPTION SLASH PRINTER TYPES ACTION BUTTON COLOR GUIDE PRINTER ACTI...

Страница 4: ...ing the instructions in this user manual and experience how easy it is to produce great quality prints You might be familiar with other types of 3D printers Regardless it is still essential that you r...

Страница 5: ...ut of the box by pulling the cardboard handle beneath the printer while holding the box On the foam packaging you will find the Quick Start Guide and accessories In the foam part on top of your SLASH...

Страница 6: ...esin Tank F Building Platform G Resin Bottle H Power Combiner I Cleaning Bottle Supplied with your package is the UNIZ desktop 3D printer and several other accessories This is everything you need to s...

Страница 7: ...04 PRODUCT DESCRIPTION...

Страница 8: ...05...

Страница 9: ...06 SLASH PRINTER TYPES You can identify the printer s type by checking the label underneath the printer and on the box...

Страница 10: ...paused z axis moving Progressing blue Data transfer in progress Green STANDBY The printer is connected and waits for a command Breathing green Data transferred waiting for touch confirmation Progressi...

Страница 11: ...l interface 4 View network status Press the Printer Settings button open the submenu The first item is the Network which shows the connection status Wi Fi Disconnected means the current Wi Fi is not c...

Страница 12: ...e network This function only supports setting via USB connection Click the Wi Fi name on Wi Fi list configure the IP address settings Click the first item The Wi Fi list will pop up in the left if it...

Страница 13: ...ind the SSID and Password on the side label b Access the Wi Fi Setting of your mobile device and connect to UNIZ3D as shown in the SSID 3 Check and Set Network a Find IP address on the side label b Op...

Страница 14: ...day trial period in which the SLASH OL PRO OL will become and function as a SLASH PLUS UDP SLASH PRO UDP Method 1 UNIZ Desktop Method 2 UNIZ App a Start the UNIZ Desktop and select the printer in the...

Страница 15: ...o open the printer control interfacet b An icon will show next to the firmware version when there is a new version available available Click the icon to start upgrading Restart the printer when the up...

Страница 16: ...by visiting official website https www uniz com 2 Click My Printer in the left menu of the Dashboard from the website to show the activated printers under the current username and choose the one that...

Страница 17: ...process Please restart the printer manually after the upgrade is complete The printer model should change upon the next power up UNIZ App a Click the Printer button in the main menu the app select th...

Страница 18: ...ial During the trial period check whether the printer is connected to the Internet and whether the resin bottle information is normal before printing During the trial period the trial status will be s...

Страница 19: ...ion is completed the system will prompt as below 3 After the next restart the printer will be restored to its original model 1 If the trial period has expired the system will pop up the dialog box as...

Страница 20: ...17 1 Software Interface Open UNIZ Desktop and click Control button to show the 3D model viewer 1 1 Viewer C UNIZ SOFTWARE USER MANUAL...

Страница 21: ...1 3 Additional Tools Load 3D Models Move Selected Model Rotate Selected Model Scale Selected Model Generate Supports Slice New Scence Save Scence Save Scence as Advanced Setting Model List Undo Operat...

Страница 22: ...be marked with the icon and USB communication will be prior The status bar appears along the lower edge of the window and shows software progress such as loading generating supports and slicing To loa...

Страница 23: ...t in contact with platform Use the Centered button to center active part on platform Use the Duplicate button to duplicate the active part Once the Rotation tab is open hold the left mouse button on t...

Страница 24: ...the scale box Click the Reset Button to restore the activated object to the original size Units toggle between millimeters and inches Tips Tips Large Flat surfaces or Long Straight lines with support...

Страница 25: ...elow shows supports with connection and the right one shows supports without connection This box is checked by default Foundation Click the check box to add Foundations when generating supports The le...

Страница 26: ...ort angle otherwise they will not be generated The bigger the support angle is the wider the scope of generating support Set this value to prevent generating supports at steep places and to eliminate...

Страница 27: ...hted to indicate that it has been selected Once selected you can drag and drop the support to a target location If the support turns red while moving the position of the support is not ideal and there...

Страница 28: ...ameters of each segment of a model After version 1 2 0 and the upper Desktop sets a separate slider at the third layer by default and users cannot move this slider in the bar The Exposure Time of the...

Страница 29: ...me the Pixel Shrink Shrink or expand the slice polygons If value is zero do nothing If positive shrink slice if negative then expand The unit is pixels LED Power sets the power to the UV LEDS and will...

Страница 30: ...ick the Key to move the slider up one layer incrementally until it reaches the next slider or the top layer of the model Click the Key to move the slider down one layer incrementally until it reaches...

Страница 31: ...edrawing resin from the tank back into the bottle Click again to stop Full Screen Clean Click Clean to expose the entire screen in order to fully cure and clean the resin at the bottom of the tank Deb...

Страница 32: ...ch the LCD screen Then click Yes again and the build platform will rise back up This function is used if there are issues relating to the initial distance between the build platform and the screen Thi...

Страница 33: ...s on the printer will pump resin from the bottle into the tank automatically 1 Network This shows the printer connection network status and provides network settings It supports automatic and manual I...

Страница 34: ...progress bar and the printer s front LED circle button will indicate the file transfer progress by lighting in blue Confirm Print Job Make sure that your printer is ready to print and then touch the...

Страница 35: ...ed Settings Wall Thickness of Hollowing sets the shell thickness of parts hollowed with the advanced settings in the slice menu Fill Style sets the fill style of parts hollowed with the advanced setti...

Страница 36: ...must conform to certain design rules in order to print successfully and prevent damage to the printer Read more about the design rules at the link below Download link https www uniz com support design...

Страница 37: ...ing ickering or di erent displaying on left right side The calibration for platform initi correct position Build platform surface is too model falls into the resin tank The suction force between the r...

Страница 38: ...a new resin tank 2 Remove the resin tank clean the LCD panel and the bottom of the resin tank lm wipe them with alcohol and then with a dry paper towel Note touch ONLY the glass part of the screen th...

Страница 39: ...roblems Reason 5 6 7 8 Edge warp defects on the printed model Liquid or solid resin residue appear on the screen surface There are wavy lines on the XY plane Problems with supports structu Solid resin...

Страница 40: ...en lm is not strong Solutions Replace with a new resin tank and increase the cooling time properly for the next print Replace with a new resin tank and clean the residual resin on the screen Follow th...

Страница 41: ...and the right of the printer Printed model has ripples or wavy lines on the side face Oily liquid exuded from the seams area in front of the label at the print er bottom and the level of the liquid i...

Страница 42: ...erce either top hole of the resin bottle with the provided awl Adjust the tightness of the lead screw nut and the build platform holder according to the guide Replace with new LCD cooling module or re...

Страница 43: ...ic pumping failed Abnormal sound can be heard from the rear cooling fan Abnormal display appear on the front light of the printer Touch problems occur with the front light of the printer Z axis limit...

Страница 44: ...ell connected Reinsert the cable and restart Replace with a new circuit board according to the guidance Remove the rear fan lter cover and check if there is any cable interference adjust the tightness...

Страница 45: ...42 F ROHS AUTHENTICATION Hazardous Substance Pb Hg Cd Cr VI PBB PBDE Mainboard Motor Column Power Cooling Board Resin Tank LCD Board LED Board Fans...

Страница 46: ...support technology 350 400 530 mm W H D 14 16 21 14KG 30LB LCD Stereolithography 150 m 192 120 200mm 7 5 4 7 7 9 Polymer lm natural peel Up to 100x more durable than PDMS UDP ready 70 m Up to 600 mm h...

Страница 47: ...rray liquid cooling system Uniz smart support technology 350 400 530 mm W H D 14 16 21 14KG 30LB LCD Stereolithography 75 m 192 120 200mm 7 5 4 7 7 9 Polymer lm natural peel Up to 100x more durable th...

Страница 48: ...50 400 530 mm W H D 14 16 21 14KG 30LB LCD Stereolithography 75 m 192 120 200mm 7 5 4 7 7 9 Polymer lm natural peel Up to 100x more durable than PDMS UDP ready 20 m Up to 600 mm hr UDP mode Up to 200...

Страница 49: ...350 400 730 mm W H D 14 16 29 14KG 30LB LCD Stereolithography 150 m 192 120 400mm 7 5 4 7 7 9 Polymer lm natural pee Up to 100x more durable than PDMS UDP ready 70 m Up to 600 mm hr UDP mode Up to 200...

Страница 50: ...rray liquid cooling system Uniz smart support technology 350 400 730 mm W H D 14 16 29 18KG 40LB LCD Stereolithography 75 m 192 120 400mm 7 5 4 7 15 8 Polymer lm natural peel Up to 100x more durable t...

Страница 51: ...50 400 730 mm W H D 14 16 29 18KG 40LB LCD Stereolithography 75 m 192 120 400mm 7 5 4 7 15 8 Polymer lm natural peel Up to 100x more durable than PDMS UDP ready 20 m Up to 600 mm hr UDP mode Up to 200...

Страница 52: ...C Suggested 64 82 F 100 240VAC 6A 50 60Hz 5500 Lux blue LED array liquid cooling system Uniz smart support technology 350 400 530 mm W H D 14 16 21 14KG 30LB LCD Stereolithography 47 m Duo LCD 120 68...

Страница 53: ...system Uniz smart support technology 350 400 530 mm W H D 14 16 21 14KG 30LB LCD Stereolithography 47 m 120 68 200mm 4 76 2 67 7 9 Polymer lm natural peel Up to 100x more durable than PDMS 10 m Up to...

Страница 54: ......

Отзывы: