background image

SRS and XRS EID Stick Reader 

Issue 2, 02/2013 

33 

While holding the serial connector from the inside with pliers, tighten the nut using the 11 mm 
socket. Tighten to a low torque (0.23 Nm).  

Wipe off the excess threadlocking product. 

10  Connect the power loom to the main module. 

Deleting all sessions, VID-EID pairs and alerts on the stick reader (XRS EID Stick Reader only) 

To clear all sessions, all VID-EID pairs and all alerts from the stick reader using EziLink: 

Connect the stick reader to the PC's USB port using the SRS/XRS-Serial cable and the USB-
Serial adaptor. 

Turn on the stick reader. 

Launch EziLink by double-clicking on the EziLink icon on the desktop: 

When connected, the stick reader icon in the top right-hand corner of the EziLink screen 
illuminates and the connection details appear at the bottom of the screen. 

Click 

File

 / 

Clear all sessions, VID-EID pairs and alerts 

in XRS…


A warning appears advising that this process will remove all records from all sessions, all VID-EID 
pairs and all alerts from the stick reader. 

Click 

Clear Everything

The data is cleared from the stick reader. 

A confirmation message is displayed. 

Click 

OK

Changing the stick reader settings on the stick reader itself (XRS EID Stick Reader only) 

Some settings can be modified on the stick reader itself.  

Press and hold both the Read button and the Scroll button. 

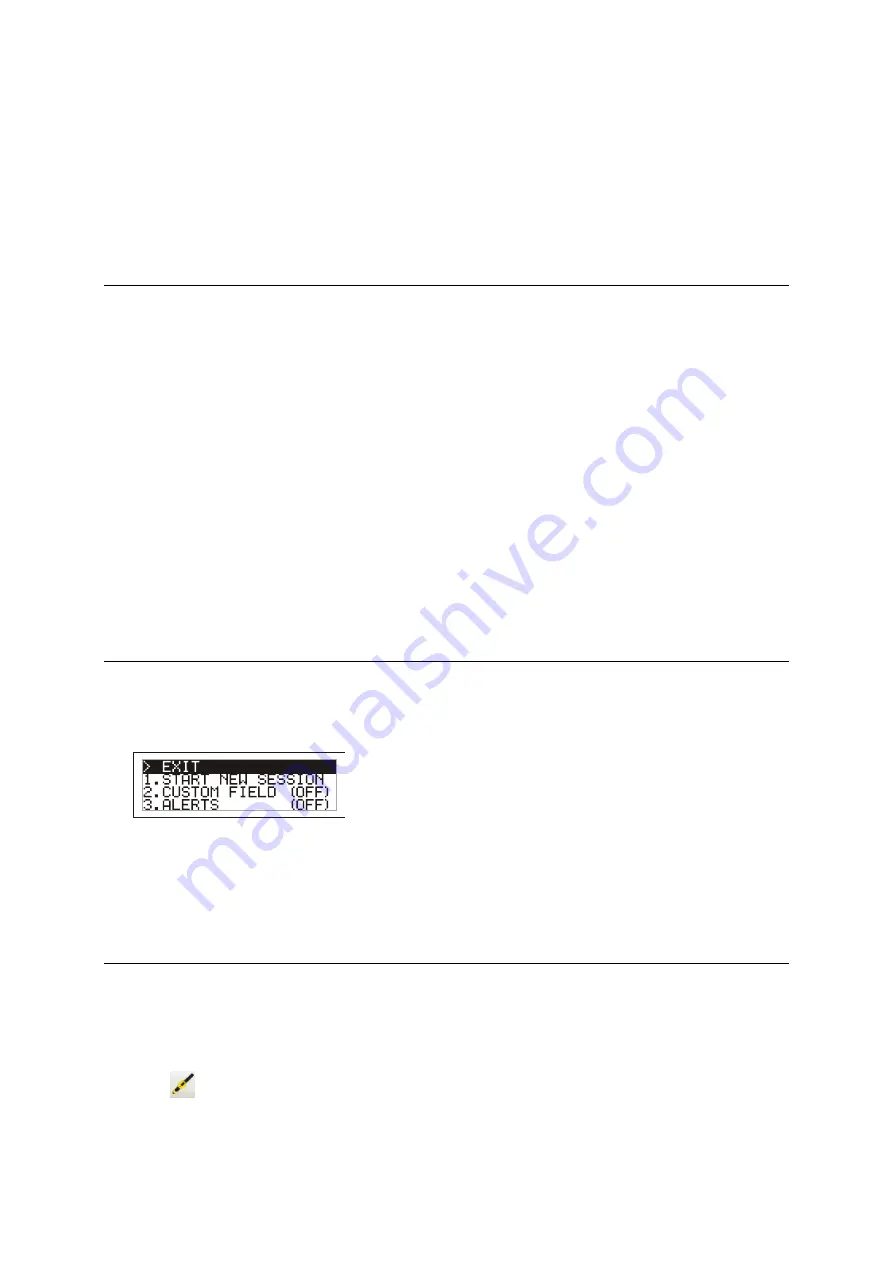
The first three items appear on the LCD with EXIT available at the top:  


To scroll through the menu options, press the scroll button repeatedly. 

To select an option, highlight the option and press the Read button. 

To exit out of the stick reader menu settings, press the scroll button until EXIT is highlighted, then 
press the Read button. 

Changing the stick reader settings using EziLink 

Instructions for installing and using EziLink are provided in the 

XRS EID Stick Reader User Manual 

and 

SRS EID Stick Reader Quickstart Guide


To modify the stick reader settings using EziLink: 

Connect the stick reader to the PC and launch EziLink. 

Click 

Содержание XRS

Страница 1: ...Unexpected behaviour during use 12 EziLink problems 14 LCD display problems XRS EID Stick Reader only 15 Connection problems 16 Testing the stick reader 17 Testing the power connection XRS EID Stick R...

Страница 2: ...settings on the stick reader itself XRS EID Stick Reader only 33 Changing the stick reader settings using EziLink 33 Changing the file format 34 Charging the battery 34 Updating the software 34 Resto...

Страница 3: ...mponent and may result in faults developing within that component over time When working on a stick reader ensure that correct anti static procedures are used 1 Use a wrist band and earth strap 2 Work...

Страница 4: ...xample Loctite 243 Test tags FDX and HDX test tags Main module Known good sample Display module Known good sample Computer Windows XP or later with EziLink and Hyperterminal installed EziLink is suppl...

Страница 5: ...SRS and XRS EID Stick Reader Issue 2 02 2013 5 Parts diagram...

Страница 6: ...rial Adaptor 814643 provides connection to a PC or On its own provides connection to a 3000 series weigh scale indicator 819821 2 Charging kit Both models 1 x multi region power adaptor 1 x SRS XRS ad...

Страница 7: ...case beeper and SRS name plate 822639 2 Bottom case 1 x bottom case assembly consists of bottom case gasket for battery compartment cover 4 pin serial connector and loom vent vibration motor dust cap...

Страница 8: ...y Try replacing the serial connector and loom See page 32 Main module faulty Replace the main module See page 28 XRS EID Stick Reader only Battery goes flat too soon even though the charging symbol on...

Страница 9: ...tenna broken poor tuning Try replacing the main module assembly which includes the antenna See page 28 Faulty module Replace the main module See page 28 Both models Stick reader doesn t turn on Batter...

Страница 10: ...D Stick Reader only To change the Read Mode see Changing the stick reader settings using EziLink on page 33 Reading Tags tab Read Time setting Both models The stick reader keeps on scanning for a tag...

Страница 11: ...e Read Mode see Changing the stick reader settings using EziLink on page 33 Reading Tags tab Read Time setting Both models The stick reader doesn t beep when a tag is scanned or the stick reader is sw...

Страница 12: ...e battery contacts may be misaligned Replace the battery See page 27 Both models The stick reader won t record an EID twice in a session This is normal behaviour when default settings are applied XRS...

Страница 13: ...memory is full 20 000 scan capacity the stick reader will begin to overwrite the oldest scan records Transfer sessions to a PC using EziLink See Backing up customer data on page 22 Clear unwanted sess...

Страница 14: ...Excel as scientific numbers e g 982000000123456 displayed as 9 82E 14 EziLink has been set to import sessions in a NLIS or csv format and the EID information doesn t display correctly when opened in E...

Страница 15: ...on the stick reader itself on page 33 LCD display has missing pixels Faulty Display FFC flat flexible circuit cable Test the LCD See page 20 Try replacing the Display FFC flat flexible circuit cable...

Страница 16: ...reader must be connected to the PC and switched on before EziLink is launched 1 Ensure that the stick reader is connected to the PC properly 2 Turn on the stick reader 3 Launch EziLink Another applic...

Страница 17: ...connection are both functioning correctly If not then the SRS XRS Serial cable or the USB Serial adaptor may be faulty Check using a known good cable adaptor Testing the Bluetooth wireless connection...

Страница 18: ...hold both buttons to go into the menu Go down to 4 BLUETOOTH using the Scroll button Change the setting to MANUAL using the READ button 3 If you have not done so already pair the PC to the stick read...

Страница 19: ...re you start EziLink so that it s ready to be found If you turn on the stick reader more than a minute after starting EziLink EziLink may resume searching the COM ports This can be prevented by settin...

Страница 20: ...ened if the battery remains discharged for long periods Lithium Ion batteries naturally lose some of their capacity each year depending on the temperature and battery state and eventually need to be r...

Страница 21: ...f the battery using a multi meter If less than 6 0 V replace battery See page 30 4 Plug battery into battery test load 3 3 5 W and 4 7 5 W in series After one hour the battery voltage should be greate...

Страница 22: ...M or DVD and return this to the customer with the stick reader Notes The stick reader must be on before EziLink is launched otherwise EziLink will not connect with the stick reader Installing and usin...

Страница 23: ...damaging the tail on the FFC or the FFC connector on either the display module or the main module Do not force the FFC tail out of the FFC connector The track on the FFC has a pitch of only 0 5 mm 1 5...

Страница 24: ...lightly to the case gasket so gently rocking should be able to remove it 5 Turn over the top case and lie it side by side with the bottom case Figure 1 Case open To close the case Stick readers are of...

Страница 25: ...rew may be replaced by a No 4x 5 8 pan pozi stainless steel screw long case screw supplied in the screws kit Do NOT use a variable speed drill to tighten or undo the screws Replacing the gasket for th...

Страница 26: ...the case gasket 1 Open the case See page 24 2 Disconnect the FFC from the main module See Using flat flexible circuit FFC cables and connectors on page 23 3 Using your fingers gently peel away the ca...

Страница 27: ...be assembly from the bottom case See page 28 3 Remove the tube gasket by sliding it off the FRP tube 4 Slide the new tube gasket back over the FRP tube Note that it must be orientated as shown in Figu...

Страница 28: ...disconnect the vibration motor loom Both models Disconnect the power loom 4 Manually remove the screw securing the main module to the bottom case Figure 6 Location of two looms and main module securin...

Страница 29: ...To remove the display module 1 Open the case See page 24 2 Disconnect the FFC from the main module See Using flat flexible circuit FFC cables and connectors on page 23 3 Manually remove the 5 screws...

Страница 30: ...to 0 5 Nm 4 lbf in 6 Reconnect the FFC to the main module See Using flat flexible circuit FFC cables and connectors on page 23 7 Close the case See page 24 8 XRS EID Stick Reader only Test the LCD See...

Страница 31: ...real time clock battery XRS EID Stick Reader only Caution Replacing the real time clock battery will reset the date and time Reset the date and time before returning the stick reader to the customer...

Страница 32: ...odule See page 29 2 Disconnect the other end of the FFC connected to the main module See Using flat flexible circuit FFC cables and connectors on page 23 3 Discard the old FFC and replace it with a ne...

Страница 33: ...g appears advising that this process will remove all records from all sessions all VID EID pairs and all alerts from the stick reader 5 Click Clear Everything The data is cleared from the stick reader...

Страница 34: ...sv This is a csv file suitable for uploading to the NLIS database applicable in Australia only NAIT This is a csv file suitable for uplading to the NAIT database applicable in New Zealand only Changin...

Страница 35: ...USB to Serial Comm Port COMxx where xx is the COM port number Windows XP Click on Start Settings Control Panel to access the Device Manager Double click on the System icon click on the Hardware tab th...

Страница 36: ...be hidden To display hidden files and folders see the help menu for your platform Windows 7 or Windows XP Double click on the ini file and modify the string FirmwareUpdateDevice to read FirmwareUpdat...

Страница 37: ...est Ltd service trutest co nz From Distributor Tru Test Ltd representative Date Return authority RA number Warranty Yes No Product returned XRS EID Stick Reader SRS EIDStick Reader Serial number Part...

Отзывы: