_____________________________________________________________
Hardware Installation
2-3
XConnect II switches:
Switch 1
Normally
OFF
. If put in the
ON
position, will restore the
print server to its factory default settings when the unit is
powered on again. If you use this switch, don’t forget to
return it to the
OFF
position after you restore the default
settings.
Switch 1 can also be used to print a self-test page. This is
done by moving the switch to the
ON
position and then
immediately returning it to the
OFF
position.
Switches 2 & 3
ON
for autosensing 10baseT and 10base 2 operation.
May be put in
OFF
position for 10baseT-only operation
(reduces power consumption)
Switch 4
Defines whether serial port will be used as a console
(
OFF
) or for a serial printer (
ON
).
XJet 2000 XJet 100, Pony Print Server Plus, Pony 100, and XConnect 100
Pushbutton Switch
Note:
Skip this section if you have an XJet IV-2, XJet IV-Plus, or XConnect II.
Newer TROY print servers have a single pushbutton test switch. It is used
as follows:
•
To print a self-test page, press the switch in for at least one-eighth second but
less than five seconds.
•
To reset the unit back to factory default settings, press the switch and
hold it in for at least 5 seconds
XJet IV-2 10base2/10base5 Jumper Block
Note:
This section applies only to the XJet IV-2. Skip this section if you
have any other print server.
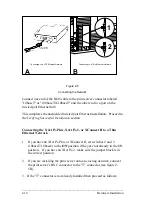
The XJet IV-2 uses a jumper block to set the Ethernet type as shown in
figure 2-2. If you are using thin Ethernet, make sure the block is set to the
position shown in figure 2-2A. If you are using the AUI (10base5) with the
HP LaserJet IIISi or 4Si (bottom slot only), with the DesignJet 600/650C,
or with a self-powered transceiver (for example, a DEC DELNI multiport


