5–16
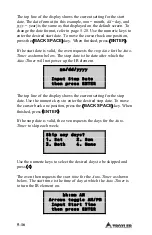
The top line of the display shows the current setting for the start
date. The date format (in this example,
mm
= month,
dd
= day, and
yyyy
= year) is the same as that displayed on the default
screen. To
change the date format, refer to page 5–28. Use the numeric keys to
enter the desired start date. To move the cursor back one position,
press the
〈
BACK SPACE
〉
key. When finished, press
〈
ENTER
〉
.
If the start date is valid, the oven requests the
stop date
for the
Auto-
Timer
as shown below. The stop date is the date after which the
Auto-Timer
will not power up the IR element.
mm/dd/yyyy
Input Stop Date
then press ENTER
The top line of the display shows the current setting for the stop
date. Use the numeric keys to enter the desired stop date. To move
the cursor back one position, press the
〈
BACK SPACE
〉
key. When
finished, press
〈
ENTER
〉
.
If the stop date is valid, the oven requests the days for the
Auto-
Timer
to skip each week:
Skip any days?
1. Sat 2. Sun
3. Both 4. None
Use the numeric keys to select the desired days to be skipped and
press
〈
4
〉
.
The oven then requests the
start time
for the
Auto-Timer
as shown
below. The start time is the time of day at which the
Auto-Timer
is
to turn the IR element on.
hh:mm AM
Arrows toggle AM/PM
Input Start Time
then press ENTER
Содержание NTO 4730
Страница 10: ...x LIST OF TABLES Table Title Page 4 1 Oven Keys 4 3 5 1 Recommended Minimum Burn Times 5 6...
Страница 30: ...2 10 NOTES...
Страница 90: ...5 36 NOTES...
Страница 110: ...6 20 NOTES...
Страница 130: ...Appendix A 10 Figure A 1 Printer with Doors Open Figure A 2 Inserting the Paper Roll SPRING CLIPS...
Страница 136: ...Appendix A 16 NOTES...
Страница 148: ...Appendix C 6 NOTES...
Страница 156: ...Index 8 NOTES...
Страница 157: ...Troxler NTO Warranty 1 WARRANTY NOTES...

