


Troxler NTO
Appendix A–13
A. MAINTENANCE
& SERVICE
3.
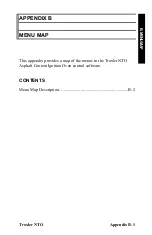
Remove the old printer cartridge and discard.
4.
Install the new printer cartridge as shown in Figure A–6.
Carefully guide the paper between the printer ribbon and
cartridge housing as you slide the cartridge into place.
5.
You will feel a positive
click
when the printer cartridge is
correctly seated on the
spool latch
.
6.
Wind the ribbon tension wheel clockwise several turns to ensure
the printer ribbon is not twisted or creased along its length.
7.
Close the lower printer door and perform a test print to verify
proper fit and print quality.
Figure A–6. Installing the Printer Cartridge
GUIDE PAPER
BETWEEN RIBBON AND HOUSING
SPOOL LATCH
RIBBON
TENSION WHEEL
Содержание NTO 4730
Страница 10: ...x LIST OF TABLES Table Title Page 4 1 Oven Keys 4 3 5 1 Recommended Minimum Burn Times 5 6...
Страница 30: ...2 10 NOTES...
Страница 90: ...5 36 NOTES...
Страница 110: ...6 20 NOTES...
Страница 130: ...Appendix A 10 Figure A 1 Printer with Doors Open Figure A 2 Inserting the Paper Roll SPRING CLIPS...
Страница 136: ...Appendix A 16 NOTES...
Страница 148: ...Appendix C 6 NOTES...
Страница 156: ...Index 8 NOTES...
Страница 157: ...Troxler NTO Warranty 1 WARRANTY NOTES...


