


Troxler NTO
4–7
4. SETUP & OP
ERATI
O
N
3.
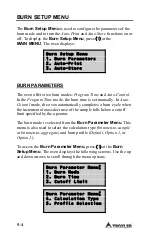
Press
〈
1
〉
to access the
Burn Setup Menu
.
For more
information, refer to page 5–4.
a.
Press
〈
1
〉
to access the
Burn Parameter Menu
.
For more
information, refer to page 5–4.
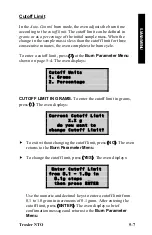
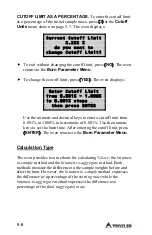
Set the burn mode to
Program Time
or
Auto-Control
, as desired (the default
setting is
Auto-Control
). Set the desired burn time and/or
cutoff limit. Set the calculation type to
bitumen-to-sample
or
bitumen-to-aggregate
, as desired (the default is
bitumen-
to-sample
). Select the desired burn profile. Press
〈
ESC
〉
to
return to the
Burn Setup Menu
.
b.
The oven features an
Auto-Print
function that, when turned
on, automatically prints sample data during a burn cycle. As
shipped, this function is turned on. To change the status of
the
Auto-Print
function, press
〈
2
〉
.
For more information,
refer to page 5–10.
c.
The oven also includes an
Auto-Store
function that, when
on, automatically stores sample data in the active project
upon completion of a burn cycle. As shipped, this function
is turned off. To turn the
Auto-Store
function on, press
〈
3
〉
.
For more information, refer to page 5–12.
d.
Press
〈
ESC
〉
to return to the
MAIN MENU
.
4.
Press
〈
2
〉
to set up the
Auto-Timer
feature, if desired. The
Auto-Timer
automatically powers the IR element on and off
based upon start and stop times and dates entered by the
operator.
For more information, refer to page 5–15.
5.
Determine the aggregate correction factors (ACFs), if necessary.
From the
MAIN MENU
, press
〈
4
〉
to access the
Correction
Menu
. Use this menu to create and store up to twenty ACFs
and to select the active ACF.
For more information, refer to
Chapter 6.
Содержание NTO 4730
Страница 10: ...x LIST OF TABLES Table Title Page 4 1 Oven Keys 4 3 5 1 Recommended Minimum Burn Times 5 6...
Страница 30: ...2 10 NOTES...
Страница 90: ...5 36 NOTES...
Страница 110: ...6 20 NOTES...
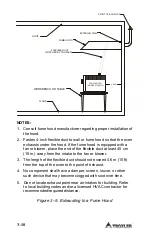
Страница 130: ...Appendix A 10 Figure A 1 Printer with Doors Open Figure A 2 Inserting the Paper Roll SPRING CLIPS...
Страница 136: ...Appendix A 16 NOTES...
Страница 148: ...Appendix C 6 NOTES...
Страница 156: ...Index 8 NOTES...
Страница 157: ...Troxler NTO Warranty 1 WARRANTY NOTES...


