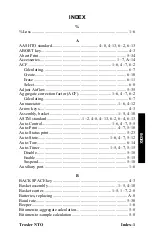
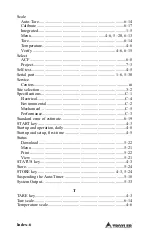
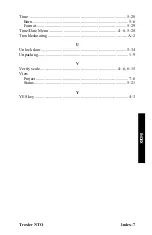
Troxler NTO 4730 Скачать руководство пользователя страница 156


Index–8 

NOTES 

Содержание NTO 4730

Страница 1: ...Troxler NTO Asphalt Content Ignition Oven Troxler Electronic Laboratories Inc 3008 Cornwallis Road P O Box 12057 Research Triangle Park NC 27709 Phone 1 877 TROXLER Outside the U S A 1 919 549 8661 Fa...

Страница 2: ...Troxler Electronic Laboratories Inc All Rights Reserved No part of this manual may be reproduced or transmitted in any form or by any means electronic or mechanical including photocopying recording o...

Страница 3: ...o FL 32807 Fax 407 681 3188 Texas Service Center 2016 East Randol Mill Road Suite 406 Arlington TX 76011 Fax 817 275 8562 Illinois Service Center 1430 Brook Drive Downers Grove IL 60515 Fax 630 261 93...

Страница 4: ...73 23 EEC as amended by 93 68 EEC Standards to which Conformity is Declared EN 61010 1 A2 EN 61326 1 1998 Manufacturer Troxler Electronic Laboratories Inc P O Box 12057 3008 Cornwallis Road Research T...

Страница 5: ...sponsible for ensuring the safe use of the oven Neither the manufacturer its subsidiary distributors or representatives can assume responsibility for any mishaps damage or personal injury that may occ...

Страница 6: ...ts and a different typestyle indicate a key or character number or letter to press on the oven keypad For example Press START means to press the key labeled START DISPLAY A different typestyle is used...

Страница 7: ...R 3 INSTALLATION Site Selection 3 2 Oven Installation 3 3 Exhaust System Installation 3 5 CHAPTER 4 SETUP AND OPERATION Keypad 4 2 Printer 4 4 First Time Startup and Setup 4 5 Daily Startup and Operat...

Страница 8: ...ICE Troubleshooting A 2 Cleaning A 4 Replacing Parts A 8 Replacement Parts A 14 Returning Parts for Service A 15 APPENDIX B MENU MAP Menu Map Description B 2 APPENDIX C SPECIFICATIONS Environmental Co...

Страница 9: ...h Screen 3 8 3 4 Roof Penetration 3 9 3 5 Exhausting to a Fume Hood 3 10 4 1 Oven Keypad 4 2 4 2 Printer Front Panel 4 4 4 3 Sample Basket Assembly 4 10 5 1 Sample Reduced Printout 5 11 6 1 Sample Agg...

Страница 10: ...x LIST OF TABLES Table Title Page 4 1 Oven Keys 4 3 5 1 Recommended Minimum Burn Times 5 6...

Страница 11: ...NTO New Technology Oven Asphalt Content Ignition Oven This information includes a list of the parts and accessories as well as instructions for unpacking and inspecting the oven upon receipt CONTENTS...

Страница 12: ...dicates the AC Standard sieve analysis of the remaining clean aggregate provides the gradation The ignition oven test method is covered by the provisions of the American Society of Testing and Materia...

Страница 13: ...Troxler stresses that the user is solely responsible for ensuring the safe use of the oven Neither the manufacturer its subsidiary distributors nor representatives can assume responsibility for any m...

Страница 14: ...e criteria for selecting an installation site Chapter 4 Setup and Operation Describes the oven keypad and provides instructions for setting up starting operating and shutting down the oven Chapter 5 M...

Страница 15: ...since the chamber temperature has peaked or since the ABORT key was pressed The sample basket assembly is designed to provide operator safety while handling HMA samples and to ensure an even burn of...

Страница 16: ...which are percentage values used to adjust the measured asphalt content for specific aggregates During a burn cycle the oven displays measurement units of percent loss Loss The Loss measurement is th...

Страница 17: ...fits over the sample baskets 4 The stackable sample baskets 2 hold the HMA sample for burning 5 The catch pan catches aggregate particles that may fall through the bottom of the sample basket s 6 The...

Страница 18: ...1 8 BASKET CARRIER LOCK ARMS BASKET COVER SAMPLE BASKETS CATCH PAN INTERNAL PRINTER CIRCUIT BREAKER POWER SWITCH DISPLAY KEYPAD EXHAUST DUCT OVEN ACCESS PANEL Figure 1 1 Parts and Accessories...

Страница 19: ...r any other part or accessory appears damaged notify the carrier and your Troxler representative immediately 2 Cut the nylon bands from around the carton then lift off the top half of the box and remo...

Страница 20: ...sulated gloves Sample safety cage Exhaust duct Duct adapter 3 to 4 inch Clamp 4 inch hose Brush soft bristle Troxler NTO Manual of Operation and Instruction Material Safety Data Sheet MSDS Information...

Страница 21: ...ORMATION This chapter provides basic product safety information concerning the Troxler NTO Asphalt Content Ignition Oven as well as cautions and warnings related to the safe use of the oven CONTENTS I...

Страница 22: ...aintenance personnel They include removal of the rear or top panels for troubleshooting cleaning or making repairs During the performance of such maintenance operations observe the precautions set for...

Страница 23: ...ard 29 CFR 1910 1200 the MSDSs are designed to communicate important information about the safe handling of refractory ceramic fiber products recommended protective measures and health hazard informat...

Страница 24: ...ry use only Upper Right of Oven Door Surfaces of the oven are hot and may cause burns to unprotected skin Place oven on a non combustible surface and 15 cm 6 in away from any structure or other items...

Страница 25: ...3 ft of clearance above the oven WARNING The unit must not be operated without an exhaust system Refer to Chapter 3 for information on proper installation of the exhaust system Upper Rear of Electroni...

Страница 26: ...e oven clear and free from all combustible materials gasoline and other flammable vapors and liquids Failure to do so could cause fire or explosion Place the oven on a level sturdy fireproof surface T...

Страница 27: ...local code for exhaust outlet Do not restrict the airflow in and around the bottom of the oven Do not place any objects other than those specified in this manual into the oven chamber Remove all extra...

Страница 28: ...care when loading and unloading the oven to avoid touching or scraping the hearth plate chamber sides or IR element Avoid bodily contact with the IR element Step away from the oven during ignition If...

Страница 29: ...removed from the IR element Do not touch the interior or exterior oven surfaces except door and control panel for an extended period after use Only qualified personnel Troxler service representatives...

Страница 30: ...2 10 NOTES...

Страница 31: ...ION CHAPTER 3 INSTALLATION This chapter provides instructions on site selection and installation of the Troxler NTO Asphalt Content Ignition Oven CONTENTS Site Selection 3 2 Oven Installation 3 3 Exha...

Страница 32: ...tance does not place stress on the power cord The power source must be wired by a qualified electrician Place the oven on a level sturdy fireproof surface Locate the oven at least 15 cm 6 in from othe...

Страница 33: ...guidelines on the previous page set the oven in place 2 Using the adjustable feet level the oven from front to back and from side to side 3 Remove all packaging material from the oven chamber includin...

Страница 34: ...he U S and Canada the connector must meet ANSI UL 498 safety requirements NEMA Type 6 20P In Europe the connector must meet IEC 320 safety requirements Refer to the Electrical Specifications section o...

Страница 35: ...orm Mechanical Code Section 914 b While every installation is unique these instructions provide general guidelines on proper installation of the exhaust system Refer to local building codes and or a l...

Страница 36: ...NTO MODEL 4730 4731 SEE FIGURE 3 4 SEE FIGURE 3 2 OR 3 3 6 MIN EXTERIOR WALL WORKBENCH OR TABLE FLOOR ROOF FLEXIBLE DUCT SUPPLIED BY TROXLER Figure 3 1 Overall Schematic for Exterior Wall and Roof Pe...

Страница 37: ...inimum thickness of all galvanized metal parts is 28 gauge or that which is called for in local building codes whichever is thicker 3 The overall length of all ducts should not exceed 4 6 m 15 ft from...

Страница 38: ...ized metal parts is 28 gauge or that which is called for in local building codes whichever is thicker 3 The overall length of all ducts should not exceed 4 6 m 15 ft from the top of the oven to the po...

Страница 39: ...ts the cap must be at least 91 cm 36 in above the roof 4 The minimum thickness of all galvanized metal parts is 28 gauge or that which is called for in local building codes whichever is thicker 5 Seal...

Страница 40: ...ed with a fan or blower place the end of the flexible duct at least 45 cm 18 in away from the intake to the fan or blower 3 The length of the flexible duct should not exceed 4 6 m 15 ft from the top o...

Страница 41: ...pad and provides procedures for starting up the oven and setting it up for the first time daily startup and operation and shutting the oven down The procedures in this chapter are general in nature Mo...

Страница 42: ...re 4 1 shows the layout of the oven keypad Table 4 1 lists the function of each key ESC BACK SPACE MENU 7 8 9 4 5 6 1 2 3 0 ENTER YES NO PAPER FEED TARE STORE START ABORT Asphalt Ignition Oven Figure...

Страница 43: ...anumeric characters on input screens Also can be used to adjust the contrast of the display when the default screen is displayed 0 9 Enter numbers and access menu options Enters a decimal point ENTER...

Страница 44: ...ered on In the event of a print error the LED is amber The paper feed button activates the paper feed mechanism Paper will continue to feed until the button is released NOTE The paper feed button is d...

Страница 45: ...the chamber door open position the circuit breaker power switch found in the lower left of the oven front panel see Figure 1 1 to the ON up position The oven performs a self test and then displays th...

Страница 46: ...Date Menu For more information refer to page 5 28 b The oven is shipped with the baud rates for the serial communications and auxiliary ports set to 9600 baud To change the baud rates press 2 For more...

Страница 47: ...ned on To change the status of the Auto Print function press 2 For more information refer to page 5 10 c The oven also includes an Auto Store function that when on automatically stores sample data in...

Страница 48: ...ng Bituminous Pavement Mixtures 1 Power the oven on as follows f If the Auto Timer is not enabled close the chamber door and position the circuit breaker power switch shown in Figure 1 1 to the ON up...

Страница 49: ...fer to Chapter 7 4 Use an external scale to weigh the sample basket assembly including the catch pan and sample basket cover Record the mass of the basket assembly WB WARNING Always wear heat resistan...

Страница 50: ...sample sample baskets catch pan and sample basket cover Record the total mass WT 10 Press START to begin the process 11 The oven requests the sample mass WS as shown below To determine the sample mass...

Страница 51: ...rth plate chamber sides or IR element 12 The oven displays Place Sample in chamber and close door xxx x g Then press START Wearing heat resistant gloves and a face shield use the basket carrier to pla...

Страница 52: ...Burn Time XXX XX 14 When the mass loss does not exceed 0 01 of the sample mass WS for three consecutive one minute periods the burn is complete The oven displays the results of the burn as shown below...

Страница 53: ...n is not enabled the results can be stored any time before the next burn by pressing STORE from the default screen or by pressing MENU then pressing 7 Store Refer to the Store Function section on page...

Страница 54: ...bled leave the circuit breaker power switch see Figure 1 1 in the ON up position The oven will automatically power down the IR element and exhaust fan at the designated stop time WARNING Depending upo...

Страница 55: ...ONTENTS Oven Main Menu 5 3 Burn Setup Menu 5 4 Burn Parameters 5 4 Burn Mode 5 5 Burn Time 5 6 Cutoff Limit 5 7 Calculation Type 5 8 Profile Selection 5 9 Auto Print 5 10 Auto Store 5 12 Active Projec...

Страница 56: ...5 24 Active Project Selected 5 25 No Project Data 5 25 No Project Selected 5 26 Miscellaneous Menu 5 27 Time Date Menu 5 28 Set Time 5 28 Set Date 5 29 Time Format 5 29 Date Format 5 30 Baud Rate 5 3...

Страница 57: ...low To select an item from the menu press the corresponding numeric key Use the up and down arrows to scroll through the menu options MAIN MENU 1 Burn Setup 2 Auto Timer 3 Project MAIN MENU 4 Corr Fac...

Страница 58: ...mode the oven automatically completes a burn cycle when the incremental mass decrease of the sample falls below a cutoff limit specified by the operator The burn mode is selected from the Burn Parame...

Страница 59: ...etween 15 and 720 minutes then press ENTER Use the numeric keys to set the burn time To move the cursor back one position press the BACK SPACE key When finished press ENTER For more information on set...

Страница 60: ...lists the minimum recommended burn times for selected sample masses To program the burn time manually press 2 at the Burn Parameter Menu shown on page 5 4 The oven requests the burn time between 15 a...

Страница 61: ...plays Cutoff Units 1 Grams 2 Percentage CUTOFF LIMIT IN GRAMS To enter the cutoff limit in grams press 1 The oven displays Current Cutoff Limit X X g do you want to change Cutoff Limit f To exit witho...

Страница 62: ...Use the numeric and decimal keys to enter a cutoff limit from 0 001 to 1 000 in increments of 0 001 Use the numeric keys to set the burn time After entering the cutoff limit press ENTER The oven retu...

Страница 63: ...sets the calculation type and returns to the Burn Parameter Menu Profile Selection The oven features three burn profiles which define the operation of the oven during a burn cycle The Default profile...

Страница 64: ...uto Print function automatically prints sample data during a burn cycle The oven offers two Auto Print printout options standard and reduced A standard printout includes minute by minute burn data A r...

Страница 65: ...t status briefly displays a confirmation message and returns to the Burn Setup Menu Loss 5 09 AC 4 8 MTCF 0 00 ACF 0 29 Mass Loss 159 8 Initial Mass 3020 0 g Elapsed Time 0 47 47 3020 0 555 159 8 5 09...

Страница 66: ...For example if the Auto Store function is turned on for a new project the oven stores the sample data for the first two burn cycles under sample IDs 1 and 2 Assume that the Auto Store is then turned o...

Страница 67: ...the Burn Setup Menu Automatic Storage is now ON Project XXXXXXXXXXXX Next Sample XX No Project Data If the operator attempts to turn the Auto Store function on but no projects have been created the ov...

Страница 68: ...n Chapter 7 After the project is selected the oven sets the project as active briefly displays the confirmation shown on page 5 13 and then returns to the Burn Setup Menu f To create a new project ID...

Страница 69: ...on or off To re enable the Auto Timer the operator must re enter all of the Auto Timer parameters start and stop dates and times and so on If the Auto Timer is suspended the oven retains all of the Au...

Страница 70: ...imer will not power up the IR element mm dd yyyy Input Stop Date then press ENTER The top line of the display shows the current setting for the stop date Use the numeric keys to enter the desired stop...

Страница 71: ...ac Model 4731 oven before the first sample is to be burned To ensure consistent repeatable results Troxler recommends allowing the oven chamber to reach 400 C 750 F for a 120 V ac Model 4730 unit or 3...

Страница 72: ...e Auto Timer press 2 at the MAIN MENU shown on page 5 3 If the Auto Timer is active but has not applied power to the IR element the oven displays Auto Timer is active do you want to disable it f To re...

Страница 73: ...sing 2 The oven displays the message Auto Timer Disabled and returns to the MAIN MENU To re enable the Auto Timer after it has been suspended press 2 at the MAIN MENU shown on page 5 3 The oven displa...

Страница 74: ...RRECTION MENU The oven stores up to twenty operator defined aggregate correction factors ACFs The Correction Menu enables the operator to create select and erase ACFs The Correction Menu is described...

Страница 75: ...2 Print 3 Download Status Menu 4 Auto Status Print VIEW STATUS To view the system status information press 1 The oven displays five screens showing Burn mode AUTO or MANUAL Cutoff criteria for the bu...

Страница 76: ...to the Status Menu DOWNLOAD STATUS To download the system status information from the oven connect the serial communications port to a computer or other serial device The serial communications port i...

Страница 77: ...n below Auto Status Print 1 On 2 Off f To return to the Status Menu without changing the Auto Status Print function press ESC f To turn the Auto Status Print function on press 1 The oven updates the s...

Страница 78: ...ID number is not incremented if sample data is stored manually When using the manual Store function the operator enters a sample ID number manually Therefore duplicate sample ID numbers could be store...

Страница 79: ...the sample data under the active project ID and sample number entered briefly displays a confirmation message then returns to the previous screen If there is insufficient memory to store the data the...

Страница 80: ...tored but there is no active project although project IDs have been created the oven displays Select 1 Scroll Projects 2 Enter Project ID f To return to the previous display without selecting a projec...

Страница 81: ...mperature scale Enter the customer name Turn the system information output on and off Abort printing To access the Miscellaneous Menu press 8 at the MAIN MENU shown on page 5 3 Use the up and down arr...

Страница 82: ...me Format Time Date Menu 4 Date Format Set Time To set the current time press 1 at the Time Date Menu The oven displays hh mm AM Arrows toggle AM PM Input Time and Press ENTER Note that in this exampl...

Страница 83: ...accept the displayed date press ENTER To change the date use the numeric keys to enter the new date When finished press ENTER The oven sets the date and returns to the Time Date Menu Time Format The o...

Страница 84: ...side by side at the left side of the rear panel as viewed from the rear of the oven The serial communications port the leftmost of the two ports is used to connect the oven to an RS 232 serial device...

Страница 85: ...baud rate that matches that of the peripheral device Refer to the device user manual to determine the proper setting The oven sets the baud rate for the selected port displays a brief confirmation mes...

Страница 86: ...g up to sixteen alphanumeric characters Use the numeric keys to enter numbers and move the cursor to the next position To enter alphabetic characters use the arrow keys to scroll through the character...

Страница 87: ...apsed time in seconds of a burn cycle applies only during a burn cycle Current mass loss in grams applies only during a burn cycle Current percentage mass loss applies only during a burn cycle takes i...

Страница 88: ...ator to unlock the chamber door if the sample burn time is less than 30 minutes or under any other condition from the default screen To unlock the door press 7 on the Miscellaneous Menu The oven brief...

Страница 89: ...o increase the speed of the exhaust fan if needed To access this function press 9 on the Miscellaneous Menu The oven displays Airflow Adjust 1 Increase 2 Remove Press 1 to increase the speed of the ex...

Страница 90: ...5 36 NOTES...

Страница 91: ...r determining an aggregate correction factor ACF for using the Correction Menu to manage ACFs and for using the Scale Menu to tare verify and calibrate the integrated scale CONTENTS Correcting AC Meas...

Страница 92: ...oss effect the oven uses an aggregate correction factor ACF to adjust asphalt content measurements The magnitude of the mass loss effect is influenced most by the type of aggregate Granite aggregates...

Страница 93: ...2 Refer to Figure 6 1 on the following page for a sample form for recording and calculating data To prepare correction samples follow the steps below 1 Ensure that the oven is properly set up for igni...

Страница 94: ...o 105 5 C 221 9 F Figure 6 1 Sample Aggregate Correction Factor Form Date ___________ Project ________________ ACT ________ Sample Number 1 2 3 4 Sample Basket Catch Pan and Basket Cover Mass WP Sampl...

Страница 95: ...e to weigh the sample baskets with the catch pan and basket cover Record the mass WP 8 With the catch pan under the sample baskets spread the correction sample evenly in the baskets Put no more than 2...

Страница 96: ...Press START WARNING Step away from the oven during ignition Do not override the door lock 18 After ignition is complete the oven releases the door lock and prints a summary of the sample burn data Wea...

Страница 97: ...2 Determine the average ACF value ACFAVG as follows f If the difference between the two ACF values is less than 0 15 then average the two values f If the difference between the two ACF values is great...

Страница 98: ...n existing ACF to create a new ACF or to erase one or more stored ACFs To access the Correction Menu press 4 at the MAIN MENU The oven displays Correction Menu 1 Select ACF 2 Create ACF 3 Erase ACF To...

Страница 99: ...the numeric keys to enter numbers and move the cursor to the next position To enter alphabetic characters use the arrow keys to scroll through the characters When the desired character is displayed pr...

Страница 100: ...ENTER when done Enter the desired ACF ID Use the numeric keys to enter numbers and move the cursor to the next position To enter alphabetic characters use the arrow keys to scroll through the characte...

Страница 101: ...nfirmation message and returns to the Correction Menu ERASE ACF To erase one or more ACFs press 3 at the Correction Menu shown on page 6 8 The oven displays Erase 1 One ACF 2 All ACFs To erase all ACF...

Страница 102: ...he desired ACF ID and press ENTER After the ACF ID has been selected or entered the oven displays Erase ACF ACF ID Are you sure f To erase the ACF press YES The oven erases the ACF displays a brief co...

Страница 103: ...Specification for Weighing Devices Used in the Testing of Materials ASTM D 4753 Standard Specification for Evaluating Selecting and Specifying Balances and Scales for use in Soil Rock and Construction...

Страница 104: ...Auto Tare function is suspended when the chamber door is open The Auto Tare function is also suspended if the mass on the scale is above a predetermined threshold such as when loaded sample baskets a...

Страница 105: ...e that the hearth plate does not touch the chamber sides NOTE The oven chamber must be at room temperature less than 35 C the hearth plate must be in place and the chamber door must remain open to pro...

Страница 106: ...ut printing press NO or ESC If the error percentage is less than 0 1 the oven returns to the Scale Menu If the error percentage is greater than 0 1 the oven displays do you want to calibrate f To cont...

Страница 107: ...ust be open NOTE It is not necessary to tare the scale before calibration To calibrate the scale after verifying its accuracy press YES at the do you want to calibrate prompt shown on the previous pag...

Страница 108: ...s accurate to within 0 1 g The oven requests the mass of the first calibration point as shown Enter mass X value 3000 9000g then press ENTER Ensure that the hearth plate does not touch the chamber sid...

Страница 109: ...the other decreases their correlation coefficient is close to 1 If two variables have a positive linear relationship one variable increases as the other increases their value is close to 1 In an idea...

Страница 110: ...6 20 NOTES...

Страница 111: ...can store sample data for viewing and printing later This data is stored in projects This chapter explains how to use the Project Menu to create select view erase print and download projects and data...

Страница 112: ...roject IDs can be defined The operator manages project files from the Project Menu described in the remainder of this chapter This menu allows the operator to create project IDs to select the active p...

Страница 113: ...rough the menu options Use the numeric keys to select a menu option SELECT The Select function allows the operator to activate an existing project To select an existing project press 1 at the Project...

Страница 114: ...sired character is displayed press YES to move the cursor to the next position To move the cursor back one position press the BACK SPACE key NOTE After the last character has been entered press YES to...

Страница 115: ...on To enter alphabetic characters use the arrow keys to scroll through the characters When the desired character is displayed press YES to move the cursor to the next position To move the cursor back...

Страница 116: ...le data the oven displays the message No Samples found in selected project and returns to the Project Menu If the selected project contains sample data the oven displays the data for the first sample...

Страница 117: ...n displays Select 1 Scroll Projects 2 Enter Project ID Press 1 to scroll through the stored projects or 2 to enter a known project ID Follow the same procedures as described in the Select section on p...

Страница 118: ...ject ID Follow the same procedures as described in the Select section on page 7 3 to select or enter the desired project ID f To print all projects press 2 The oven prompts do you want to output in RE...

Страница 119: ...proper data transfer the cable connected to the serial communications port should not exceed 3 m 10 ft in length To download project data stored previously press 6 at the Project Menu The oven displa...

Страница 120: ...ES to enable a standard output press NO A standard output includes minute by minute burn data A reduced output includes only a header and footer and a summary of the burn data While downloading the se...

Страница 121: ...NTO Asphalt Content Ignition Oven CONTENTS Troubleshooting A 2 Cleaning A 4 Cleaning the Oven Chamber A 4 Cleaning the Exhaust Plenum Box A 5 Replacing Parts A 8 Replacing Fuses A 8 Replacing the Lith...

Страница 122: ...er Service Center see page iii OVEN DOES NOT TURN ON Ensure that the oven is plugged into an outlet and that the circuit breaker for the outlet is on Check that the circuit breaker power switch at the...

Страница 123: ...oven the exhaust system should be cleaned regularly The oven monitors the total burn time that has elapsed since the last cleaning Upon completion of a burn cycle if this elapsed time exceeds 1050 min...

Страница 124: ...cess the Clean Oven function close the chamber door and press 8 on the Miscellaneous Menu see page 5 27 NOTE The chamber door must be closed and previous burn or clean cycles must be cleared before us...

Страница 125: ...displayed Troxler strongly recommends cleaning the exhaust plenum box as described on the following page To ensure that the exhaust system has been cleaned when the operator presses START to begin ano...

Страница 126: ...8 Loosen the two captive thumbscrews that secure the access panel and set the panel aside 3 Loosen the three captive thumbscrews that secure the plenum access panel Lift the panel from the oven and s...

Страница 127: ...ve vibration and shorten the life of the fan 7 Use the vacuum cleaner to clean the loosened soot from the turbine DO NOT insert the vacuum cleaner nozzle into the exhaust fan intake CAUTION To prevent...

Страница 128: ...ven memory loss replace the battery at least once a year WARNING Carefully note the polarity of the battery when installing it in the battery holder A battery may explode or leak if installed improper...

Страница 129: ...ollow the same procedure for the upper door pulling forward and upwards Figure A 1 shows the printer with the doors open and the printer paper removed 3 With the upper and lower doors open the paper r...

Страница 130: ...Appendix A 10 Figure A 1 Printer with Doors Open Figure A 2 Inserting the Paper Roll SPRING CLIPS...

Страница 131: ...Troxler NTO Appendix A 11 A MAINTENANCE SERVICE INSERT PAPER INTO SLOT Figure A 3 Insert Paper into Slot Figure A 4 Printer Paper with Bottom Door Open...

Страница 132: ...ld be replaced after no more than five complete paper rolls have been used or sooner if the print quality is faded or of uneven density To replace the printer cartridge 1 Open the lower printer door t...

Страница 133: ...dge into place 5 You will feel a positive click when the printer cartridge is correctly seated on the spool latch 6 Wind the ribbon tension wheel clockwise several turns to ensure the printer ribbon i...

Страница 134: ...wer cord 240 V International European unit 108733 Printer paper 20 rolls per package 108734 Printer cartridges package of six ACCESSORIES 006505 Clamp 4 inch hose 018290 Brush soft bristled 018682 Glo...

Страница 135: ...he box folds for easy storage Please have the following information available when requesting an RGA number Unit or part model and serial number Part number serial number if applicable Is the unit par...

Страница 136: ...Appendix A 16 NOTES...

Страница 137: ...Troxler NTO Appendix B 1 B MENU MAP APPENDIX B MENU MAP This appendix provides a map of the menus in the Troxler NTO Asphalt Content Ignition Oven control software CONTENTS Menu Map Description B 2...

Страница 138: ...1 are MAIN MENU 1 Burn Setup Burn Setup Menu 1 Burn Parameters Burn Parameter Menu This indicates that the first menu item under the MAIN MENU is 1 Burn Setup Press 1 to access the Burn Setup Menu a s...

Страница 139: ...Mode Choose Burn Mode 1 Program Time 2 Auto Control 2 Burn Time 3 Cutoff Limit Cutoff Units 1 Grams 2 Percentage 4 Calculation Type Calculation Type 1 Bitumen to Sample 2 Bitumen to Agg 5 Profile Sele...

Страница 140: ...Project ID 2 Create 3 View View 1 Scroll Projects 2 Enter Project ID 4 Erase Erase 1 One Project Select 1 Scroll Projects 2 Enter Project ID 2 All Projects 5 Print Output 1 One Project Select 1 Scrol...

Страница 141: ...Select ACF Select 1 Scroll ACFs 2 Enter ACF ID 2 Create ACF 3 Erase ACF Erase 1 One ACF Select 1 Scroll ACFs 2 Enter ACF ID 2 All ACFs 5 Scale Scale Menu 1 Tare 2 Auto Tare Auto Tare 1 On 2 Off 3 Ver...

Страница 142: ...1 mm dd yyyy 2 dd mm yyyy 2 Baud Rate Set Baud Rate on 1 Ser Comm Port Baud Rate 1 600 4 4800 2 1200 5 9600 3 2400 2 Auxiliary Port Baud Rate 1 600 4 4800 2 1200 5 9600 3 2400 3 Temperature Scale Tem...

Страница 143: ...APPENDIX C SPECIFICATIONS This appendix contains specifications for the Troxler NTO Asphalt Content Ignition Oven CONTENTS Environmental Conditions C 2 Performance Specifications C 3 Electrical Specif...

Страница 144: ...ient Storage 55 to 85 C Temperature 67 to 185 F Ambient Operating 10 to 50 C Temperature 50 to 122 F Altitude Rating 2000 m maximum Main Supply Voltage 10 Fluctuation Pollution Degree 2 Installation C...

Страница 145: ...egate correction factors 20 Temperature sensors Type K thermocouples see note below NOTE The ignition method employed by the Troxler NTO Asphalt Content Ignition Oven does not require precise control...

Страница 146: ...t 1 8 m 6 ft Liquid crystal display 4 line x 20 character Keypad 25 key sealed membrane RS 232C configuration Data Terminal Equipment DTE Serial data format 8 Data bits 2 Stop bits No parity Baud rate...

Страница 147: ...66 W x 68 6 D x 55 1 H cm 26 W x 27 D x 21 7 H in Chamber dimensions 28 W x 43 2 D x 20 3 H cm 11 W x 17 D x 8 H in Weight 63 5 kg 140 lb Sample basket dimensions 20 3 W x 36 8 D x 4 1 H cm each 8 W x...

Страница 148: ...Appendix C 6 NOTES...

Страница 149: ...nciator 1 6 4 12 Arrow keys 4 3 Assembly basket 1 5 4 10 ASTM standard 1 2 4 8 4 13 6 2 6 4 6 13 Auto Control 1 6 4 7 5 5 Auto Print 4 7 5 10 Auto Status print 5 23 Auto Store 1 6 4 7 5 12 Auto Tare 6...

Страница 150: ...an Oven 5 34 A 4 Cleaning A 4 Exhaust plenum box 4 13 A 5 Contrast display 4 3 4 5 Conventions manual vi Correcting AC measurements 6 2 Correction Menu 4 7 5 20 6 8 Correlation coefficient 6 19 Create...

Страница 151: ...A 5 System installation 3 5 F Features 1 5 Format Date 5 30 Time 5 29 Fuses replacing A 8 I ID number Project 7 2 Sample 5 12 Indicator Burn Complete 1 6 4 12 Infrared IR element 1 5 Inspecting 1 9 In...

Страница 152: ...Status 5 21 Time Date 4 6 5 28 MENU key 4 3 Miscellaneous Menu 4 6 5 27 Mode Auto Control 1 6 4 7 5 5 Burn 1 6 4 7 5 5 Program Time 1 6 4 7 5 5 N NO key 4 3 Numeric keys 4 3 O Occupational Safety Hea...

Страница 153: ...5 Project Create 7 5 Download 7 9 Erase 7 7 Files 1 6 4 9 7 2 Identification ID numbers 7 2 Menu 4 9 5 20 7 3 Print 7 8 Select 7 3 View 7 6 Pyrolysis 1 2 R Reduced printout 5 10 7 8 7 10 Replacing Ba...

Страница 154: ...selection 3 2 Specifications C 1 Electrical C 4 Environmental C 2 Mechanical C 5 Performance C 3 Standard error of estimate 6 19 START key 4 3 Startup and operation daily 4 8 Startup and setup first t...

Страница 155: ...Troxler NTO Index 7 INDEX Time 5 28 Burn 5 6 Format 5 29 Time Date Menu 4 6 5 28 Troubleshooting A 2 U Unlock door 5 34 Unpacking 1 9 V Verify scale 4 6 6 15 View Project 7 6 Status 5 21 Y YES key 4 3...

Страница 156: ...Index 8 NOTES...

Страница 157: ...Troxler NTO Warranty 1 WARRANTY NOTES...

Страница 158: ...NEITHER ASSUMES NOR AUTHORIZES ANYONE TO ASSUME FOR IT ANY OTHER LIABILITY IN CONNECTION WITH THE SALE OF THE INSTRUMENT THIS WARRANTY SHALL NOT APPLY TO THE INSTRUMENT OR ANY PART THAT HAS BEEN SUBJ...

Отзывы: