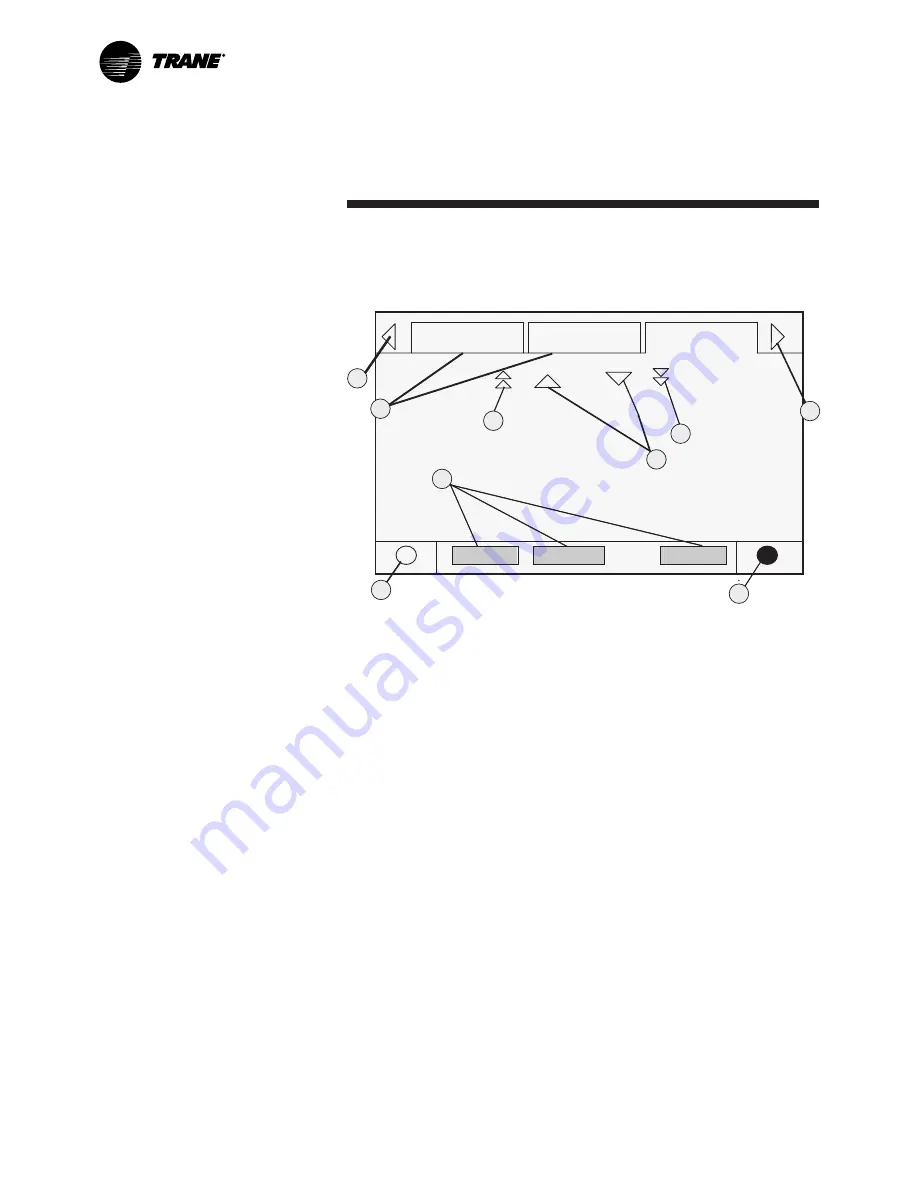
Legend
1. File folder tabs
2. Page-by-page scroll up
3. Line-by-line scroll up/down
4. Page-by-page scroll down
5. Navigator
6. Reduce contrast/viewing angle
7. Radio buttons
8. Increase contrast/viewing angle
The file folder tabs across the top of
the screen are used to select the
various display screens.
Scroll arrows are added if more file
tabs (choices) are available. When
the tabs are at the left most position,
the left navigator will not show and
only navigation to the right will be
possible. Likewise when the right
most screen is selected, only left
navigation will be possible.
The main body of the screen is used
for description text, data, setpoints,
or keys (touch sensitive areas). The
Chiller Mode is displayed here.
The double up arrows cause a page-
by-page scroll either up or down. The
single arrow causes a line by line
scroll to occur. At the end of the
page, the appropriate scroll bar will
disappear.
A double arrow pointing to the right
indicates more information is
available about the specific item on
that same line. Pressing it will bring
you to a subscreen that will present
the information or allow changes to
settings.
The bottom of the screen (Fixed
Display) is present in all screens and
contains the following functions. The
left circular area
is used to reduce
the contrast/viewing angle of the
display. The
right circular area
is
used to increase the contrast/viewing
angle of the display. The contrast
may require re-adjustment at
ambient temperatures significantly
different from those present at last
adjustment.
The other functions are critical to
machine operation. The AUTO and
STOP keys are used to enable or
disable the chiller. The key selected is
in black (reverse video). The chiller
will stop when the STOP key is
touched and after completing the
Run Unload mode.
Touching the AUTO key will enable
the chiller for active cooling if no
diagnostic is present. (A separate
action must be taken to clear active
diagnostics.)
The AUTO and STOP keys take
precedence over the Enter and
Cancel keys. (While a setting is being
changed, AUTO and STOP keys are
recognized even if Enter or Cancel
has not been pressed.)
The ALARMS button appears only
when an alarm is present, and blinks
(by alternating between normal and
reverse video) to draw attention to a
diagnostic condition. Pressing the
ALARMS button takes you to the
corresponding tab for additional
information.
Controls Interface
Basic Screen Format
The basic screen format appears as:
8
1
2
3
4
5
6
7
5
Auto
Stop
Alarms
RLC-SVU01B-E4
10


