No.
Part to be replaced
Work procedure
Remarks
③
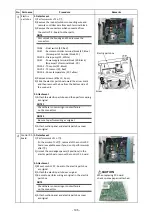
Electric parts box
1. Detachment
1) Remove the panel under the air intake and the electric
parts box cover.
(see the 1. of
①
and 1. of
②
)
2) Remove the remote controller wire, indoor/outdoor
connecting cord and power supply wire from the
remote controller terminal block and power terminal
block.
3) Remove the connectors from the control board.
Note
First unlock the housing and then
disconnect the connectors.
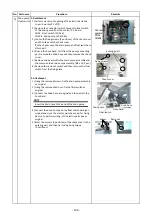
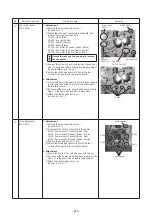
CN34 : Float switch (3P : Red)
CN41 : Remote controller wire (2P : Blue)
CN40 : Indoor/outdoor connecting cord (2P : Blue)
CN 67 : Power supply (2P : Black)
CN01 : Reactor (2P : Blue)
CN100 : TC1 sensor (3P : Brown)
CN101 : TC2 sensor (2P : Black)
CN102 : TCJ sensor (2P : Red)
CN103 : TF sensor (2P : Green)
CN104 : TA sensor (2P : Yellow)
CN333 : Fan motor (3P : White)
CN 82 : Electronic control valve coil (6P : Blue)
4)
5)
Remove the mounting screws for the electric parts
box.
( 4X10, 2 pcs (screws locate under the cross slit on
the heat-insulating material))
Slide the electric parts box in arrow direction, and
remove the box from the bottom side.
2. Attachment
1) Attach the electric parts box, and rewire the connector
in the same way as before replacement.
Note
Con
fi
rm that the connector is installed
correctly.
Be sure to con
fi
rm that the wiring is
correct.
2) Attach the electric parts box cover and the panel under
the air intake..
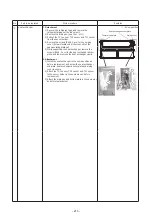
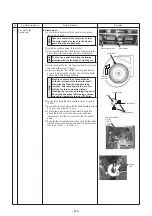
Remote controller
terminal block
Electric parts box
Screw
Electronic control valve output
CN82 (Blue)
Float SW
CN34 (Red)
TF sensor
CN103 (Green)
DC fan output
CN333 (White)
TCJ sensor
CN102 (Red)
EEROM
IC503
TA sensor
CN104 (Yellow)
Power supply
CN67 (Black)
Reactor
CN01 (Blue)
TC1 sensor
CN100 (brown)
TC2 sensor
CN101 (Black)
Power supply
terminal block
④
Control board
1. Detachment
1) Remove the electric parts box. (see the 1. of
③
)
(The control board can be removed without performing
the work procedure 1. of
③
)
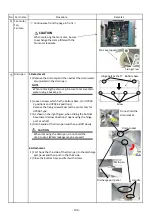
2) Unlock the cart edge spacers (5 pcs) within the
electrical equipment box, and remove the control
board.
Note
Unlock the locks on the housing to remove
the connector.
2. Attachment
1) Reinstall the control board in the electric parts box in
the same way as before replacement
2) Install the electric parts box.
3) Re-connect the wiring within the electric parts box in
the same way as before replacement.
4) Mount the panel under the air intake, the electric parts
box cover, and the electric parts box.
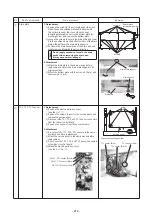
Control board
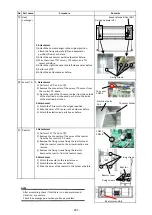
Con
fi
rm that Nomex pare is in place
when replacing the control board.
Note
- 209 -
Содержание MMC-UP0151HP-E
Страница 41: ...2 2 Ceiling type MMC UP0151HP E TR MMC UP0181HP E TR 41 ...
Страница 42: ...MMC UP0241HP E TR MMC UP0271HP E TR 6 4 12 7 42 ...
Страница 43: ...MMC UP0361HP E TR MMC UP0481HP E TR MMC UP0561HP E TR 43 ...
Страница 58: ...3 WIRING DIAGRAMS 3 1 4 way cassette type MMU UP HP E TR 58 ...
Страница 59: ...3 2 Ceiling type MMC UP HP E TR 59 ...
Страница 60: ...3 3 Concealed Duct Standard type MMD UP BHP E TR 60 ...
Страница 61: ...3 4 Concealed Duct High Static Pressure type MMD UP HP E TR 61 ...
Страница 62: ...Concealed Duct High Static Pressure type MMD UP HP E TR 62 ...
Страница 63: ...3 5 Concealed Duct High Static Pressure fresh air intake type MMD UP HFP E TR 63 ...
Страница 65: ...3 7 High wall type MMK UP HP E TR 65 ...
Страница 247: ...MMU UP0241HP E TR MMU UP0271HP E TR MMU UP0301HP E TR 211 233 252 253 251 254 255 213 216 263 247 ...
Страница 249: ...MMU UP0361HP E TR MMU UP0481HP E TR MMU UP0561HP E TR 268 267 213 214 249 ...
Страница 252: ...12 2 Ceiling type MMC UP0151HP E TR MMC UP0181HP E TR 025 024 252 ...
Страница 254: ...MMC UP0241HP E TR MMC UP0271HP E TR 029 028 254 ...
Страница 256: ...MMC UP0361HP E TR MMC UP0481HP E TR MMC UP0561HP E TR 051 028 027 256 ...
Страница 261: ...MMD UP0151BHP E TR MMD UP0181BHP E TR 240 239 238 233 235 261 ...
Страница 263: ...MMD UP0241BHP E TR MMD UP0271BHP E TR MMD UP0301BHP E TR 240 239 238 233 235 263 ...
Страница 265: ...MMD UP0361BHP E TR MMD UP0481BHP E TR MMD UP0561BHP E TR 240 239 238 233 235 265 ...
Страница 289: ...MMK UP0031HPL E TR MMK UP0051HPL E TR MMK UP0071HPL E TR MMK UP0091HPL E TR MMK UP0121HPL E TR 289 ...
Страница 295: ...144 9 MOO 5 BANGKADI INDUSTRIAL PARK TIVANON ROAD TAMBOL BANGKADI AMPHUR MUANG PATHUMTHANI 12000 THAILAND ...

