e-STUDIO162/162D/151/151D UNPACKING AND INSTALLATION 5 - 10
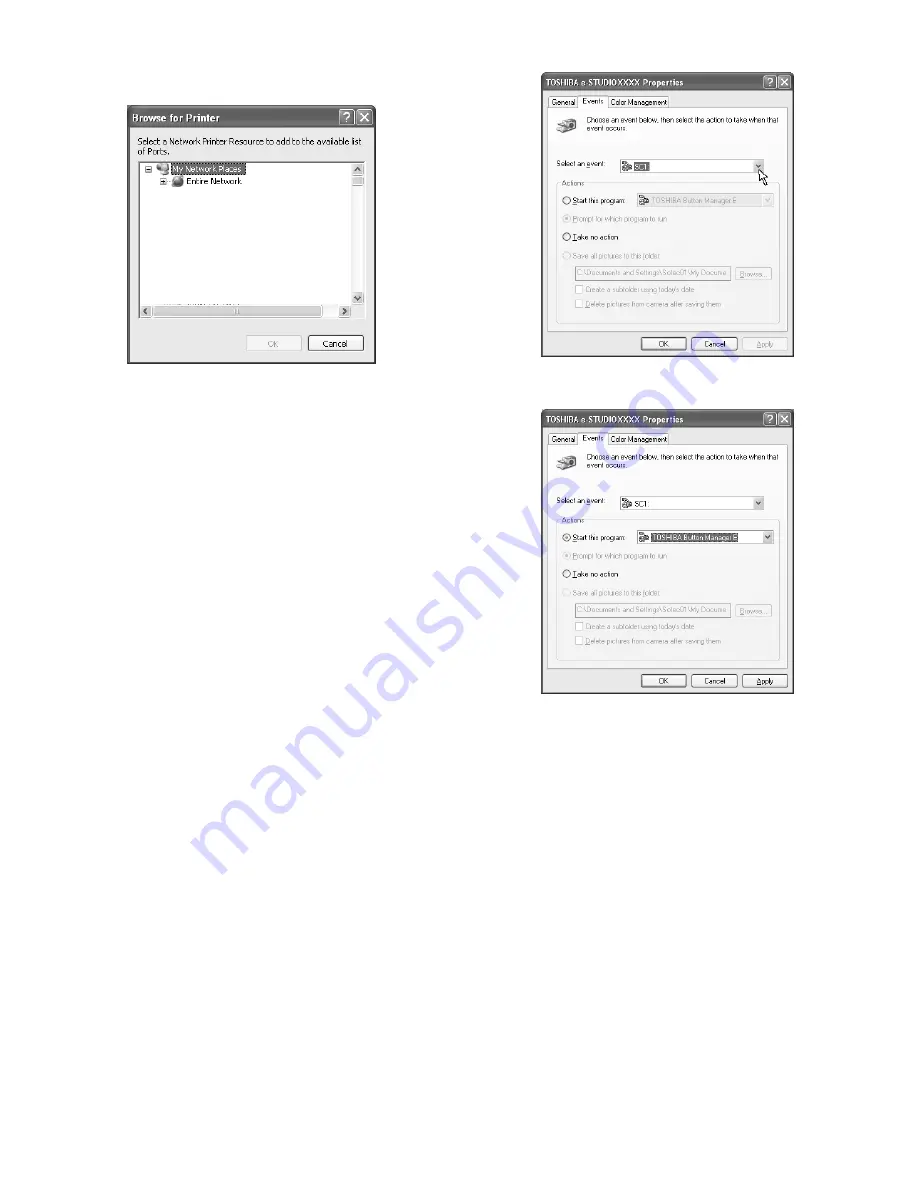
6) Select the network printer that is shared and click the "OK" button.
Ask your network administrator for the server name and printer
name of the machine on the network.
7) In the printer port selection window, verify the network printer that is
shared and whether the machine is to be used as the default
printer, make the selections and click the "Next" button.
8) When you are asked to select the model name, select the model
that you are using and click the "Next" button.
Follow the on-screen instructions.
Caution: If you are running Windows 2000/XP and a warning message
appears regarding the Windows logo test or digital signature,
be sure to click "Continue Anyway" or "Yes".
9) You will return to the window of step 2). Click the "Close" button.
Note: After the installation, a message prompting you to restart your
computer may appear. In this case, click the "Yes" button to
restart your computer.
This completes the installation of the MFP driver.
C. Setting up button manager
Button Manager is a software program that works with the scanner
driver to enable scanning from the machine.
To scan using the machine, Button Manager must be linked with the
scan menu on the machine. Follow the steps below to link Button Man-
ager to scanner events.
(1) Windows XP
1) Click the "start" button, click "Control Panel", click "Printers and
Other Hardware", and then click "Scanners and Cameras".
2) Click the "TOSHIBA e-STUDIOXXXX" icon and select "Properties"
from the "File" menu.
3) In the "Properties" screen, click the "Events" tab.
4) Select "SC1:" from the "Select an event" pull-down menu.
5) Select "Start this program" and then select "TOSHIBA Button Man-
ager E" from the pull-down menu.
6) Click the "Apply" button.
7) Repeat Steps 4) through 6) to link Button Manager to "SC2:"
through "SC6:".
Select "SC2:" from the "Select an event" pull-down menu. Select
"Start this program", select "TOSHIBA Button Manager E" from the
pull-down menu, and then click the "Apply" button. Do the same for
each ScanMenu through "SC6:".
When the settings have been completed, click the "OK" button to
close the screen.
Button Manager is now linked to the scan menu (1 through 6).
The scan settings for each of scan menu 1 through 6 can be changed
with the setting window of Button Manager.
For the factory default settings of the scan menu and the procedures
for configuring Button Manager settings.
(2) Windows 98/Me/2000
1) Click the "Start" button, select "Settings", and then click "Control
Panel".
2) Double-click the "Scanners and Cameras" icon.
Note: If the "Scanners and Cameras" icon does not appear in
Windows Me, click "view all Control Panel options".
3) Select "TOSHIBA e-STUDIOXXXX" and click the "Properties" button.
In Windows Me, right click "TOSHIBA e-STUDIOXXXX" and click
"Properties" in the pop-up menu.
4) In the "Properties" screen, click the "Events" tab.
e-STUDIO162_151.book 10
ページ
2004年12月2日 木曜日 午後9時37分
Содержание e-studio 151
Страница 156: ...e STUDIO162 162D 151 151D CIRCUIT DIAGRAM 14 30 6 7 8 9 10 11 12 6 7 8 9 10 11 12 A B C D E F G H 1 1 ...
Страница 157: ...e STUDIO162 162D 151 151D CIRCUIT DIAGRAM 14 31 A 1 2 3 4 5 6 B C D E F G H 1 2 3 4 5 6 POWER SUPPLY 220V 240V ...
Страница 158: ...e STUDIO162 162D 151 151D CIRCUIT DIAGRAM 14 32 6 7 8 9 10 11 12 6 7 8 9 10 11 12 A B C D E F G H 1 1 ...
Страница 170: ...Memo ...
Страница 171: ...Memo ...
Страница 172: ...Memo ...
Страница 176: ...2 17 2 HIGASHIGOTANDA SHINAGAWA KU TOKYO 141 8664 JAPAN ...


