


3
Installing the Front and Rear
Lights
Parts needed for this procedure:
1
Headlight support
3
Bolt (5/16 x 2-1/4 inch)
3
Washer (5/16 inch)
3
Flanged locknut (5/16 inch)
2
Headlight
1
Rear-light bracket (left)
1
Rear-light bracket (right)
2
Rear-light assembly
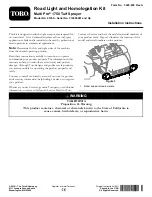
Installing the Front Lights
1.
Align the holes in the front-light support with the holes
in the front channel of the chassis (
Figure 8
1.
Flanged locknut
4.
Washer
2.
Front channel
5.
Bolt (5/16 x 2-1/4 inch)
3.
Front-light support
2.
Secure the light support to the channel with the 3 bolts
(5/16 x 2-1/4 inch), 3 washers, and 3 flanged locknuts
(
3.
Torque the bolts and nuts to 19.8 to 25.4 N∙m (175
to 225 in-lb).
4.
Remove the locknut (10 mm), 1 joint half, and 1
serrated shell from the headlight assembly (
Figure 9
1.
Threaded post (headlight)
4.
Vertical hole (front-light
support)
2.
Joint half
5.
Locknut (10 mm)
3.
Serrated shell
5.
Align the threaded post of the headlight with the
vertical hole at the end of the headlight support (
).
Note:
Ensure that the upper joint half and the serrated
shell are aligned as shown in
.
6.
Install the headlight to the front-light support with the
serrated shell, joint half, locknut that you removed in
step
and tighten the nut hand tight.
7.
Repeat steps
through
for the other headlight.
6