4
Disconnecting the Optional
Attachments
No Parts Required
Disconnecting the Optional Eductor Kit
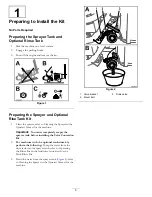
1.
Remove the flange clamp that secures the flanged
hose-barb of the supply hose to the inlet flange of the
eductor (
Figure 9
1.
Inlet flange (eductor)
3.
Flange clamp
2.
Gasket
4.
Flanged-hose-barb
(supply hose)
2.
Remove the flanged hose barb and gasket from the
eductor (
Note:
Retain the flange clamp and gasket for
installation in
18 Installing the Supply Hose for the
Optional Eductor Kit (page 47)
.You no longer need
the supply hose and you will remove it with the
agitation, rate, and master spray valves in
the Agitation, Rate, and Master-Spray Valves (page 14)
.
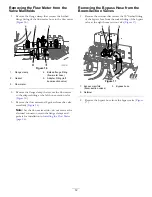
3.
Remove the retainer that secures the 90° barbed fitting
of the sprayer supply hose to the T-fitting located
forward of the pressure-relief valve (
).
Note:
Retain the retainers for installation in
the Sprayer Supply Hose—Machine without the
Optional Eductor Kit (page 34)
.
Figure 10
Figure 11
1.
Retainer
5.
Sprayer supply hose
2.
90° barbed fitting (sprayer
supply hose)
6.
Pressure-relief valve
3.
Front of the machine
7.
3-way valve
4.
T-fitting
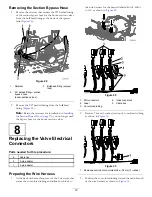
4.
Remove the 90° barbed fitting from the T-fitting
(
).
9
Содержание 136-0372
Страница 61: ...Schematics Flow Diagram Rev A 61...
Страница 62: ...Notes...
Страница 63: ...Notes...
Страница 64: ......


