English
10
© Titan Tool Inc. All rights reserved.
Maintenance
Before proceeding, follow the Pressure Relief
Procedure outlined previously in this manual.
additionally, follow all other warnings to reduce
the risk of an injection injury, injury from moving
parts, or electric shock.
General Repair and Service Notes
The following tools are needed when repairing this sprayer:
flat-blade screwdriver
T20 Torx head driver
needle-nose pliers
adjustable wrench
1. Before repairing any part of the sprayer, read the
instructions carefully, including all warnings.
IMPORTaNT: Never pull on a wire to disconnect it. Pulling
on a wire could loosen the connector from the wire.
2. Test your repair before regular operation of the sprayer
to be sure that the problem is corrected. If the sprayer
does not operate properly, review the repair procedure to
determine if everything was done correctly. Refer to the
Troubleshooting section to help identify other possible
problems.
3. Make certain that the service area is well ventilated in
case solvents are used during cleaning. Always wear
protective eyewear while servicing. Additional protective
equipment may be required depending on the type of
cleaning solvent. Always contact the supplier of solvents
for recommendations.
4. If you have any further questions concerning your TITAN
Airless Sprayer, call TITAN:
Technical Service (U.S.)
....................... 1-800-526-5362
Fax ................................................ 1-800-528-4826
adjusting the Trigger Tension
Use the following procedure to adjust the spring tension of the
trigger lever on the gun holder assembly. The trigger lever pulls
and releases the spray gun trigger when operated from the spray
lever on the cart. The proper tension ensures that the gun will
shut off when the gun trigger is released.
IMPORTaNT: always keep the trigger lock on the spray
gun in the locked position while making adjustments to the
system. If necessary, loosen the gun holder clamp knob and
then engage the spray gun trigger lock. Move the spray gun
to its original position and tighten the clamp knob.
Before proceeding, follow the Pressure Relief
Procedure outlined previously in this manual.
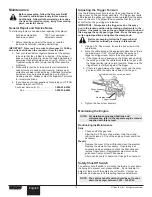
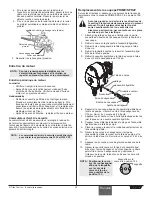
1. Using a 9/16” hex wrench, loosen the hex screw on the
cable block.
2. Move the cable block in the appropriate direction so there
is a maximum of 1/32” of movement by the spray gun
trigger and trigger lever before the spray gun opens.
a. If the trigger lever is pushing on the trigger and opening
the spray gun, slide the cable block toward the gun until
the trigger settles into its normal position. Make sure the
trigger lever is still flush against the trigger.
b. If there is a gap between the trigger lever and the spray
gun lever, slide the cable block away from the gun.
Spray gun
trigger
Trigger lever
No clearance
Cable block (hex screw on back)
3. Tighten the hex screw securely.
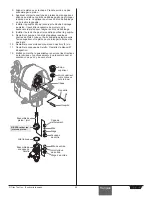
Maintaining the Engine
NOTE: For detailed engine specifications and
maintenance, refer to the separate engine manual
supplied with this sprayer.
Routine Engine Maintenance
Daily
• Check and fill the gas tank.
• After the first 20 hours of operation, drain the oil and
refill with clean oil. Check the engine oil level and fill as
necessary.
Weekly
• Remove the cover of the air filter and clean the element.
Replace the element if necessary. If operating in an
unusually dusty environment, check the filter daily and
replace if necessary. (Replacement elements can be
purchased from your local Titan dealer.)
• After each 50 hours of operation: Change the engine oil.
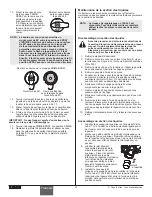
Safety Shut-Off Switch
The safety shut-off switch is pre-set by the factory to shut down
the sprayer to prevent over-pressurization. Do not attempt to
adjust or tamper with the safety shut-off switch. Contact an
authorized service center if this setting requires adjustment.
NOTE: The safety shut-off switch should be set to shut
down the sprayer between 3200 – 3300 PSI.


