


English
12
© Titan Tool Inc. All rights reserved.
Servicing the Fluid Section
Use the following procedures to replace the seals and repack the
fluid section.
NOTE: Repacking kit P/N 759-365 is available. For best
results use all parts supplied in this kit.
Disassembling the Fluid Section
Before proceeding, follow the Pressure Relief
Procedure outlined previously in this manual.
additionally, follow all other warnings to reduce the
risk of an injection injury, injury from moving parts
or electric shock.
1. Remove the suction set.
2. Remove the front cover and the three (3) screws that
secure it using a T20 Torx head driver.
3. Remove the yoke screw and washer that secures the
dowel pin. The dowel pin connects the yoke to the piston.
4. Using a pliers, pull the dowel pin out.
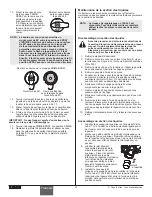
5. Rotate the pump shaft so the piston is in the top dead
center position. This can be done by pushing on the yoke.
This is required to disassemble all the parts.
6. Unscrew and remove the Sureflo Valve assembly (refer to
the Cleaning the Sureflo Valve procedure in the Cleanup
section of this manual).
7. Remove the piston assembly by pushing down on the
piston near the yoke.
8. Unscrew and remove the top nut using an adjustable
wrench.
9. Remove the worn seal using a flat head screwdriver or
punch. Remove the top seal from the top by pressing
against the side of the seal and popping it out. Be sure
not to scratch the housing where the seals are located.
10. Clean the area where the new seals are to be installed.
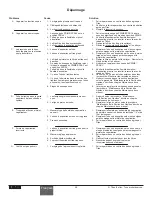
assembling the Fluid Section
1. Lubricate the new top seal with Piston Lube (P/N 314-480)
or light household oil and place the seal by hand with the
cup side of seal down into the top port of the housing.
2. Place a small amount of anti-seize on the threads of the
top nut. Place the top nut into the top of the housing and
tighten with an adjustable wrench. This will drive the top
seal into the correct position.
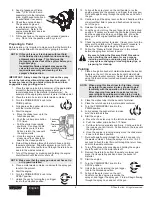
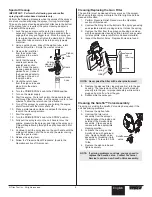
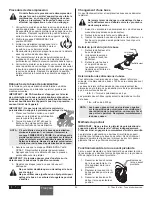
Insertion
Tool
3. Lubricate the seal on the piston/
seal assembly similar to the
top seal. Place the piston/seal
assembly into the bottom of the
housing. Insert the insertion tool
and push into position to properly
seat the piston/seal. Remove
the insertion tool.
4. Install the new O-ring on the
Sureflo Valve assembly, lubricate
with Piston Lube (P/N 314-480),
thread into the bottom (inlet) of the housing, and tighten
with an adjustable wrench. This will drive the bottom seal
into the correct position.
5. Align the piston with the yoke. Be careful not to damage
the piston.
6. Apply any type of non-silicone household grease to the
piston and yoke area to prolong life. Apply to the holes in
the yoke where the dowel is inserted.
7. Install the dowel pin to connect the yoke to the piston.
The piston may have to be moved up or down to align with
the yoke.
8. Install the yoke screw and washer to secure the dowel pin.
9. Turn pump right side up and apply a few drops of Piston
Lube or light household oil between the top nut and piston.
This will prolong the seal life.
10. Install front cover and three (3) screws.
11. Replace Sureflo Valve and install the suction set.
12. Turn on the sprayer by following the procedure in the
“Operation” section of this manual and check for leaks.
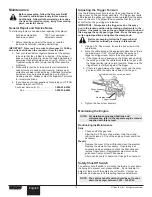
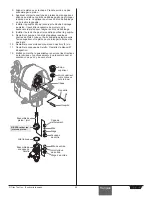
Top seal
(cup down)
Top nut
Dowel
Ball guide
Outlet ball
Outlet seat
Inlet ball
Inlet O-ring
Inlet seat
Outlet valve
Yoke
Piston/seal
assembly
O-ring
Sureflo
Valve
assembly
Washer
Screw
DO NOT attempt
to remove the seals
from the piston.


