


English
© Titan Tool Inc. All rights reserved.
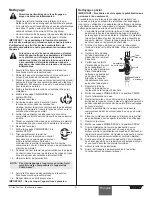
7
14. Continue to pull the spray lever on the cart handle until
material is coming out of the gun.
15. Release the spray lever.
16. Lock the gun by turning the gun trigger lock to the locked
position. If necessary, loosen the gun holder clamp knob
and then engage the spray gun trigger lock. Move the
spray gun to its original position and tighten the clamp
knob.
17. Turn the PRIME/SPRAY knob to PRIME.
18. Turn off the sprayer by pressing and holding the engine
shutoff switch until the motor shuts off.
19. Attach tip guard and tip to the spray gun. Refer to the
instructions later in this section.
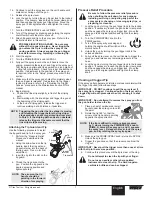
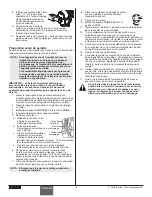
POSSIBLE INJEcTION haZaRD. Do not spray
without the tip guard in place. Never trigger the
gun unless the tip is in either the spray or the
unclog position. always engage the gun trigger
lock before removing, replacing or cleaning tip.
20. Start the engine.
21. Turn the PRIME/SPRAY knob to SPRAY.
22. Fully pull the spray lever on the cart handle to rev the
engine, pressurize the sprayer, and trigger the spray gun.
Test the spray pattern and line position on a long piece of
roofing felt or cardboard. Check for proper line width and
position. If adjustment to the position of the spray gun
is required, refer to the “Setup” procedure earlier in this
section.
23. Make sure that the spray gun shuts off completely when
the gun trigger is released. If adjustment to the trigger
tension is required, refer to the “Adjusting the Trigger
Tension” procedure in the Maintenance section of this
manual.
24. Begin striping.
a. Position the line striper slightly in front of the striping
path.
b. Start walking with the line striper and trigger the gun at
the beginning of the striping path.
c. At the end of striping path, release the trigger and
continue walking a short distance, if possible.
NOTE: Triggering the gun after the line striper is moving
and releasing the trigger before the line striper
stops produces an evenly painted line from start
to finish. If the striping path ends at an obstacle,
release the trigger at the same moment that the
line striper stops moving.
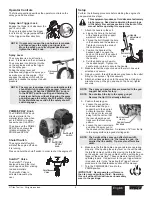
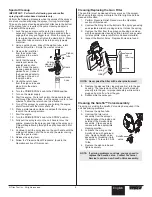
attaching the Tip Guard and Tip
Tip seal
retainer
Tip seal
Tip
Tip
handle
Tip
guard
Use the following procedure to install
the tip guard and tip to the spray gun.
1. Perform the “Pressure Relief
Procedure” described in this
manual.
2. Using the arrow head on the tip
handle, insert the tip seal and
tip seal retainer into the back of
the tip guard. Press in for final
adjustment.
3. Insert the tip into the slot on the
tip guard.
4. Thread the tip guard onto the
gun. Position the tip guard in the
desired spraying position and
tighten securely.
NOTE: The arrow on the tip
handle should be
pointing in the forward
direction for spraying.
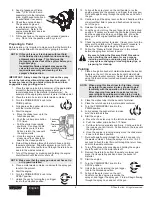
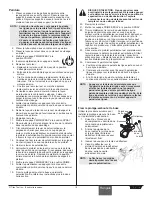
Pressure Relief Procedure
Be sure to follow the pressure relief procedure
when shutting the unit down for any purpose,
including servicing or adjusting any part of the
spray system, changing or cleaning spray tips, or
preparing for cleanup.
1. Lock the gun by turning the gun trigger lock to the locked
position. If necessary, loosen the gun holder clamp knob
and then engage the spray gun trigger lock. Move the
spray gun to its original position and tighten the clamp
knob.
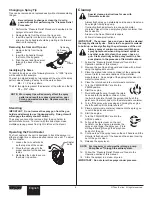
SPRAY
P
R
IM
E
2. Turn the PRIME/SPRAY knob to the
PRIME position.
3. Turn off the sprayer by pressing and
holding the engine shutoff switch until the
motor shuts off.
4. Unlock the gun by turning the gun trigger lock to the
unlocked position.
5. Fully pull the spray lever on the cart handle to trigger the
spray gun and release any remaining pressure in the
hose.
6. Lock the gun by turning the gun trigger lock to the locked
position. If necessary, loosen the gun holder clamp knob
and then engage the spray gun trigger lock. Move the
spray gun to its original position and tighten the clamp
knob.
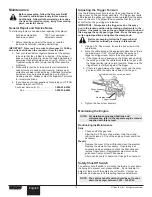
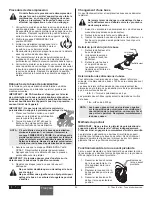
clearing a clogged Tip
If the spray pattern becomes distorted or stops completely while
the trigger is pulled, follow these steps.
IMPORTaNT: DO NOT continue to pull the spray lever if
the spray tip is clogged. continued pull on the lever with a
clogged tip will over-pressurize the unit, causing it to shut
down.
IMPORTaNT: Do not attempt to remove the spray gun from
the gun holder to clean the tip.
1. Place a sheet of cardboard or small
bucket under the spray gun to catch
the paint.
2. Rotate the tip 180º so that the
arrow on the tip handle is pointing
opposite the spray direction.
NOTE: If the tip is difficult to rotate, relieve pressure
by 1) slowly turning the PRIME/SPRaY knob to
PRIME, 2) unlock the spray gun, and 3) squeeze
the spray lever. Release the lever, lock the spray
gun, and try rotating the spray tip again.
3. Make sure the PRIME/SPRAY knob is turned to SPRAY.
Unlock the spray gun.
4. Trigger the gun once so that the pressure can blow the
clog out.
IMPORTaNT: Never pull the trigger more than once at a time
with the tip in the reverse position.
5. Continue this procedure until the tip is clear of the clog.
Do not attempt to clean the tip with your finger.
Do not use a needle or other sharp pointed
instrument to clean the tip. The hard tungsten
carbide is brittle and can be chipped.


