


English
© Titan Tool Inc. All rights reserved.
5
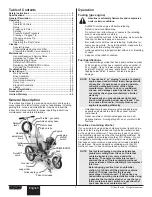
Operator controls
The following section describes the operator controls on the
spray gun and line striper.
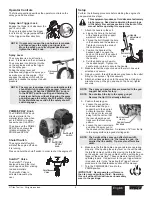
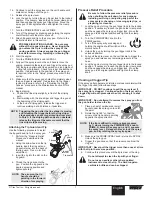
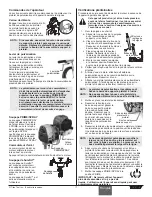
Spray Gun Trigger Lock
Engage the trigger lock whenever the
gun is not in use.
The gun is locked when the trigger
lock is at a 90º angle (perpendicular
to the trigger in either direction).
NOTE: If necessary, loosen the gun holder clamp knob
and then engage the spray gun trigger lock.
Move the spray gun to its original position and
tighten the clamp knob.
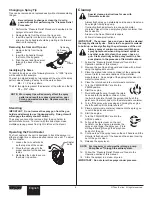
Spray Lever
Spray
lever
The spray lever is a dual-function
lever. It is located on the cart handle.
The spray lever controls the throttle
on the engine as well as the trigger
on the spray gun.
Pulling the spray lever will
simultaneously trigger the spray gun
as well as rev up the engine. This
engages the engine clutch with the
pump and causes the sprayer to build
pressure.
NOTE: The sprayer is equipped with an automatic safety
shut-off switch to prevent the sprayer from over-
pressurizing. When the PRIME/SPRaY knob is
in the SPRaY position, pulling and holding the
spray lever half way without triggering the spray
gun will engage the safety shut-off switch. Refer
to the Maintenance section if the safety shut-off
switch engages.
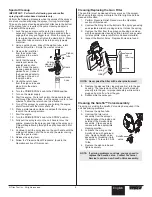
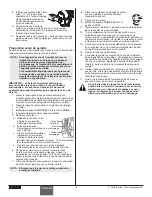
Shutoff
switch
PRIME/
SPRAY
knob
PRIME/SPRaY Knob
The PRIME/SPRAY knob
directs material to the
material return tube when
set to PRIME or to spray
hose when set to SPRAY.
The arrows on the PRIME/
SPRAY knob shows the
rotation directions for
PRIME and SPRAY.
Shutoff Switch
The engine shutoff switch
will shut the engine off when
it is running.
Press and hold the shutuff switch in order to shut the engine off.
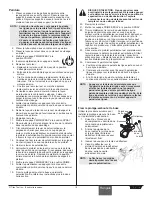
Sureflo
Valve
Sureflo™ Valve
The Sureflo™ Valve is
designed to keep the inlet
valve open and from sticking
to dried materials.
The Sureflo Valve is
activated manual by the
user.
Setup
Perform the following procedure before starting the engine of a
gas-powered line striper.
This equipment produces a fluid stream at extremely
high pressure. Read and understand the warnings
in the Safety Precautions section at the front of this
manual before operating this equipment.
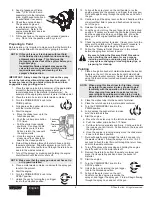
1. Attach the handle to the cart.
Handle
adjustment
knob
Handle
knob
a. Line up the hole in the bottom
of the handle with the support
weldment on the cart.
b. Thread the bolt through the hole
in the handle and the weldment.
Tighten by turning the knob of
the bolt clockwise.
c. Position the handle at the
desired height. Loosen the
knob on the rear of the support
weldment in order to to loosen
the handle.
d. Pull the handle up or down to
the desired height. Tighten the
handle knob in order to secure the handle.
2. Make sure that the siphon tube and the return hose are
attached and secure.
3. Using a wrench, thread the airless spray hose to the outlet
fitting on the sprayer. Tighten securely.
4. Attach an airless spray gun to the spray hose. Using two
wrenches (one on the gun and one on the hose), tighten
securely.
NOTE: The spray gun and cables are mounted to the gun
support bar at the factory.
NOTE: Do not attach the tip to the spray gun yet.
Remove the tip if it is already attached.
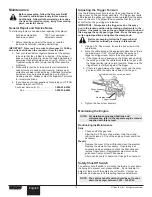
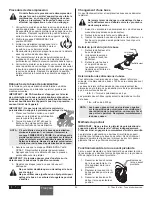
5. Position the spray gun.
Support
bar knob
Gun riser
clamp
a. Loosen the support bar
knob and slide the gun
support bar to the desired
horizontal position. Make
sure the gun is far enough
away from the cart so that
the rear wheel does not
track over the fresh spray
pattern.
b. Loosen the gun riser clamp
and slide the spray gun to
the desired vertical position. A distance of 6” from the tip
to the spray surface is a good starting point.
NOTE: The height of the spray gun affects the width
of the spray pattern (i.e., the lower the gun, the
smaller the line width). Tip size also affects line
width.
6. Make sure the throttle cable and gun cable are operating
properly. When pulling the spray lever on the cart handle,
the throttle cable should be fully moving the throttle lever
on the engine, and the gun cable should be pulling the gun
trigger at the same time. These cables are factory-set to
operate properly. If adjustment to the gun trigger tension
is required, refer to the “Adjusting the Trigger Tension”
procedure in the Maintenance section of this manual.
SPRAY
P
R
IM
E
7. Turn the PRIME/SPRAY knob to the
PRIME position.
IMPORTaNT: Never operate unit for more
than ten seconds without fluid. Operating
this unit without fluid will cause unnecessary
wear to the packings.


