background image

Control unit 

Settings register

41

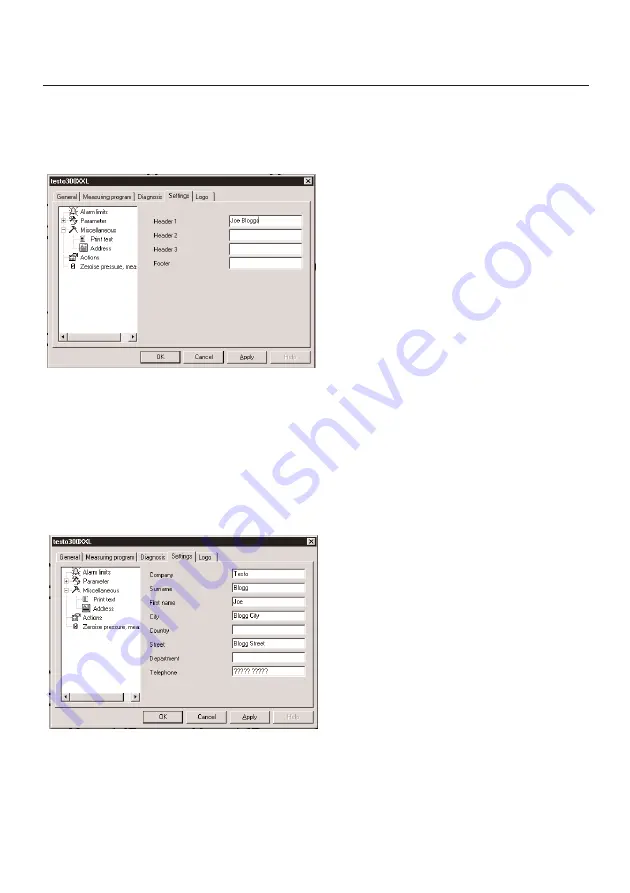
Entering the address

1. Click on “

+

” in front of

Miscellaneous

”. The sub-menus appear.

2. Click on 

Address

3. Enter the text (Name, 

Street, City etc.). The length of the 
lines varies between 15 and 47 
characters.

4. The text is saved and applied in the

control unit by clicking on “

Apply

”.

5. Click on“

OK

” to save the data and to

close the instrument driver window.

Entering print text

1.  Click on “

+

” in front of

Miscellaneous

”. The sub-menus

appear.

2. Click on 

Print text

. Three headers 

(with 20 characters) and one footer 

(with 20 characters) are available to 
you for the text.

3. The text is saved and applied in the

control unit by clicking on “

Apply

”.

4. Click on“

OK

” to save the data and to

close the instrument driver window.

Содержание 300 XXL

Страница 1: ...Comfort Software Professional Analysis software testo 300XXL Instruction manual en...

Страница 2: ...2...

Страница 3: ...of the software solely for security and filing purposes or you can transmit the software to one hard disk on the condition that the original is kept solely for security or filing purposes Reverse eng...

Страница 4: ...formation 35 Displaying general information 35 Synchronizing clock in instrument with PC clock 35 Measuring program register 36 Entering measuring program 36 Deleting measuring program 36 Diagnosis re...

Страница 5: ...addition 52 Calculating dew point VL 53 Changing display sequence 53 Deleting instrument memory 54 Zeroing measuring pressure 54 Online measurement 55 Cancelling analysis box 56 Error messages Error m...

Страница 6: ...sing Testo analysers and are transmitted to the PC via serial software Also the configurations set in the PC such as display sequence alarm limits are updated via the same interface in the testo 300 X...

Страница 7: ...ease register with the same user name password used during installation Otherwise the installation may not be correctly carried out 1 Place CD ROM in the drive Installation will start automatically If...

Страница 8: ...trol unit The instrument driver appears in the directory If you wish to carry out changes press Back to return to the previous pages 8 You can select between the configuration for the control unit or...

Страница 9: ...the mouse while others need to be clicked twice The following options are available depending on where you are in the program Click left on menu item Opens sub menu or carries out function Click left...

Страница 10: ...Open file Save active document Page view Print view Set up new location Set up new folder Transmit to instrument Delete element Undo last action Copy in clipboard Insert contents in clipboard Set up f...

Страница 11: ...Device control Control measurement Start online measurement Stop online measurement Read out memory View category View as diagram View as table View as digit box View as histogram View as form View a...

Страница 12: ...ion Left mouse button enlarges Left mouse button shows crosshair Left mouse button marks area to be included in mean calculation Left mouse button shows compensating curve Left mouse shows difference...

Страница 13: ...r new toolbars on the register available and define whether the toolbar should be displayed or not whether large or small buttons are to be used which icons are to appear in the toolbar To change the...

Страница 14: ...m and read out data loggers and should therefore be placed in the toolbar for direct access Main emphasis Data management Regular reworking and updating of the archive tree is necessary in this case T...

Страница 15: ...isplayed The files which were last used are available in a list which can be opened The program can be exited in this menu Instrument Connection to the measuring instruments is controlled from this me...

Страница 16: ...fset using a mathematical function Format The font can be set here This font is then used for protocols and to label diagrams The appearance of the diagrams and tables can be improved optically using...

Страница 17: ...nstrument the current instrument can be registered and deregistered or all of the settings in the instrument can also be undertaken via Device control in the PC Context Folders in archive Click right...

Страница 18: ...be entered via Properties These are also available on site once they are transmitted to the instrument Context Work area In the work area context e g table the data which is shown or is to be printed...

Страница 19: ...cation Measuring protocol includes additional data on the protocol itself Context menu in diagrams and other presentation elements Edit line leads to the settings menu for presenting the data and edit...

Страница 20: ...help is available for many functions This online help is activated by pressing F1 function button on the keypad or by clicking on in the menu bar Press Shift F1 for direct help The cursor arrow will...

Страница 21: ...in the top part of the dialog mask A list with file names appears in the middle part The type of files required is selected in Files of type A file name is selected and is opened by clicking twice or...

Страница 22: ...ne what form the measurement protocol is to appear in by clicking on one of the following Table Digit box Analog instrument Diagram Histogram or Parametric Graph Diagram Table Demo file without instru...

Страница 23: ...23 Histogram Digit box Form only in VAC module Demo file without instrument Example...

Страница 24: ...shows the current value The diagram is returned to its normal size by clicking on Actual size All of the section zooms are then undone Crosshair Select a measurement curve to demonstrate a crosshair w...

Страница 25: ...e degree of the curve is determined at between 0 to 7 in the context menu for the curve right mouse button 0 degree corresponds to a pure mean calculation 1 degree describes the linear trend a higher...

Страница 26: ...work by zooming sections Display status info Provides detailed description of invalid readings Edit pattern Is used in diagrams and parametric graphs to set background and grid line colour and to cha...

Страница 27: ...surement points if required Define the required limit values in Data sequence and define how they are to be displayed in Limit value display You can click away a curve or reactivate a curve by clickin...

Страница 28: ...start mark Position defines a fixed frame which can be moved over the time axis Autom scaling defines a fixed section Optimise the value range y axis For an improved overview it is better to scale th...

Страница 29: ...shing time of a measurement tables only Channel and reading number tables only Consecutive page number Option of entering Conditions Additional comment lines Special protocol headers can be selected f...

Страница 30: ...button and select Open The Select device window appears Slave Mode appears on the testo 300 XXL control unit display It is not possible to operate the control unit keypad in this mode 3 Select the con...

Страница 31: ...w folder location appears under the instrument in the archive 4 Enter the required name location with 20 characters folder with 8 characters New locations and or new files can be set up in the archive...

Страница 32: ...Rename You can input your modifications in the folder location box 3 Your modifications are automatically saved once you leave the folder location box Copying locations folders 1 Click on location or...

Страница 33: ...r structure to structure your measurement logs in accordance with your tour plan to customers Memory management Control unit It is not possible to set up folders with the same name Locations with the...

Страница 34: ...main menu or Click on the Device control icon in the main menu Pressure settings Area Pitot tube Dew point VL Ambient CO Ambient CO2 Diff pressure 80 mbar Diff pressure 1000 mbar Timer Print text Add...

Страница 35: ...Firmware version instrument software for control unit Battery voltage in control unit Memory space Instrument temperature Names of the instrument unit Information on instrument errors Synchronizing c...

Страница 36: ...odifications are no longer possible 6 The data is saved via OK and the instrument driver window is closed 7 Open the context menu for the instrument driver with the right mouse button and select Close...

Страница 37: ...ges 1 Select the Diagnosis register 2 Open the sub menus by clicking on Errors are displayed 3 Click on the error message The corresponding explanation appears to the right of the error message Contro...

Страница 38: ...ox 5 Save the current register card by clicking on the Apply button 6 The data is saved by clicking on OK and the instrument driver window is closed Setting alarm limit for ambient CO2 1 Click on ambi...

Страница 39: ...ister card by clicking on the Apply button 6 Click on OK to save the data and to close the instrument driver window Setting the alarm limit for 1000 to 1000 mbar differential pressure 1 Click on diffe...

Страница 40: ...rox 9 s 4 Display of current differential pressure 5 Click on OK to return to main menu Setting timer for printer 1 Click on Timer 2 Enter the required value in the min box 3 Save the data of the curr...

Страница 41: ...in the control unit by clicking on Apply 5 Click on OK to save the data and to close the instrument driver window Entering print text 1 Click on in front of Miscellaneous The sub menus appear 2 Click...

Страница 42: ...a is retained if No is pressed Entering parameters for volume flow measurement pressure area Pitot tube factors 1 Click on in front of Parameters The sub menus appear 2 Pressure Enter altitude baromet...

Страница 43: ...internal file Format Bitmap 128 x 76 Pixle monochrome 1 4 The selected logo is shown in the Instrument logo display 5 Click on Apply and your logo will be shown everytime you start the instrument 6 Pr...

Страница 44: ...g on Cancel and the existing data is retained Online measurement 1 Click on testo 300 XXL Control unit Open the sub menu with the right mouse button or click on the Instrument main menu 2 Click on Onl...

Страница 45: ...e tick on a highlighted location by clicking on The location is not printed 4 Click on the label with which printing should begin 5 You can enter the company names and number of copies 6 Click on Prin...

Страница 46: ...restrictions when making these sub directories legible via barcodes An internal key and not the displayed location is coded in the printed barcodes The required locations have to be input in the cont...

Страница 47: ...use button and click on Open The Instrument selection window appears Slave Mode appears on the testo 300 XXL control unit display It is not possible in this mode to operate the control unit via keypad...

Страница 48: ...in the Instrument main menu or click on the device control icon in the main menu Analysis box Device control menu Menu Device c control GENERAL DIAGNOSIS SETTINGS Outline of device control menu Displa...

Страница 49: ...t software for analysis box battery voltage in the analysis box memory space instrument temperature the names of the unit instrument error information 1 Click on the Diagnosis register 2 The sub menus...

Страница 50: ...the Measuring program register 2 Select the location in the Location name menu 3 Enter the duration of a measurement series in the Times menu Mark hour and or minute with the left mouse button and en...

Страница 51: ...Dilution is set automatically at factor 20 The factor can be changed 9 Open the context menu for the instrument driver using the right mouse button and select Close Slave Mode is cancelled Measuring...

Страница 52: ...coefficients appear in the window 4 Click on the O2 reference or CO2max The window with the corresponding value opens and can be changed 5 The Standard settings button retains the preset values 52 Ana...

Страница 53: ...by clicking on Apply 5 The data is saved and the instrument driver window is closed by clicking on OK Setting display sequence 1 Click on beside Miscellaneous 2 Click on display sequence The window wi...

Страница 54: ...ns are applied and transferred to the analysis box Analysis box Settings register 54 Deleting instrument memory 1 Click on Actions 2 Click on the Delete device memory button The question Do you really...

Страница 55: ...l to exit the menu the existing data remain Online measurement 1 Click on testo 300 XXL analysis box Open the sub menu via the right mouse button or click on the Instrument menu 2 Click on Online 3 On...

Страница 56: ...ancelling the analysis box 1 Open the sub menu using the right mouse button 2 Select Close Slave Mode disappears from the testo 300 XXL control unit display and the testo 300 XXL can once again be ope...

Страница 57: ...measurement protocol You have selected a pre defined function which needs more or other parameters than those included in the measurement protocol e g you want to calculate the dew point but only the...

Страница 58: ...be used for different instruments You are trying to connect protocols using invalid data Overlapping time ranges cannot always be put together in a common protocol The Analysis software also includes...

Страница 59: ...ent with the right mouse button and you will then receive a menu from which to select Select Open to activate the required measuring instrument The measuring instrument has to be connected and switche...

Страница 60: ...from the archive to the work area the data will be shown You can decide which type of display to take It is possible to change the view if so required Simply click on the corresponding icon in the to...

Страница 61: ...pending on the structure of the measured data 2 many data items within a data block consisting of Time mark Date and time of respective measurement Readings From all the connected channels File Save M...

Страница 62: ...h file or instrument names date start or finishing time of a measurement tables only channel and reading number tables only current page number Conditions line and additional comment lines 2 Measured...

Страница 63: ...63 Main menu item File Details Background Example of printout diagram...

Страница 64: ...Windows Explorer The location or also the location name is used to assign measurement data reading unit time a name relevant to a specific location or other attributes Preparing the measurement It is...

Страница 65: ...p is complete 1 A list of instruments appears for you to select Select the instrument which you have just connected 2 The next step is to select the interface to which the instrument is connected It i...

Страница 66: ...s Background testo 300 XXL Device control This menu item is used to call up the configuration page of the selected instrument These are adapted to the corresponding instruments and make available the...

Страница 67: ...the work area on your hard disk ONLINE Configuration The measuring rate for online measurement is set here The maximum number of measurements is calculated from this measuring rate The minimum adjusta...

Страница 68: ...o another program You can also copy the data within Comfort software in the same way Note To prepare the picture of a graph for subsequent printing using a different program please first select the li...

Страница 69: ...in menu item Edit Details Background Formula A complete pre defined formula can be edited or redefined using this command Delete Deletes all the formulated functions and contents for this measurement...

Страница 70: ...ow The values shown are constantly updated during measurement The following is a list of the functions included in this menu Toolbar Activates or deactivates functions which appear in Tools Customize...

Страница 71: ...nts are activated or deactivated Fullscreen Enlarges the presentation area to screen size Header Use to fill header of current diagram table The appearance of the protocol header depends on the chosen...

Страница 72: ...72 Details Background Contents Individual channels can be activated or deactivated in the protocol currently shown Main menu item View...

Страница 73: ...deletes a selected text box from the screen Formula If there are several channels in a measurement protocol e g temperature humidity they can be offset The result is a new value sequence which can be...

Страница 74: ...ues on a parameter list are separated by a comma e g td K2 K1 Syntax Permitted digits symbol sequence for a formula and an arithmetical printout Symbols Numerical constants e g 3 14 Channel references...

Страница 75: ...grid Color code Tick this box to enable the allocation of the diagram line and histogram bar to the parameter The axis in diagrams is labelled with a colour associated with a parameter Histogram bars...

Страница 76: ...icons are to be used Which icons are to appear in the toolbar New It is also possible to set up and name a new toolbar Reset Standard settings are restored when Reset is activated Commands Open the C...

Страница 77: ...em Window Window The following sub menu items can be selected Tiled Tiled horizontally Cascading The names of all the open measurement protocols are shown Is ticked when activated is in foreground Det...

Страница 78: ......

Страница 79: ......

Страница 80: ...testo AG Postfach 11 40 79849 Lenzkirch Testo Stra e 1 79853 Lenzkirch Telefon 07653 681 0 Fax 07653 681 100 E Mail info testo de Internet http www testo com 0971 0427 08 02 T wh PC_qxd 12 02 2004...

Отзывы: