4. INSTALLATION PROCEDURE FOR OPTIONAL EQUIPMENT
EO18-33012A
4. INSTALLATION PROCEDURE FOR OPTIONAL EQUIPMENT
4- 1
4. INSTALLATION PROCEDURE FOR OPTIONAL
EQUIPMENT
WARNING!
1. Make sure to unplug the power cord before installing the optional equipment.
2. Be careful not to pinch your fingers or hands with the covers.
The following optional equipments are provided for this printer.
B-4205-QM:
Swing Cutter
B-9700-PCM-QM: PCMCIA Interface Board
B-8204-QM:
Rotary Cutter
B-9700-LAN-QM:
LAN Interface Board
B-9904-H-QM: Strip Module
B-9700-USB-QM: USB Interface Board
B-9904-R-QM: Ribbon Saving Module
B-7704-IO-QM:
Expansion I/O Interface Board
In this section, installation procedures for these optional equipments are described.
NOTES:
1. The B-4205-QM, B-8204-QM, and B-9904-H-QM cannot be used together.
2. The B-9700-LAN-QM and the B-9700-USB-QM cannot be used together.
3. When using the B-9700-PCM-QM together with the B-9700-LAN-QM or the B-9700-USB-QM, attach the
B-9700-PCM-QM onto the Main PC board.
4. The strip module, ribbon saving module, and expansion I/O interface board are standard on the B-SX5T
series.
5. When installing the B-4205-QM swing cutter module or B-8204-QM rotary cutter module on the B-SX5T
series, it is necessary to remove the strip sensor, rewinder harness, rewind full sensor harness,
expansion I/O interface board, etc. Follow the procedure below.
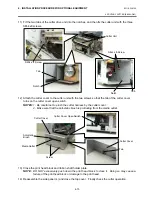
1) Turn the power off and disconnect the power cord.
2) When the printer is used in the batch or strip mode:
Remove the two black screws to detach the front plate.
NOTE
: Retain the two black screws and front plate.
When the printer is used in the built-in rewinder mode:
Open the top cover, remove the two SMW-4x8 screws, and detach the rewinder guide plate
from the printer.
Black Screws
SMW-4x8
SMW-4x8
Rewinder Guide
Plate
Содержание B-SX4T Series
Страница 3: ...TEC Thermal Printer B SX4T QQ QP Owner s Manual ...
Страница 54: ......
Страница 56: ......
Страница 57: ......
Страница 58: ...M EO1 33034 ...
Страница 59: ...TEC Thermal Printer B SX5T QQ QP Owner s Manual ...
Страница 105: ...APPENDIX 4 PRINT SAMPLES ENGLISH VERSION EO1 33036 APPENDIX 4 PRINT SAMPLES EA4 1 APPENDIX 4 PRINT SAMPLES n Font ...
Страница 112: ......
Страница 114: ......
Страница 115: ......
Страница 116: ...M EO1 33036 ...
Страница 141: ......
Страница 142: ...PRINTED IN JAPAN EO10 33013A ...
Страница 208: ...5 SYSTEM MODE EO18 33012A 5 4 PARAMETER SETTING 5 19 PC 1250 PC 1251 PC 1252 PC 1253 PC 1254 PC 1257 ...
Страница 312: ......
Страница 313: ......
Страница 314: ...PRINTED IN JAPAN EO18 33012A ...
Страница 315: ......
Страница 316: ...PRINTED IN JAPAN EO0 33013A ...


