background image

User Guide

The control panel

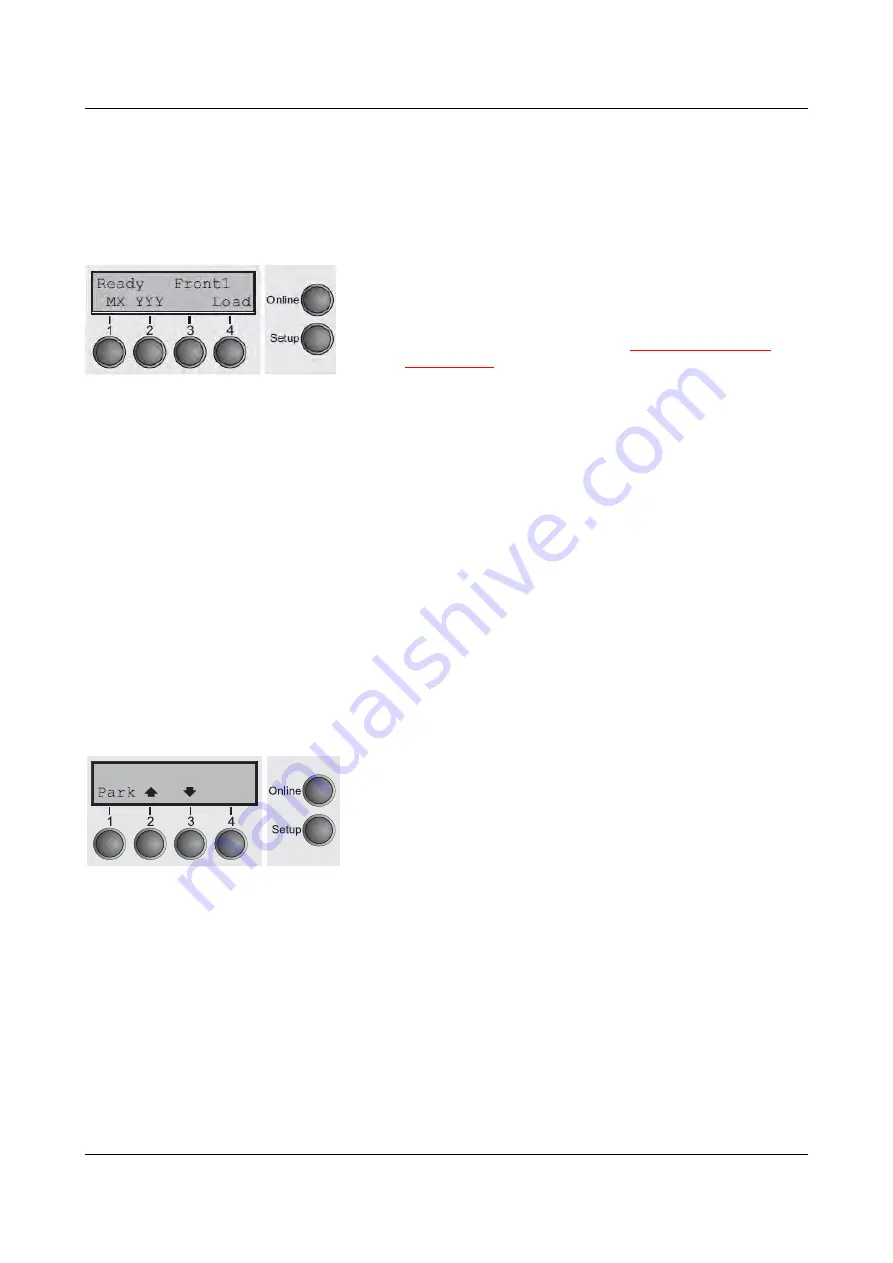
Online mode

After switching on, the printer is automatically set to online mode. Only in this mode can it receive data
from the computer.

MX

(a message only; X = 1 to 4): Shows the selected menu

(Macro)

YYY

(a message only; YYY = EPS, IBM, DEC): shows the

active emulation of the active Interface (Parallel or Serial);
for further information refer to

Selecting Protocol

(emulation).

Load

key (4): if this is displayed above this key, no paper is

loaded in the printer or the printer is in park position. In this

case the display switches between

Online

and

Load

paper fromTrac1

. Press the key to feed paper to the

printing position.

Setup

key: Sets the printer to setup mode.

Online

key: Sets the printer to offline mode.

Offline mode

Only in this mode is it possible to perform step, line, or form feeds from the control panel, see

Paper

transport

; however, data cannot be received.

Park

key (1): Clears the paper path with paper loaded and
activates paper path quick selection.

Key (2): Short keypress: Microstep forward. Long keypress:

Continuous paper feed.

Key (3): Short keypress: Microstep reverse. Long keypress:

Continuous paper reverse feed up to the park position.

Load

key (4): Displays that no paper is loaded in the printer

or the printer is in park position. In this case the display
switches between

Online

and

Load paper from Front1

.

If paper is loaded: Loads paper from the selected paper

source; the display changes to

LF/FF

.

Short keypress: provides Line Feed (

LF

).

Long keypress: provides Form Feed (

FF

).

Setup

key: Sets the printer to setup mode.

Online

key: Sets the printer to online mode.

21

LF/FF

Pause

Front1

Содержание LA2810

Страница 1: ...User guide LA2810 LA2820 Matrix Printer ...

Страница 2: ...ing the Ribbon Cassette 10 Printer Drivers 15 Installing a printer driver in Windows 15 Other operating systems 16 Changing printer settings 17 Form settings Windows 2000 2003 XP Vista Windows 7 2008 17 Loading optional firmware 18 The Control Panel 19 The LC display 20 Online mode 21 Offline mode 21 Setup mode 22 Messages in the LC display 23 Key functions when turning on the printer 24 USB host ...

Страница 3: ...urations 38 Menu handling 39 Save settings 39 Selecting the LC display language 40 Terminating Setup mode 41 Menu structure 42 Menu parameters 43 Printing out menu configurations Print 43 Loading menu configurations Menu 43 Reset to default values Reset 44 Quietmode Quietm 44 Selecting font Font 45 Setting line spacing LPI 46 Selecting start signal for escape sequence ESCChar 46 Selecting Protocol...

Страница 4: ... tear position TearView 61 Line length Width 62 Barcode Barcode 62 Normal characters and barcode Barmode 63 Vertical position after oversized barcode BarTop 67 Vertical position after oversized character LCPtop 67 Form feed mode Ffmode 64 Setting the left margin LeftMrg 65 Setting the right margin RightMrg 65 Automatic paper motion sensor PMS 66 Automatic gap adjustment AGA 67 Enable Disable paper...

Страница 5: ...ck on ENQ Answ_ENQ 81 Setting IBM Mode parameters IBMMode 82 Horizontal spacing of characters CPI 82 IBM character set IBM Cset 82 Code Page Codpage 83 IBM Double Height DblHigh 84 Horizontal pitch on Compress IBMComp 84 Slash Zero Sl zero 85 Setting Epson Mode parameters EPSMode 86 Horizontal spacing of Characters CPI 86 EPSON Character Set EPS Cset 86 Code Page Codpage 87 Slash zero Sl zero 88 M...

Страница 6: ...nt quality 107 Error messages via the display 108 Additional display messages 111 Care and Maintenance 112 Replacing the fuse 112 Cleaning the housing 113 Cleaning the interior 113 Cleaning the platen 114 Ribbon 114 Cleaning the upper friction 115 Carriage shafts 115 Specifications 116 Printer specifications 116 Interface specifications 119 Paper specifications 120 Character Sets 121 MTPL standard...

Страница 7: ...tor assignment 134 Serial interface V 24 RS232C optional 135 Connector assignment 135 Interface cable serial interface 136 Input signals 136 Output signals 136 Protocols 137 Memory mode XON XOFF 137 Memory mode Robust XON XOFF 137 Management 138 Setup 138 Physical printer port in Ethernet with TCP IP 138 Options and Accessories 139 Options 139 Tractor 2 front 139 Autocut facility 139 Printer pedes...

Страница 8: ...withstands dusty dirty and hostile environments For all these reasons it is a professional solution for many industrial sectors Symbols used Important information is highlighted in this manual by two symbols CAUTION highlights information which must be observed in order to prevent injuries to the user and damage to the printer NOTE highlights general or additional information about a specific topi...

Страница 9: ...nsity print head distance print line height and tear off position Chapter 8 The Menu contains all the information necessary for controlling the printer via the control panel Chapter 9 Advanced menu describes the possible test settings and other technical adjustments of the printer Chapter 10 Troubleshootingprovides instructions for rectifying faults which do not require the intervention of qualifi...

Страница 10: ...User Guide Printer at a glance Printer at a Glance 3 ...

Страница 11: ...Printer at a glance User Guide Printer in tractor mode 4 ...

Страница 12: ...User Guide Printer at a glance Paperway Standard printer Tractor 1 Options Tractor 2 For additional paper options please contact your dealer 5 Tractor 1 Tractor 2 ...

Страница 13: ...g take out the accessory cassette and unpack it Pull the printer out of the cardboard box towards you and remove the remaining packaging material Check the printer for any visible transport damage and completeness Apart from this CD ROM the Quick start guide the power cable and the ribbon must be included If you find any transport damage or if any accessories are missing please contact your dealer...

Страница 14: ...upply cable and the paper When selecting the printer location observe the following additional instructions Never place the printer in the vicinity of inflammable gas or explosive substances Do not expose the printer to direct sunlight If you cannot avoid placing the printer near a window protect it from the sunlight with a curtain When connecting the computer with the printer make sure not to exc...

Страница 15: ...the power cable plug to a mains socket Make sure that the printer and the computer are switched off and connect the data cable 2 between the printer and the computer The printer by default is provided with a USB and an Ethernet interface For further information about the interfaces refer to the section Interfaces 8 ...

Страница 16: ...witching on the printer passes through a memory test during the initialization phase In the display appears temporary the message SDRAMTEST XXXXX XX ok If the memory test is successful finished the firmware number appears in the display After finishing the initialization the printer switches to online mode see Online mode 9 SDRAMTEST 20000 55AA ok Online Setup 2 1 3 4 70548 Initializing ...

Страница 17: ...y require the use of the manufacturers original ribbon cassettes see Accessories If other ribbon cassettes were used the message Check Ribbon appears in the display it is impossible to print Before opening the cover make sure that the printer is switched on so that it can execute automatic preparations for ribbon changing widening the print head gap Open the printer top cover Cautiously slide the ...

Страница 18: ...ide Inserting the ribbon cassette Move the colored friction tabs to the left and right direction of the arrows as shown in the figure and raise the friction mechanism Raise the colored insertion tongue A 11 A ...

Страница 19: ...bbon cassette Turn the knob in the direction of the arrow in order to take up slack of the ribbon Slightly tilt the ribbon cassette forwards and thread in the ribbon between the colored insertion tongue and the ribbon support transparent plastic plate Align and insert the cassette into the guides on the left and right then press down until it clicks into place 12 A B ...

Страница 20: ...red tension knob into one of the two locations Turn the tension knob in the direction of the arrow to take up slack in the ribbon until it is seated correctly at the bottom in the ribbon support Remove the knob Press down the colored insertion tongue A 13 A ...

Страница 21: ...Inserting the ribbon cassette User Guide Press the friction mechanism down until it clicks into place Close the top cover 14 ...

Страница 22: ...bit V3 is the previous driver architecture from Windows supporting internal printer fonts Windows V4 driver for 8 8 1 10 and Server 2012 2016 32 64bit V4 is the new prospective driver architecture from Windows which will not support printer internal fonts only Windows fonts will be supported Installing a printer driver in Windows To install the printer drivers easily please use the DriverSetup exe...

Страница 23: ...s The printer can also be used with other operating systems such as Linux or Unix by using either of the printers emulations Epson PS 2 or IBM Proprinter XL 24e Proprinter XL 24e AGM for which default drivers are available in most operating systems 16 ...

Страница 24: ...enu It is therefore possible that the former may overwrite the latter Form settings Windows 2000 2003 XP Vista Windows 7 2008 If you want to set up a form not included in the Windows default settings proceed as follows You will need Administrator rights to define new forms 1 Click on the Start button in the Windows taskbar 2 Click on Printers and Faxes to open the printer folder 3 In the menu bar ...

Страница 25: ...ersion of the firmware can be downloaded from our internet page Loading the Firmware will be possible via the following ports in ONLINE Mode via USB PrintFile For doing so you will need an additional application called Print File which can be downloaded as freeware from www lerup com printfile via Ethernet WebPanel Via Webpanel the according download pages will be available for doing this in a com...

Страница 26: ...rinter and computer is interrupted i e no data can be received and printed In the Setup mode you can either select the printer menu or carry out the so called quick switch function The quick switch option was included so that you can change the most important parameters for example adjustments character density font paper path adjustments i e head gap directly without having to enter them via the ...

Страница 27: ...ou that the printer is either in online or offline mode in the example below the printer is in the Ready mode and the selected paperpath below Trac1 Tractor 1 tractor mode Status lists which Macro is selected and its emulation with key 4 is currently activating the Loading of the Paper Example 20 Ready Trac1 MX YYY Load Online Setup 2 1 3 4 Printer status Paper path Key functions Status messages ...

Страница 28: ...printer to offline mode Offline mode Only in this mode is it possible to perform step line or form feeds from the control panel see Paper transport however data cannot be received Park key 1 Clears the paper path with paper loaded and activates paper path quick selection Key 2 Short keypress Microstep forward Long keypress Continuous paper feed Key 3 Short keypress Microstep reverse Long keypress ...

Страница 29: ...oceed as follows to release this lock temporarily Hold depressed the Setup key or the Menu key 1 for five seconds Or 1 Switch off the printer for approx 5 seconds 2 Switch the printer on again keeping the Setup key pressed until Online is displayed then let up For information on how to enable access permanently and about the available settings refer to the section Menu lock MenLock and Menu parame...

Страница 30: ...annot draw in the loaded paper Load paper from The printer has detected paper end during operation printer was switched on with no paper loaded Loading default Factory defined parameters will be reloaded in all available menus after switching on the printer Out of paper The printer has detected paper end during operation printer was switched on with no paper loaded Paperwidth error Print character...

Страница 31: ...other formats like NTFS are not supported It is strongly recommended to use an empty and newly formatted device otherwise the data transfer may not work The firmware or config files for download must always be located in the root directory The format of the config files is the same that is used when you up download the printer configuration via the webpanel or via the config tool Firmware Download...

Страница 32: ...a USB stick was connected the printer will search the root directory for a file with the extension cfg If more than one file with this extension is found the first one will be used If no file was found the display will show no file found You then have the chance to remove the USB stick and try again maybe with a different device After the download was completed the printer will reboot 25 ...

Страница 33: ...printer can process fanfold paper For information on allowable paper formats refer to the section Paper specifications Only use dust free or low dust paper Many paper qualities are suitable for this printer For more information please refer to the section Paper specifications Open the front cover Remove the bottom cover A Open the right and left tractor flaps 26 A ...

Страница 34: ... of the right hand tractor and align it to the paper width Insert the fanfold paper into the right hand tractor Make sure that it is inserted by the same length as on the left hand tractor in order to avoid any paper jam Close the tractor flap and lock the tractor by turning the tractor lever to the rear Do not tension the paper excessively to avoid tearing the perforation holes do not allow exces...

Страница 35: ...itch the printer on The active paper source Front1 appears in the display The display alternates between and The paper is automatically loaded when the printer is in online mode and receives data from the computer Press the Load 4 key only to load paper before starting the printout However it is recommended to let the receiving data load the paper 28 90 ...

Страница 36: ... 2 Short keypress Paper is transported upwards step by step Long keypress Continuous transport upwards Key 3 Short keypress Paper is transported downwards step by step Long keypress Continuous transport downwards LF FF Key 4 Short keypress Line Feed LF is executed Long keypress Form Feed FF is executed 29 STOP Offline Trac1 Park LF FF The maximum value of the paper return feed is 22 inches You can...

Страница 37: ... Exit 3 4 2 1 A STOP Online Tear Exit Online Setup 2 1 3 4 Your printer by default moves the paper into the Tear position once paper is loaded If you deactivate this feature in the printers menu setting Manual you can use the Tear key to move the paper to the Tear position For more information refer to View and Tear position tear view You can use the Tear key to move the paper to the tear position...

Страница 38: ...be damaged Make sure that the printer is in offline mode press the Online key if necessary Press the Park 1 key If fanfold paper is loaded in the printer it is fed to the tear position The text Tear paper off Press any button appears in the display Press any of the 4 keys under the display Now remove the paper from the tractor 31 STOP ...

Страница 39: ...setup mode Press the Adjust 2 key Press the Head 1 key Use the 2 or 3 key to set the range within which the automatic gap adjustment is to be corrected You can select values in the range from 10 to 10 Confirm the input by pressing the Set 1 key Press the Setup key The printer returns to the initial status Negative values decrease the print head gap positive values increase it Changing the automati...

Страница 40: ...0 to 100 Default Setting 18 Select the Head 18 parameter for normal paper Use a greater distance for thicker paper Recommended values for the print head gap thin thick 18 26 34 42 50 58 If you change this value this may affect the print quality If the printout shows signs of smudging we recommend that you increase the print head gap Confirm the setting by pressing the Set key 1 Press the Next key ...

Страница 41: ... perforation to the desired position Confirm the input by pressing the Set 1 key Confirm the input again by pressing the Setup key The printer is reset to the initial status The correction made a maximum of approx 1 2 5 cm in each direction will be retained after switching the printer off It can be set separately for each paper path Make sure that the set form length corresponds to the actual leng...

Страница 42: ...quivalent to the second line from the top Press the 2 or 3 key to move the first printing line to the desired position You can set values from 0 to 220 72 for fanfold paper 35 Adjust Paperway Menu Char Online Setup 2 1 3 4 TOF Head Tear Online Setup 2 1 3 4 B A FormAdj 12 72 Set Exit Online Setup 2 1 3 4 Press the Setup key The printer changes to setup mode Press the Adjust 2 key Press the TOF 3 k...

Страница 43: ... key to select the desired font Confirm the selection by pressing the Set 1 key You can cancel the selection and leave the setting unchanged by pressing the Exit 4 key Press the Setup key The printer returns to the initial status It is also possible to press the Online key The printer then changes directly to online mode The selection made will not be retained after switching off the printer For m...

Страница 44: ...r printed pages however it is also a more sophisticated method and requires some experience with programming languages and printer control systems All programming via the interface is lost after you turn off the printer whereas the programming carried out using the control panel is saved and stored even after you turn off the printer Enabling access to menu mode The menu can be locked by default t...

Страница 45: ...equires an IBM printer while another program works better with an EPSON printer you can set an IBM emulation configuration with the desired settings and set the second configuration as an EPSON emulation The active menu is always the one you used last When you switch on the printer for the very first time menu no 1 is loaded Menu no 1 only remains active until you load another menu The last active...

Страница 46: ... either press the Next key to access the two following parameter groups in the menu or you can press the Back key to access the two previous parameter groups in the menu If you want to change a setting e g the line density then press the LPI key LPI lines per inch to access the actual parameter level The currently valid setting is marked by a in the example below the current setting is 6 lpi With ...

Страница 47: ...ld down the Setup key while switching on the printer to enable menu mode If you want to enable access to this mode permanently you need to change the appropriate setting in the menu see Menu lock MenLock Press the Next key 4 several times until the display indicates Language Press the Language key 3 The display now changes to Parameter mode and indicates English in the top line The lower line disp...

Страница 48: ... pressing the Exit key 4 the old setting is retained After saving your setting Set the display in our example indicates the following text This setting is retained even after switching off your printer Terminating Setup mode Press either the Setup key to change into Offline mode or the Online key to change to Online mode 41 German Online Setup Set Exit 2 1 3 4 ...

Страница 49: ...ly different from the example shown here depending on the printer software 42 MENU Auto CR Auto LF Protocol ESCChar Prindir I O GRSpeed Hvy Form LPI Font Reset Macro Barcode PMS FFmode AGA IBMMode RightMrg TearView Wrap Barmode MenLock Language Width Back Next Quiet CX Bid Sound Paper Print LeftMrg Paphand ...

Страница 50: ...s using the active paper feed see Menu settings example Press Print 2 key to start the printout Loading menu configurations Macro A menu is loaded you can choose between five menus see Menu handling Press Macro 3 key Use the 2 or 3 key to select the desired setting Setting Options Load Macro 1 2 3 4 5 Default Setting Load Macro 1 Confirm the setting by pressing the Set key 1 Press the Next key 4 t...

Страница 51: ... For all printing modes the print out is made with the bidirectional method in quiet mode printing In the first step the first row of pins is activated during the second step the second row is used Press Quiet 3 key Use the 2 or 3 key to select the desired setting Setting Options Quiet On Off Default Setting Off Please note that the activation of Quietmode decreases the throughput Confirm the sett...

Страница 52: ...t the printer works faster but with a slightly lower resolution LQ stands for Letter Quality which means that the resolution is higher at the expense of a slightly slower speed Available fonts HIGH SPEED COURIER LQ COUR I PS NLQ DRAFT COURIER NLQ COUR I PS LQ DRAFT COPY PRESTIGE NLQ ORATOR NLQ ROMAN NLQ PRESTIGE LQ ORATOR LQ ROMAN LQ SCRIPT NLQ GOTHIC NLQ ROMAN PS NLQ SCRIPT LQ GOTHIC LQ ROMAN PS ...

Страница 53: ...s the next group of parameters 46 Font LPI Online Setup 2 1 3 4 Back Next 6 LPI Online Setup Set Exit 2 1 3 4 Selecting start signal for escape sequence ESCChar Selects the start signal for control sequences Setting ESC Only character Escape can be used Setting ESC Character Escape or alternatively two characters can be used For more information see the section The procedure ESCChar Protocol Onlin...

Страница 54: ...allel DEC PPL2 for Serial Epson ESC PS 2 for USB DEC PPL2 for Ethernet If the printer is switched to online mode after changing the emulation it performs a reset Confirm the setting by pressing the Set key 1 Press the Next key 4 to access the next group of parameters Bidirectional printing PrinDir Setting On Printer prints in both directions bidirectional Setting Off Printer prints only in one dir...

Страница 55: ...ng on your printer model the serial interface is already installed or it is available as an option Press Serial 2 key Data transmssion rate Baud Selects the data transmission rate baud rate baud bit per second Press Baud 2 key Use the 2 or 3 key to select the desired setting Setting Options 600 1200 2400 4800 9600 19200 Default Setting 9600 Printer and computer must have the same baud rate Confirm...

Страница 56: ... 8 Bit Even 1 Stop 8 Bit Odd 1 Stop 8 Bit Mark 1 Stop 8 Bit Spc 1 Sets the number of data bits You can select 7 or 8 2 The parity test for received data bytes can be selected NO causes transmission in both directions without parity bit If EVEN or ODD is selected the bytes are checked if they have even or odd parity The selection of MARK or SPACE causes a data byte transmission with parity bit but ...

Страница 57: ...l Processing DTR Defines the conductor to which the DTR signal is connected DTR Data Terminal Ready Press DTR 2 key Use the 2 or 3 key to select the desired setting Setting Options DTR READY Default Setting DTR DTR DTR DTR signal is assigned to DTR line DTR READY READY signal is assigned to DTR line DTR Pin 20 on 25 pin female RS232 connector DTR Pin 4 on 9 pin female RS232 connector Confirm the s...

Страница 58: ... Confirm the setting by pressing the Set key 1 Press the Next key 4 to access the next group of parameters Interface buffer Buffer Selects the size of the interface buffer Press Buffer 2 key Use the 2 or 3 key to select the desired setting Setting Options 0 256 KB Default Setting 256 KB If buffer 0 KB and the serial interface is selected or if the setting Share is active the actual buffer size wil...

Страница 59: ...1 Press the Next key 4 to access the next group of parameters 52 Timeout 2 sec Online Setup Set Exit 2 1 3 4 Selecting Interface Timeout Timeout The Timeout option allows you to define the duration after which the interface switches back to the Stand by state when the printer stops receiving data Press Timeout 3 key Buffer Timeout Online Setup 2 1 3 4 Back Next ...

Страница 60: ...offers the possibility to set the IP address which is divided into four digit groups octet 1 to 4 You can activate octet 3 and 4 by pressing the Next 2 key Press OCTET 1 1 key Use the 2 or 3 key to select the desired digit Setting Options 0 to 255 Default Setting 0 Confirm the setting by pressing the Set key 1 Set the remaining three digit groups in the same way Press the Next key 4 to access the ...

Страница 61: ... Input of the Subnet mask address of the printer Press Subnet 2 key This menu level offers the possibility to set the IP address which is divided into four digit groups octet 1 to 4 You can activate octet 3 and 4 by pressing the Next 2 key Press OCTET 1 1 key Use the 2 or 3 key to select the desired digit Setting Options 0 to 255 Default Setting 0 Confirm the setting by pressing the Set key 1 Set ...

Страница 62: ...D ROM Press the Next key 4 to access the next group of parameters Banner page Banner Specifies whether a banner page is to be printed out when using the LPD LPR protocol Press Banner 2 key Use the 2 or 3 key to select the desired setting Setting Options Yes No Default Setting No Yes When using the LPD LPR protocol a banner page will be printed out in front of every print job containing the file na...

Страница 63: ...on speed to 10 MBit full duplex per second 100Mbit Half Sets the transmission speed to 100 MBit half duplex per second 100Mbit Full Sets the transmission speed to 100 MBit full duplex per second It is recommended that the ethernet interface transmission speed setting of the printer and the connected transmission device coincide The printout of the current menu settings contains the ethernet link s...

Страница 64: ...to LF 3 key Use the 2 or 3 key to select the desired setting Setting Options Off On Default Setting Off 57 Auto LF On Online Setup Set Exit 2 1 3 4 Auto CR Auto LF Online Setup 2 1 3 4 Back Next Auto CR Auto LF Online Setup Back Next 2 1 3 4 Auto CR On Online Setup Set Exit 2 1 3 4 Automatic line feed Auto LF Switches the automatic line feed LF on or off after receiving the signal CR carriage retu...

Страница 65: ...s in Online and Offline mode while Setup mode is disabled In this case the Setup menu can only be called up by holding the key Setup while switching on the printer Press MenLock 2 key Use the 2 or 3 key to select the desired setting Setting Options Off Menu All Default Setting Menu Confirm the setting by pressing the Set key 1 Language Language The menu can be shown in six languages on the LC disp...

Страница 66: ...r 11 If you wish to define the form length via a line format press Line 2 key Use the 2 or 3 key to select the desired setting Setting Options 6 to 144 Default Setting 66 59 Paper AutoTear Online Setup 2 1 3 4 Back Next Trac1 Forml FormAdj Online Setup 2 1 3 4 Back Next Lines Standard Online Setup 2 1 3 4 Back Next 6 LPI 66 Online Setup Set Exit 2 1 3 4 Press Forml 2 key Sets the form length via l...

Страница 67: ...a standard format Confirm the setting by pressing the Set key 1 Use the 2 or 3 key to select the desired setting Setting Options 0 72 to 220 72 Default Setting 12 72 60 Lines Standard Online Setup 2 1 3 4 Back Next Fanfold 12 Online Setup Set Exit 2 1 3 4 Forml FormAdj Online Setup 2 1 3 4 Back Next FormAdj 12 72 Online Setup Set Exit 2 1 3 4 Use First printing position FormAdj Sets the first prin...

Страница 68: ...l to bring the paper once more to the auto View position If the parameter Tear is set to 1s 3s 6s the perforation of the paper is positioned at the tear edge of the printer If data is recweived the paper is returns to the normal position After printing the printer waits for the given interval to bring the paper once more to the tear off position If the tear off edge is not aligned with the perfora...

Страница 69: ...l sequences through the interface Since this selection is possible for all emulations it must be noted that conflicts in sequence conformity with the selected emulation may occur For this reason the barcode function can also be switched on and off by MTPL sequences The possible barcodes LCP characters and the operation of these functions are described in the Barcode Programmer s Application Manual...

Страница 70: ...already being printed Consequently normal characters can be printed in every line to the right or left of the barcode In unsecured mode the required paper transport for printing barcodes and LCP is carried out automatically it is not possible to print more than one line of normal characters in the barcode line All characters in the mixed line are printed such that their bottom edges are in a strai...

Страница 71: ...or 3 key to select the desired setting Setting Options On Off Default Setting Off 64 FFmode PapOpt Online Setup 2 1 3 4 Back Next FFmode Off Online Setup Set Exit 2 1 3 4 FFmode On If the paper is positioned in the first printing line TOF form feeds will be ignored FFmode Off Form feed will be performed in all cases Confirm the setting by pressing the Set key 1 ...

Страница 72: ...136 10 The value may not fall below the LeftMrg value 65 LeftMrg RightMrg Online Setup 2 1 3 4 Back Next LeftMrg 0 10 Online Setup Set Exit 2 1 3 4 LeftMrg RightMrg Online Setup 2 1 3 4 Back Next RightMrg 136 10 Online Setup Set Exit 2 1 3 4 Press RightMrg 3 key Confirm the setting by pressing the Set key 1 Press the Next key 4 to access the next group of parameters Setting the right margin RightM...

Страница 73: ... the paper motion detection feature When it is active printing and paper movements stop in case of a paper jam and an error message is output in the display Low Sensitivity 800 360 Mid Sensitivity 600 360 High Sensitivity 300 360 PMS Off A paper jam will not produce an error message The Paper Motion Sensor PMS detects any paper jam or unintended paper end condition and provides efficient protectio...

Страница 74: ...hanges gap adjustment if necessary default Measurements take place after power on whenever changing the paper path when loading paper AGA Off selects manual gap adjustment the value can be set for each paper source and each of the five menus available Confirm the setting by pressing the Set 1 key The printer automatically leaves test mode and assumes online mode Setting options Off On Default sett...

Страница 75: ...8 Right Zone Increasing the printhead gap Head up With this function you can increase the printhead gap before and after the perforation of the form With this If the parameter is set to On the printhead gap increases during form feed and line feed four lines before and after the perforation on the form protected zone The printhead gap is always increased during form feeding past the perforation ev...

Страница 76: ...h rather than the actual paper width Setting options On Off Default setting Off 69 Head up Pagewid Online Setup Back Next 2 1 3 4 Pagewid 136 10 Online Setup Set Exit 2 1 3 4 Leftzon Rightzo Online Setup Back Next 2 1 3 4 Leftzon Off Online Setup Set Exit 2 1 3 4 Select the Leftzon menu 2 stands for left zone Confirm your settings with the Set key 1 Press the Next key 4 to access the next group of...

Страница 77: ...eft margin This parameter cannot be changed by emulation dependent margin settings Margin setting values entered by ESC sequences are added to the Physlm Note that this value is subtracted from the maximum printing width of 13 6 inches 70 Leftzon Rightzo Online Setup Back Next 2 1 3 4 Rightzo Off Online Setup Set Exit 2 1 3 4 Physlm Online Setup Back Next 2 1 3 4 Physlm 0 10 Online Setup Set Exit ...

Страница 78: ...transmitted per line the characters which cannot be printed on this line are printed at the beginning of next line Wrap Off If more characters than can be printed are transmitted per line the characters which cannot be printed on this line are cut off 71 Paphand CX bid Online Setup Back Next 2 1 3 4 CX bid On Online Setup Set Exit 2 1 3 4 Wrap Sound Online Setup Back Next 2 1 3 4 Wrap On Online Se...

Страница 79: ...Next key 4 to access the next group of parameters Graphic print speed GrSpeed This parameter allows improved graphic speed independently to the driver It affects only the print speed of graphic printouts at 180 x 180 dpi Select the GrSpeed menu 2 Setting options Normal High Default setting High GrSpeed HvyForm GrSpeed High Normal means 180 dpi normal print speed full space and High means 180 dpi d...

Страница 80: ...ed twice however at single strike 73 Online Setup Back Next 2 1 3 4 GrSpeed HvyForm HvyForm Off Set Exit Online Setup 2 1 3 4 Select the HvyForm menu 3 Confirm the setting by pressing the Set 1 key Change to the next parameter group with the Next key 4 Setting the Page Margins Margin This parameter group allows you to define the area for printing You can set the Top Bottom Left and Right margins S...

Страница 81: ...argin with the number of the line numbered from the top paper edge where the printing actually stops for a given page Select the Botmrg menu 3 Setting options Line 1 to Form length Default setting Formlength The setting of this Option depends on the setting of both the vertical pitch and the form length options For details refer to Setting line spacing LPI and Form length FORMLEN The Values range ...

Страница 82: ...m margin with the number of the line numbered from the top paper edge where the printing actually stops for a given page Select the Rightmrg menu 3 Confirm your setting with the Set key 1 Press the Next key 4 to access the next group of parameters Setting the Left Margin Leftmrg The left margin option is defined by the number of columns numbered from the left paper edge where the printing actually...

Страница 83: ...d setting Setting Options 5 6 6 65 8 25 9 10 12 13 3 15 16 5 17 1 18 20 PIC and Proportational Spacing Default Setting 10 CPI 76 Margin DECMode Online Setup 2 1 3 4 Back Next Extended Online Setup Set Exit 2 1 3 4 CPI Charset Online Setup 2 1 3 4 Back Next E US ASCII Online Setup Set Exit 2 1 3 4 Select the DECMode menu 3 Select the CPI menu 2 Select the CPI menu 2 Confirm your setting with the Se...

Страница 84: ...h DEC Finnish DEC French Can DEC French Canadian DEC Norw Dan DEC Norwegian Danish DEC Swedish DEC Swedish DEC Dutch DEC Dutch DEC Swiss DEC Swiss DEC Portuguese DEC Portuguese DEC Supplement DEC Supplemental DEC Spec Graphi DEC Special Graphics DEC Technical DEC Technical DEC 7bit Hebrew DEC 7Bit Hebrew DEC Turkish DEC 7Bit Turkish DEC Hebrew Sup DEC Hebrew Supplemental DEC Greek Sup DEC Greek Su...

Страница 85: ...y Code Page 862 ISO Spanish E United Kingd Code Page 863 DEC Swedish E Denmark 1 Code Page 864 Norw Danish E Sweden Code Page 865 DEC Dutch E Italy Code Page 866 DEC Swiss E Spain 1 XXX Code Page 869 DEC Portuguese E Japan Abicomp Legal E Norway Brazilian ASCII DEC Supplement E Denmark 2 Mazowian DEC Spec Graph E Spain 2 Code MJK DEC Technical E L America Bulgarian DEC 7Bit Hebrew E Turkey ISO 885...

Страница 86: ...k Next 2 1 3 4 Abort Sequ Online Setup Set Exit 2 1 3 4 Press Prn ID 2 key Use the 2 or 3 key to select the desired setting Setting Options PPL2 LA210 ID LA210 ID Default Setting PPL2 Prn ID CAN Fkt Online Setup 2 1 3 4 Back Next PPL2 Allows the Pritner to respond as a DEC Conformance Level 2 device LA120 ID The Printer resonds as a LA120 printer LA210 ID The Printer responds as a LA210 printer Co...

Страница 87: ...ng Options Enabled Disable Default Setting Disable 80 Disable Online Setup Set Exit 2 1 3 4 Discnct Report Online Setup Back Next 2 1 3 4 Disable Online Setup Set Exit 2 1 3 4 Press Discnct 2 key Use the 2 or 3 key to select the desired setting Setting Options Enable Disable Default Setting Disable Discnct Report Online Setup 2 1 3 4 Back Next Confirm your setting with the Set key 1 Press the Next...

Страница 88: ... setting Setting Options Enabled Disable Default Setting Disable 81 Disable Online Setup Set Exit 2 1 3 4 Answbck Answ_ENQ Online Setup Back Next 2 1 3 4 Disable Online Setup Set Exit 2 1 3 4 Press Answbck 2 key Use the 2 or 3 key to select the desired setting Setting Options Enable Disable Default Setting Disable Answbck Answ_ENQ Online Setup 2 1 3 4 Back Next Confirm your setting with the Set ke...

Страница 89: ...de Online Setup 2 1 3 4 Back Next Confirm your setting with the Set key 1 Press the Next key 4 to access the next group of parameters IBM character set IBM Cset This option identifies which kind of character set is to use for English IBM standard characters or non English languages IBM extended characters CPI IBM Cset Online Setup Back Next 2 1 3 4 Standard Online Setup Set Exit 2 1 3 4 CPI IBM Cs...

Страница 90: ...an ISO Latin 5 Su E Legal German ISO Latin 9 Su E Old Hebrew ISO Italian E USA Code Page 437 JIS Roman E France CP 437 Greek DEC Norw Dan E Germany Code Page 850 ISO Spanish E United Kingd Code Page 851 DEC Swedish E Denmark 1 Code Page 852 Norw Danish E Sweden Code Page 853 DEC Dutch E Italy Code Page 855 DEC Swiss E Spain 1 Code Page 857 DEC Portuguese E Japan Code Page 858 Legal E Norway Code P...

Страница 91: ...ons 17 1 20 CPI Default Setting 17 1 CPI Confirm your setting with the Set key 1 Press the Next key 4 to access the next group of parameters CodPage DblHigh Online Setup Back Next 2 1 3 4 Use the 2 or 3 key to select the desired setting Setting Options On Off Default Setting Off If the parameter is set to On all data will be printed in double height If the parameter is set to Off all data will be ...

Страница 92: ...inted Press Sl Zero 3 key Use the 2 or 3 key to select the desired setting Setting Options Off On Default Setting Off 85 IBMComp Sl Zero Online Setup Back Next 2 1 3 4 Sl Zero Off Online Setup Set Exit 2 1 3 4 Confirm your setting with the Set key 1 Press the Next key 4 to access the next group of parameters ...

Страница 93: ...p of parameters EPSON Character Set EPS Cset Sets the horizontal spacing of the printed characters used with the IBM protocol CPI EPS Cset Online Setup Back Next 2 1 3 4 Standard Online Setup Set Exit 2 1 3 4 CPI EPS Cset Online Setup 2 1 3 4 Back Next Press EPS Cset 3 key Use the 2 or 3 key to select the desired setting Setting Options Graphic Italic DLL Default Setting Graphic Confirm your setti...

Страница 94: ...age 858 DEC French Can ISO Latin 9 Su Code Page 860 German E USA Code Page 861 ISO Italian E France Code Page 862 JIS Roman E Germany Code Page 863 DEC Norw Dan E United Kingd Code Page 864 ISO Spanish E Denmark 1 Code Page 865 DEC Swedish E Sweden Code Page 866 Norw Danish E Italy Code Page 869 DEC Dutch E Spain 1 Abicomp DEC Swiss E Japan Brazilian ASCII DEC Portuguese E Norway Mazowian Legal E ...

Страница 95: ...ress Sl Zero 3 key Use the 2 or 3 key to select the desired setting Setting Options Off On Default Setting Off 88 Country Sl Zero Online Setup Back Next 2 1 3 4 Sl Zero Off Online Setup Set Exit 2 1 3 4 Confirm your setting with the Set key 1 Press the Next key 4 to access the next group of parameters ...

Страница 96: ...The menu User Guide Menu settings example 89 ...

Страница 97: ...chanics as well as efficient data transmission from the computer to the printer The extended menu contains three test functions ASCII 80 ASCII 136 H Dump Enter advanced menu mode by pressing the key Online while switching on the printer The display shows Test mode for approx 1 second and then automatically changes to display ASCII 80 ASCII 136 90 Testmode Initializing Online Setup 2 1 3 4 ASCII80 ...

Страница 98: ...ration for the test printout To do this press the key Setup The printer then changes to Setup mode and the first of the main levels is then displayed Program your printer in the usual way for the test printout to change the parameters See section Programming via the control panel Some changes in menu mode may cause the printer to reinitialize in this case the Rolling ASCII test is aborted By press...

Страница 99: ... used to determine and set the optimal printhead gap see the section Setting the print head gap Exiting Rolling ASCII test mode The self Rolling ASCII test mode test mode can only be terminated by switching off your printer For this operation the printer must be Offline If you want to stop the test printout before switching off the printer press the key Online 92 ...

Страница 100: ...x 1 second and then automatically changes to display ASCII 80 ASCII 136 Press the key Next 4 the display shows the next menu level If you press the key H Dump 2 you select the H Dump mode and Offline H Dump is shown on the display Put the printer into Online H Dump mode by pressing the key Online The printer is now ready to receive data from the computer and to print it out in hexadecimal format T...

Страница 101: ... press the key Online and then the key LF FF 4 once Paper sensor display If the keys 1 and 2 are pressed at power on and then after releasing the keys key 3 is pressed within 2 seconds the time is marked by an asterisk in the upper right corner of the LCD display the printer will show the paper sensor value in millivolts on the LCD display PE shows the value of the paper end sensor 94 ...

Страница 102: ...ion Wrap you can set line wrap and with the function Sound beep at paper end The function JobCtrl activates the PJL functionality The function Pap back allows printing on paper with a dark back With the function GrSpeed you can select an improved graphic speed You can use the HvyForm function to set the print head to print the same line twice at double strike force in order to ensure that copy pap...

Страница 103: ...print head Setting line wrap and sound when paper empty Automatic paper width detection Settings to facilitate handling paper of poor quality and the parallel interface Changing serial number and asset number of the printer GrSpeed HvyForm Backxxxxxxx N ext Allows improved graphic speed and increases the density of impact to assist visibility to print on multi layer paper Enter the Advanced Menu m...

Страница 104: ...tment AGA This function allows you to switch the Automatic Gap Adjustment AGA off or on AGA On printer checks paper thickness and changes gap adjustment if necessary default Measurements take place after power on whenever changing the paper path when loading paper AGA Off selects manual gap adjustment the value can be set for each paper source and each of the five menus available Confirm the setti...

Страница 105: ...ears in the display Select the Paphand menu 2 Paphand CX Bid Online Setup Back Next 2 1 3 4 Bidirectional parallel interface CX bid Setting options On Off Default setting On CX bid ON sets the parallel interface of the printer to bidirectional mode IEEE 1284 Nibble mode e g for Windows Plug Play CX bid OFF sets the interface to compatibility mode in order to ensure reliable operation with special ...

Страница 106: ...ed on this line are cut off Wrap Sound Online Setup Back Next 2 1 3 4 Wrap On Online Setup Set Exit 2 1 3 4 Line wrap Wrap Confirm your setting with the Set key 1 Press the Next key 4 to access the next group of parameters Beep at paper end Sound Setting options On Off Default setting On When Sound On a beep is generated every second to notify that paper is empty Wrap Sound Online Setup Back Next ...

Страница 107: ...ors 100 JobCntl Pap back Pap back normal Set Exit Online Setup 2 1 3 4 Select the Pap back menu 3 Activate PJL language Jobcntl This parameter activates the printer language PJL Printer Job Language Select the Jobcntl menu 2 Setting options Off On Default setting Off JobCntl Pap back Jobcntl Off Online Setup Set Exit 2 1 3 4 On activates the PJL printer language see PJL commands Confirm your setti...

Страница 108: ...line Setup 2 1 3 4 Select the HvyForm menu 3 key Confirm your setting with the Set key 1 Press the Next key 4 to access the next group of parameters Graphic print speed GrSpeed This parameter allows improved graphic speed independently to the driver It affects only the print speed of graphic printouts at 180 x 180 dpi Select the GrSpeed menu 2 Setting options Normal High Default setting High GrSpe...

Страница 109: ...unction APW Off since otherwise the printout will be too narrow or there will be no printout at all In this case contact your service technician 102 Paperwidth Error Online Setup Press Online 2 1 3 4 Confirm your setting with the Set key 1 Press the Next key 4 to access the next group of parameters Setting options On Off Default setting On If APW On the printer is in the standard mode and truncate...

Страница 110: ...ed digits leave the menu by pressing Exit 4 key This setting is not reset by loading the default factory settings Asset number AssetN With the AssetN function you have the possibility to change the 10 digit asset number of the printer The number can be written with any ASCII character between hex 20 and hex 7E Select the AssetN 3 menu Setting options 10 digits of all ASCII characters hex 20 to 7E ...

Страница 111: ...a simple operating error and a major malfunction This chapter provides information on the rectification of faults without the assistance of specially trained personnel Follow the advice and tips in this chapter if your printer is not working correctly Important notes on the care and maintenance of your printer can be found at the end of this chapter Repairs should only be performed by authorized s...

Страница 112: ...d up Do not attempt to open the printer You might suffer an electric shock The display is lit but the printer does not print 1 Check that the printer is Online If the displays shows Offline then press the key Online Try to print again 2 Check the connection from the printer to the computer interface cable Check that the interface cable is properly connected to the computer and to the printer Check...

Страница 113: ...you replace the fanfold paper refer to the instructions in the section Loading paper You should pay special attention to the following points Insert the paper straight After inserting the paper close the tractors Adjust the tractors the paper should be positioned in the tractors straight but without tension Adjust the printhead gap to the paper thickness if AGA Off Set the parameter Head up to On ...

Страница 114: ...correctly connected to the computer and to the printer 2 Check that the proper emulation and the correct character set country CG table or character set is selected in the Setup menu 3 Check the length of the interface cable see section Interface specifications 4 Set CX bid in the advanced menu to Off see section Bidirectional parallel interface CX bid 5 Check that the printer is properly adapted ...

Страница 115: ... closed and locked Whether the paper is too tight or loose Whether the paper is within the specified range Details see section Loading paper alternating with The paper has run out during operation 1 Printer is switched on but no paper is loaded in the displayed active paper compartment 2 The paper is not fed past the light barrier Insert paper in the active sheet feeder Place the paper more to the...

Страница 116: ...ich has not yet been printed is overwritten with new data If an optional serial interface is installed Check that the correct busy protocol e g XON XOFF is set in the menu Serial interface protocol see Protocol Protocol Check the interface cable see section Connecting the printer and Interfaces A print job exceeds the paper width with the automatic paper width detection active Cancel the print job...

Страница 117: ...or please contact your technical service The ribbon misses is damaged and blocked or a non genuine ribbon is installed Only use genuine ribbon cassettes of the manufacturer During the process of initialization after powering on the printer checks if a ribbon cassette is installed It also checks during the execution of a print job the operativeness of the ribbon cassette These functions mandatory r...

Страница 118: ...anfold paper is in the park position No action required Note for the operator to tear off the paper automatically positioned at the tear off edge Tear paper off Paper is not available in the selected paper path indicates the active paper path Data is in the interface receiver buffer Load paper see section Loading paper If messages appear which are not described here please contact your customer se...

Страница 119: ...e printer especially the sliderails and shafts Replacing the fuse The printer is provided with a line fuse accessible from the exterior Press the fuse cover slightly inwards with a screwdriver and turn it until the cover tab comes out through the recess in housing Then remove the fuse Install the fuse in reverse order of steps Only use the same type of fuse for replacement The fuse ratings are spe...

Страница 120: ... agent and a soft lint free cloth Do not use abrasive cleaners Never use solvents Cleaning the interior Remove paper and dust with a soft brush Check that any paper has been removed from the tractors For optimal function of the print head the interior of the printer has to be as dust free as possible Clean the interior with a vacuum cleaner if necessary 113 ...

Страница 121: ...ible ribbon and ink remains carefully from the platen Avoid touching parts and components in the printer interior Ribbon Check whether the ribbon is worn or damaged The ribbon must be replaced if it is frayed see Inserting the ribbon cassette and Error messages via the display The service life of the ribbon is 20 million characters 114 STOP ...

Страница 122: ...ng the upper friction Clean the rollers of the upper friction as necessary with a mild cleaning agent and a soft lintfree cloth Carriage shafts Carriage shafts must not be oiled or greased otherwise damage will occur on the printer 115 STOP ...

Страница 123: ...x 10 12 0 CPI 90 x 120 1250 cps 08 x 08 15 0 CPI 90 x 120 1250 cps 12 x 08 15 0 CPI 90 x 120 714 cps 12 x 12 2 17 1 CPI 90 x 240 833 cps 12 x 10 2 20 0 CPI 90 x 240 Copy Draft Copy Print Quality 333 cps 24 x 12 10 0 CPI 180 x 120 400 cps 24 x 10 12 0 CPI 180 x 120 500 cps 16 x 08 15 0 CPI 180 x 120 500 cps 24 x 08 15 0 CPI 180 x 120 285 cps 24 x 12 2 17 1 CPI 180 x 240 333 cps 24 x 12 2 20 0 CPI 1...

Страница 124: ...Fonts Standard Barcodes Standard High Speed Draft DPQ Copy Draft Courier Roman Sans Serif OCR A B Gothic Prestige Orator Souvenir all resident in NLQ and LQ DLL is standard 23 Large Character Printing LCP see Barcode Emulations MTPL Genicom ANSI Epson LQ2550 LQ2170 IBM XL 24 PJL others on request Resolution 60 to 360 dpi horizontal 90 to 360 dpi vertical Print attributes in all character pitches D...

Страница 125: ...er feed Feed speed Feed first line View position Reverse motion 10 sec 6 lpi 35 ms 10 sec Up to max form length 22 inch Printhead gap Standard Automatic gap adjustment Paper transport Standard Optional Tractor 1 with parking position Tractor 2 front Tractor 1 with parking position Tractor 2 front Service life Print head Print head 750 Mio DPQ 12 x 12 Matrix 20 Mio characters 750 Mio DPQ 12 x 12 Ma...

Страница 126: ... USB interface Conformity Speed Connector USB 2 0 I O full speed Conforms to the Universal Serial Bus 2 0 Specifications Full Speed mode at 12 Mbps B type USB connector USB A Host With this additional connectivity it is possible to improve the serviceability for example to load the firmware or to upload or download Configuration easily by an USB stick Refer to section USB host interface for furthe...

Страница 127: ...ing of these sets Multi part forms must be loaded with the bound top edge down Multi part forms should be tested for suitability Paper quality Light pulp paper of medium fine quality paper bearing the quality mark SM Post and photocopy paper are suitable for use Unsuitable are satin finish or coated papers imitation art papers and embossed papers Since paper as natural material reacts strongly to ...

Страница 128: ...quences Note that MTPL sequences are available in all emulation modes The following example shows you how to find the hexadecimal value for a character from the symbol set tables Information about supported character sets can be found on our Internet site in the Support section 121 hex 0 1 2 3 4 dec 0 NUL SP 0 16 32 48 64 1 1 17 33 49 65 2 2 18 34 50 66 3 3 19 35 51 67 ASCII B hex 42 dez 66 ...

Страница 129: ... 229 245 6 ACK 6 22 38 54 70 86 102 118 134 150 166 182 298 214 230 246 7 BEL 7 23 39 55 71 87 103 119 135 151 167 183 199 215 231 247 8 BS HTS 8 24 40 56 72 88 104 120 136 152 168 184 200 216 232 248 9 HT 9 25 41 57 73 89 105 121 137 153 169 185 201 217 233 249 A LF VTS 10 26 42 58 74 90 106 122 138 154 170 186 202 218 234 250 B VT ESC PLD CSI 11 27 43 59 75 91 107 123 139 155 171 187 203 219 235...

Страница 130: ...cter sets MTPL international substitution characters 123 dec 35 36 64 91 92 93 94 96 123 124 125 126 hex 23 24 40 5B 5C 5D 5E 60 7B 7C 7D 7E US ASCII UK ASCII Swedish German Portuguese French Italian Spanish Norwegian ...

Страница 131: ...1 67 83 99 115 4 4 20 36 52 68 84 100 116 5 ENQ NAK 5 21 37 53 69 85 101 117 6 ACK 6 22 38 54 70 86 102 118 7 BEL 7 23 39 55 71 87 103 119 8 BS 8 24 40 56 72 88 104 120 9 HT 9 25 41 57 73 89 105 121 A LF 10 26 42 58 74 90 106 122 B VT ESC 11 27 43 59 75 91 107 123 C FF 12 28 44 60 76 92 108 124 D CR 13 29 45 61 77 93 109 125 E SO 14 30 46 62 78 94 110 126 F SI 15 31 47 63 79 95 111 127 ...

Страница 132: ...1 67 83 99 115 4 4 20 36 52 68 84 100 116 5 ENQ NAK 5 21 37 53 69 85 101 117 6 ACK 6 22 38 54 70 86 102 118 7 BEL 7 23 39 55 71 87 103 119 8 BS 8 24 40 56 72 88 104 120 9 HT 9 25 41 57 73 89 105 121 A LF 10 26 42 58 74 90 106 122 B VT ESC 11 27 43 59 75 91 107 123 C FF 12 28 44 60 76 92 108 124 D CR 13 29 45 61 77 93 109 125 E SO 14 30 46 62 78 94 110 126 F SI 15 31 47 63 79 95 111 127 ...

Страница 133: ...Norway 60 X X X X X X X X X X X X X ISO Spain 5A X X X X X X X X X X X X X ISO Portugal 4C X X X X X X X X X X X X X Epson USA 00 X X X X X X X X X X X X X Epson France 01 X X X X X X X X X X X X X Epson Germany 02 X X X X X X X X X X X X X Epson UK 03 X X X X X X X X X X X X X Epson Denmark 04 X X X X X X X X X X X X X Epson Sweden 05 X X X X X X X X X X X X X Epson Italy 06 X X X X X X X X X X X...

Страница 134: ... X X X X X X X X X X X X X CP860 Portugal 84 X X X X X X X X X X X X X CP861 Icelandic 94 X X X X X X X X CP863 French Canada 85 X X X X X X X X X X X X X CP864 Arabic 8C 1 1 1 1 CP864 Arab Extended 95 1 1 1 1 CP865 Nordic 86 X X X X X X X X X X X X X CP866 Cyrillic 8E X X X X X CP866 Bulgaria 9D X X X X X Siemens Turkish 9B X X X X X DEC Turkish 9C X X X X X CP1250 Win Latin 2 70 X X X X X CP1251...

Страница 135: ... X X X X X Abicomp 6E X X X X X X X X Roman 8 4D X X X X X X X X Coax Twinax Hebrew 4F X X X X X 2 3 4 New 437 Hebrew 81 X X X X X 2 3 4 New DIG 850 Hebr 83 X X X X X 2 3 4 Old Code 860 Hebr 98 X X X X X 2 3 4 Flarro 863 Hebrew 99 X X X X X 2 3 4 Table 865 Hebrew 9A X X X X X 2 3 4 CP775 Baltic A6 X X X X X CP1257 Baltic 77 X X X X X Mazovia Poland 92 X X X X X Kamenicky Czech 91 X X X X X CP866 U...

Страница 136: ... commands to the printer Please note that this escape character has nothing to do with the ESC key on your computer keyboard For example the control character ESC followed by the character 4 tells your printer to print the subsequent text in italics How are escape sequences used Escape sequences are transmitted to the printer by your computer software via the printer driver Experienced users and p...

Страница 137: ...uest command PJL INFO CONFIG INFO of the printer configuration PJL INFO VARIABLES INFO of variables which can be set by SET PJL INFO MEMORY INFO about the memory of the printer PJL USTATUS DEVICE ON PJL USTATUS DEVICE OFF PJL USTATUS DEVICE VERBOSE PJL USTATUS JOB ON PJL USTATUS JOB OFF PJL USTATUS PAGE ON PJL USTATUS PAGE OFF PJL USTATUSOFF USTATUS unsolicited status commands PJL JOB NAME PJL JOB...

Страница 138: ...ed P UPC E with HRI D Code 11 Q UPC E without HRI E BCD Matrix R Delta Distance IBM F Code 39 S Code 128 G Codabar T EAN 128 H EAN 8 with HRI 1 US Postnet I EAN 8 without HRI 1 KIX Barcode K EAN 13 with HRI 1 Royal Mail Customer Barcode L EAN 13 without HRI 1 USPS Intelligent Mail Barcode M MSI modified PLESSEY These barcodes may be printed out horizontal and vertical the unmarked only horizontal ...

Страница 139: ...es for incoming data As soon as the printer recognizes a signal it switches to the respective interface and sends the BUSY signal to the other interfaces After finishing the data transmission the printer remains switched to this interface for a certain period of time 30 seconds When this time has elapsed the controller reenables both interfaces and the sequence described restarts If incoming data ...

Страница 140: ... IEEE802 3u 10Base T with 10 Mbps IEEE802 3 RAM 8 MB Flash 4 MB Speed 100 Mbps Full Duplex Supported operating systems Windows NT 200 XP Vista 7 8 8 1 10 and 2003 2016 Server Linux Unix Sun Solaris Supported protocols SNMP SMTP TCP IP lpr lpd Port 9100 Designation of IP address D H C P BOOTP Static manually via the printer s control panel Configuration HTTP TCP IP Status SNMP TCP IP SMTP PING 133 ...

Страница 141: ...is full the data input is blocked until the data buffer is empty This guarantees data transmission in blocks of 1 KB Connector assignment Printer PC Signal 1 2 3 4 5 6 7 8 9 10 11 12 13 14 15 16 17 18 19 30 31 32 33 34 35 36 STROBE active low DATA 1 DATA 2 DATA 3 DATA 4 DATA 5 DATA 6 DATA 7 DATA 8 ACK active low BUSY PAPER EMPTY PE SELECT AUTO FEED active low not used SIGNAL GROUND CHASSIS GROUND ...

Страница 142: ...nding Type Synchronization Transmission rate Signal status Connection cable Interface connections Transmission protocol Capacity of data buffer RS232C interface Asynchronous 600 Baud to 19 200 Baud OFF log 1 3 V to 15 V ON log 0 3 V to 15 V up to 15 m length ITT Cannon connector series DB 9 S XON XOFF ENQ STX READY BUSY Robust XON XOFF ETX ACK 1024 KB max Connector assignment Connector no Directio...

Страница 143: ...is active at pin 4 Input signals Signal Function CTS DSR RxD Clear to Send Data Set Ready Receive Data Output signals Signal Function DTR RTS READY TxD Data Terminal Ready Request to Send Ready to receive data Transmit Data 136 PC AT 9 pin Printer 9 pin RxD 2 3 TxD TxD 3 2 RxD CTS 8 4 DTR RDY SG 5 5 SG DSR 6 DTR 4 PC AT 25 pin Printer 9 pin FG 1 FG TxD 2 2 RxD RxD 3 3 TxD CTS 8 4 DTR RDY SG 5 5 SG...

Страница 144: ...ission When the FIFO buffer is empty again the interface signals READY level 0 12 V and XON hex 11 dec 17 Data transmission can be continued In addition the READY signal is influenced by the status of the printer On Off Line If the printer assumes an undefined state the interface also signals NOT READY and XOFF Memory mode Robust XON XOFF Robust XON XOFF is similar to XON XOFF However the state of...

Страница 145: ...ur network administrator who has the necessary rights to install printers on the network and or make any changes The assumed address space corresponds to the TCP IP adress class C 192 168 1 xxx The subnet mask to be used is 255 255 255 0 The address of the router or gateway is 0 0 0 0 if not available You will find more information on our internet page 138 Example of a printer connected to a compu...

Страница 146: ...n additional module for automatic cutting Part no 062661 Printer pedestal A cabinet to be used as a printer stand and for storing fanfold paper stacks Part no 731717 Interface modules The following interface modules are available Name Part no Combi parallel and serial interface module RS 232C Sub D 9 pin f connector 070566 Ethernet interface module 10 100 Mb s compatible to TallyCom Pocket I F 043...

Страница 147: ...er s application manual Barcode in English 379300 Programmer s application manual Epson in English 379302 140 All rights reserved Translations reprinting or copying by any means of this manual complete or in part or in any different form requires our explicit approval We reserve the right to make changes to this manual without notice All care has been taken to ensure accuracy of information contai...

Страница 148: ...one 44 0 1256 355130 Fax 44 0 1256 481400 www dascom com FRANCE DASCOM Europe GmbH 117 Avenue Victor Hugo 92100 Boulogne Billancourt France Phone 33 1 73 02 51 98 www dascom com AMERICAS Dascom Americas LLC 34 Lakeview Court Verona VA 24482 USA Phone 1 877 434 1377 Fax 1 540 242 7221 www dascomamericas com SINGAPORE Asia Pacific DASCOM AP Pte Ltd 2 Jurong East Street 21 05 42 IMM Building Singapor...

Отзывы: