PMX MANUAL
26
118164-001 REV. A
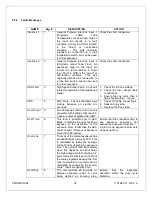
calibrate the large filament, but the calibration fails, it does not affect the small filament
calibration. In this case you would have to rerun the large filament calibration, but not the
small filament calibration.
3.
Exiting calibration mode
When calibration process is finished, Prep and Exposure should be released, and then
sending a “Set Calibration Mode” Command with an argument of 0 will let the PMX exit
calibration mode.
4.4
OPERATING X-RAY EXPOSURES
4.4.1
Normal Exposure
WARNING:
AFTER TURN OFF, DO NOT UNPLUG THE OUPUT CABLE UNTIL THE INTERNAL
CAPACITANCE IS DISCHARGED (APPROXIMATELY 3 MINUTES).
Use these steps to initiate a normal exposure:
Step
operation
Action
2.
Presetting
Using the computer interface, select ROTOR SPEED, and
SMALL or LARGE FILAMENT. Set KV (initial setting of
20kV is suggested), mA (10mA suggested), and
EXPOSURE time (0.5 seconds suggested).
2.
PREP
After presetting desired levels, initiate a PREP command.
This will cause the X-Ray tube anode rotor to start, and apply
filament pre-heat current to the tube per value stored in the
PMX internal memory.
3.
READY
After approximately 2 seconds, a READY status signal will
be returned to the computer indicating that the anode rotor is
up to speed, and the tube is ready to generate X-Rays. The
READY signal will remain for 30 seconds and automatically
reset.
4.
EXPOSURE
When READY status is returned from the power supply, an
exposure can then be initiated. When exposure is initiated,
HV is applied to the X-Ray tube and the power supply loop
control automatically adjusts the filament current to provide
the mA tube current that was previously pre-set for the
duration of the exposure time. Following an exposure, the HV
will return to 0 volts until the next PREP/EXPOSURE cycle.
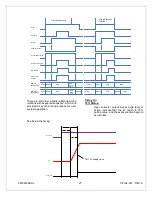
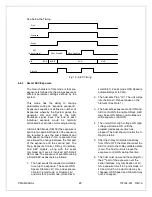
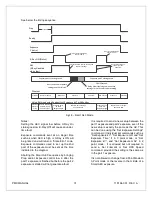
Below is timing sequence for a typical normal exposure.

