background image

Sets the ISO sensitivity to 800.

1600

Sets the ISO sensitivity to 1600.

3200

Sets the ISO sensitivity to 3200.

This setting is only available in 

Manual

 capturing mode.

Metering

This function automatically determines a well-balanced exposure by measuring the

amount of light striking the image you want to capture.

Center

Adjusts the exposure to the center of the image.

Average

Calculates the exposure based on the amount of light striking the whole image.

Spot

Adjusts the exposure in a very small part of the image that you want to capture.

This setting is only available in 

Manual

 capturing mode.

Image stabilizer

When taking a photo, it can be difficult to hold the device steady. The stabilizer helps you

by compensating for small movements of the hand.

This setting is only available in 

Manual

 capturing mode.

Preview

You can choose to preview photos or videos just after you shoot them.

Unlimited

The preview of the photo or video appears after you shoot it.

5 seconds

The preview of the photo or video appears for 5 seconds after you shoot it.

3 seconds

The preview of the photo or video appears for 3 seconds after you shoot it.

Edit

The photo or video opens for editing after you shoot it.

Off

The photo or video is saved after you shoot it, and no preview appears.

Flash

Use the flash to take photos when lighting conditions are poor or when there is a

backlight. The following options are available when you tap the flash icon   in the

camera screen:

Auto

The camera automatically determines if the lighting conditions require the use of a flash.

Fill flash

Use this setting when the background is brighter than the subject. This removes unwanted dark

shadows.

Red-eye reduction

Reduces the red color of eyes when taking a photo.

Off

82

This is an Internet version of this publication. © Print only for private use.

Содержание Xperia Z Ultra

Страница 1: ...User guide Xperia Z2 D6502 D6503 ...

Страница 2: ...lication overview 23 Downloading applications 25 Downloading applications from Google Play 25 Downloading applications from other sources 25 Internet and networks 26 Browsing the web 26 Internet and messaging settings 26 Wi Fi 27 Sharing your mobile data connection 29 Controlling data usage 30 Selecting cellular networks 31 Virtual private networks VPNs 31 Synchronizing data on your device 33 Sync...

Страница 3: ...alls 48 Multiple calls 48 Conference calls 49 Voicemail 49 Emergency calls 50 Contacts 51 Transferring contacts 51 Searching and viewing contacts 52 Adding and editing contacts 53 Adding medical and emergency contact information 54 Favorites and groups 55 Sending contact information 56 Avoiding duplicate entries in the Contacts application 56 Backing up contacts 56 Messaging and chat 58 Reading an...

Страница 4: ...ces 76 Adding the geographical position to your photos 77 General camera settings 77 Still camera settings 80 Video camera settings 84 Photos and videos in Album 87 Viewing photos and videos 87 Sharing and managing photos and videos 88 Editing photos with the Photo editor application 89 Photo albums 90 Viewing your photos on a map 91 Videos 93 Watching videos in the Movies application 93 Transferr...

Страница 5: ... with a car infotainment system 109 Airplane mode 109 Calendar and alarm clock 110 Calendar 110 Alarm and clock 111 Support and maintenance 113 Support for your device 113 Computer tools 113 Updating your device 114 Finding a lost device 115 IMEI number 116 Battery and power management 116 Memory and storage 118 Managing files using a computer 119 Backing up and restoring content 120 Restarting an...

Страница 6: ...re updates see Updating your device on page 114 To check the current software version of your device 1 From your Home screen tap 2 Find and tap Settings About phone Android version Overview 1 Proximity Light sensor 2 Speaker Charging light Notification light 3 Front camera lens 4 Memory card slot cover 5 Power key 6 Volume Zoom key 7 Camera key 8 Speaker 9 Microphone 6 This is an Internet version ...

Страница 7: ...Fi GPS Bluetooth antenna area 17 Charging dock connector 18 Strap hole Assembly A protective plastic sheet is attached to the screen You should peel off this sheet before using the touchscreen Otherwise the touchscreen might not function properly To insert the micro SIM card 7 This is an Internet version of this publication Print only for private use ...

Страница 8: ...ponsible for any damage caused by such action To insert a memory card 1 Insert a fingernail into the gap between the memory card cover and the device then detach the memory card cover 2 Place the memory card in the memory card slot with the gold colored contacts facing towards you then push the memory card all the way into the slot until you hear a locking sound 3 Re attach the memory card cover T...

Страница 9: ...lied by your service provider but you can change it later from the Settings menu To correct a mistake made while entering your SIM card PIN tap To turn off the device 1 Press and hold down the power key until the options menu opens 2 In the options menu tap Power off 3 Tap OK It may take a while for the device to shut down Why do I need a Google account Your Xperia device from Sony runs on the And...

Страница 10: ...rger into a power outlet 2 Plug one end of the USB cable into the charger or into the USB port of a computer 3 Plug the other end of the cable into the micro USB port on your device with the USB symbol facing up The notification light illuminates when charging begins 4 When the device is fully charged disconnect the cable from your device by pulling it straight outward Make sure not to bend the co...

Страница 11: ...unmark a checkbox or option Enter text using the on screen keyboard Touching and holding Move an item Activate an item specific menu Activate selection mode for example to select several items from a list 11 This is an Internet version of this publication Print only for private use ...

Страница 12: ...ding Zoom in or out on a web page a photo or a map Swiping Scroll up or down a list Scroll left or right for example between Home screen panes 12 This is an Internet version of this publication Print only for private use ...

Страница 13: ... it When you buy your device a basic screen swipe lock is already set This means that you have to swipe in any direction from the middle of the screen to unlock it You can change the security settings later and add other kinds of locks See Screen lock on the 37 page To activate the screen Briefly press the power key To unlock the screen Place a finger on the middle of the screen and swipe in any d...

Страница 14: ... are currently in To go to the Home screen Press To browse the Home screen Home screen panes You can add new panes to your Home screen up to a maximum of seven panes and delete panes You can also set the pane that you want to use as the main Home screen pane To set a pane as the main Home screen pane 1 Touch and hold an empty area on your Home screen until the device vibrates 2 Flick left or right...

Страница 15: ...ion To open the Application screen menu When the Application screen is open drag the left edge of the screen to the right To move an application on the Application screen 1 To open the Application screen menu drag the left edge of the Application screen to the right 2 Make sure Own order is selected under SHOW APPS 3 Touch and hold the application until it magnifies and the device vibrates then dr...

Страница 16: ...background or pause If the application is paused or runs in the background you can continue where you left off the next time you open the application 1 Recently used applications window Open a recently used application 2 Small apps bar Open a small app 3 Task navigation key Open the recently used applications window and the small apps bar 4 Home navigation key Exit an application and go back to th...

Страница 17: ... drag it to the right edge or to the bottom edge of the screen To rearrange the small apps in the small apps bar Touch and hold a small app and drag it to the desired position To remove a small app from the small apps bar Touch and hold a small app then drag it to To restore a previously removed small app 1 Open the small apps bar then tap 2 Touch and hold the small app you want to restore then dr...

Страница 18: ...en drag it to the new location To delete a widget Touch and hold the widget until it magnifies and the device vibrates then drag it to To add a widget to the lock screen 1 To activate the screen briefly press the power key 2 Swipe inward from the top left area of the screen until appears then tap it 3 If required enter your PIN code pattern or password to unlock the screen 4 Find and tap the widge...

Страница 19: ...ibrates then drag the item to the new location To delete an item from the Home screen Touch and hold an item until it magnifies and the device vibrates then drag the item to To create a folder on the Home screen Touch and hold an application icon or a shortcut until it magnifies and the device vibrates then drag and drop it on top of another application icon or shortcut To add items to a folder on...

Страница 20: ...nshot Screenshots you take are automatically saved in Album To take a screenshot 1 Press and hold down the power key and the volume down key simultaneously until you hear a clicking sound 2 To view the screenshot drag the status bar fully downwards Status and notifications The icons in the status bar inform you of events such as new messages and calendar notifications activities in progress such a...

Страница 21: ...el Place your finger on a notification and flick left or right To clear all notifications from the Notification panel Tap Clear Notification light The notification light informs you about battery status and some other events For example a flashing white light means there is a new message or a missed call Icons in the status bar Status icons Signal strength No signal Roaming GPRS is available EDGE ...

Страница 22: ...blem with sign in or synchronization Your device is ready to connect o other ANT capable devices Notification icons The following notification icons may appear on your screen New email message New text message or multimedia message New voicemail Upcoming calendar event A song is playing The device is connected to a computer via a USB cable Warning message Error message Missed call Call ongoing Cal...

Страница 23: ...h your photos and videos Use the Gmail application to read write and organize email messages Search for information in your device and on the web View your current location find other locations and calculate routes using Google Maps Go to Google Play to download free and paid applications for your device Use the Messaging application to send and receive text and multimedia messages Use the Movies ...

Страница 24: ...access a User guide troubleshooting information plus tips and tricks Download and install new applications and updates Some applications are not supported by all networks and or service providers in all areas 24 This is an Internet version of this publication Print only for private use ...

Страница 25: ...rmissions to applications you trust You can view the permissions granted to a downloaded application by tapping the application under Settings Apps Downloading applications from other sources When your device is set to allow downloads from sources other than Google Play you can download applications directly from other websites by following the relevant download instructions Installing application...

Страница 26: ...i network you must have a working cellular data connection with the correct Internet and messaging settings Here are some tips For most mobile networks and operators Internet and messaging settings come pre installed on your device You can then start using the Internet and send multimedia messages right away In some cases you get the option to download Internet and messaging settings the first tim...

Страница 27: ...tings 1 From your Home screen tap 2 Find and tap Settings More Mobile networks 3 Tap Access Point Names then tap 4 Tap Reset to default All Internet and messaging settings are deleted Wi Fi Use Wi Fi connections to surf the Internet download applications or send and receive email Once you have connected to a Wi Fi network your device remembers the network and automatically connects to it the next ...

Страница 28: ...trength of a Wi Fi signal Move your device closer to the Wi Fi access point Move the Wi Fi access point away from any potential obstructions or interference Don t cover the Wi Fi antenna area of your device the highlighted area in the illustration Your device can only connect to an FCC approved access point when using 5 GHz WLAN for indoor and outdoor operation This is because operation in the 5 1...

Страница 29: ... to establish a network connection via USB cable Go to www android com tether to get the most current information To share your data connection using a USB cable 1 Deactivate all USB cable connections to your device 2 Using the USB cable that came with your device connect your device to a computer 3 From your Home screen tap 4 Find and tap Settings More Tethering portable hotspot 5 Mark the USB te...

Страница 30: ...still establish Wi Fi and Bluetooth connections To set a data usage warning 1 Make sure cellular data traffic is turned on 2 From your Home screen tap 3 Find and tap Settings Data usage 4 To set the warning level drag the warning line to the desired value You receive a warning notification when the amount of data traffic approaches the level you set To set a cellular data usage limit 1 Make sure c...

Страница 31: ... 3 Tap Search mode Automatic Virtual private networks VPNs Use your device to connect to virtual private networks VPNs which allow you to access resources inside a secured local network from a public network For example VPN connections are commonly used by corporations and educational institutions for users who need to access intranets and other internal services when they are outside of the inter...

Страница 32: ...onnect from a virtual private network 1 Drag the status bar downwards 2 Tap the notification for the VPN connection to turn it off 32 This is an Internet version of this publication Print only for private use ...

Страница 33: ...ap Remove account 4 Tap Remove account again to confirm Synchronizing with Microsoft Exchange ActiveSync Using a Microsoft Exchange ActiveSync account you can access your corporate email messages calendar appointments and contacts directly on your device After setup you can find your information in the Mail Calendar and Contacts applications To set up an EAS account for synchronization 1 Make sure...

Страница 34: ...he PC Companion on a PC or the Sony Bridge for Mac application on an Apple Mac computer see Computer tools on the 113 page To synchronize with your Outlook contacts using a computer 1 Make sure the PC Companion application is installed on the PC or the Sony Bridge for Mac application is installed on the Apple Mac computer 2 Computer Open the PC Companion application or the Sony Bridge for Mac appl...

Страница 35: ...o set your device to silent mode so that it doesn t ring when you re in a meeting To adjust the ringtone volume with the volume key Press the volume key up or down To adjust the media playing volume with the volume key When playing music or watching video press the volume key up or down To set your device to vibrate mode Press the volume key down until appears in the status bar To set your device ...

Страница 36: ... 3 Tap Change SIM PIN 4 Enter the old SIM card PIN and tap OK 5 Enter the new SIM card PIN and tap OK 6 Retype the new SIM card PIN and tap OK To unlock a blocked SIM card using the PUK code 1 Enter the PUK code and tap 2 Enter a new PIN code and tap 3 Re enter the new PIN code and tap If you enter an incorrect PUK code too many times you need to contact your network operator to get a new SIM card...

Страница 37: ...ace Unlock feature 1 From your Home screen tap Settings Security Screen lock 2 Tap Face Unlock then follow the instructions in your device to capture a photo of your face 3 After your face is successfully captured tap Continue 4 Select a backup unlock method and follow the instructions in the device to complete the setup For best results capture your face in an indoor area that is well lit but not...

Страница 38: ...riting language for text input See Personalizing the Xperia keyboard on page 43 To change the language 1 From the Home screen tap 2 Find and tap Settings Language input Language 3 Select an option 4 Tap OK If you select the wrong language and cannot read the menu texts find and tap Then select the text beside and select the first entry in the menu that opens You can then select the language you wa...

Страница 39: ... output automatically 1 From your Homescreen tap 2 Find and tap Settings Sound Sound effects 3 Mark the ClearAudio checkbox To adjust the sound settings manually 1 From the Homescreen tap 2 Find and tap Settings Sound Sound effects 3 Unmark the ClearAudio checkbox if it is marked 4 Tap Sound enhancements Settings 5 Mark or unmark the relevant checkboxes The manual adjustment of sound output settin...

Страница 40: ...A noise canceling headset may not be included with your device at purchase When a noise canceling headset is connected to your device you can also select the noise canceling headset type by dragging down the status bar to open the Notification panel and then tapping Audio accessories To adjust the settings to the noise environment 1 Make sure a noise canceling headset is connected to your device 2...

Страница 41: ...try field To use the on screen keyboard in landscape orientation When the on screen keyboard is displayed turn the device sideways You may need to adjust the settings in some applications to enable landscape orientation To enter text character by character 1 To enter a character visible on the keyboard tap the character 2 To enter a character variant touch and hold a regular keyboard character to ...

Страница 42: ...mber of languages and regions To enable voice input 1 When you enter text using the on screen keyboard tap 2 Tap then tap Keyboard settings 3 Mark the Google voice typing key checkbox 4 Tap to save your settings A microphone icon appears on your on screen keyboard To enter text using voice input 1 Open the on screen keyboard 2 Tap When appears speak to enter text 3 When you re done tap again The s...

Страница 43: ...board tap 2 Tap then tap Keyboard settings and change the settings as desired 3 To add a writing language for text input tap Writing languages and mark the relevant checkboxes 4 Tap OK to confirm To change the text input settings 1 When you enter text using the on screen keyboard tap 2 Tap then tap Keyboard settings Text input settings and select the relevant settings To display the Smiley key 1 W...

Страница 44: ...View your call log entries 3 View your favorite contacts 4 View all contact groups saved to your device 5 Delete number 6 Dial pad 7 View more options 8 Call button 9 Hide or show the dialer To make a call by dialing 1 From your Home screen tap 2 Find and tap Phone 3 Enter the number of the recipient and tap To make a call using smart dial 1 From your Home screen tap 2 Find and tap Phone 3 Use the...

Страница 45: ...e how many seconds to wait before the calls get answered automatically You can also manually route calls to the answering machine when you are too busy to answer them And you can access messages left on your answering machine directly from your device Before using the answering machine you must record a greeting message To reject a call with the answering machine When an incoming call arrives drag...

Страница 46: ...xt message 1 When an incoming call arrives drag Reject call options upward then tap Reject with message 2 Select a predefined message or tap and write a new message To reject a second call with a text message 1 When you hear repeated beeps during a call drag Reject call options upward then tap Reject with message 2 Select a predefined message or tap and write a new message To edit the text message...

Страница 47: ...r from your call log 1 From your Home screen tap 2 Find and tap Phone The call log view appears on the upper part of the screen 3 To call a number directly tap the number To edit a number before calling touch and hold the number then tap Edit number before call You can also call a number by tapping Call back To add a number from the call log to your contacts 1 From your Home screen tap 2 Find and ...

Страница 48: ...ocking function You must use this same password later if you want to edit call blocking settings To enable or disable fixed dialing 1 From your Home screen tap 2 Find and tap Settings Call settings Fixed dialing numbers 3 Tap Activate fixed dialing or Deactivate fixed dialing 4 Enter your PIN2 and tap OK To access the list of accepted call recipients 1 From your Home screen tap 2 Find and tap Sett...

Страница 49: ...l participant 1 During an ongoing conference call tap 0 participants 2 Tap the telephone number of the participant with whom you want to talk privately 3 To end the private conversation and return to the conference call tap To release a participant from a conference call 1 During an ongoing conference call tap the button showing the number of participants For example tap 3 participants if there ar...

Страница 50: ... To make an emergency call 1 From your Home screen tap 2 Find and Tap Phone 3 Enter the emergency number and tap To delete a number tap You can make emergency calls when no SIM card is inserted or when outgoing calls are barred To make an emergency call while the SIM card is locked 1 From the lock screen tap Emergency call 2 Enter the emergency number and tap 50 This is an Internet version of this...

Страница 51: ...ons to transfer your contacts Transferring contacts using an online account If you sync the contacts in your old device or your computer with an online account for example Google Sync Facebook or Microsoft Exchange ActiveSync you can transfer your contacts to your new device using that account To synchronize contacts to your new device using a synchronization account 1 From your Home screen tap th...

Страница 52: ...ing contacts 1 Contacts Calling Favorites and Groups tabs 2 Edit and view medical and emergency contact information 3 View contact details 4 Jump to contacts starting with the selected letter 5 Access communication options for the contact 6 Search for contacts 7 Add a contact 8 View more options To search for a contact 1 From your Home screen tap then tap 2 Tap and enter a phone number name or oth...

Страница 53: ...r Home screen tap then tap 2 Tap the contact that you want to edit then tap 3 Edit the desired information 4 When you are done tap Done Some synchronization services do not allow you to edit contact details To associate a picture with a contact 1 From your Home screen tap then tap 2 Tap the contact you want to edit then tap 3 Tap and select the desired method for adding the contact picture 4 When ...

Страница 54: ...ion as part of the ICE information 4 Medical information 5 Create new ICE contacts 6 Use existing contacts as ICE contacts 7 ICE contact list To enter your medical information 1 From your Home screen tap then tap 2 Tap ICE In Case of Emergency 3 Tap then tap Edit medical info 4 Edit the desired information 5 When you are done tap Done To add a new ICE contact 1 From your Home screen tap then tap 2...

Страница 55: ...hen tap Settings 4 Mark the ICE in lockscreen checkbox Your ICE information is visible from the security lockscreen by default To enable calls to ICE contacts from the security lock screen 1 From your Home screen tap then tap 2 Tap ICE In Case of Emergency 3 Tap then tap Settings 4 Mark the Enable call in ICE checkbox Some service providers may not support ICE calls Favorites and groups You can ma...

Страница 56: ...f this happens you can join such duplicates to create a single entry And if you join entries by mistake you can separate them again later To link contacts 1 From your Home screen tap then tap 2 Tap the contact that you want to link with another contact 3 Press then tap Link contact 4 Tap the contact whose information you want to join with the first contact then tap OK to confirm The information fr...

Страница 57: ... Mark all if you want to export all your contacts 4 Tap Export 5 Select Add contacts if you want to add the contacts to existing contacts on your SIM card or select Replace all contacts if you want to replace the existing contacts on your SIM card 57 This is an Internet version of this publication Print only for private use ...

Страница 58: ...rom your Home screen tap then find and tap 2 Tap 3 Enter the recipient s name or phone number or other contact information that you have saved about the recipient then select from the list that appears If the recipient is not listed as a contact enter the recipient s number manually 4 Tap Write message and enter your message text 5 If you want to add an attachment tap and select an option 6 To sen...

Страница 59: ...oad message 4 Touch and hold the file you want to save then select the desired option Organizing your messages To delete a message 1 From your Home screen tap then find and tap 2 Tap the conversation containing the message you want to delete 3 Touch and hold the message you want to delete then tap Delete message Delete To delete conversations 1 From your Home screen tap then find and tap 2 Tap the...

Страница 60: ...t function on or off for outgoing messages 1 From your Home screen tap then find and tap 2 Tap then tap Settings 3 Mark or unmark the Delivery report checkbox as desired After the delivery report function is turned on a check mark is displayed in messages that have been successfully delivered Instant messaging and video chat You can use the Google Hangouts instant messaging and video chat applicat...

Страница 61: ...y from the suggested list 4 To start an instant messaging session tap 5 To start a video call tap To reply to a chat message or join a video call 1 When someone contacts you on Hangouts or appears in the status bar 2 Drag the status bar downward then tap the message or video call and begin to chat To learn more about Hangouts When the Hangouts application is open tap then tap Help 61 This is an In...

Страница 62: ...s and password then tap Next If the settings for the email account cannot be downloaded automatically complete the setup manually 5 When prompted enter a name for your email account so that it is easily identifiable 6 When you are finished tap Next To set an email account as your default account 1 From your Home screen tap 2 Find and tap Mail 3 Press then tap Settings 4 Select the account you want...

Страница 63: ...r Contacts list 4 Enter the email subject and message text then tap To reply to an email message 1 In your email inbox find and tap the message that you want to reply to then tap Reply or Reply all 2 Enter your reply then tap To forward an email message 1 In your email inbox find and tap the message that you want to forward then tap Forward 2 Enter the recipient s email address manually or tap and...

Страница 64: ... Combined inbox 4 Tap then tap Sort 5 Select a sorting option To search for emails 1 From your Home screen tap then find and tap Mail 2 If you are using several email accounts tap and select the name of the account that you want to check then tap Inbox in the drop down menu If you want to search all your email accounts at once tap then tap Combined view 3 Tap 4 Enter your search text then tap on t...

Страница 65: ...Press then tap Settings 3 Select the EAS Exchange Active Sync account for which you want to set an Out of Office auto reply 4 Tap Out of office 5 Tap beside Out of office so that changes to 6 If needed mark the Set time range checkbox and set the time range for the auto reply 7 Enter your Out of Office message in the body text field 8 Tap OK to confirm Gmail If you have a Google account you can us...

Страница 66: ... learn more and download Sony Bridge for Mac go to www sonymobile com global en tools bridge for mac Listening to music Use the WALKMAN application to listen to your favorite music and audio books 1 Browse your music 2 Search songs on Music Unlimited and all songs saved to your device 3 View the current play queue 4 Album art if available 5 Tap to go to the previous song in the play queue Touch an...

Страница 67: ...mize the WALKMAN application When a song is playing tap to go to the Home screen The WALKMAN application stays playing in the background To open the WALKMAN application when it is playing in the background 1 While a song is playing in the background tap the to open the recently used applications window 2 Tap the WALKMAN application WALKMAN homescreen The WALKMAN homescreen gives you an overview of...

Страница 68: ...To delete a shortcut From the WALKMAN home screen touch and hold a shortcut until it magnifies and your device vibrates then drag the item to You can only delete shortcuts that you create yourself You can also drag default shortcuts to but they only get hidden not deleted To update your music with the latest information 1 From the WALKMAN home screen tap 2 Tap Download music info Start Your device...

Страница 69: ...rom the list that appears To delete a playlist 1 Open the WALKMAN home screen then tap Playlists 2 Touch and hold the playlist that you want to delete 3 Tap Delete 4 Tap Delete again to confirm You cannot delete default playlists Sharing music To send a song 1 Open the WALKMAN home screen 2 Browse to the song or album that you want to send then touch and hold the song title 3 Tap Share 4 Select an...

Страница 70: ...d sound VPT 3 Select a setting then tap OK to confirm Visualizer The Visualizer adds visual effects to your songs as you play them The effects for each song are based on the characteristics of the music They change for example in response to changes in the music s volume rhythm and frequency level You can also change the background theme To turn on the Visualizer 1 In the WALKMAN application tap 2...

Страница 71: ...our own region is shown To view TrackID charts from another region 1 Open the TrackID application then tap Charts 2 Tap Regions then select a country or region To buy a track recognized by the TrackID application 1 After a track has been recognized by the TrackID application tap Download 2 Follow the instructions in your device to complete your purchase You can also select a track to buy by openin...

Страница 72: ...riety of devices or sync your playlists and music using a PC that runs the Windows operating system Go to www sonyentertainmentnetwork com for more information Sony Entertainment Network with Video Unlimited and Music Unlimited is not available in every market Separate subscription required Additional terms and conditions apply To get started with Music Unlimited 1 Open the WALKMAN home screen 2 T...

Страница 73: ... the frequency band to search for a channel 9 A saved favorite channel 10 Move down the frequency band to search for a channel To listen to the FM radio 1 Connect a headset or a set of headphones to your device 2 From your Home screen tap 3 Find and tap FM radio The available channels appear as you scroll through the frequency band When you start the FM radio available channels appear automaticall...

Страница 74: ...e radio channels To save a channel as a favorite 1 When the radio is open navigate to the channel that you want to save as a favorite 2 Tap 3 Enter a name and select a color for the channel then press Save To listen to a favorite radio channel 1 Tap 2 Select an option To remove a channel as a favorite 1 When the radio is open navigate to the channel that you want to remove 2 Tap then tap Delete So...

Страница 75: ...cool down In such cases you must wait a while until the camera is ready to shoot video again To take a photo from the lock screen 1 To activate the screen briefly press the power key 2 To activate the camera touch and hold and drag upwards 3 After the camera opens tap To take a photo using the camera key 1 Activate the camera 2 Press the camera key fully down To take a photo by tapping the on scre...

Страница 76: ...ppear 3 Tap 4 Tap Delete to confirm Face detection You can use face detection to bring an off center face into focus The camera automatically detects up to five faces indicated by white frames A yellow frame shows which face has been selected for focus Focus is set to the face closest to the camera You can also tap one of the frames to select which face should be in focus To turn on face detection...

Страница 77: ...hoto can get geotagged When neither of these two symbols appear geotagging is turned off To turn on geotagging 1 From your Home screen tap 2 Tap Settings Location 3 Drag the slider beside Location to the right 4 Activate the camera 5 Tap then tap 6 Drag the slider beside Geotagging to the right 7 Tap OK General camera settings Capturing mode settings overview Superior auto Optimize your settings t...

Страница 78: ...information touch and hold Product details then drag upward AR effect You can apply AR augmented reality effects to your photos and make them more fun This setting lets you integrate 3D scenes into your photos as you take them Just select the scene you want and adjust its position in the viewfinder Creative effect You can apply different effects on your photos or videos Add a Nostalgic effect to m...

Страница 79: ...n launch the camera when the screen is locked by pressing and holding down the camera key Launch and capture When this setting is activated you can launch the camera and capture a photo automatically when the screen is locked by pressing and holding down the camera key Launch and record video When this setting is activated you can launch the camera and start capturing video when the screen is lock...

Страница 80: ...gapixel resolution with 16 9 aspect ratio Suitable for photos you want to view on widescreen displays 8MP 3264 2448 4 3 8 megapixel resolution with 4 3 aspect ratio Suitable for photos you want to view on non widescreen displays or print in high resolution 8MP 3840 2160 16 9 8 megapixel resolution with 16 9 aspect ratio Suitable for photos you want to view on widescreen displays 3MP 2048 1536 4 3 ...

Страница 81: ...face You can also select which face to focus on by tapping it on the screen When you tap the camera screen a blue frame shows which face is selected and in focus Face detection cannot be used for all scene types Continuous autofocus is on Touch focus Touch a specific area on the camera screen to set the area of focus Continuous autofocus is off Touch and hold the camera screen until the yellow foc...

Страница 82: ... mode Preview You can choose to preview photos or videos just after you shoot them Unlimited The preview of the photo or video appears after you shoot it 5 seconds The preview of the photo or video appears for 5 seconds after you shoot it 3 seconds The preview of the photo or video appears for 3 seconds after you shoot it Edit The photo or video opens for editing after you shoot it Off The photo o...

Страница 83: ...taken at night or in poorly lit environments Due to the long exposure time the camera must be held still or placed on a stable surface Night scene Use when taking photos at night or in poorly lit environments Due to the long exposure time the camera must be held still or placed on a stable surface Hand held twilight Use for taking hand held low light photos with reduced noise and blur High sensiti...

Страница 84: ...hout holding the device Use it to record group videos where everyone can be in the video You can also use the self timer to avoid shaking the camera when recording videos On 10 sec Set a 10 second delay from when you tap the camera screen until the video begins to record On 2 sec Set a 2 second delay from when you tap the camera screen until the video begins to record Off The video begins to recor...

Страница 85: ...age Calculates the exposure based on the amount of light striking the whole image Spot Adjusts the exposure in a very small part of the image that you want to capture This setting is only available in Manual capturing mode SteadyShot When recording a video it can be difficult to hold the device steady The stabilizer helps you by compensating for small movements of the hand Microphone Select whethe...

Страница 86: ... lit environments Videos of fast moving objects may get blurred Hold your hand steady or use a support Turn off night mode when lighting conditions are good to improve the video quality Beach Use for videos of seaside or lakeside scenes Snow Use in bright environments to avoid overexposed videos Sports Use for videoing fast moving objects Short exposure time minimizes motion blurring Party Use for...

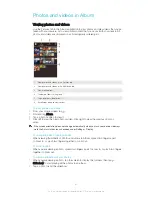
Страница 87: ... 4 Flick left to view the next photo or video Flick right to view the previous photo or video If the screen orientation does not change automatically when you turn your device sideways mark the Auto rotate screen checkbox under Settings Display To change the size of the thumbnails When viewing thumbnails of photos and videos in Album spread two fingers apart to zoom in or pinch two fingers togethe...

Страница 88: ...that you ve stored on your device You can also manage them in different ways For example you can work with photos in batches delete photos and link them to contacts You might not be able to copy send or transfer copyright protected items Also some items may not send if the file size is too large To share a photo or video 1 In Album find and tap the photo or video that you want to share 2 Tap the s...

Страница 89: ...viewing a face in full screen view tap the screen to display the toolbars then tap Edit name tags 2 Tap OK 3 Tap the name of the face that you want to edit 4 Edit the name then tap Done Add as new person Editing photos with the Photo editor application You can edit and apply effects to original photos that you ve taken with your camera For example you can change the light effects After you save th...

Страница 90: ...hen select an option 4 To save a copy of the edited photo tap Save Photo albums The My albums tab in the Album application gathers together all your photo albums including albums of photos and videos taken with the camera as well as content that you share online via services such as PlayMemories Picasa and Facebook Once you are logged in to such services you can manage content comment on photos an...

Страница 91: ... comments in the input field then tap Post To Like a photo or video on Facebook While viewing a photo or video from one of your Facebook albums tap the screen to display the toolbars then tap to show that you Like the item on Facebook Viewing your photos on a map Adding location information to photos is referred to as geotagging You can view and tag your photos on a map and show friends and family...

Страница 92: ...e location of the photo tap the location on the map where you want to move the photo to 4 When you are done tap OK to save the geotag and return to the photo viewer To view geotagged photos on a map 1 From your Home screen tap 2 Find and tap Album My albums Maps 3 Tap a photo to view it in full screen To view geotagged photos on a globe 1 From your Home screen tap 2 Find and tap Album My albums Gl...

Страница 93: ...ony Entertainment Network with Video Unlimited and Music Unlimited is not available in every market Separate subscription required Additional terms and conditions apply To play a video in Movies 1 From your Home screen tap then find and tap Movies 2 Find and tap the video that you want to play If the video is not displayed on the screen tap All in the My Collection tab then find and tap the video ...

Страница 94: ... more and download Sony Bridge for Mac go to www sonymobile com global en tools bridge for mac Managing video content To get movie information manually 1 Make sure your device has an active data connection 2 From your Home screen tap then find and tap Movies 3 Tap All in the My Collection tab to browse to the thumbnail of a file that you want to get information about 4 Touch and hold the thumbnail...

Страница 95: ...rtainment Network account then you can use that account instead Sony Entertainment Network with Video Unlimited and Music Unlimited is not available in every market Separate subscription required Additional terms and conditions apply To get started with Video Unlimited 1 From your Home screen tap 2 Find and tap 3 If you are starting Video Unlimited for the first time tap Continue in the Welcome sc...

Страница 96: ...ons to view your media files on the TV To view help about using the TV remote control 1 While your device is connected to the TV set drag the status bar downward to open the Notification panel 2 Tap MHL connected You can also press the yellow button on the TV remote control to open the Notification panel To disconnect your device from the TV set Disconnect the MHL cable or the MHL adaptor from you...

Страница 97: ...ust be connected to the same Wi Fi network as your device To play a shared track on your device 1 Make sure the devices that you want to share files with are connected to the same Wi Fi network as your device 2 From your Home screen tap then find and tap WALKMAN 3 Select a device from the list of connected devices 4 Browse the folders of the connected device and select the track that you want to p...

Страница 98: ...es on a Digital Media Renderer device Using DLNA technology you can push media content saved on your device to another device connected to the same Wi Fi network The other device must be able to function as a Digital Media Renderer DMR device which means that it can render or play content received from your device A DMR device can be for example a TV with DLNA function or a PC running Windows 7 or...

Страница 99: ... wireless controller and your device then you can connect your device to the TV using a cable To set up a connection between a DUALSHOCK 3 wireless controller and your device a USB On The Go adapter is required To set up a connection with a DUALSHOCK 3 wireless controller 1 Make sure the Bluetooth function on your device is turned on 2 Connect a USB On The Go OTG adaptor to your device 3 Connect t...

Страница 100: ...ens are active 2 To open the WALKMAN application tap then find and tap 3 Select a music category and browse to the track you want to share 4 Tap the track to play it You can then tap to pause the track The transfer works whether the track is playing or paused 5 Hold your device and the receiving device back to back so that the NFC detection areas of each device touch each other When the devices co...

Страница 101: ...such as a speaker or a headphone When establishing this kind of connection refer to the User guide of the compatible device for more information You may need to have Wi Fi or Bluetooth activated on both devices for the connection to work Bluetooth wireless technology Use the Bluetooth function to send files to other Bluetooth compatible devices or to connect to hands free accessories Turn on the B...

Страница 102: ... you to both pair and connect with the other device You can pair your device with several Bluetooth devices but you can only connect to one Bluetooth profile at the same time To pair your device with another Bluetooth device 1 Make sure the device you want to pair with has the Bluetooth function activated and is visible to other Bluetooth devices 2 From your device s Home screen tap 3 Find and tap...

Страница 103: ...e receiving device 9 Receiving device Accept the incoming item To receive items using Bluetooth 1 Make sure that the Bluetooth function is on and is visible to other Bluetooth devices 2 The sending device now starts sending data to your device 3 If prompted enter the same passcode on both devices or confirm the suggested passcode 4 When you are notified of an incoming file to your device drag the ...

Страница 104: ...n times of the day For example when you connect your headset between 7am and 9am you can decide that The WALKMAN application starts The web browser opens the morning paper The ring volume is set to vibrate With Smart Connect you can also manage your accessories such as SmartTags and SmartWatch Refer to the User guide of the specific accessory for more information 1 Tap to display all added devices...

Страница 105: ...Connect application to manage a range of smart accessories that you can connect to your device including SmartTags SmartWatch and Smart Wireless Headset pro from Sony Smart Connect downloads any necessary applications and also finds third party applications when available Previously connected devices show in a list that allows you to get more information about the features of each device To pair a...

Страница 106: ...ut reaching for your real wallet You can also keep information about special offers on your device To be able to pay for goods using your cellular device you need to first sign up with a wallet payment service They can be offered for example by Google or by your network operator For more information about such wallet services refer to your service provider You can read more about Google Wallet at ...

Страница 107: ...enabled by default You can disable either option manually To allow Google apps to access your location 1 From your Home screen tap 2 Find and tap Settings Google Location settings 3 Drag the slider beside Let Google apps access your location to the right You must be logged into your Google account to be able to use location services Improving GPS accuracy The first time you use the GPS function in...

Страница 108: ...6 View help and options To show your location on the map 1 From your Home screen tap 2 Find and tap Maps then tap To search for a location 1 From your Home screen tap 2 Find and tap Maps 3 In the search field enter the name of the location you want to find 4 Tap the Enter key on the keyboard to start the search or select a suggested location from the list If the search is successful the location i...

Страница 109: ...t made available via MirrorLink To connect your device to a car infotainment system Connect your device and the car infotainment system using a USB cable The screen of your device appears on the screen of the infotainment system You may need to start MirrorLink manually if the connection between your device and the infotainment system is not established automatically To start MirrorLink manually 1...

Страница 110: ...ice 1 Select a view type and the calendars you want to view 2 Add a calendar event 3 Return to the current date 4 Access settings and other options 5 Flick left or right to browse more quickly 6 Agenda for the selected day To create a calendar event 1 From your Home screen tap then tap Calendar 2 Tap 3 If you have synchronized your calendar with one or more accounts select the account you want to ...

Страница 111: ...4 If location services are disabled tap Add then search for the city you want to add For more information about how to enable location services see Using location services on the 107 page To change weather forecast settings in the Calendar application 1 From your Home screen tap then tap Calendar 2 Tap then tap Settings 3 Tap Weather forecast 4 Adjust the settings as desired Alarm and clock You ca...

Страница 112: ...m clock application then touch and hold the alarm that you want to delete 2 Tap Delete alarm then tap Yes To set the sound for an alarm 1 Open the Alarm clock application then tap the alarm you want to edit 2 Tap Alarm sound and select an option or tap to select from your music files 3 Tap Done twice To set a recurring alarm 1 Open the Alarm clock application then tap the alarm you want to edit 2 ...

Страница 113: ...rom your Home screen tap 2 Find and tap Settings About phone Usage info settings 3 Mark the Send usage info checkbox if it is not already marked 4 Tap Agree Computer tools There are a number of tools available to help you connect your device to a computer and manage content such as contacts movies music and photos PC Companion for Microsoft Windows PC Companion is a computer application that gives...

Страница 114: ...ve an Internet connected Apple Mac computer that runs Mac OS version 10 6 or later To install Sony Bridge for Mac on an Apple Mac computer 1 Connect your device to an Apple Mac computer using a USB cable 2 Your device Tap Install 3 Computer The Sony Bridge for Mac installation starts automatically Follow the on screen instructions to complete the installation Learn more and download Sony Bridge fo...

Страница 115: ...onnection You need a USB cable and a PC running the PC Companion application or an Apple Mac computer running the Sony Bridge for Mac application If you don t have the PC Companion or the Sony Bridge for Mac application installed on the relevant computer connect your device to the computer using a USB cable and follow the on screen installation instructions To update your device using a computer 1...

Страница 116: ...rnail under the right or left edge of the label tray then drag the tray outward to view your IMEI number You can also open the phone dialer on your device and enter 06 to view the IMEI number To view your IMEI number in the device 1 From your Home screen tap 2 Find and tap Settings About phone Status 3 Scroll to IMEI to view the IMEI number Battery and power management Your device has an embedded ...

Страница 117: ...u are activating STAMINA mode for the first time the Extended standby checkbox is marked by default To choose when to activate STAMINA mode 1 From your Home screen tap 2 Find and tap Settings Power management STAMINA mode Activation 3 Drag the slider to adjust the battery level you want to activate STAMINA mode at 4 Tap OK appears in the status bar when the battery reaches the level you ve set To ...

Страница 118: ...based Wi Fi to the right Improving battery time by queuing background data You can improve battery performance by setting your device to send background data at pre defined intervals when you re not using it that is when the screen is not active To allow the queuing of background data 1 From your Home screen tap 2 Find and tap Settings Power management 3 Mark the checkbox beside Queue background d...

Страница 119: ...k the file types you want to transfer to the memory card 5 Tap Transfer To stop applications and services from running 1 From your Home screen tap 2 Find and tap Settings Apps Running 3 Select an application or service then tap Stop To format the memory card 1 From your Home screen tap 2 Find and tap Settings Storage Erase SD card 3 To confirm tap Erase SD card Erase everything All content on the ...

Страница 120: ...e name of your device appears on the screen click Network configuration and follow the instructions to pair the computer and your device 4 When you are done pairing disconnect the USB cable from both devices To connect wirelessly to a paired device 1 Make sure Media transfer mode is enabled on your device It is normally enabled by default 2 Make sure the Wi Fi function is turned on 3 From your Hom...

Страница 121: ...puter detects your device 3 Computer Click Back up restore and select a backup file from the backup records then follow the on screen instructions to back up data from your device Backing up with the Backup and restore application You can only use this method to back up and restore content between the same Android software version You cannot use it to restore content after a system upgrade The Bac...

Страница 122: ... the cover of the micro SIM card slot 2 Using the tip of a pen or a similar object press and hold down the OFF button until the device shuts down Do not use overly sharp objects that could damage the OFF button To perform a factory data reset To avoid permanent damage to your device do not restart your device while a reset procedure is underway 1 Before you start be sure to back up any important d...

Страница 123: ...ried Please note that the drying time can be up to three hours depending on the environment During this time you can however use other features in the device that do not utilize the speaker or microphone All compatible accessories including batteries chargers hands free devices and micro USB cables are not waterproof and dust resistant on their own Your warranty does not cover damage or defects ca...

Страница 124: ...bited by rights of third parties including but not limited to restriction under applicable copyright laws You and not Sony are entirely responsible for additional content that you download to or forward from your mobile device Prior to your use of any additional content please verify that your intended use is properly licensed or is otherwise authorized Sony does not guarantee the accuracy integri...

Отзывы: