o
If the fax configuration information has already been registered, the [Send Fax Wizard] window, which can be viewed under "
Sending a fax
" below, will appear instead of the [Fax Configuration Wizard] window.
5.
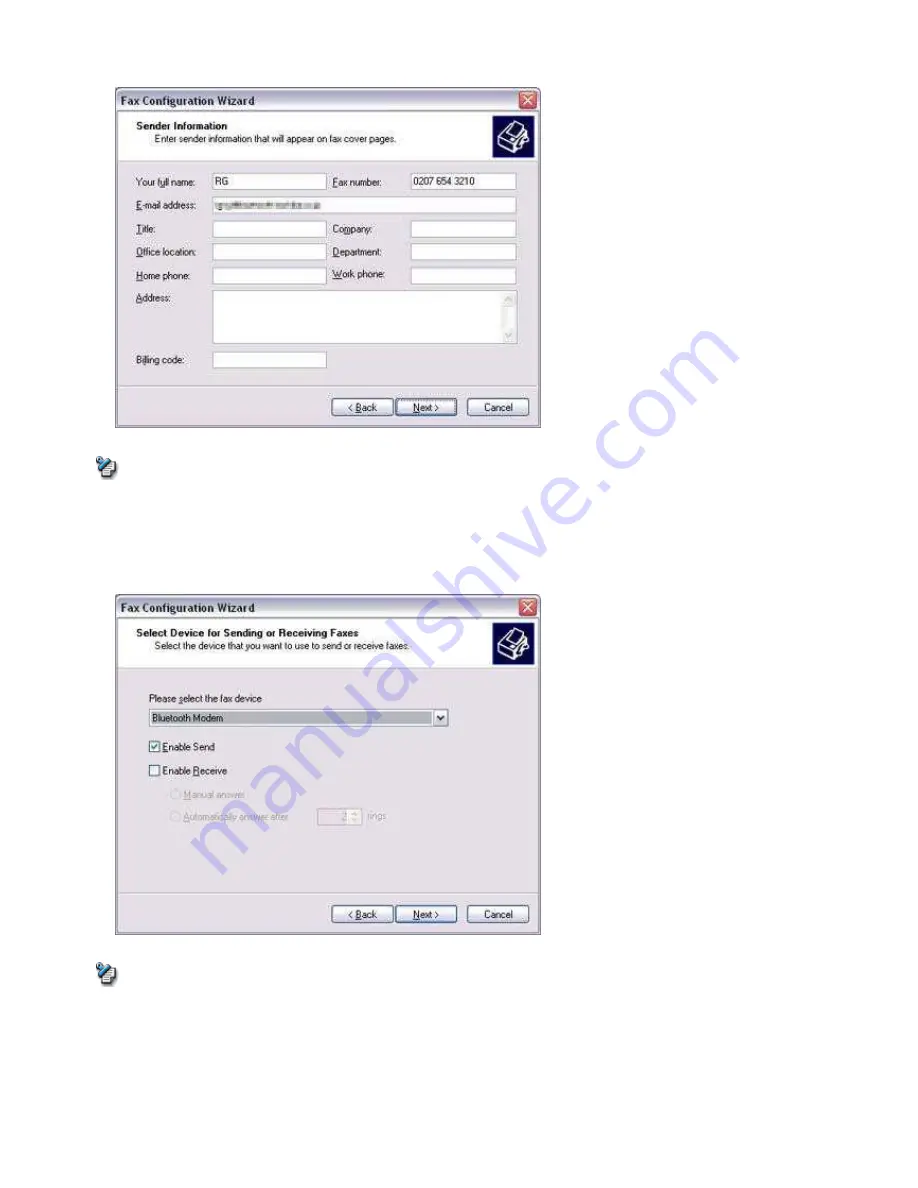
Enter the sender information, and click on the [Next] button
Note
o
The sender information that you configure here will be automatically appended as header information when you send a fax.
The [Fax Configuration Wizard (Select Device for Sending or Receiving Faxes)] window will appear.
6.
Select a device to be used for fax transmissions, enable the device for sending or receiving, and then click on the [Next] button
Note
o
If [Enable Receive] is selected, the device will be on standby for receiving faxes even if it is not sending or receiving anything,
and therefore will be in continuous connection to the wireless modem (when
COM Auto Connect
is on).
Please decide whether to select this option based on the desired objective and/or frequency of transmission.
The [Fax Configuration Wizard (Transmitting Subscriber Identification (TSID))] window will appear.
7.
Click on the [Next] button
It is important that you do not change the transmitter subscriber identification.
Page 563
Содержание VGN-BX563B - VAIO - Pentium M 1.73 GHz
Страница 10: ...Relatedtopics Exchanging files with PCs and PDAs Page 10 ...
Страница 54: ...Click on the Yes button in the disconnection confirmation dialog boxthat appears Page 54 ...
Страница 67: ...Page 67 ...
Страница 81: ...An image of the received faxwill be displayed Related topic Sending a fax Page 81 ...
Страница 95: ...An image of the received faxwill be displayed Related topic Sending a fax Page 95 ...
Страница 112: ...Page 112 ...
Страница 139: ...Please click on the OK button to close the message and repeat the procedure Page 139 ...
Страница 157: ...Page 157 ...
Страница 197: ...An image of the received faxwill be displayed Related topic Sending a fax Page 197 ...
Страница 218: ...An image of the received faxwill be displayed Related topic Sending a fax Page 218 ...
Страница 223: ...Please click on the OK button to close the message and repeat the procedure Page 223 ...
Страница 231: ...Click on the Yes button in the disconnection confirmation dialog boxthat appears Page 231 ...
Страница 254: ...Page 254 ...
Страница 294: ...Page 294 ...
Страница 301: ...Page 301 ...
Страница 327: ...Page 327 ...
Страница 361: ...Page 361 ...
Страница 366: ...The mouse will be connected Page 366 ...
Страница 370: ...The new icon will appear Page 370 ...
Страница 372: ...Page 372 ...
Страница 378: ...Page 378 ...
Страница 404: ...Page 404 ...
Страница 427: ...Click on the Yes button in the disconnection confirmation dialog boxthat appears Page 427 ...
Страница 440: ...Page 440 ...
Страница 454: ...An image of the received faxwill be displayed Related topic Sending a fax Page 454 ...
Страница 468: ...An image of the received faxwill be displayed Related topic Sending a fax Page 468 ...
Страница 485: ...Page 485 ...
Страница 512: ...Please click on the OK button to close the message and repeat the procedure Page 512 ...
Страница 530: ...Page 530 ...
Страница 570: ...An image of the received faxwill be displayed Related topic Sending a fax Page 570 ...
Страница 591: ...An image of the received faxwill be displayed Related topic Sending a fax Page 591 ...
Страница 596: ...Please click on the OK button to close the message and repeat the procedure Page 596 ...
Страница 604: ...Click on the Yes button in the disconnection confirmation dialog boxthat appears Page 604 ...
Страница 627: ...Page 627 ...
Страница 667: ...Page 667 ...
Страница 674: ...Page 674 ...
Страница 700: ...Page 700 ...
Страница 738: ...Page 738 ...


