background image

Note

o

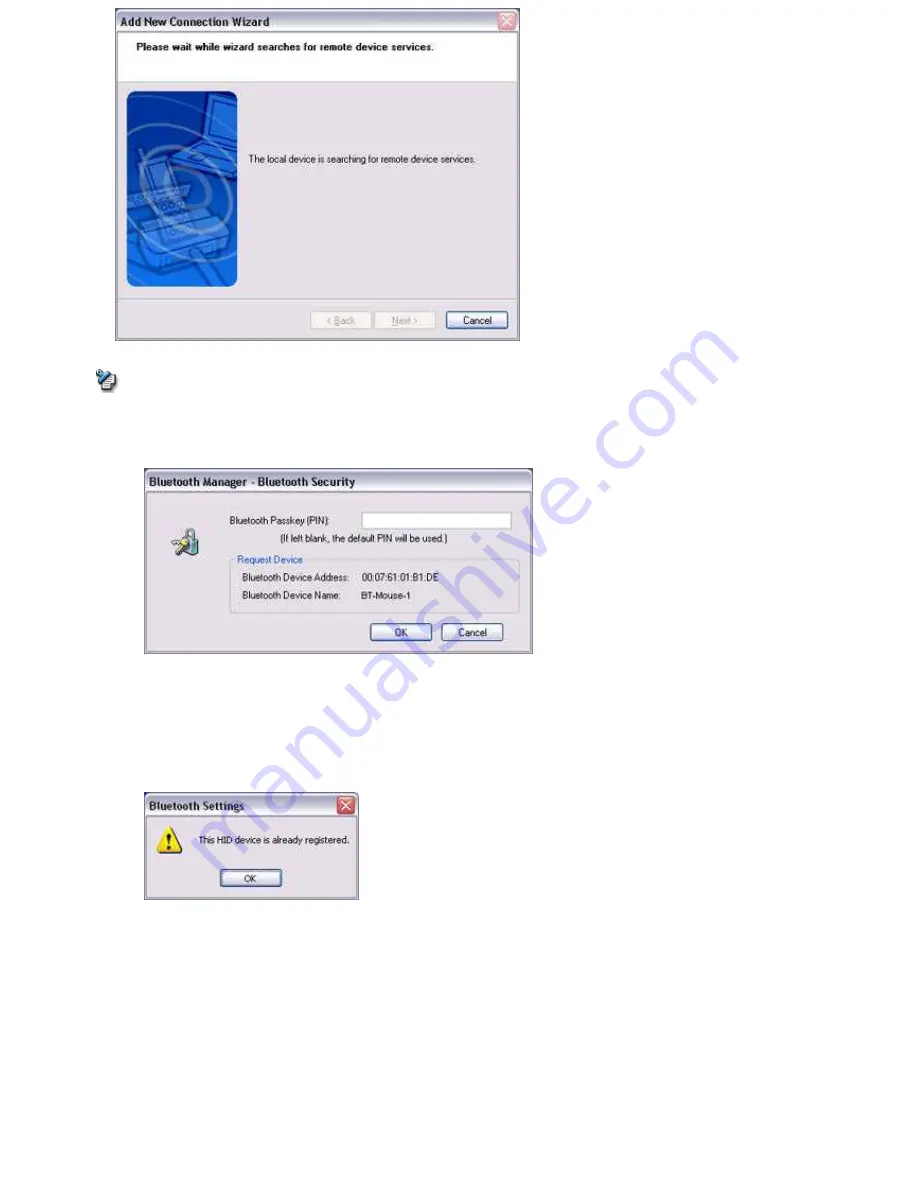
When a service has been detected, a window prompting you to enter the Bluetooth passkey (PIN code) may appear. Please enter
the passkey and click on the [OK] button.
Please refer to your device instruction manual for information on which passkey to use.
 

o

If you have not entered your Bluetooth passkey after a certain amount of time has passed, the connection process will be
cancelled for security reasons. Please perform the passkey entry process again.

o

If you try to register a device that has already been registered, the following message will appear, and you will not be able to
proceed with further operation.
Please click on the [OK] button to close the message.

The services supported by the device will be displayed.

2.

Select the desired service and click on the [Next] button

Page  28

Содержание VGN-BX563B - VAIO - Pentium M 1.73 GHz

Страница 1: ...an use Contents of the BluetoothTM Utility Important This Help is oriented towards PCs that are compatible with BluetoothTM wireless technology whether onboard or via installed communications cards or adapters as supported by the BluetoothTM Utility Some of the described functions may be impossible to use in your operating environment The type or configuration of your PC may cause the POWER OFF PO...

Страница 2: ...ing onboard Bluetooth wireless technology to let them communicate with one another will make it possible for data to be readily exchanged between the devices A maximumof seven Bluetooth wireless technology devices may be connected together By using Bluetooth wireless technology to connect to a mouse keyboard modem printer or other device you can do away with messy cabling and avoid any concerns ab...

Страница 3: ...s situated in locations beyond the reach of the radio waves will not recognize each other which will make communication impossible In particular please ensure that your devices are located close enough so that they can communicate with each other before you initially register and configure them Note PCs have a communication distance restriction of ten meters Please refer to the instruction manuals...

Страница 4: ...ireless technology cannot be used if the devices have not been switched ON Some PCs and other components will have a Bluetooth wireless technology communication switch that is operated independently fromthe main power Bluetooth wireless technology cannot function if this switch has been turned off Using PCs with onboard Bluetooth wireless technology When using a Bluetooth wireless technology USB a...

Страница 5: ...uage In the above example the traveller and his her counterpart correspond to the devices the languages to the profiles and the dialogues between the two people to the services The former example refers to a situation where a service can be performed because the devices support a common profile whereas the latter example refers to a situation where a service cannot be performed because a common pr...

Страница 6: ...ncedAudio Distribution Profile Allows audio data to be exchanged between wireless headsets and other audio devices as well as allowing high quality music playback AVRCP Audio Video Remote Control Profile A Vremote control functions such as play and stop The BluetoothTM Utility supports remote control operation GAVDP Generic Audio Video Distribution Profile Basic profile used to support A2DP AVRCP ...

Страница 7: ...e Camera Bluetooth Local COM Wireless File Transfer Bluetooth Settings This program enables you to easily configure settings when you connect to a BluetoothTM wireless technology device for the first time The function of a configured and registered device is displayed on the main window as a connection icon As a rule the device will be connected automatically after having been set up however a sho...

Страница 8: ...ges to or exchange business card data with a wireless device by selecting the icon of the counterpart device or using the right click menu in Explorer The wireless devices to which you are connecting must also support the same service functions FTP and OPP Relatedtopics Exchanging files with PCs and PDAs Sending images to mobile telephones Sending images to PCs or PDAs Exchanging business card dat...

Страница 9: ...uetoothTM Utility If you need to create a client COM port with the Bluetooth Setup Utility it can be created automatically without having to start the program Relatedtopics Manually creating a virtual Bluetooth COM port Wireless File Transfer You can send a file wirelessly to another device by right clicking on the intended file and using the Sending to Bluetooth Device menu that appears Page 9 ...

Страница 10: ...Relatedtopics Exchanging files with PCs and PDAs Page 10 ...

Страница 11: ... on the BluetoothTM Utility functions Flow of operation Basic settings Making the most of your BluetoothTM wireless technology device Using the features more effectively BluetoothTM Utility functions in detail Note The BluetoothTM Utility operates under Windows XP and Windows 2000 The descriptions in the examples mainly pertain to operation under Windows XP Windows XP Microsoft Windows XP Operatin...

Страница 12: ...d fromthe Bluetooth Settings window Enter Bluetooth passkey PIN code if required by the device During these stages of the set up process the BluetoothTM wireless technology device must be set to Connectability mode Simply turning the power on will activate Connectability mode in certain devices Please refer to the device instruction manual for further details Next Page 12 ...

Страница 13: ...iority shall be selected and registered Express Mode is normally recommended for device set up Custom Mode After having been detected the services supported by the device are displayed as a list fromwhich you can select the desired function s CustomMode must be used to set up a device if for example you wish to use a modem station to send a fax because in Express Mode the DUN profile will be autom...

Страница 14: ...ms Bluetooth Bluetooth Settings Note o The same result can be achieved by right clicking on the BluetoothTM wireless technology icon in the task tray and selecting Bluetooth Settings fromthe menu that appears The Bluetooth Settings window below will appear when other devices have already been registered Please click the New Connection button to open the Add New Connection Wizard window If no devic...

Страница 15: ...please proceed directly to Detecting BluetoothTM wireless technology Devices continued in Detecting BluetoothTM wireless technology Devices Next Page 15 ...

Страница 16: ...ction Wizard window will appear 1 Switch the mouse power ON to make it connectable Please refer to the mouse instruction manual for details on this procedure 2 Confirm that Express Mode has been selectedin the AddNewConnection Wizard Welcome to the AddNewConnection Wizard window andclick on the Next button Searching for devices will start Page 16 ...

Страница 17: ...will appear in the Add New Connection Wizard Select Device window Note o If no device is found please confirm that the device has been made connectable and click on the Update button A further device search will be performed continued in Detecting Services Next Page 17 ...

Страница 18: ...tep When the mouse has been detected the name and address of the device will appear in the Add New Connection Wizard Select Device window 1 Select the mouse device name from Device List andclick on the Next button Searching for services will start Page 18 ...

Страница 19: ... instruction manual for information on which passkey to use o If you have not entered your Bluetooth passkey after a certain amount of time has passed the connection process will be cancelled for security reasons Please perform the passkey entry process again A message will appear prompting you to prepare the device for connection 2 Click on the OK button Note o When the settings information has b...

Страница 20: ...w Connection Wizard Connection Name Setup window will appear if a service has been properly detected 3 Select the type andname of the icon to be displayedonce the device has been registered andclick on the Next button Note o If you wish to change the icon please click on the Change Icon button and select your preferred icon from the list that appears continued in Registering Settings Information N...

Страница 21: ...ious step The Add New Connection Wizard Completing the Add New Connection Wizard window will appear 1 Click on the Finish button The Bluetooth Settings window will appear The icons of the registered devices will appear and the devices will be ready to use Page 21 ...

Страница 22: ...Note The connection icons and icon names can be changed Changing a connection icon name Changing a connection icon Page 22 ...

Страница 23: ... Bluetooth Bluetooth Settings Note o The same result can be achieved by right clicking on the BluetoothTM wireless technology icon in the task tray and selecting Bluetooth Settings fromthe menu that appears The Bluetooth Settings window below will appear when other devices have already been registered Please click the New Connection button to open the Add New Connection Wizard window If no devices...

Страница 24: ...please proceed directly to Detecting BluetoothTM wireless technology Devices continued in Detecting BluetoothTM wireless technology Devices Next Page 24 ...

Страница 25: ...ection Wizard window will appear 1 Switch the mouse power ON to make it connectable Please refer to the mouse instruction manual for details on this procedure 2 Confirm that Custom Mode has been selectedin the AddNewConnection Wizard Welcome to the AddNewConnection Wizard window andclick on the Next button Searching for devices will start Page 25 ...

Страница 26: ...will appear in the Add New Connection Wizard Select Device window Note o If no device is found please confirm that the device has been made connectable and click on the Update button A further device search will be performed continued in Detecting Services Next Page 26 ...

Страница 27: ...tep When the mouse has been detected the name and address of the device will appear in the Add New Connection Wizard Select Device window 1 Select the mouse device name from Device List andclick on the Next button Searching for services will start Page 27 ...

Страница 28: ...th passkey after a certain amount of time has passed the connection process will be cancelled for security reasons Please perform the passkey entry process again o If you try to register a device that has already been registered the following message will appear and you will not be able to proceed with further operation Please click on the OK button to close the message The services supported by t...

Страница 29: ...ation services If Express Mode is used to performthe set up the highest priority service in the device will be automatically selected and configured 3 Click on the OK button Note o When the settings information has been registered a window prompting you to enter the Bluetooth passkey PIN code may appear Please enter the passkey and click on the OK button Please refer to your device instruction man...

Страница 30: ...w Connection Wizard Connection Name Setup window will appear if a service has been properly detected 4 Select the type andname of the icon to be displayedonce the device has been registered andclick on the Next button Note o If you wish to change the icon please click on the Change Icon button and select your preferred icon from the list that appears continued in Registering Settings Information N...

Страница 31: ...ious step The Add New Connection Wizard Completing the Add New Connection Wizard window will appear 1 Click on the Finish button The Bluetooth Settings window will appear The icons of the registered devices will appear and the devices will be ready to use Page 31 ...

Страница 32: ...Note o The connection icons and icon names can be changed Changing a connection icon name Changing a connection icon Page 32 ...

Страница 33: ...ion on connecting the modemstation to a telephone line A Bluetooth passkey PIN code is required for you to connect to the modemstation Please make a note of your Bluetooth passkey before you start the set up process Setting up the modem station Procedure 1 Turn on the wireless modem station 2 Right click the BluetoothTM wireless technology icon in the task tray andthen click on AddNewConnection No...

Страница 34: ...rd Searching for devices window will appear 4 Select the device name of the wireless modem station from Device List andthen click on the Next button The Add New Connection Wizard Searching for Services window will appear Page 34 ...

Страница 35: ...asskey for the modem station under Bluetooth Passkey PIN code andthen click on the OK button Once the programhas finished searching for the devices the Add New Connection Wizard Device Selection window will appear 6 Click on the Next button Certain modems require you to configure initialization commands separately Please click on the Additional initialization Command Settings button enter the init...

Страница 36: ... are provided solely for purpose of explanation Please use your own telephone number ID and password according to the arrangement with your provider The settings will be registered and an icon will appear in the Bluetooth Settings window Connecting to the Internet You can connect to the Internet by following the procedure below if the connection destination registered when you configured the wirel...

Страница 37: ...ct button Important o A connection will be automatically established with the modemstation if COM Auto Connect is available If COM Auto Connect is not available please manually connect to the modem station The following message will appear once you have connected to the Internet 4 Endthe connection The window below will appear if you double click on the icon in the task bar Please click on the Dis...

Страница 38: ...he Bluetooth Settings window right click on the connection destination icon andthen click on Connect from the menu that appears A window indicating that the connection is being established will appear If the connection has been established successfully the connection icon and task tray will appear as shown below You will be able to browse Web pages using your browser and send and receive e mail Pa...

Страница 39: ...e mail the set up method will vary with the application 2 Endthe connection Right click on the icon and then click Disconnect to end the connection The following message will appear Click on the Yes button When the icon appears as shown below the connection will have ended Page 39 ...

Страница 40: ... to the mobile telephone Please make a note of your Bluetooth passkey before you start the set up process Configuring a mobile telephone for use as a modem Procedure 1 Turn on the mobile telephone andset it to be connectable Note o Please refer to the mobile telephone instruction manual for information on how to operate the device 2 Right click on the BluetoothTM wireless technology icon in the ta...

Страница 41: ...izard Searching for devices window will appear 4 Select the device name of the mobile telephone from Device List andthen click on the Next button The Add New Connection Wizard Searching for Services window will appear Page 41 ...

Страница 42: ...for the wireless modem station under Bluetooth Passkey PIN code andthen click on the OK button Once the programhas finished searching for the devices the Add New Connection Wizard Device Selection window will appear 6 Click on the Next button Certain modems require you to configure initialization commands separately Please click on the Additional Initialization Command Settings button enter the in...

Страница 43: ...are provided solely for purpose of explanation Please use your own telephone number ID and password according to the arrangement with your provider The settings will be registered and an icon will appear in the Bluetooth Settings window Connecting to the Internet You can connect to the Internet by following the procedure below if the connection destination registered when you configured the mobile...

Страница 44: ...button Important o A connection will be automatically established with the mobile telephone if COM Auto Connect is available If COM Auto Connect is not available please manually connect to the mobile telephone The following message will appear once you have connected to the Internet 4 Endthe connection The window below will appear if you double click on the icon in the task bar Please click on the...

Страница 45: ...he Bluetooth Settings window right click on the connection destination icon andthen click on Connect from the menu that appears A window indicating that the connection is being established will appear If the connection has been established successfully the connection icon and task tray will appear as shown below You will be able to browse Web pages using your browser and send and receive e mail Pa...

Страница 46: ... mail the set up method will vary with the application 2 Endthe connection Right click on the icon and then click Disconnect to end a connection The following message will appear Click on the Yes button When the icon appears as shown below the connection will have been ended Page 46 ...

Страница 47: ...nformation on how to set up the access point A Bluetooth passkey PIN code is required for you to connect to the access point Please make a note of your Bluetooth passkey before you start the set up process Setting up the access point Procedure 1 Turn on the access point andconfirm that a connection has been establishedwith the network 2 Right click the BluetoothTM wireless technology icon in the t...

Страница 48: ...ogramhas finished searching for the devices the Add New Connection Wizard Device Selection window will appear 4 Select the device name of the access point from Device List andthen click on the Next button The Add New Connection Wizard Searching for Services window will appear Page 48 ...

Страница 49: ...e OK button Service detection and COM port creation will be performed automatically The Add New Connection Wizard Create Connection Destination window will appear 6 Enter the connection name user name andpassword then click on the Next button Note o The user name and password are entered here to allow you to connect to the access point Page 49 ...

Страница 50: ...tton The Internet Options window will appear 8 Configure the connection method andthen click on the OK button Set the connection destination used for the LAN connection set up in 6 above as the default connection destination and then select Always dial my default connection 9 Click on the Next button Page 50 ...

Страница 51: ...e Next button Please click on the Next button if you are satisfied with the settings The Add New Connection Wizard Completing the Add New Connection Wizard window will appear 11 Click on the Finish button The access point icon will be registered in the Bluetooth Settings window This will complete the access point set up process Connecting to a LAN LAP Page 51 ...

Страница 52: ... an example of what happens when you use Direct connection as a connection name under Connect to access point If a name different from the connection name is used that name will appear under Connection Destination o Please simply click on Settings if no user name or password have been entered i e if those fields have been left blank o Please change the connection destination if a different connect...

Страница 53: ... are going to use has already been set up as a proxy server 1 Select Internet Options from the Tools menu in Internet Explorer The Internet Options window will appear 2 Click on the Connections tab andthen click on the Settings button 3 Enter the IP address andport number of the proxy server under Proxy Server andthen click on the OK button 3 Endthe connection Right click either on the connection ...

Страница 54: ...Click on the Yes button in the disconnection confirmation dialog boxthat appears Page 54 ...

Страница 55: ...mation on how to set up the access point A Bluetooth passkey PIN code is required for you to connect to the access point Please make a note of your Bluetooth passkey before you start the set up process Setting up the access point Procedure 1 Turn on the access point andconfirm that a connection has been establishedwith the network 2 Right click the BluetoothTM wireless technology icon in the task ...

Страница 56: ...ogramhas finished searching for the devices the Add New Connection Wizard Device Selection window will appear 4 Select the device name of the access point from Device List andthen click on the Next button The Add New Connection Wizard Searching for Services window will appear Page 56 ...

Страница 57: ...ll be performed automatically The Add New Connection Wizard Connection Name Settings window will appear 6 Enter the type andname of the icon displayedafter registration andthen click on the Next button Please click on the Next button if you are satisfied with the settings The Add New Connection Wizard Completing the Add New Connection Wizard window will appear 7 Click on the Finish button Page 57 ...

Страница 58: ...The access point icon will be registered in the Bluetooth Settings window This will complete the access point set up process Connecting to a LAN PAN Page 58 ...

Страница 59: ...d to the network Internet Explorer will start automatically and you will be able to exchange data with other computers on the network Note o Please follow the procedure below if you need to set up a proxy server to connect to the Internet the following procedure is not necessary if the PC you are going to use has already been set up as a proxy server 1 Select Internet Options from the Tools menu i...

Страница 60: ...andthen click on the OK button 3 Endthe connection Right click either on the connection icon under the Bluetooth Settings window or on the icon in the task tray and then click on Disconnect Click on the Yes button in the disconnection confirmation dialog boxthat appears Page 60 ...

Страница 61: ...number of devices that can be used to constitute a single personal area network is seven one server and sixclients A network comprising as many as seven devices could theoretically be built but an operating environment that involves the use of other BluetoothTM wireless technology devices leaving aside other complications might require the network to comprise fewer components By using the PAN prof...

Страница 62: ...rk 2 Click the Yes button The PAN server will be activated and an icon will accordingly appear in the tasktray Other devices that use the PAN profile will now be able to connect over the network Important When using the device as the server make sure that all user accounts have a password set for the security reasons The IP address of the server is automatically set up when it starts Please do not...

Страница 63: ...HCP server Operating as a client Connecting to a server as a client is performed fromthe Bluetooth Settings window as described below Procedure 1 Right click on the BluetoothTM wireless technology icon in the task tray andclick on AddNewConnection Note o Alternatively click on Start All Programs Bluetooth Bluetooth Settings and then on New Connection from the Bluetooth Settings window 2 Confirm th...

Страница 64: ...zard Searching for devices window will appear Once the programhas finished searching for the devices the Add New Connection Wizard Device Selection window will appear 4 Select the name of the device designatedas the server from Device List andthen click on the Next button Page 64 ...

Страница 65: ... New Connection Wizard ConfirmConnection Name window will appear 5 Click on the Next button The registered icon will appear in the Bluetooth Settings window onnecting to a server Procedure 1 Right click on the icon in the Bluetooth Settings window andthen click on Connect Page 65 ...

Страница 66: ...tion to a server Procedure 1 Right click on the icon in the Bluetooth Settings window andthen click on Disconnect A message confirming whether you wish to disconnect will appear Click on the Yes button Once you have disconnected the icon will change to indicate that the device is not connected Page 66 ...

Страница 67: ...Page 67 ...

Страница 68: ... for you to be able to send and receive faxes The description below is based on a example using Microsoft Fax which is installed with Windows XP as standard If you are going to use a commercially available faxapplication then please refer to the manual that came with the application for information on how to send and receive faxes Setting up the modem station Set up and register the modem station ...

Страница 69: ...Wizard Searching for devices window will appear Once the programhas finished searching for the devices the Add New Connection Wizard Select Device window will appear 4 Select the device name of the wireless modem station from Device List andthen click on the Next button Page 69 ...

Страница 70: ...ion for the first time enter the passkey for the device from the Bluetooth Passkey PIN Code window andthen click on the OK button Once the programhas finished searching for the services the Add New Connection Wizard Select Service window will appear 6 Select Fax under Select Service andthen click on the Next button Page 70 ...

Страница 71: ...performed Once the COM port and modem standard 33600 bps type registration is complete the Add New Connection Wizard Setting Connection Name screen will appear 7 Configure the type andname of the icon to appear after registration andclick on the Next button Please click only on the Next button once you are satisfied with the configuration Page 71 ...

Страница 72: ...ion Configure send receive settings and register faxinformation Procedure 1 Select Start Control Panel andthen double click on the Printers andOther Hardware icon Note o If the control panel is displayed in Classic view and you use Windows 2000 please start fromStep 2 2 Double click on the Printers andFaxes icon The Printers Faxes window will appear 3 Click on Install a local fax printer in the Pr...

Страница 73: ...ted in the Printers and Faxes screen 4 Click on Senda fax under Printer Tasks on the left side of the window If you have not yet configured a faxdevice the FaxConfiguration Wizard window will appear In the window you can enter settings pertaining to the sender yourself Note Page 73 ...

Страница 74: ...r 6 Select a device to be usedfor fax transmissions enable the device for sending or receiving andthen click on the Next button Note o If Enable Receive is selected the device will be on standby for receiving faxes even if it is not sending or receiving anything and therefore will be in continuous connection to the wireless modem when COM Auto Connect is on Please decide whether to select this opt...

Страница 75: ...nfiguration Wizard window will appear 8 Click on the Finish button The faxinformation will be have been registered and the FaxConsole window will appear This will complete the faxset up process Related topics Sending a fax and Receiving a fax Page 75 ...

Страница 76: ...ng a wireless modem station under Troubleshooting for how to change the send and receive settings once the service has been configured Procedure 1 Double click on the Fax icon in the Control Panel The FaxConsole window will appear 2 In the Fax Console window click File Sendfax The Send FaxWizard Starting the Send FaxWizard window will appear 3 Click on the Next button Page 76 ...

Страница 77: ...r 4 Enter the name andfax number of the destination party andthen click on the Next button The Send FaxWizard Preparing the Cover Page window will appear 5 Specify the cover page template subject line andnote body text andthen click on the Next button Page 77 ...

Страница 78: ... you wish to sendthe fax immediately select Now andthen click on the Next button The Send FaxWizard Completing the Send FaxWizard window will appear 7 Confirm the destination information andtransmission details andthen click on the Finish button Page 78 ...

Страница 79: ...The software will automatically dial the number and send the fax Once the faxhas been sent FaxMonitor will revert to standby mode Related topic Receiving a fax Page 79 ...

Страница 80: ...mstation before you receive a fax the device will be connected to the modemif Enable Receive has been selected or COM Auto Connect has been activated Procedure 1 When a fax arrives the Fax Monitor will start automatically as the fax is received Once the faxhas been received the FaxMonitor will revert to standby mode Note o If you have enabled manual faxreception the message below will appear when ...

Страница 81: ...An image of the received faxwill be displayed Related topic Sending a fax Page 81 ...

Страница 82: ...is based on a example using Microsoft Fax which is installed with Windows XP as standard If you are going to use a commercially available faxapplication then please refer to the manual that came with the application for information on how to send and receive faxes Setting up the mobile telephone Set up and register the mobile telephone as a faxservice Procedure 1 Turn on the mobile telephone andse...

Страница 83: ...click on the Next button The Add New Connection Wizard Searching for devices window will appear Once the programhas finished searching for the devices the Add New Connection Wizard Select Device window will appear 4 Select the device name of the mobile telephone from Device List andthen click on the Next button Page 83 ...

Страница 84: ... for the first time enter the passkey for the device from the Bluetooth Passkey PIN Code window andthen click on the OK button Once the programhas finished searching for the services the Add New Connection Wizard Select Service window will appear 6 Select Fax under Select Service andthen click on the Next button Page 84 ...

Страница 85: ...performed Once the COM port and modem standard 33600 bps type registration is complete the Add New Connection Wizard Setting Connection Name screen will appear 7 Configure the type andname of the icon to appear after registration andclick on the Next button Please click only on the Next button once you are satisfied with the configuration Page 85 ...

Страница 86: ...information Configure send receive settings and register faxinformation Procedure 1 Select Start Control Panel andthen double click on the Printers andOther Hardware icon Note o If the control panel is displayed in Classic view and you use Windows 2000 please start fromStep 2 2 Double click on the Printers andFaxes icon The Printers Faxes window will appear 3 Click on Set upfaxing in the Printers ...

Страница 87: ...ted in the Printers and Faxes screen 4 Click on Senda fax under Printer Tasks on the left side of the window If you have not yet configured a faxdevice the FaxConfiguration Wizard window will appear In the window you can enter settings pertaining to the sender yourself Note Page 87 ...

Страница 88: ...6 Select a device to be usedfor fax transmissions enable the device for sending or receiving andthen click on the Next button Note o If Enable Receive is selected the device will be on standby for receiving faxes even if it is not sending or receiving anything and therefore will be in continuous connection to the wireless modem when COM Auto Connect is on Please decide whether to select this optio...

Страница 89: ...nfiguration Wizard window will appear 8 Click on the Finish button The faxinformation will be have been registered and the FaxConsole window will appear This will complete the faxset up process Related topics Sending a fax and Receiving a fax Page 89 ...

Страница 90: ...Using a mobile telephone under Troubleshooting for how to change the send and receive settings once the service has been configured Procedure 1 Double click on the Fax icon in the Control Panel The FaxConsole window will appear 2 In the Fax Console window click File Sendfax The Send FaxWizard Starting the Send FaxWizard window will appear 3 Click on the Next button Page 90 ...

Страница 91: ...r 4 Enter the name andfax number of the destination party andthen click on the Next button The Send FaxWizard Preparing the Cover Page window will appear 5 Specify the cover page template subject line andnote body text andthen click on the Next button Page 91 ...

Страница 92: ... you wish to sendthe fax immediately select Now andthen click on the Next button The Send FaxWizard Completing the Send FaxWizard window will appear 7 Confirm the destination information andtransmission details andthen click on the Finish button Page 92 ...

Страница 93: ...The software will automatically dial the number and send the fax Once the faxhas been sent FaxMonitor will revert to standby mode Related topic Receiving a fax Page 93 ...

Страница 94: ...ation before you receive a fax the device will be connected to the modemif Enable Receive has been selected or COM Auto Connect has been activated Procedure 1 When a fax arrives the Fax Monitor will start automatically as the fax is received Once the faxhas been received the FaxMonitor will revert to standby mode Note o If you have enabled manual faxreception the message below will appear when a f...

Страница 95: ...An image of the received faxwill be displayed Related topic Sending a fax Page 95 ...

Страница 96: ...h ordinary cable connected printers Printing document and images SPP OPP 2 Not required Allows you to print business card data directly Printing business card data BIP Not required Allows you to print image data directly Printing images directly froma digital camera or other device Note 1 The majority of BluetoothTM wireless technology compatible printers support HCRP If you have selected Express ...

Страница 97: ... to the printer Please make a note of your Bluetooth passkey before you start the set up process Setting up the printer Procedure 1 Turn on the printer 2 Right click on the BluetoothTM wireless technology icon in the task tray andthen click on AddNewConnection Note o Alternatively click Start All Programs Bluetooth Bluetooth Settings and then click on New Connection from the active Bluetooth Setti...

Страница 98: ...devices window will appear Once the programhas finished searching for the devices the Add New Connection Wizard Device Selection window will appear 4 Select the device name of the printer from Device List andthen click on the Next button Page 98 ...

Страница 99: ...ndow andthen click on the OK button Once the services have been detected successfully connection to the device and creation of the HCRP port will be performed automatically If you have not yet installed a printer a message prompting you to install a printer will appear 6 Click on the OK button The Add Printer Wizard Starting the Add Printer Wizard window will appear 7 Click on the Next button Page...

Страница 100: ...t Local printer attachedto this computer remove the check next to Automatically detect andinstall my Plug andPlay printer andthen click on the Next button The Add Printer Wizard Select Printer Port window will appear 9 Select the desiredport andthen click on the Next button Page 100 ...

Страница 101: ... printer to be installed or click on the Use Device button andthen click on the Next button Please install the printer according to the instructions in the windows that follow Once installation is complete a message of confirmation will appear in the Add New Connection Wizard Printer Settings window 11 Click on Next Page 101 ...

Страница 102: ...Please click on the Next button if you are satisfied with the settings Note o You can change the connection icon and icon name Changing the connection icon name Changing the connection icon Printing Try to print fromthe message pad 1 Click File Print The Print screen will appear 2 Select wireless printer from under Select Printer andthen click on the Print button Page 102 ...

Страница 103: ...Note If you have connected to a printer using HCRP or SPP profiles all future BluetoothTM wireless technology connections to that printer will be established automatically once you have printed a document fromyour PC Page 103 ...

Страница 104: ...rinter using icons Printing image files on a printer by right clicking the mouse Note Below is a list of file types extensions of images that can be printed out directly o Bitmap bmp o JPEG jpg jpeg o PNG png Procedure Printing image files on a printer using icons 1 Turn on the printer 2 Click on the Bluetooth Information Exchanger icon on the Desktop Note o Alternatively open Explorer and click o...

Страница 105: ...the list please confirmthat the printer has been turned on and then click on Bluetooth Search Devices A device search will be performed 4 Drag anddropthe file to be sent on topof the icon of the destination printer The file will be sent to the printer If the file has been sent to the printer successfully the message below will appear and the image will be printed out Please click on the OK button ...

Страница 106: ...les to a printer by right clicking the mouse 1 Turn on the printer 2 Right click on the file to be sent andthen click on the destination printer under to Bluetooth Note o If your desired device does not appear in the list please confirmthat the device has been turned on and then click on to Bluetooth Search Other Devices Once the device has been detected the message below will appear Please select...

Страница 107: ...sage below will appear and the image will be printed out Please click on the OK button The message below will appear if the file transmission was unsuccessful Please click on the OK button to close the message and repeat the printing procedure Note o If the printer does not support the BIP profile the message below will appear Page 107 ...

Страница 108: ...siness card data by right clicking the mouse Procedure Printing business carddata using icons 1 Turn on the printer 2 Click on the Bluetooth Information Exchanger icon on the Desktop Note o Alternatively open Explorer and click on the Bluetooth Information Exchanger folder for the same result The Bluetooth Information Exchanger window will appear 3 Double click on the Object Push icon A list of de...

Страница 109: ...sired printer does not appear in the list please confirmthat the printer has been turned on and then click on Bluetooth Search Devices A device search will be performed 4 Drag anddropthe business carddata to be sent on topof the icon of the destination printer Page 109 ...

Страница 110: ...lick on the OK button The message below will appear if the business card transmission was unsuccessful Please click on the OK button to close the message and repeat the printing procedure Printing business carddata by right clicking the mouse 1 Turn on the printer 2 Right click on the business carddata to be sent andthen click on the destination printer under to Bluetooth Page 110 ...

Страница 111: ...lect the destination device and click on the Send button The business card will be sent to the printer If the business card has been sent to the printer successfully the message below will appear and the image will be printed out Please click on the OK button The message below will appear if the business card transmission was unsuccessful Please click on the OK button to close the message and repe...

Страница 112: ...Page 112 ...

Страница 113: ...edure 1 Right click on the BluetoothTM wireless technology icon in the task tray andclick on AddNewConnection Note o Alternatively click Start All Programs Bluetooth Bluetooth Settings and then click on New Connection from the Bluetooth Settings screen that has opened The Add New Connection Wizard Welcome to the Add New Connection Wizard will appear 2 Switch ON the stereo headphones andactivate Di...

Страница 114: ...ce the search for the devices has ended the Add New Connection Wizard Select Device screen will appear 4 Select the device name of the stereo headphones from the list andclick on the Next button The Add New Connection Wizard Searching for Services screen will appear Page 114 ...

Страница 115: ...ck applications o e Conferencing applications o Voice recognition applications Please finish connecting the stereo headphones before launching any of these applications Listening to music or other audio files 1 Playing music or other audio files on your PC Important o Please confirm the points below if you are unable to hear anything despite having properly connected the stereo headphones Click St...

Страница 116: ...connect the stereo headphones fromyour PC Music video playback applications e Conferencing applications Voice recognition applications Please completely disconnect the stereo headphones before launching any of these applications Please refer to the user guide for information on terminating a connection from the stereo headphones Playing music using remote control Music applications and video playb...

Страница 117: ...the appropriate item from the pull down menu of positions where the receive commandis to be displayed and then click on the OK button If the receive command appears but does not function properly sometimes the problemmay be rectified by changing the setting to Do not display The commands supported by this application are shown below Please refer to the headphone user guide for commands that are su...

Страница 118: ...vices that support this function Procedure 1 Double click on the BluetoothTM wireless technology icon in the task tray Launches Bluetooth Settings 2 Select Bluetooth from the menu andclick on Copyright Protection Setting The copyright protection dialog will appear 3 Tick the box next to Only connect to devices that are copyright protectedunder the SCMS T format andclick on the OK button Page 118 ...

Страница 119: ...ask tray andthen click on AddNewConnection Note o Alternatively click Start All Programs Bluetooth Bluetooth Settings and then click on New Connection from the active Bluetooth Settings window The Add New Connection Wizard Welcome to the Add New Connection Wizard window will appear 2 Confirm that Express Mode has been selected andthen click on the Next button The Add New Connection Wizard Searchin...

Страница 120: ...indow will appear 3 Select the device name of the keyboardfrom Device List andthen click on the Next button The Add New Connection Wizard Searching for Services window will appear 4 Use the wireless keyboardto enter the numbers that appear in Bluetooth Passkey PIN Code andthen hit the Enter key Page 120 ...

Страница 121: ...dd New Connection Wizard Connection Name Settings window will appear 5 Enter the type andname of the icon displayedafter registration andthen click on the Next button Please click on the Next button if you are satisfied with the settings Note o You can change the connection icon and icon name Changing a connection icon name Changing a connection icon Page 121 ...

Страница 122: ...ick on the Finish button The settings information will be registered and an icon will appear in the Bluetooth Settings window Note Pressing any key on the wireless keyboard will automatically connect it to the PC thereafter Please connect manually if automatic connection is unsuccessful Page 122 ...

Страница 123: ...passkey will require one If your mouse s user guide does not contain any passkey related information please consult the outlet where you purchased your mouse or the relevant support center 2 Right click on the BluetoothTM wireless technology icon in the task tray andthen click on AddNewConnection Note o Alternatively click Start All Programs Bluetooth Bluetooth Settings and then click on New Conne...

Страница 124: ... devices window will appear Once the programhas finished searching for the devices the Add New Connection Wizard Device Selection window will appear 4 Select the device name of the mouse from Device List andthen click on the Next button Page 124 ...

Страница 125: ...tration andthen click on the Next button Please click on the Next button if you are satisfied with the settings Note o Please use this window to change the connection name and icon Changing the connection icon name Changing the connection icon The Add New Connection Wizard Completing the Add New Connection Wizard window will appear 7 Click on the Finish button The settings information will be have...

Страница 126: ...Note o Clicking on one of the mouse buttons or otherwise operating it will automatically connect it to the PC thereafter Please connect manually if automatic connection is unsuccessful Page 126 ...

Страница 127: ... transfer cannot be used to send or receive business card data Please instead use Object Push to performthese activities Sending files to a PC or PDA using icons Sending files to a PC or PDA by right clicking the mouse Receiving files froma PC or PDA Procedure Sending files to a PC or PDA using icons 1 Turn on the PC or PDA 2 Double click on the Bluetooth Information Exchanger icon on the Desktop ...

Страница 128: ...will be performed o You can also use Image transfer when sending individual image files 4 Use the mouse to drag anddropthe file you wish to sendover the destination icon In this case the file will be sent to a PC named PC 1 Note o When using File transfer you can send individual files as well as entire folders 5 Confirm that the file is being sent The file will be sent to the PC Note o When sendin...

Страница 129: ...ion was unsuccessful Please click on the OK button to close the message and repeat the procedure Note o Files that have been sent will be saved in a file transfer shared folder on the destination device o Additionally with File transfer you can open the shared folder on the destination device using Explorer specify a subfolder and then send the file there o You can use Properties in the Bluetooth ...

Страница 130: ...ear in the list please confirmthat the device has been turned on and then select to Bluetooth Search other devices Once the devices have been detected the message below will appear Please select the destination device and then click on the Send button 3 Confirm that the file is being sent The file will be sent to the PC Note Page 130 ...

Страница 131: ...ssful Please click on the OK button to close the message and then repeat the procedure Note o Files that have been sent will be saved in a file transfer shared folder on the destination device Receiving files from a PC or PDA Your PC is able to receive files that have been saved in the shared folder on the destination PC or PDA Received files will be saved in the shared folder under File transfer ...

Страница 132: ...list of devices will appear in the File transfer window In this case the file will be received fromthe PDA named My Mobile 4 Double click on the PDA 1 icon The file saved in the shared folder in My Mobile will appear 5 Right click on the file you wish to receive andthen select Receive file Page 132 ...

Страница 133: ...med in the same manner as when receiving individual files If the file has been received successfully the message below will appear Please click on the OK button The message below will appear if the file transmission was unsuccessful Please click on the OK button to close the message and repeat the procedure Note o The received file will be saved in the Shared folder under File transfer in the Blue...

Страница 134: ...You can use Properties under the Bluetooth Information Exchanger to specify the location of the Shared folder on the hard drive Page 134 ...

Страница 135: ... be sent and received using Image transfer o Bitmap bmp o JPEG jpg jpeg o PNG png Sending images to a mobile telephone using icons Sending images to a mobile telephone by right clicking the mouse Procedure Sending images to a mobile telephone using icons 1 Turn on the PC or PDA Confirmthat a BluetoothTM wireless technology connection has been enabled before proceeding 2 Double click on the Bluetoo...

Страница 136: ...ansfer window Note o If the desired device does not appear in the list please confirmthat the device has been turned on and then select Bluetooth Search Devices A device search will be performed 4 Drag anddropthe file you wish to sendover the destination icon In this case the image will be sent to a mobile telephone named BT Phone 1 Page 136 ...

Страница 137: ...as unsuccessful Please click on the OK button to close the message and repeat the procedure Sending images to a mobile telephone by right clicking the mouse 1 Turn on the mobile telephone Confirmthat a BluetoothTM wireless technology connection has been enabled before proceeding 2 Right click on the file you wish to send andthen click on its destination from to Bluetooth Page 137 ...

Страница 138: ...devices Once the devices have been detected the message below will appear Please select the destination device and then click on the Send button The image will be sent If the image has been sent successfully the message below will appear Please click on the OK button The message below will appear if the image transmission was unsuccessful Page 138 ...

Страница 139: ...Please click on the OK button to close the message and repeat the procedure Page 139 ...

Страница 140: ...pg jpeg o PNG png Sending images to a PC or PDA using icons Sending images to a PC or PDA by right clicking the mouse Procedure Sending images to a PC or PDA using icons 1 Turn on the PC or PDA Confirmthat a BluetoothTM wireless technology connection has been enabled before proceeding 2 Double click on the Bluetooth Information Exchanger icon on the Desktop Note o Alternatively opening Explorer an...

Страница 141: ...e Image transfer window Note o If the desired device does not appear in the list please confirmthat the device has been turned on and then select Bluetooth Search Devices A device search will be performed 4 Drag anddropthe file you wish to sendover the destination icon In this case the image will be sent to a PC named PC 1 Page 141 ...

Страница 142: ...f the image transmission was unsuccessful Please click on the OK button to close the message and repeat the procedure Note o Images that have been sent will be saved in an image transfer folder on the destination device o Images received using Image transfer in the Bluetooth Information Exchanger will be saved in the Image Box in Image transfer Page 142 ...

Страница 143: ...echnology connection has been enabled before proceeding 2 Right click on the file you wish to send andthen click on its destination from to Bluetooth Note o If the desired device does not appear in the list please confirmthat the device has been turned on and then select to Bluetooth Search other devices Once the devices have been detected the message below will appear Please select the destinatio...

Страница 144: ...ar if the image transmission was unsuccessful Please click on the OK button to close the message and repeat the procedure Note o When you send images by right clicking the mouse the image data that has been sent will be saved in the image transfer shared folder on the destination device This is also the case when you send images using icons Page 144 ...

Страница 145: ...must be supported by the PC or PDA of the other party Selecting a business card and sending it to a PC or PDA using icons Selecting a business card and sending it to a PC or PDA by right clicking the mouse Sending your personal business card Receiving a business card from another party Exchanging business cards Procedure Selecting a business cardandsending it to a PC or PDA using icons Select a bu...

Страница 146: ...ndow Note o If the desired device does not appear in the list please confirmthat the device has been turned on and then select Bluetooth Search Devices A device search will be performed 4 Use the mouse to drag anddropthe business cardyou wish to sendover the destination icon In this case the business card will be sent to a PC named PC 1 Page 146 ...

Страница 147: ...ssage similar to the one below will appear If the business card has been sent successfully the message below will appear Please click on the OK button The message below will appear if the business card transmission was unsuccessful Please click on the OK button to close the message and repeat the procedure Memo o Data that have been sent will be saved in a folder for exchanged business cards on th...

Страница 148: ...othTM wireless technology connection has been enabled before proceeding 2 Right click on the business cardyou wish to send andthen click on its destination from to Bluetooth Note o If the desired device does not appear in the list please confirmthat the device has been turned on and then select to Bluetooth Search other devices Once the devices have been detected the message below will appear Plea...

Страница 149: ...ure to follow the instructions provided If you are using the BluetoothTM Utility a message similar to the one below will appear If the business card has been sent successfully the message below will appear Please click on the OK button The message below will appear if the business card transmission was unsuccessful Please click on the OK button to close the message and repeat the procedure Note o ...

Страница 150: ...e business card registered as your own that is able to be sent 1 Turn on the PC or PDA Confirmthat a BluetoothTM wireless technology connection has been enabled before proceeding 2 Double click on the Bluetooth Information Exchanger icon on the Desktop Note o Alternatively opening Explorer and clicking on the Bluetooth Information Exchanger folder will produce the same result The Bluetooth Informa...

Страница 151: ...ess card will be sent to a PC named PC 1 The business card will be sent Note o When you try to send a business card a message requesting permission to receive the files may appear on the device belonging to the other party i e on the receiving end The content of the message will vary with the software installed on the destination device so please be sure to follow the instructions provided If you ...

Страница 152: ... o Data that has been sent will be saved in a folder for exchanged business cards on the destination device Acquiring a business cardfrom another party You can use your PC to acquire a business card froma party containing their details 1 Turn on the PC or PDA Confirmthat a BluetoothTM wireless technology connection has been enabled before proceeding 2 Double click on the Bluetooth Information Exch...

Страница 153: ...h to acquire andthen click on Receive business card In this case the business card of the other party will be acquired froma PC named PC 1 The business card will be received Note o When you try to acquire a business card a message requesting permission to send the files may appear on the device belonging to the other party i e on the sending end The content of the message will vary with the softwa...

Страница 154: ...ect Push You can use Properties under the Bluetooth Information Exchanger to set the location of the Inboxon the hard drive Exchanging business cards Simultaneously exchange your business card with one belonging to another party 1 Turn on the PC or PDA Confirmthat a BluetoothTM wireless technology connection has been enabled before proceeding 2 Double click on the Bluetooth Information Exchanger i...

Страница 155: ...he desired device does not appear in the list please confirmthat the device has been turned on and then select Bluetooth Search Devices A device search will be performed 4 Right click on the icon of the party with whom you wish to exchange business cards andthen click on Object Push In this case the business cards will be exchanged with a PC named PC 1 Page 155 ...

Страница 156: ...has been successfully sent Note o Business cards that have been sent will be saved in the Inboxof the destination party Once your business card has finished being sent the programwill start receiving the business card belonging to the other party Note o When a business card is to be received a message such as the one below may appear on the device belonging to the other party Please click on the Y...

Страница 157: ...Page 157 ...

Страница 158: ...l in the BluetoothTM Utility to connect the camera to your PC Procedure 1 Click on Start All Programs Bluetooth Remote Camera Note o In Windows 2000 click on Start Programs Bluetooth Remote Camera 2 Turn on the camera andset it to be connectable via BluetoothTM wireless technology Note o Different cameras are operated in different ways depending on the manufacturer and model used Please refer to t...

Страница 159: ... will be connected and images fromthe camera will appear on screen Taking pictures By placing the mouse cursor over the on screen image the camera s operating window will appear You can operate the camera fromthis window Procedure Taking a single picture Page 159 ...

Страница 160: ...t to the PC Note o The remote camera shutter cannot be operated while the camera is connected to the PC o The number of consecutive pictures taken can be set to anywhere between 2 and 16 1 In the Remote Camera window click on Bluetooth Properties Consecutive Image Settings The Change number of consecutive images dialog boxwill appear 2 Click on the buttons to select the number of consecutive image...

Страница 161: ...sferred to the PC Viewing images saves on your PC A Remote Camera folder will be created in the Bluetooth folder under My Documents during initial set up A folder bearing the same name as the camera will be created in it and images will be saved in this folder Click the Explorer button in the Remote Camera window to display the folder where the images have been saved Note This window is an example...

Страница 162: ...c v 3 7 or higher Also please establish a partnership between the devices using a USB or infrared link before you connect via BluetoothTM wireless technology Please refer to the ActiveSync Help or other manuals for information on how to use the application Microsoft Outlook 2002 or another schedule management tool must also be installed on the PC Connecting using ActiveSync Both the PC and PDA mus...

Страница 163: ...select COM7 Note o In the standard set up the port is configured to COM7 refer to Steps 3 and 4 under Preparing the PDA below When using a different port please also change the port number selected in this window Preparing the PDA Procedure 1 Tapon the BluetoothTM wireless technology icon in the bottom right of the screen Page 163 ...

Страница 164: ... model of PDA you use Please refer to the product instruction manuals for further details The Bluetooth Settings window will open The message Connection not registered will appear if no BluetoothTM wireless technology device has been registered Please tap on OK to close the message 2 Double click on Tools Search for peripheral components Page 164 ...

Страница 165: ...PC icon andthen select Update Services A search for services will be carried out and then a list of service names and their connection status will appear as list in the lower window 4 Tapandholdon COM7 from the list of service names andthen select Register ActiveSync Page 165 ...

Страница 166: ...successfully established with a PDA the procedure for establishing a partnership with the PDA will be started by the ActiveSync application on the PC Performing this set up procedure will enable data to be synchronised between your PC and PDA Procedure 1 In the NewPartnership Set Upa Partnership window select Standardpartnership andthen click on the Next button Page 166 ...

Страница 167: ...will appear 2 Select Synchronise with this PC andthen click on the Next button The New Partnership Select Synchronisation Settings window will appear 3 Select the type of information to be synchronisedbetween your PC andPDA andthen click on the Next button Page 167 ...

Страница 168: ...nership Completing Setup window will appear 4 Click on the Finish button When you click on the Finish button ActiveSync will begin to synchronise your information Confirming changes Synchronisation process Page 168 ...

Страница 169: ...tion will be opened and ActiveSync will synchronise your information Finishing an ActiveSync connection Follow the procedure below on your PDA if you want to end an ActiveSync connection manually Procedure 1 Tapandholdon COM7 in the Bluetooth Settings window andselect ActiveSync Release Cancelling a partnership Follow the procedure below fromthe ActiveSync window on the PC if you want to cancel th...

Страница 170: ...lick on the Yes button when the confirmation message appears Note o If you wish to create another ActiveSync connection you will have to repeat the above procedure to re establish a partnership Page 170 ...

Страница 171: ...tion Wizard Note o Alternatively you can click on Start All Programs Bluetooth Bluetooth Settings then click on New Connection in the Bluetooth Settings screen that has opened The Add New Connection Wizard Welcome to the Add New Connection Wizard screen will appear 2 Turn the headset power on Once you have turned on the headset set the mode to enable a connection Important o The procedure for oper...

Страница 172: ...ching for Devices screen will appear Once the device search has been completed the Add New Connection Wizard Select a Device screen will appear 4 Select the name of the headset device from the list then click on the Next button Page 172 ...

Страница 173: ...e Circuit screen will appear and device configuration will be performed Note o If you are connecting to the headset for the first time or if another audio device has not yet been registered the following Found New Hardware Wizard screen will appear fromwhich you can proceed to install the driver If another audio device has already been registered i e the driver has been installed you can proceed t...

Страница 174: ...ion wizard will appear 8 Click on the Finish button Once driver installation is complete the Add New Connection Wizard Enter Connection Name will appear 9 Confirm the information you have entered andclick on the Next button The Add New Connection Wizard Completing the Add New Connection Wizard screen will appear Page 174 ...

Страница 175: ...wing audio related applications have been closed before you connect the headset to your PC o Windows Media Player BeatJam InterVideo WinDVD and other music audio playback software o Windows Messenger and other e conferencing software If you wish to use these applications please terminate the headset connection before you launch them Procedure 1 Right click on the headset icon then click on Connect...

Страница 176: ...connect from the headset Procedure 1 Right click on the headset icon in the Bluetooth Settings screen then click on Disconnect A message will appear requesting confirmation that you wish to disconnect Click on the Yes button The icon on the Bluetooth Settings screen will appear as shown below indicating that the device has been disconnected Page 176 ...

Страница 177: ...ion on connecting the modemstation to a telephone line A Bluetooth passkey PIN code is required for you to connect to the modemstation Please make a note of your Bluetooth passkey before you start the set up process Setting up the modem station Procedure 1 Turn on the wireless modem station 2 Right click the BluetoothTM wireless technology icon in the task tray andthen click on AddNewConnection No...

Страница 178: ...rd Searching for devices window will appear 4 Select the device name of the wireless modem station from Device List andthen click on the Next button The Add New Connection Wizard Searching for Services window will appear Page 178 ...

Страница 179: ...asskey for the modem station under Bluetooth Passkey PIN code andthen click on the OK button Once the programhas finished searching for the devices the Add New Connection Wizard Device Selection window will appear 6 Click on the Next button Certain modems require you to configure initialization commands separately Please click on the Additional initialization Command Settings button enter the init...

Страница 180: ...are provided solely for purpose of explanation Please use your own telephone number ID and password according to the arrangement with your provider The settings will be registered and an icon will appear in the Bluetooth Settings window Connecting to the Internet You can connect to the Internet by following the procedure below if the connection destination registered when you configured the wirele...

Страница 181: ...ct button Important o A connection will be automatically established with the modemstation if COM Auto Connect is available If COM Auto Connect is not available please manually connect to the modem station The following message will appear once you have connected to the Internet 4 Endthe connection The window below will appear if you double click on the icon in the task bar Please click on the Dis...

Страница 182: ...e Bluetooth Settings window right click on the connection destination icon andthen click on Connect from the menu that appears A window indicating that the connection is being established will appear If the connection has been established successfully the connection icon and task tray will appear as shown below You will be able to browse Web pages using your browser and send and receive e mail Pag...

Страница 183: ...e mail the set up method will vary with the application 2 Endthe connection Right click on the icon and then click Disconnect to end the connection The following message will appear Click on the Yes button When the icon appears as shown below the connection will have ended Page 183 ...

Страница 184: ...for you to be able to send and receive faxes The description below is based on a example using Microsoft Fax which is installed with Windows XP as standard If you are going to use a commercially available faxapplication then please refer to the manual that came with the application for information on how to send and receive faxes Setting up the modem station Set up and register the modem station a...

Страница 185: ...Wizard Searching for devices window will appear Once the programhas finished searching for the devices the Add New Connection Wizard Select Device window will appear 4 Select the device name of the wireless modem station from Device List andthen click on the Next button Page 185 ...

Страница 186: ...on for the first time enter the passkey for the device from the Bluetooth Passkey PIN Code window andthen click on the OK button Once the programhas finished searching for the services the Add New Connection Wizard Select Service window will appear 6 Select Fax under Select Service andthen click on the Next button Page 186 ...

Страница 187: ...performed Once the COM port and modem standard 33600 bps type registration is complete the Add New Connection Wizard Setting Connection Name screen will appear 7 Configure the type andname of the icon to appear after registration andclick on the Next button Please click only on the Next button once you are satisfied with the configuration Page 187 ...

Страница 188: ...ion Configure send receive settings and register faxinformation Procedure 1 Select Start Control Panel andthen double click on the Printers andOther Hardware icon Note o If the control panel is displayed in Classic view and you use Windows 2000 please start fromStep 2 2 Double click on the Printers andFaxes icon The Printers Faxes window will appear 3 Click on Install a local fax printer in the Pr...

Страница 189: ...ted in the Printers and Faxes screen 4 Click on Senda fax under Printer Tasks on the left side of the window If you have not yet configured a faxdevice the FaxConfiguration Wizard window will appear In the window you can enter settings pertaining to the sender yourself Note Page 189 ...

Страница 190: ... 6 Select a device to be usedfor fax transmissions enable the device for sending or receiving andthen click on the Next button Note o If Enable Receive is selected the device will be on standby for receiving faxes even if it is not sending or receiving anything and therefore will be in continuous connection to the wireless modem when COM Auto Connect is on Please decide whether to select this opti...

Страница 191: ...figuration Wizard window will appear 8 Click on the Finish button The faxinformation will be have been registered and the FaxConsole window will appear This will complete the faxset up process Related topics Sending a fax and Receiving a fax Page 191 ...

Страница 192: ...g a wireless modem station under Troubleshooting for how to change the send and receive settings once the service has been configured Procedure 1 Double click on the Fax icon in the Control Panel The FaxConsole window will appear 2 In the Fax Console window click File Sendfax The Send FaxWizard Starting the Send FaxWizard window will appear 3 Click on the Next button Page 192 ...

Страница 193: ...r 4 Enter the name andfax number of the destination party andthen click on the Next button The Send FaxWizard Preparing the Cover Page window will appear 5 Specify the cover page template subject line andnote body text andthen click on the Next button Page 193 ...

Страница 194: ...you wish to sendthe fax immediately select Now andthen click on the Next button The Send FaxWizard Completing the Send FaxWizard window will appear 7 Confirm the destination information andtransmission details andthen click on the Finish button Page 194 ...

Страница 195: ...The software will automatically dial the number and send the fax Once the faxhas been sent FaxMonitor will revert to standby mode Related topic Receiving a fax Page 195 ...

Страница 196: ...mstation before you receive a fax the device will be connected to the modemif Enable Receive has been selected or COM Auto Connect has been activated Procedure 1 When a fax arrives the Fax Monitor will start automatically as the fax is received Once the faxhas been received the FaxMonitor will revert to standby mode Note o If you have enabled manual faxreception the message below will appear when ...

Страница 197: ...An image of the received faxwill be displayed Related topic Sending a fax Page 197 ...

Страница 198: ...to the mobile telephone Please make a note of your Bluetooth passkey before you start the set up process Configuring a mobile telephone for use as a modem Procedure 1 Turn on the mobile telephone andset it to be connectable Note o Please refer to the mobile telephone instruction manual for information on how to operate the device 2 Right click on the BluetoothTM wireless technology icon in the tas...

Страница 199: ...izard Searching for devices window will appear 4 Select the device name of the mobile telephone from Device List andthen click on the Next button The Add New Connection Wizard Searching for Services window will appear Page 199 ...

Страница 200: ...or the wireless modem station under Bluetooth Passkey PIN code andthen click on the OK button Once the programhas finished searching for the devices the Add New Connection Wizard Device Selection window will appear 6 Click on the Next button Certain modems require you to configure initialization commands separately Please click on the Additional Initialization Command Settings button enter the ini...

Страница 201: ...re provided solely for purpose of explanation Please use your own telephone number ID and password according to the arrangement with your provider The settings will be registered and an icon will appear in the Bluetooth Settings window Connecting to the Internet You can connect to the Internet by following the procedure below if the connection destination registered when you configured the mobile ...

Страница 202: ...utton Important o A connection will be automatically established with the mobile telephone if COM Auto Connect is available If COM Auto Connect is not available please manually connect to the mobile telephone The following message will appear once you have connected to the Internet 4 Endthe connection The window below will appear if you double click on the icon in the task bar Please click on the ...

Страница 203: ...e Bluetooth Settings window right click on the connection destination icon andthen click on Connect from the menu that appears A window indicating that the connection is being established will appear If the connection has been established successfully the connection icon and task tray will appear as shown below You will be able to browse Web pages using your browser and send and receive e mail Pag...

Страница 204: ...mail the set up method will vary with the application 2 Endthe connection Right click on the icon and then click Disconnect to end a connection The following message will appear Click on the Yes button When the icon appears as shown below the connection will have been ended Page 204 ...

Страница 205: ...s based on a example using Microsoft Fax which is installed with Windows XP as standard If you are going to use a commercially available faxapplication then please refer to the manual that came with the application for information on how to send and receive faxes Setting up the mobile telephone Set up and register the mobile telephone as a faxservice Procedure 1 Turn on the mobile telephone andset...

Страница 206: ...click on the Next button The Add New Connection Wizard Searching for devices window will appear Once the programhas finished searching for the devices the Add New Connection Wizard Select Device window will appear 4 Select the device name of the mobile telephone from Device List andthen click on the Next button Page 206 ...

Страница 207: ...for the first time enter the passkey for the device from the Bluetooth Passkey PIN Code window andthen click on the OK button Once the programhas finished searching for the services the Add New Connection Wizard Select Service window will appear 6 Select Fax under Select Service andthen click on the Next button Page 207 ...

Страница 208: ...performed Once the COM port and modem standard 33600 bps type registration is complete the Add New Connection Wizard Setting Connection Name screen will appear 7 Configure the type andname of the icon to appear after registration andclick on the Next button Please click only on the Next button once you are satisfied with the configuration Page 208 ...

Страница 209: ...nformation Configure send receive settings and register faxinformation Procedure 1 Select Start Control Panel andthen double click on the Printers andOther Hardware icon Note o If the control panel is displayed in Classic view and you use Windows 2000 please start fromStep 2 2 Double click on the Printers andFaxes icon The Printers Faxes window will appear 3 Click on Set upfaxing in the Printers a...

Страница 210: ...ted in the Printers and Faxes screen 4 Click on Senda fax under Printer Tasks on the left side of the window If you have not yet configured a faxdevice the FaxConfiguration Wizard window will appear In the window you can enter settings pertaining to the sender yourself Note Page 210 ...

Страница 211: ...6 Select a device to be usedfor fax transmissions enable the device for sending or receiving andthen click on the Next button Note o If Enable Receive is selected the device will be on standby for receiving faxes even if it is not sending or receiving anything and therefore will be in continuous connection to the wireless modem when COM Auto Connect is on Please decide whether to select this optio...

Страница 212: ...figuration Wizard window will appear 8 Click on the Finish button The faxinformation will be have been registered and the FaxConsole window will appear This will complete the faxset up process Related topics Sending a fax and Receiving a fax Page 212 ...

Страница 213: ...sing a mobile telephone under Troubleshooting for how to change the send and receive settings once the service has been configured Procedure 1 Double click on the Fax icon in the Control Panel The FaxConsole window will appear 2 In the Fax Console window click File Sendfax The Send FaxWizard Starting the Send FaxWizard window will appear 3 Click on the Next button Page 213 ...

Страница 214: ...r 4 Enter the name andfax number of the destination party andthen click on the Next button The Send FaxWizard Preparing the Cover Page window will appear 5 Specify the cover page template subject line andnote body text andthen click on the Next button Page 214 ...

Страница 215: ...you wish to sendthe fax immediately select Now andthen click on the Next button The Send FaxWizard Completing the Send FaxWizard window will appear 7 Confirm the destination information andtransmission details andthen click on the Finish button Page 215 ...

Страница 216: ...The software will automatically dial the number and send the fax Once the faxhas been sent FaxMonitor will revert to standby mode Related topic Receiving a fax Page 216 ...

Страница 217: ...ation before you receive a fax the device will be connected to the modemif Enable Receive has been selected or COM Auto Connect has been activated Procedure 1 When a fax arrives the Fax Monitor will start automatically as the fax is received Once the faxhas been received the FaxMonitor will revert to standby mode Note o If you have enabled manual faxreception the message below will appear when a f...

Страница 218: ...An image of the received faxwill be displayed Related topic Sending a fax Page 218 ...

Страница 219: ... be sent and received using Image transfer o Bitmap bmp o JPEG jpg jpeg o PNG png Sending images to a mobile telephone using icons Sending images to a mobile telephone by right clicking the mouse Procedure Sending images to a mobile telephone using icons 1 Turn on the PC or PDA Confirmthat a BluetoothTM wireless technology connection has been enabled before proceeding 2 Double click on the Bluetoo...

Страница 220: ...ansfer window Note o If the desired device does not appear in the list please confirmthat the device has been turned on and then select Bluetooth Search Devices A device search will be performed 4 Drag anddropthe file you wish to sendover the destination icon In this case the image will be sent to a mobile telephone named BT Phone 1 Page 220 ...

Страница 221: ...as unsuccessful Please click on the OK button to close the message and repeat the procedure Sending images to a mobile telephone by right clicking the mouse 1 Turn on the mobile telephone Confirmthat a BluetoothTM wireless technology connection has been enabled before proceeding 2 Right click on the file you wish to send andthen click on its destination from to Bluetooth Page 221 ...

Страница 222: ...devices Once the devices have been detected the message below will appear Please select the destination device and then click on the Send button The image will be sent If the image has been sent successfully the message below will appear Please click on the OK button The message below will appear if the image transmission was unsuccessful Page 222 ...

Страница 223: ...Please click on the OK button to close the message and repeat the procedure Page 223 ...

Страница 224: ...formation on how to set up the access point A Bluetooth passkey PIN code is required for you to connect to the access point Please make a note of your Bluetooth passkey before you start the set up process Setting up the access point Procedure 1 Turn on the access point andconfirm that a connection has been establishedwith the network 2 Right click the BluetoothTM wireless technology icon in the ta...

Страница 225: ...gramhas finished searching for the devices the Add New Connection Wizard Device Selection window will appear 4 Select the device name of the access point from Device List andthen click on the Next button The Add New Connection Wizard Searching for Services window will appear Page 225 ...

Страница 226: ... OK button Service detection and COM port creation will be performed automatically The Add New Connection Wizard Create Connection Destination window will appear 6 Enter the connection name user name andpassword then click on the Next button Note o The user name and password are entered here to allow you to connect to the access point Page 226 ...

Страница 227: ...ton The Internet Options window will appear 8 Configure the connection method andthen click on the OK button Set the connection destination used for the LAN connection set up in 6 above as the default connection destination and then select Always dial my default connection 9 Click on the Next button Page 227 ...

Страница 228: ... Next button Please click on the Next button if you are satisfied with the settings The Add New Connection Wizard Completing the Add New Connection Wizard window will appear 11 Click on the Finish button The access point icon will be registered in the Bluetooth Settings window This will complete the access point set up process Connecting to a LAN LAP Page 228 ...

Страница 229: ...an example of what happens when you use Direct connection as a connection name under Connect to access point If a name different from the connection name is used that name will appear under Connection Destination o Please simply click on Settings if no user name or password have been entered i e if those fields have been left blank o Please change the connection destination if a different connecti...

Страница 230: ... are going to use has already been set up as a proxy server 1 Select Internet Options from the Tools menu in Internet Explorer The Internet Options window will appear 2 Click on the Connections tab andthen click on the Settings button 3 Enter the IP address andport number of the proxy server under Proxy Server andthen click on the OK button 3 Endthe connection Right click either on the connection ...

Страница 231: ...Click on the Yes button in the disconnection confirmation dialog boxthat appears Page 231 ...

Страница 232: ...mation on how to set up the access point A Bluetooth passkey PIN code is required for you to connect to the access point Please make a note of your Bluetooth passkey before you start the set up process Setting up the access point Procedure 1 Turn on the access point andconfirm that a connection has been establishedwith the network 2 Right click the BluetoothTM wireless technology icon in the task ...

Страница 233: ...gramhas finished searching for the devices the Add New Connection Wizard Device Selection window will appear 4 Select the device name of the access point from Device List andthen click on the Next button The Add New Connection Wizard Searching for Services window will appear Page 233 ...

Страница 234: ...l be performed automatically The Add New Connection Wizard Connection Name Settings window will appear 6 Enter the type andname of the icon displayedafter registration andthen click on the Next button Please click on the Next button if you are satisfied with the settings The Add New Connection Wizard Completing the Add New Connection Wizard window will appear 7 Click on the Finish button Page 234 ...

Страница 235: ...The access point icon will be registered in the Bluetooth Settings window This will complete the access point set up process Connecting to a LAN PAN Page 235 ...

Страница 236: ... to the network Internet Explorer will start automatically and you will be able to exchange data with other computers on the network Note o Please follow the procedure below if you need to set up a proxy server to connect to the Internet the following procedure is not necessary if the PC you are going to use has already been set up as a proxy server 1 Select Internet Options from the Tools menu in...

Страница 237: ...andthen click on the OK button 3 Endthe connection Right click either on the connection icon under the Bluetooth Settings window or on the icon in the task tray and then click on Disconnect Click on the Yes button in the disconnection confirmation dialog boxthat appears Page 237 ...

Страница 238: ...h ordinary cable connected printers Printing document and images SPP OPP 2 Not required Allows you to print business card data directly Printing business card data BIP Not required Allows you to print image data directly Printing images directly froma digital camera or other device Note 1 The majority of BluetoothTM wireless technology compatible printers support HCRP If you have selected Express ...

Страница 239: ... to the printer Please make a note of your Bluetooth passkey before you start the set up process Setting up the printer Procedure 1 Turn on the printer 2 Right click on the BluetoothTM wireless technology icon in the task tray andthen click on AddNewConnection Note o Alternatively click Start All Programs Bluetooth Bluetooth Settings and then click on New Connection from the active Bluetooth Setti...

Страница 240: ...devices window will appear Once the programhas finished searching for the devices the Add New Connection Wizard Device Selection window will appear 4 Select the device name of the printer from Device List andthen click on the Next button Page 240 ...

Страница 241: ...dow andthen click on the OK button Once the services have been detected successfully connection to the device and creation of the HCRP port will be performed automatically If you have not yet installed a printer a message prompting you to install a printer will appear 6 Click on the OK button The Add Printer Wizard Starting the Add Printer Wizard window will appear 7 Click on the Next button Page ...

Страница 242: ...t Local printer attachedto this computer remove the check next to Automatically detect andinstall my Plug andPlay printer andthen click on the Next button The Add Printer Wizard Select Printer Port window will appear 9 Select the desiredport andthen click on the Next button Page 242 ...

Страница 243: ... printer to be installed or click on the Use Device button andthen click on the Next button Please install the printer according to the instructions in the windows that follow Once installation is complete a message of confirmation will appear in the Add New Connection Wizard Printer Settings window 11 Click on Next Page 243 ...

Страница 244: ...Please click on the Next button if you are satisfied with the settings Note o You can change the connection icon and icon name Changing the connection icon name Changing the connection icon Printing Try to print fromthe message pad 1 Click File Print The Print screen will appear 2 Select wireless printer from under Select Printer andthen click on the Print button Page 244 ...

Страница 245: ...Note If you have connected to a printer using HCRP or SPP profiles all future BluetoothTM wireless technology connections to that printer will be established automatically once you have printed a document fromyour PC Page 245 ...

Страница 246: ...rinter using icons Printing image files on a printer by right clicking the mouse Note Below is a list of file types extensions of images that can be printed out directly o Bitmap bmp o JPEG jpg jpeg o PNG png Procedure Printing image files on a printer using icons 1 Turn on the printer 2 Click on the Bluetooth Information Exchanger icon on the Desktop Note o Alternatively open Explorer and click o...

Страница 247: ...the list please confirmthat the printer has been turned on and then click on Bluetooth Search Devices A device search will be performed 4 Drag anddropthe file to be sent on topof the icon of the destination printer The file will be sent to the printer If the file has been sent to the printer successfully the message below will appear and the image will be printed out Please click on the OK button ...

Страница 248: ...les to a printer by right clicking the mouse 1 Turn on the printer 2 Right click on the file to be sent andthen click on the destination printer under to Bluetooth Note o If your desired device does not appear in the list please confirmthat the device has been turned on and then click on to Bluetooth Search Other Devices Once the device has been detected the message below will appear Please select...

Страница 249: ...sage below will appear and the image will be printed out Please click on the OK button The message below will appear if the file transmission was unsuccessful Please click on the OK button to close the message and repeat the printing procedure Note o If the printer does not support the BIP profile the message below will appear Page 249 ...

Страница 250: ...siness card data by right clicking the mouse Procedure Printing business carddata using icons 1 Turn on the printer 2 Click on the Bluetooth Information Exchanger icon on the Desktop Note o Alternatively open Explorer and click on the Bluetooth Information Exchanger folder for the same result The Bluetooth Information Exchanger window will appear 3 Double click on the Object Push icon A list of de...

Страница 251: ...sired printer does not appear in the list please confirmthat the printer has been turned on and then click on Bluetooth Search Devices A device search will be performed 4 Drag anddropthe business carddata to be sent on topof the icon of the destination printer Page 251 ...

Страница 252: ...lick on the OK button The message below will appear if the business card transmission was unsuccessful Please click on the OK button to close the message and repeat the printing procedure Printing business carddata by right clicking the mouse 1 Turn on the printer 2 Right click on the business carddata to be sent andthen click on the destination printer under to Bluetooth Page 252 ...

Страница 253: ...lect the destination device and click on the Send button The business card will be sent to the printer If the business card has been sent to the printer successfully the message below will appear and the image will be printed out Please click on the OK button The message below will appear if the business card transmission was unsuccessful Please click on the OK button to close the message and repe...

Страница 254: ...Page 254 ...

Страница 255: ...edure 1 Right click on the BluetoothTM wireless technology icon in the task tray andclick on AddNewConnection Note o Alternatively click Start All Programs Bluetooth Bluetooth Settings and then click on New Connection from the Bluetooth Settings screen that has opened The Add New Connection Wizard Welcome to the Add New Connection Wizard will appear 2 Switch ON the stereo headphones andactivate Di...

Страница 256: ...ce the search for the devices has ended the Add New Connection Wizard Select Device screen will appear 4 Select the device name of the stereo headphones from the list andclick on the Next button The Add New Connection Wizard Searching for Services screen will appear Page 256 ...

Страница 257: ...ck applications o e Conferencing applications o Voice recognition applications Please finish connecting the stereo headphones before launching any of these applications Listening to music or other audio files 1 Playing music or other audio files on your PC Important o Please confirm the points below if you are unable to hear anything despite having properly connected the stereo headphones Click St...

Страница 258: ...connect the stereo headphones fromyour PC Music video playback applications e Conferencing applications Voice recognition applications Please completely disconnect the stereo headphones before launching any of these applications Please refer to the user guide for information on terminating a connection from the stereo headphones Playing music using remote control Music applications and video playb...

Страница 259: ...the appropriate item from the pull down menu of positions where the receive commandis to be displayed and then click on the OK button If the receive command appears but does not function properly sometimes the problemmay be rectified by changing the setting to Do not display The commands supported by this application are shown below Please refer to the headphone user guide for commands that are su...

Страница 260: ...vices that support this function Procedure 1 Double click on the BluetoothTM wireless technology icon in the task tray Launches Bluetooth Settings 2 Select Bluetooth from the menu andclick on Copyright Protection Setting The copyright protection dialog will appear 3 Tick the box next to Only connect to devices that are copyright protectedunder the SCMS T format andclick on the OK button Page 260 ...

Страница 261: ...ask tray andthen click on AddNewConnection Note o Alternatively click Start All Programs Bluetooth Bluetooth Settings and then click on New Connection from the active Bluetooth Settings window The Add New Connection Wizard Welcome to the Add New Connection Wizard window will appear 2 Confirm that Express Mode has been selected andthen click on the Next button The Add New Connection Wizard Searchin...

Страница 262: ...indow will appear 3 Select the device name of the keyboardfrom Device List andthen click on the Next button The Add New Connection Wizard Searching for Services window will appear 4 Use the wireless keyboardto enter the numbers that appear in Bluetooth Passkey PIN Code andthen hit the Enter key Page 262 ...

Страница 263: ...dd New Connection Wizard Connection Name Settings window will appear 5 Enter the type andname of the icon displayedafter registration andthen click on the Next button Please click on the Next button if you are satisfied with the settings Note o You can change the connection icon and icon name Changing a connection icon name Changing a connection icon Page 263 ...

Страница 264: ...ick on the Finish button The settings information will be registered and an icon will appear in the Bluetooth Settings window Note Pressing any key on the wireless keyboard will automatically connect it to the PC thereafter Please connect manually if automatic connection is unsuccessful Page 264 ...

Страница 265: ...passkey will require one If your mouse s user guide does not contain any passkey related information please consult the outlet where you purchased your mouse or the relevant support center 2 Right click on the BluetoothTM wireless technology icon in the task tray andthen click on AddNewConnection Note o Alternatively click Start All Programs Bluetooth Bluetooth Settings and then click on New Conne...

Страница 266: ... devices window will appear Once the programhas finished searching for the devices the Add New Connection Wizard Device Selection window will appear 4 Select the device name of the mouse from Device List andthen click on the Next button Page 266 ...

Страница 267: ...tration andthen click on the Next button Please click on the Next button if you are satisfied with the settings Note o Please use this window to change the connection name and icon Changing the connection icon name Changing the connection icon The Add New Connection Wizard Completing the Add New Connection Wizard window will appear 7 Click on the Finish button The settings information will be have...

Страница 268: ...Note o Clicking on one of the mouse buttons or otherwise operating it will automatically connect it to the PC thereafter Please connect manually if automatic connection is unsuccessful Page 268 ...

Страница 269: ... transfer cannot be used to send or receive business card data Please instead use Object Push to performthese activities Sending files to a PC or PDA using icons Sending files to a PC or PDA by right clicking the mouse Receiving files froma PC or PDA Procedure Sending files to a PC or PDA using icons 1 Turn on the PC or PDA 2 Double click on the Bluetooth Information Exchanger icon on the Desktop ...

Страница 270: ...will be performed o You can also use Image transfer when sending individual image files 4 Use the mouse to drag anddropthe file you wish to sendover the destination icon In this case the file will be sent to a PC named PC 1 Note o When using File transfer you can send individual files as well as entire folders 5 Confirm that the file is being sent The file will be sent to the PC Note o When sendin...

Страница 271: ...ion was unsuccessful Please click on the OK button to close the message and repeat the procedure Note o Files that have been sent will be saved in a file transfer shared folder on the destination device o Additionally with File transfer you can open the shared folder on the destination device using Explorer specify a subfolder and then send the file there o You can use Properties in the Bluetooth ...

Страница 272: ...ear in the list please confirmthat the device has been turned on and then select to Bluetooth Search other devices Once the devices have been detected the message below will appear Please select the destination device and then click on the Send button 3 Confirm that the file is being sent The file will be sent to the PC Note Page 272 ...

Страница 273: ...ssful Please click on the OK button to close the message and then repeat the procedure Note o Files that have been sent will be saved in a file transfer shared folder on the destination device Receiving files from a PC or PDA Your PC is able to receive files that have been saved in the shared folder on the destination PC or PDA Received files will be saved in the shared folder under File transfer ...

Страница 274: ...list of devices will appear in the File transfer window In this case the file will be received fromthe PDA named My Mobile 4 Double click on the PDA 1 icon The file saved in the shared folder in My Mobile will appear 5 Right click on the file you wish to receive andthen select Receive file Page 274 ...

Страница 275: ...med in the same manner as when receiving individual files If the file has been received successfully the message below will appear Please click on the OK button The message below will appear if the file transmission was unsuccessful Please click on the OK button to close the message and repeat the procedure Note o The received file will be saved in the Shared folder under File transfer in the Blue...

Страница 276: ...You can use Properties under the Bluetooth Information Exchanger to specify the location of the Shared folder on the hard drive Page 276 ...

Страница 277: ...pg jpeg o PNG png Sending images to a PC or PDA using icons Sending images to a PC or PDA by right clicking the mouse Procedure Sending images to a PC or PDA using icons 1 Turn on the PC or PDA Confirmthat a BluetoothTM wireless technology connection has been enabled before proceeding 2 Double click on the Bluetooth Information Exchanger icon on the Desktop Note o Alternatively opening Explorer an...

Страница 278: ...e Image transfer window Note o If the desired device does not appear in the list please confirmthat the device has been turned on and then select Bluetooth Search Devices A device search will be performed 4 Drag anddropthe file you wish to sendover the destination icon In this case the image will be sent to a PC named PC 1 Page 278 ...

Страница 279: ...f the image transmission was unsuccessful Please click on the OK button to close the message and repeat the procedure Note o Images that have been sent will be saved in an image transfer folder on the destination device o Images received using Image transfer in the Bluetooth Information Exchanger will be saved in the Image Box in Image transfer Page 279 ...

Страница 280: ...echnology connection has been enabled before proceeding 2 Right click on the file you wish to send andthen click on its destination from to Bluetooth Note o If the desired device does not appear in the list please confirmthat the device has been turned on and then select to Bluetooth Search other devices Once the devices have been detected the message below will appear Please select the destinatio...

Страница 281: ...ar if the image transmission was unsuccessful Please click on the OK button to close the message and repeat the procedure Note o When you send images by right clicking the mouse the image data that has been sent will be saved in the image transfer shared folder on the destination device This is also the case when you send images using icons Page 281 ...

Страница 282: ...must be supported by the PC or PDA of the other party Selecting a business card and sending it to a PC or PDA using icons Selecting a business card and sending it to a PC or PDA by right clicking the mouse Sending your personal business card Receiving a business card from another party Exchanging business cards Procedure Selecting a business cardandsending it to a PC or PDA using icons Select a bu...

Страница 283: ...ndow Note o If the desired device does not appear in the list please confirmthat the device has been turned on and then select Bluetooth Search Devices A device search will be performed 4 Use the mouse to drag anddropthe business cardyou wish to sendover the destination icon In this case the business card will be sent to a PC named PC 1 Page 283 ...

Страница 284: ...ssage similar to the one below will appear If the business card has been sent successfully the message below will appear Please click on the OK button The message below will appear if the business card transmission was unsuccessful Please click on the OK button to close the message and repeat the procedure Memo o Data that have been sent will be saved in a folder for exchanged business cards on th...

Страница 285: ...othTM wireless technology connection has been enabled before proceeding 2 Right click on the business cardyou wish to send andthen click on its destination from to Bluetooth Note o If the desired device does not appear in the list please confirmthat the device has been turned on and then select to Bluetooth Search other devices Once the devices have been detected the message below will appear Plea...

Страница 286: ...ure to follow the instructions provided If you are using the BluetoothTM Utility a message similar to the one below will appear If the business card has been sent successfully the message below will appear Please click on the OK button The message below will appear if the business card transmission was unsuccessful Please click on the OK button to close the message and repeat the procedure Note o ...

Страница 287: ...e business card registered as your own that is able to be sent 1 Turn on the PC or PDA Confirmthat a BluetoothTM wireless technology connection has been enabled before proceeding 2 Double click on the Bluetooth Information Exchanger icon on the Desktop Note o Alternatively opening Explorer and clicking on the Bluetooth Information Exchanger folder will produce the same result The Bluetooth Informa...

Страница 288: ...ess card will be sent to a PC named PC 1 The business card will be sent Note o When you try to send a business card a message requesting permission to receive the files may appear on the device belonging to the other party i e on the receiving end The content of the message will vary with the software installed on the destination device so please be sure to follow the instructions provided If you ...

Страница 289: ... o Data that has been sent will be saved in a folder for exchanged business cards on the destination device Acquiring a business cardfrom another party You can use your PC to acquire a business card froma party containing their details 1 Turn on the PC or PDA Confirmthat a BluetoothTM wireless technology connection has been enabled before proceeding 2 Double click on the Bluetooth Information Exch...

Страница 290: ...h to acquire andthen click on Receive business card In this case the business card of the other party will be acquired froma PC named PC 1 The business card will be received Note o When you try to acquire a business card a message requesting permission to send the files may appear on the device belonging to the other party i e on the sending end The content of the message will vary with the softwa...

Страница 291: ...ect Push You can use Properties under the Bluetooth Information Exchanger to set the location of the Inboxon the hard drive Exchanging business cards Simultaneously exchange your business card with one belonging to another party 1 Turn on the PC or PDA Confirmthat a BluetoothTM wireless technology connection has been enabled before proceeding 2 Double click on the Bluetooth Information Exchanger i...

Страница 292: ...he desired device does not appear in the list please confirmthat the device has been turned on and then select Bluetooth Search Devices A device search will be performed 4 Right click on the icon of the party with whom you wish to exchange business cards andthen click on Object Push In this case the business cards will be exchanged with a PC named PC 1 Page 292 ...

Страница 293: ...has been successfully sent Note o Business cards that have been sent will be saved in the Inboxof the destination party Once your business card has finished being sent the programwill start receiving the business card belonging to the other party Note o When a business card is to be received a message such as the one below may appear on the device belonging to the other party Please click on the Y...

Страница 294: ...Page 294 ...

Страница 295: ...number of devices that can be used to constitute a single personal area network is seven one server and sixclients A network comprising as many as seven devices could theoretically be built but an operating environment that involves the use of other BluetoothTM wireless technology devices leaving aside other complications might require the network to comprise fewer components By using the PAN prof...

Страница 296: ...k 2 Click the Yes button The PAN server will be activated and an icon will accordingly appear in the tasktray Other devices that use the PAN profile will now be able to connect over the network Important When using the device as the server make sure that all user accounts have a password set for the security reasons The IP address of the server is automatically set up when it starts Please do not ...

Страница 297: ...CP server Operating as a client Connecting to a server as a client is performed fromthe Bluetooth Settings window as described below Procedure 1 Right click on the BluetoothTM wireless technology icon in the task tray andclick on AddNewConnection Note o Alternatively click on Start All Programs Bluetooth Bluetooth Settings and then on New Connection from the Bluetooth Settings window 2 Confirm tha...

Страница 298: ...zard Searching for devices window will appear Once the programhas finished searching for the devices the Add New Connection Wizard Device Selection window will appear 4 Select the name of the device designatedas the server from Device List andthen click on the Next button Page 298 ...

Страница 299: ... New Connection Wizard ConfirmConnection Name window will appear 5 Click on the Next button The registered icon will appear in the Bluetooth Settings window onnecting to a server Procedure 1 Right click on the icon in the Bluetooth Settings window andthen click on Connect Page 299 ...

Страница 300: ...ion to a server Procedure 1 Right click on the icon in the Bluetooth Settings window andthen click on Disconnect A message confirming whether you wish to disconnect will appear Click on the Yes button Once you have disconnected the icon will change to indicate that the device is not connected Page 300 ...

Страница 301: ...Page 301 ...

Страница 302: ... transfer cannot be used to send or receive business card data Please instead use Object Push to performthese activities Sending files to a PC or PDA using icons Sending files to a PC or PDA by right clicking the mouse Receiving files froma PC or PDA Procedure Sending files to a PC or PDA using icons 1 Turn on the PC or PDA 2 Double click on the Bluetooth Information Exchanger icon on the Desktop ...

Страница 303: ...will be performed o You can also use Image transfer when sending individual image files 4 Use the mouse to drag anddropthe file you wish to sendover the destination icon In this case the file will be sent to a PC named PC 1 Note o When using File transfer you can send individual files as well as entire folders 5 Confirm that the file is being sent The file will be sent to the PC Note o When sendin...

Страница 304: ...ion was unsuccessful Please click on the OK button to close the message and repeat the procedure Note o Files that have been sent will be saved in a file transfer shared folder on the destination device o Additionally with File transfer you can open the shared folder on the destination device using Explorer specify a subfolder and then send the file there o You can use Properties in the Bluetooth ...

Страница 305: ...ear in the list please confirmthat the device has been turned on and then select to Bluetooth Search other devices Once the devices have been detected the message below will appear Please select the destination device and then click on the Send button 3 Confirm that the file is being sent The file will be sent to the PC Note Page 305 ...

Страница 306: ...ssful Please click on the OK button to close the message and then repeat the procedure Note o Files that have been sent will be saved in a file transfer shared folder on the destination device Receiving files from a PC or PDA Your PC is able to receive files that have been saved in the shared folder on the destination PC or PDA Received files will be saved in the shared folder under File transfer ...

Страница 307: ...list of devices will appear in the File transfer window In this case the file will be received fromthe PDA named My Mobile 4 Double click on the PDA 1 icon The file saved in the shared folder in My Mobile will appear 5 Right click on the file you wish to receive andthen select Receive file Page 307 ...

Страница 308: ...med in the same manner as when receiving individual files If the file has been received successfully the message below will appear Please click on the OK button The message below will appear if the file transmission was unsuccessful Please click on the OK button to close the message and repeat the procedure Note o The received file will be saved in the Shared folder under File transfer in the Blue...

Страница 309: ...You can use Properties under the Bluetooth Information Exchanger to specify the location of the Shared folder on the hard drive Page 309 ...

Страница 310: ...pg jpeg o PNG png Sending images to a PC or PDA using icons Sending images to a PC or PDA by right clicking the mouse Procedure Sending images to a PC or PDA using icons 1 Turn on the PC or PDA Confirmthat a BluetoothTM wireless technology connection has been enabled before proceeding 2 Double click on the Bluetooth Information Exchanger icon on the Desktop Note o Alternatively opening Explorer an...

Страница 311: ...e Image transfer window Note o If the desired device does not appear in the list please confirmthat the device has been turned on and then select Bluetooth Search Devices A device search will be performed 4 Drag anddropthe file you wish to sendover the destination icon In this case the image will be sent to a PC named PC 1 Page 311 ...

Страница 312: ...f the image transmission was unsuccessful Please click on the OK button to close the message and repeat the procedure Note o Images that have been sent will be saved in an image transfer folder on the destination device o Images received using Image transfer in the Bluetooth Information Exchanger will be saved in the Image Box in Image transfer Page 312 ...

Страница 313: ...echnology connection has been enabled before proceeding 2 Right click on the file you wish to send andthen click on its destination from to Bluetooth Note o If the desired device does not appear in the list please confirmthat the device has been turned on and then select to Bluetooth Search other devices Once the devices have been detected the message below will appear Please select the destinatio...

Страница 314: ...ar if the image transmission was unsuccessful Please click on the OK button to close the message and repeat the procedure Note o When you send images by right clicking the mouse the image data that has been sent will be saved in the image transfer shared folder on the destination device This is also the case when you send images using icons Page 314 ...

Страница 315: ...must be supported by the PC or PDA of the other party Selecting a business card and sending it to a PC or PDA using icons Selecting a business card and sending it to a PC or PDA by right clicking the mouse Sending your personal business card Receiving a business card from another party Exchanging business cards Procedure Selecting a business cardandsending it to a PC or PDA using icons Select a bu...

Страница 316: ...ndow Note o If the desired device does not appear in the list please confirmthat the device has been turned on and then select Bluetooth Search Devices A device search will be performed 4 Use the mouse to drag anddropthe business cardyou wish to sendover the destination icon In this case the business card will be sent to a PC named PC 1 Page 316 ...

Страница 317: ...ssage similar to the one below will appear If the business card has been sent successfully the message below will appear Please click on the OK button The message below will appear if the business card transmission was unsuccessful Please click on the OK button to close the message and repeat the procedure Memo o Data that have been sent will be saved in a folder for exchanged business cards on th...

Страница 318: ...othTM wireless technology connection has been enabled before proceeding 2 Right click on the business cardyou wish to send andthen click on its destination from to Bluetooth Note o If the desired device does not appear in the list please confirmthat the device has been turned on and then select to Bluetooth Search other devices Once the devices have been detected the message below will appear Plea...

Страница 319: ...ure to follow the instructions provided If you are using the BluetoothTM Utility a message similar to the one below will appear If the business card has been sent successfully the message below will appear Please click on the OK button The message below will appear if the business card transmission was unsuccessful Please click on the OK button to close the message and repeat the procedure Note o ...

Страница 320: ...e business card registered as your own that is able to be sent 1 Turn on the PC or PDA Confirmthat a BluetoothTM wireless technology connection has been enabled before proceeding 2 Double click on the Bluetooth Information Exchanger icon on the Desktop Note o Alternatively opening Explorer and clicking on the Bluetooth Information Exchanger folder will produce the same result The Bluetooth Informa...

Страница 321: ...ess card will be sent to a PC named PC 1 The business card will be sent Note o When you try to send a business card a message requesting permission to receive the files may appear on the device belonging to the other party i e on the receiving end The content of the message will vary with the software installed on the destination device so please be sure to follow the instructions provided If you ...

Страница 322: ... o Data that has been sent will be saved in a folder for exchanged business cards on the destination device Acquiring a business cardfrom another party You can use your PC to acquire a business card froma party containing their details 1 Turn on the PC or PDA Confirmthat a BluetoothTM wireless technology connection has been enabled before proceeding 2 Double click on the Bluetooth Information Exch...

Страница 323: ...h to acquire andthen click on Receive business card In this case the business card of the other party will be acquired froma PC named PC 1 The business card will be received Note o When you try to acquire a business card a message requesting permission to send the files may appear on the device belonging to the other party i e on the sending end The content of the message will vary with the softwa...

Страница 324: ...ect Push You can use Properties under the Bluetooth Information Exchanger to set the location of the Inboxon the hard drive Exchanging business cards Simultaneously exchange your business card with one belonging to another party 1 Turn on the PC or PDA Confirmthat a BluetoothTM wireless technology connection has been enabled before proceeding 2 Double click on the Bluetooth Information Exchanger i...

Страница 325: ...he desired device does not appear in the list please confirmthat the device has been turned on and then select Bluetooth Search Devices A device search will be performed 4 Right click on the icon of the party with whom you wish to exchange business cards andthen click on Object Push In this case the business cards will be exchanged with a PC named PC 1 Page 325 ...

Страница 326: ...has been successfully sent Note o Business cards that have been sent will be saved in the Inboxof the destination party Once your business card has finished being sent the programwill start receiving the business card belonging to the other party Note o When a business card is to be received a message such as the one below may appear on the device belonging to the other party Please click on the Y...

Страница 327: ...Page 327 ...

Страница 328: ...c v 3 7 or higher Also please establish a partnership between the devices using a USB or infrared link before you connect via BluetoothTM wireless technology Please refer to the ActiveSync Help or other manuals for information on how to use the application Microsoft Outlook 2002 or another schedule management tool must also be installed on the PC Connecting using ActiveSync Both the PC and PDA mus...

Страница 329: ...select COM7 Note o In the standard set up the port is configured to COM7 refer to Steps 3 and 4 under Preparing the PDA below When using a different port please also change the port number selected in this window Preparing the PDA Procedure 1 Tapon the BluetoothTM wireless technology icon in the bottom right of the screen Page 329 ...

Страница 330: ... model of PDA you use Please refer to the product instruction manuals for further details The Bluetooth Settings window will open The message Connection not registered will appear if no BluetoothTM wireless technology device has been registered Please tap on OK to close the message 2 Double click on Tools Search for peripheral components Page 330 ...

Страница 331: ...PC icon andthen select Update Services A search for services will be carried out and then a list of service names and their connection status will appear as list in the lower window 4 Tapandholdon COM7 from the list of service names andthen select Register ActiveSync Page 331 ...

Страница 332: ...successfully established with a PDA the procedure for establishing a partnership with the PDA will be started by the ActiveSync application on the PC Performing this set up procedure will enable data to be synchronised between your PC and PDA Procedure 1 In the NewPartnership Set Upa Partnership window select Standardpartnership andthen click on the Next button Page 332 ...

Страница 333: ...will appear 2 Select Synchronise with this PC andthen click on the Next button The New Partnership Select Synchronisation Settings window will appear 3 Select the type of information to be synchronisedbetween your PC andPDA andthen click on the Next button Page 333 ...

Страница 334: ...nership Completing Setup window will appear 4 Click on the Finish button When you click on the Finish button ActiveSync will begin to synchronise your information Confirming changes Synchronisation process Page 334 ...

Страница 335: ...tion will be opened and ActiveSync will synchronise your information Finishing an ActiveSync connection Follow the procedure below on your PDA if you want to end an ActiveSync connection manually Procedure 1 Tapandholdon COM7 in the Bluetooth Settings window andselect ActiveSync Release Cancelling a partnership Follow the procedure below fromthe ActiveSync window on the PC if you want to cancel th...

Страница 336: ...lick on the Yes button when the confirmation message appears Note o If you wish to create another ActiveSync connection you will have to repeat the above procedure to re establish a partnership Page 336 ...

Страница 337: ...l in the BluetoothTM Utility to connect the camera to your PC Procedure 1 Click on Start All Programs Bluetooth Remote Camera Note o In Windows 2000 click on Start Programs Bluetooth Remote Camera 2 Turn on the camera andset it to be connectable via BluetoothTM wireless technology Note o Different cameras are operated in different ways depending on the manufacturer and model used Please refer to t...

Страница 338: ... will be connected and images fromthe camera will appear on screen Taking pictures By placing the mouse cursor over the on screen image the camera s operating window will appear You can operate the camera fromthis window Procedure Taking a single picture Page 338 ...

Страница 339: ...t to the PC Note o The remote camera shutter cannot be operated while the camera is connected to the PC o The number of consecutive pictures taken can be set to anywhere between 2 and 16 1 In the Remote Camera window click on Bluetooth Properties Consecutive Image Settings The Change number of consecutive images dialog boxwill appear 2 Click on the buttons to select the number of consecutive image...

Страница 340: ...sferred to the PC Viewing images saves on your PC A Remote Camera folder will be created in the Bluetooth folder under My Documents during initial set up A folder bearing the same name as the camera will be created in it and images will be saved in this folder Click the Explorer button in the Remote Camera window to display the folder where the images have been saved Note This window is an example...

Страница 341: ...tion Wizard Note o Alternatively you can click on Start All Programs Bluetooth Bluetooth Settings then click on New Connection in the Bluetooth Settings screen that has opened The Add New Connection Wizard Welcome to the Add New Connection Wizard screen will appear 2 Turn the headset power on Once you have turned on the headset set the mode to enable a connection Important o The procedure for oper...

Страница 342: ...ching for Devices screen will appear Once the device search has been completed the Add New Connection Wizard Select a Device screen will appear 4 Select the name of the headset device from the list then click on the Next button Page 342 ...

Страница 343: ...e Circuit screen will appear and device configuration will be performed Note o If you are connecting to the headset for the first time or if another audio device has not yet been registered the following Found New Hardware Wizard screen will appear fromwhich you can proceed to install the driver If another audio device has already been registered i e the driver has been installed you can proceed t...

Страница 344: ...ion wizard will appear 8 Click on the Finish button Once driver installation is complete the Add New Connection Wizard Enter Connection Name will appear 9 Confirm the information you have entered andclick on the Next button The Add New Connection Wizard Completing the Add New Connection Wizard screen will appear Page 344 ...

Страница 345: ...wing audio related applications have been closed before you connect the headset to your PC o Windows Media Player BeatJam InterVideo WinDVD and other music audio playback software o Windows Messenger and other e conferencing software If you wish to use these applications please terminate the headset connection before you launch them Procedure 1 Right click on the headset icon then click on Connect...

Страница 346: ...connect from the headset Procedure 1 Right click on the headset icon in the Bluetooth Settings screen then click on Disconnect A message will appear requesting confirmation that you wish to disconnect Click on the Yes button The icon on the Bluetooth Settings screen will appear as shown below indicating that the device has been disconnected Page 346 ...

Страница 347: ...rity The Device Properties window will appear 2 Select Non discoverable mode in Discoverability mode under the Security tab andthen click on the OK button Your device will now be undetectable by other users even when they search for other devices Note Other devices are still able to establish connections with your device even if you have enabled the Non discoverable mode Please enable Non connecta...

Страница 348: ...transmitting data is conducted with an element of risk for the user Procedure 1 Right click on the BluetoothTM wireless technology icon in the task tray andclick on Device Properties Security The Device Properties window will appear 2 Select Link Level EnforcedSecurity in Security Mode under the Security tab put a check next to Encryption andthen click on the OK button Note Once you have configure...

Страница 349: ... The window in which you enter the passkey will not appear once you have connected more than two times to the device Related topic Bluetooth Manager Page 349 ...

Страница 350: ...nnection by following the procedure below Procedure 1 Start Internet Explorer 2 Click on Tools Internet Options The Internet Options window will appear 3 Click on the Connections tab In this window Direct Connection is set as the default and Never dial a connection has been selected Change the settings so that London A will always be dialled when you connect to the Internet 4 Select Always dial my...

Страница 351: ...5 Click on London A andthen click on the Set Default button London A has been changed to the default connection Page 351 ...

Страница 352: ...ny or other environment where a LAN can be accessed select Never dial a connection if you have a dial up configuration but do not want dial up to occur automatically When connecting to the Internet via a LAN you must enter the appropriate LAN settings under LAN Settings Page 352 ...

Страница 353: ...s been used to performthe procedure Subtle differences may arise when using other versions of the software Sending business card data You can send business card data directly fromthe Contacts window in Outlook Procedure 1 Start Microsoft Outlook andopen the Contacts window 2 Double click on the contact whose details you wish to sendas a business card The details of the contact you selected will ap...

Страница 354: ...ionality in Outlook as an Add in below and change the settings accordingly 4 Select the destination for the business carddata andthen click on the Send button Note o If you cannot find the destination device in the list please click on the Searching for devices button to discover it The business card will be sent If the business card has been sent successfully the message below will appear Page 35...

Страница 355: ...alling business card sending functionality in Outlook as an Add in You can install one of the functions of the BluetoothTM Utility in Outlook as an Add in which will enable you to send business cards from the Outlook toolbar Procedure 1 Click on Tools Options in Outlook The Options dialog boxwill appear 2 Select the Other tab andthen click on the AdvancedOptions button in the General field Page 35...

Страница 356: ...The Advanced Options dialog boxwill appear 3 Click on the COMAdd Ins button The COM Add Ins dialog boxwill appear 4 Click on the Add button The Add Add In dialog boxwill appear Page 356 ...

Страница 357: ... dll can be found on the hard drive at the address below C ProgramFiles Toshiba Bluetooth Toshiba Stack 6 Confirm that Sendto Bluetooth has been addedto the list andthat a check appears next to it andthen click on the OK button This will complete the Add in process Page 357 ...

Страница 358: ...e that sends certain requests to another device while a server is a device that provides a service on receipt of such requests fromanother device For example when a PC issues a print command to a wireless printer the PC functions as the client while the printer functions as the server When a PDA or other device attempts to receive files located on a PC by means of file transfer protocol the PC fun...

Страница 359: ...Panel appears in Classic view please simply click on the Bluetooth Local COM icon o No such distinction between viewing formats exists in Windows 2000 3 Click on the Add button The Bluetooth Local COM Wizard window fromwhere you can create a virtual COM port will appear Page 359 ...

Страница 360: ...low the procedure below to delete a virtual COM port when it is no longer needed Note You can only delete virtual COM ports created by the Bluetooth Local COM utility 1 Select the port you wish to delete from the Bluetooth Local COM window andthen click on the Delete button A message will appear asking you to confirmthat you wish to delete the port 2 Click on the Yes button The port will be delete...

Страница 361: ...Page 361 ...

Страница 362: ...cted device Delete Deletes selected device Create shortcut on Desktop Creates a shortcut icon for the selected device on the Desktop Rename Changes the name of the device you have selected Change Icon Changes the icon of the device you have selected COM Auto Connect Settings Opens the COM Auto Connect Settings window and allows you to enable disable Auto Connect Displays the device connection name...

Страница 363: ... protected under the SCMS T format Exit Closes the Bluetooth Settings window View menu Category Description Large icons Changes the way icons are displayed on a device Small icons List Details Help menu Category Description Help Opens the BluetoothTM Utility User Guide Version Displays the version information for Bluetooth Settings Device List Displays a list of devices that have been registered i...

Страница 364: ...New ConnectionOpens Add New Connection Wizard window Details Shows details of selected device Delete Deletes selected device Page 364 ...

Страница 365: ...ngs Note o Alternatively you can click Start All Programs Bluetooth Bluetooth Settings The Bluetooth Settings screen will appear fromwhere you can create a Shortcut entitled Bluetooth Mouse 2 Right click on the BT Mouse 01 icon andthen click on Create Shortcut on Desktop A shortcut icon entitled BT Mouse 01 will appear on the Desktop stablishing a connection from the Shortcut 1 Double click on the...

Страница 366: ...The mouse will be connected Page 366 ...

Страница 367: ...stablish a manual connection to the device using the procedure below Procedure 1 Right click on BluetoothTM wireless technology icon in task tray andclick on Bluetooth Settings Note o Alternatively click Start All Programs Bluetooth Bluetooth Settings The Bluetooth Settings screen will appear fromwhere you can create a Shortcut entitled BT Mouse 2 Right click on the BT Mouse 01 icon andthen click ...

Страница 368: ...Note o If you wish to manually disconnect a device right click on its icon and click Disconnect When the following message appears click on the Yes button Page 368 ...

Страница 369: ... icon in the task tray andthen click on Bluetooth Settings Note o Alternatively click Start All Programs Bluetooth Bluetooth Settings The Bluetooth Settings window will appear Now try to change the icon for My Mobile 2 Right click on the My Mobile icon andthen click on Change Icon A list of available icons will appear 3 Select the icon andthen click on the OK button Page 369 ...

Страница 370: ...The new icon will appear Page 370 ...

Страница 371: ...n the task tray andthen click on Bluetooth Settings Note o Alternatively click Start All Programs Bluetooth Bluetooth Settings The Bluetooth Settings window will appear Now try to change the connection name for My Mobile to Pocket PC 2 Right click on My Mobile andthen click on Change Name You will now be able to enter a name 3 Enter Pocket PC andthen hit the Enter key The new name will appear Page...

Страница 372: ...Page 372 ...

Страница 373: ... New Connection Wizard window Device Properties Security Displays BluetoothTM wireless technology device information on your PC General tab Allows you to confirm the name address and other settings displayed for other devices Note Device Name is the only category able to be changed If you wish to change the name of a device enter the new name and then click on the OK or Apply button Click on the D...

Страница 374: ...onnectable mode will cause connection requests to be rejected fromany device including registered ones Device detection will still be possible 2 Selecting Non pairable mode will make it impossible to bond with another device in a new connection relationship Connection will be possible when a request has been received froma registered device Device detection will still be possible 3 Devices to whic...

Страница 375: ...vice using Bluetooth Information Exchanger PAN Networking Service Ticking the boxenables a server function that allows networking to be performed froma remote device using the PAN Networking Service Bluetooth COM Port Service Ticking the boxenables a server function that allows COM Service to be performed froma remote location using the Serial Port Service AVRemote Control Service Ticking the boxe...

Страница 376: ...h menu Category Description Device DiscoveryDetects BluetoothTM wireless technology devices Configuration Allows detailed setting of categories related to Bluetooth Information Exchanger General tab Mode tab Inbox Business Card tab Shared folder tab Image box tab Associate tab Transfer mode tab Service security tab Service class tab Information tab Page 376 ...

Страница 377: ...h Category Description Click on the icon to display a list of devices Image box is a folder on your PC used for transferring images Click on the icon to display a list of devices Shared folder is a shared folder on your PC used for transferring files Click on the icon to display a list of devices Inbox is a folder on your PC used for exchanging business cards Page 377 ...

Страница 378: ...Page 378 ...

Страница 379: ... Adjusting the setting to Loose filtering will increase the likelihood that devices other than those intended will be detected The further you slide the setting towards Tight filtering the stricter will be the criteria determining device detection and the lower the likelihood will be that irrelevant devices will be included Please adjust the filtration level according to the results of the search ...

Страница 380: ...where you would like your captured images to be saved Exit Exits Remote Camera Help menu Category Description Image monitor version information Displays version information for the image monitor List of cameras A list of cameras that have been registered as remote cameras will be displayed Camera Search button Clicking on this button will execute a search for remote cameras Display images Images t...

Страница 381: ...n the hard drive where images that have been transferred to the PC have been stored Note A folder for saving your images will be created automatically Camera operation window Camera images Images as seen through the lens of your remote camera will be displayed Page 381 ...

Страница 382: ...te for your intended use Explorer button Clicking on this button will display the folders on the hard drive where images that have been transferred to the PC have been stored Shutter button consecutive images Clicking this button will cause the camera to take the number of images specified in Consecutive image settings under the Bluetooth menu and then send those images to your PC Shutter button s...

Страница 383: ...ollowing information will appear for ports created by Bluetooth Local COM COM port for client Local COM Client COM port for server Local COM Server name of service supplied by port Function buttons Category Description Add Starts the Add COM Port Wizard Note There can be up to 64 ports If COM ports 1 to 64 already exist you will not be able to add another port Delete Deletes selected port Note You...

Страница 384: ...e able to send files Files will be sent to those devices that have been checked Name Displays name of destination devices Connection method Displays method used to connect to other devices Note If a device to which you would like to send data is not listed you can click on the Search button to search for other devices Function buttons Category Description Add Displays the window below fromwhere yo...

Страница 385: ...the list and clicking on the Delete button you can remove that file i e the file will not be sent Search Searches for BluetoothTM wireless technology devices Cancel Closes the Wireless File Transfer window Send Sends a file Page 385 ...

Страница 386: ... device s are described in the section What you need to know about using BluetoothTM wireless technology Should you still encounter problems after having read through this information please refer to the following list which has been arranged according to application Troubleshooting by application General operation of the BluetoothTM Utility Using a wireless modem station Using an access point Usi...

Страница 387: ...etooth Remote Camera fromWindows 2000 Start Programs Bluetooth Remote Camera Wireless File Transfer fromWindows XP Start All Programs Bluetooth Wireless File Transfer fromWindows 2000 Start Programs Bluetooth Wireless File Transfer Bluetooth Settings Clicking on the NewConnection button brings upthe message Unable to prepare Bluetooth The wireless communication switch is turned off Please switch i...

Страница 388: ...pports the OPP profile Should this occur please click on Bluetooth Profiles under Bluetooth Information Exchanger to configure the Transfer mode Cannot open sharedfolder on remote device using File Transfer The other device may have a certain security level enforced Non connectable mode etc Please confirm the security settings of the other device Please enter the correct password if you are asked ...

Страница 389: ...nterior of the cable has been broken Please replace the cable with another one Please ensure that the two slide switches on the underside of the main unit have been set to the NORMAL and MODEM positions respectively Cannot connect to the Internet The telephone number of the connection i e the telephone number for the access point of your Internet service provider may not be correct Please check th...

Страница 390: ...self Please check the type of telephone line you are using The faxservice may not have been enabled for sending or receiving Please check the settings by following the procedure below 1 Open Printers andFaxes from the Control Panel right click on the Fax icon andthen click on Properties The Faxproperties window will appear 2 Select the Device tab right click on the modem you wish to use andthen cl...

Страница 391: ...4 Select the Receive tab andthen confirm that Enable device to receive has been checked when you wish to receive faxes 5 Click on the OK button Page 391 ...

Страница 392: ...n status Note o If the LAN cable has come loose because it has not been fully inserted into the socket the resulting poor contact may prevent data from being transmitted accurately o Communication will be impossible if the interior of the LAN cable has been broken Please replace the cable with another one The access point may not have been configured correctly and may not be able to maintain the c...

Страница 393: ...and is being used by another device no other device will be able to connect to the printer Cannot print garbledprint output The printer driver of the printer you are using may not have been installed correctly Please refer to your product instruction manual and re install the driver Please check to see if the printer has run out of paper ink or other consumable item If you are using a printer whil...

Страница 394: ...e remove the power adaptor and re connect Soundcuts out cannot hear anything Using a headset with other BluetoothTM wireless technology devices may cause problems such as interruptions in sound reduced transfer speed or errors during file transfer and disconnection of other devices We strongly recommend using the headset on its own not in conjunction with any other device Please confirm that the h...

Страница 395: ... mind Keyboardor mouse cannot be detected If the keyboard or mouse is connected to and is being used by another device the keyboard or mouse will be undetectable even if you search for it Cannot connect to keyboardor mouse If the keyboard or mouse is connected to and is being used by another device no other device will be able to connect to the keyboard or mouse Page 395 ...

Страница 396: ...o the camera Images from the camera can be displayed but no pictures can be taken The memory card in the camera may be full Please make a backup of all your necessary data on alternative media then delete the images fromthe memory card and ascertain how much free space remains Camera images do not appear in window The camera may not have been set to remote camera mode image browse mode configurati...

Страница 397: ... to Synchronising information using ActiveSync and re configure your ActiveSync connection If a port other than COM7 has been used please amend the ActiveSync connection settings accordingly Cannot locate a savedfile The type of file sent to your PDA as well as the profile used to send the file may affect where folders saved on your PDA are located Examples Images transferred to your PDA using Ima...

Страница 398: ... not be correct Please check the telephone number The user ID and or password for the provider with whom you have signed up may have been entered incorrectly Please check the user ID and password The default connection may have been configured with different settings Please set the connection configured for mobile telephone use as the default connection Cannot sendor receive faxes Once you have re...

Страница 399: ...operties window will appear 2 Select the Device tab right click on the modem you wish to use andthen click on Properties 3 Select the Send tab andthen confirm that Enable device to send has been checked Page 399 ...

Страница 400: ...4 Select the Receive tab andthen confirm that Enable device to receive has been checkedwhen you wish to receive faxes 5 Click on the OK button Page 400 ...

Страница 401: ... Dynamic Host Configuration Protocol DHCP is a function that automatically sets up IP addresses This function will allow you to avoid having to set up IP addresses on each computer DUN Profile A profile for Dial up Networking This profile enables you to establish a dial up BluetoothTM wireless technology connection with a wireless modem station mobile telephone or other similar device FAX Profile ...

Страница 402: ...ss a LAN via PPP OPP Abbreviation of Object Push Profile A profile that enables you to exchange business cards with a wireless device Passkey Also known as a PIN code This is a password consisting of up to 16 alphanumeric characters that enables a connection to be established to a wireless device You need to know the passkey in order to connect to a device that requires authentication Even when th...

Страница 403: ...Bluetooth SIG Special Interest Group In order to use the SCMS T feature the remote devices must also support SCMS T SPP Abbreviation of Serial Port Profile A profile that enables communication with a device through a virtual serial port configured for a BluetoothTM wireless technology connection This profile can be used for printers and printer adapters with PDAs using a method different fromHCRP ...

Страница 404: ...Page 404 ...

Страница 405: ...TM wireless technology devices It is recommended that you read this section before starting the set up process Trying out your BluetoothTM wireless technology device Describes the actual procedures used to configure and then use your BluetoothTM wireless technology device Please read this according to your desired purpose and device Troubleshooting Describes possible causes and countermeasures to ...

Страница 406: ...ion on connecting the modemstation to a telephone line A Bluetooth passkey PIN code is required for you to connect to the modemstation Please make a note of your Bluetooth passkey before you start the set up process Setting up the modem station Procedure 1 Turn on the wireless modem station 2 Right click the BluetoothTM wireless technology icon in the task tray andthen click on AddNewConnection No...

Страница 407: ...rd Searching for devices window will appear 4 Select the device name of the wireless modem station from Device List andthen click on the Next button The Add New Connection Wizard Searching for Services window will appear Page 407 ...

Страница 408: ...asskey for the modem station under Bluetooth Passkey PIN code andthen click on the OK button Once the programhas finished searching for the devices the Add New Connection Wizard Device Selection window will appear 6 Click on the Next button Certain modems require you to configure initialization commands separately Please click on the Additional initialization Command Settings button enter the init...

Страница 409: ...are provided solely for purpose of explanation Please use your own telephone number ID and password according to the arrangement with your provider The settings will be registered and an icon will appear in the Bluetooth Settings window Connecting to the Internet You can connect to the Internet by following the procedure below if the connection destination registered when you configured the wirele...

Страница 410: ...ct button Important o A connection will be automatically established with the modemstation if COM Auto Connect is available If COM Auto Connect is not available please manually connect to the modem station The following message will appear once you have connected to the Internet 4 Endthe connection The window below will appear if you double click on the icon in the task bar Please click on the Dis...

Страница 411: ...e Bluetooth Settings window right click on the connection destination icon andthen click on Connect from the menu that appears A window indicating that the connection is being established will appear If the connection has been established successfully the connection icon and task tray will appear as shown below You will be able to browse Web pages using your browser and send and receive e mail Pag...

Страница 412: ...e mail the set up method will vary with the application 2 Endthe connection Right click on the icon and then click Disconnect to end the connection The following message will appear Click on the Yes button When the icon appears as shown below the connection will have ended Page 412 ...

Страница 413: ...to the mobile telephone Please make a note of your Bluetooth passkey before you start the set up process Configuring a mobile telephone for use as a modem Procedure 1 Turn on the mobile telephone andset it to be connectable Note o Please refer to the mobile telephone instruction manual for information on how to operate the device 2 Right click on the BluetoothTM wireless technology icon in the tas...

Страница 414: ...izard Searching for devices window will appear 4 Select the device name of the mobile telephone from Device List andthen click on the Next button The Add New Connection Wizard Searching for Services window will appear Page 414 ...

Страница 415: ...or the wireless modem station under Bluetooth Passkey PIN code andthen click on the OK button Once the programhas finished searching for the devices the Add New Connection Wizard Device Selection window will appear 6 Click on the Next button Certain modems require you to configure initialization commands separately Please click on the Additional Initialization Command Settings button enter the ini...

Страница 416: ...re provided solely for purpose of explanation Please use your own telephone number ID and password according to the arrangement with your provider The settings will be registered and an icon will appear in the Bluetooth Settings window Connecting to the Internet You can connect to the Internet by following the procedure below if the connection destination registered when you configured the mobile ...

Страница 417: ...utton Important o A connection will be automatically established with the mobile telephone if COM Auto Connect is available If COM Auto Connect is not available please manually connect to the mobile telephone The following message will appear once you have connected to the Internet 4 Endthe connection The window below will appear if you double click on the icon in the task bar Please click on the ...

Страница 418: ...e Bluetooth Settings window right click on the connection destination icon andthen click on Connect from the menu that appears A window indicating that the connection is being established will appear If the connection has been established successfully the connection icon and task tray will appear as shown below You will be able to browse Web pages using your browser and send and receive e mail Pag...

Страница 419: ...mail the set up method will vary with the application 2 Endthe connection Right click on the icon and then click Disconnect to end a connection The following message will appear Click on the Yes button When the icon appears as shown below the connection will have been ended Page 419 ...

Страница 420: ...formation on how to set up the access point A Bluetooth passkey PIN code is required for you to connect to the access point Please make a note of your Bluetooth passkey before you start the set up process Setting up the access point Procedure 1 Turn on the access point andconfirm that a connection has been establishedwith the network 2 Right click the BluetoothTM wireless technology icon in the ta...

Страница 421: ...gramhas finished searching for the devices the Add New Connection Wizard Device Selection window will appear 4 Select the device name of the access point from Device List andthen click on the Next button The Add New Connection Wizard Searching for Services window will appear Page 421 ...

Страница 422: ... OK button Service detection and COM port creation will be performed automatically The Add New Connection Wizard Create Connection Destination window will appear 6 Enter the connection name user name andpassword then click on the Next button Note o The user name and password are entered here to allow you to connect to the access point Page 422 ...

Страница 423: ...ton The Internet Options window will appear 8 Configure the connection method andthen click on the OK button Set the connection destination used for the LAN connection set up in 6 above as the default connection destination and then select Always dial my default connection 9 Click on the Next button Page 423 ...

Страница 424: ... Next button Please click on the Next button if you are satisfied with the settings The Add New Connection Wizard Completing the Add New Connection Wizard window will appear 11 Click on the Finish button The access point icon will be registered in the Bluetooth Settings window This will complete the access point set up process Connecting to a LAN LAP Page 424 ...

Страница 425: ...an example of what happens when you use Direct connection as a connection name under Connect to access point If a name different from the connection name is used that name will appear under Connection Destination o Please simply click on Settings if no user name or password have been entered i e if those fields have been left blank o Please change the connection destination if a different connecti...

Страница 426: ... are going to use has already been set up as a proxy server 1 Select Internet Options from the Tools menu in Internet Explorer The Internet Options window will appear 2 Click on the Connections tab andthen click on the Settings button 3 Enter the IP address andport number of the proxy server under Proxy Server andthen click on the OK button 3 Endthe connection Right click either on the connection ...

Страница 427: ...Click on the Yes button in the disconnection confirmation dialog boxthat appears Page 427 ...

Страница 428: ...mation on how to set up the access point A Bluetooth passkey PIN code is required for you to connect to the access point Please make a note of your Bluetooth passkey before you start the set up process Setting up the access point Procedure 1 Turn on the access point andconfirm that a connection has been establishedwith the network 2 Right click the BluetoothTM wireless technology icon in the task ...

Страница 429: ...gramhas finished searching for the devices the Add New Connection Wizard Device Selection window will appear 4 Select the device name of the access point from Device List andthen click on the Next button The Add New Connection Wizard Searching for Services window will appear Page 429 ...

Страница 430: ...l be performed automatically The Add New Connection Wizard Connection Name Settings window will appear 6 Enter the type andname of the icon displayedafter registration andthen click on the Next button Please click on the Next button if you are satisfied with the settings The Add New Connection Wizard Completing the Add New Connection Wizard window will appear 7 Click on the Finish button Page 430 ...

Страница 431: ...The access point icon will be registered in the Bluetooth Settings window This will complete the access point set up process Connecting to a LAN PAN Page 431 ...

Страница 432: ... to the network Internet Explorer will start automatically and you will be able to exchange data with other computers on the network Note o Please follow the procedure below if you need to set up a proxy server to connect to the Internet the following procedure is not necessary if the PC you are going to use has already been set up as a proxy server 1 Select Internet Options from the Tools menu in...

Страница 433: ...andthen click on the OK button 3 Endthe connection Right click either on the connection icon under the Bluetooth Settings window or on the icon in the task tray and then click on Disconnect Click on the Yes button in the disconnection confirmation dialog boxthat appears Page 433 ...

Страница 434: ...number of devices that can be used to constitute a single personal area network is seven one server and sixclients A network comprising as many as seven devices could theoretically be built but an operating environment that involves the use of other BluetoothTM wireless technology devices leaving aside other complications might require the network to comprise fewer components By using the PAN prof...

Страница 435: ...k 2 Click the Yes button The PAN server will be activated and an icon will accordingly appear in the tasktray Other devices that use the PAN profile will now be able to connect over the network Important When using the device as the server make sure that all user accounts have a password set for the security reasons The IP address of the server is automatically set up when it starts Please do not ...

Страница 436: ...CP server Operating as a client Connecting to a server as a client is performed fromthe Bluetooth Settings window as described below Procedure 1 Right click on the BluetoothTM wireless technology icon in the task tray andclick on AddNewConnection Note o Alternatively click on Start All Programs Bluetooth Bluetooth Settings and then on New Connection from the Bluetooth Settings window 2 Confirm tha...

Страница 437: ...zard Searching for devices window will appear Once the programhas finished searching for the devices the Add New Connection Wizard Device Selection window will appear 4 Select the name of the device designatedas the server from Device List andthen click on the Next button Page 437 ...

Страница 438: ... New Connection Wizard ConfirmConnection Name window will appear 5 Click on the Next button The registered icon will appear in the Bluetooth Settings window onnecting to a server Procedure 1 Right click on the icon in the Bluetooth Settings window andthen click on Connect Page 438 ...

Страница 439: ...ion to a server Procedure 1 Right click on the icon in the Bluetooth Settings window andthen click on Disconnect A message confirming whether you wish to disconnect will appear Click on the Yes button Once you have disconnected the icon will change to indicate that the device is not connected Page 439 ...

Страница 440: ...Page 440 ...

Страница 441: ...for you to be able to send and receive faxes The description below is based on a example using Microsoft Fax which is installed with Windows XP as standard If you are going to use a commercially available faxapplication then please refer to the manual that came with the application for information on how to send and receive faxes Setting up the modem station Set up and register the modem station a...

Страница 442: ...Wizard Searching for devices window will appear Once the programhas finished searching for the devices the Add New Connection Wizard Select Device window will appear 4 Select the device name of the wireless modem station from Device List andthen click on the Next button Page 442 ...

Страница 443: ...on for the first time enter the passkey for the device from the Bluetooth Passkey PIN Code window andthen click on the OK button Once the programhas finished searching for the services the Add New Connection Wizard Select Service window will appear 6 Select Fax under Select Service andthen click on the Next button Page 443 ...

Страница 444: ...performed Once the COM port and modem standard 33600 bps type registration is complete the Add New Connection Wizard Setting Connection Name screen will appear 7 Configure the type andname of the icon to appear after registration andclick on the Next button Please click only on the Next button once you are satisfied with the configuration Page 444 ...

Страница 445: ...ion Configure send receive settings and register faxinformation Procedure 1 Select Start Control Panel andthen double click on the Printers andOther Hardware icon Note o If the control panel is displayed in Classic view and you use Windows 2000 please start fromStep 2 2 Double click on the Printers andFaxes icon The Printers Faxes window will appear 3 Click on Install a local fax printer in the Pr...

Страница 446: ...ted in the Printers and Faxes screen 4 Click on Senda fax under Printer Tasks on the left side of the window If you have not yet configured a faxdevice the FaxConfiguration Wizard window will appear In the window you can enter settings pertaining to the sender yourself Note Page 446 ...

Страница 447: ... 6 Select a device to be usedfor fax transmissions enable the device for sending or receiving andthen click on the Next button Note o If Enable Receive is selected the device will be on standby for receiving faxes even if it is not sending or receiving anything and therefore will be in continuous connection to the wireless modem when COM Auto Connect is on Please decide whether to select this opti...

Страница 448: ...figuration Wizard window will appear 8 Click on the Finish button The faxinformation will be have been registered and the FaxConsole window will appear This will complete the faxset up process Related topics Sending a fax and Receiving a fax Page 448 ...

Страница 449: ...g a wireless modem station under Troubleshooting for how to change the send and receive settings once the service has been configured Procedure 1 Double click on the Fax icon in the Control Panel The FaxConsole window will appear 2 In the Fax Console window click File Sendfax The Send FaxWizard Starting the Send FaxWizard window will appear 3 Click on the Next button Page 449 ...

Страница 450: ...r 4 Enter the name andfax number of the destination party andthen click on the Next button The Send FaxWizard Preparing the Cover Page window will appear 5 Specify the cover page template subject line andnote body text andthen click on the Next button Page 450 ...

Страница 451: ...you wish to sendthe fax immediately select Now andthen click on the Next button The Send FaxWizard Completing the Send FaxWizard window will appear 7 Confirm the destination information andtransmission details andthen click on the Finish button Page 451 ...

Страница 452: ...The software will automatically dial the number and send the fax Once the faxhas been sent FaxMonitor will revert to standby mode Related topic Receiving a fax Page 452 ...

Страница 453: ...mstation before you receive a fax the device will be connected to the modemif Enable Receive has been selected or COM Auto Connect has been activated Procedure 1 When a fax arrives the Fax Monitor will start automatically as the fax is received Once the faxhas been received the FaxMonitor will revert to standby mode Note o If you have enabled manual faxreception the message below will appear when ...

Страница 454: ...An image of the received faxwill be displayed Related topic Sending a fax Page 454 ...

Страница 455: ...s based on a example using Microsoft Fax which is installed with Windows XP as standard If you are going to use a commercially available faxapplication then please refer to the manual that came with the application for information on how to send and receive faxes Setting up the mobile telephone Set up and register the mobile telephone as a faxservice Procedure 1 Turn on the mobile telephone andset...

Страница 456: ...click on the Next button The Add New Connection Wizard Searching for devices window will appear Once the programhas finished searching for the devices the Add New Connection Wizard Select Device window will appear 4 Select the device name of the mobile telephone from Device List andthen click on the Next button Page 456 ...

Страница 457: ...for the first time enter the passkey for the device from the Bluetooth Passkey PIN Code window andthen click on the OK button Once the programhas finished searching for the services the Add New Connection Wizard Select Service window will appear 6 Select Fax under Select Service andthen click on the Next button Page 457 ...

Страница 458: ...performed Once the COM port and modem standard 33600 bps type registration is complete the Add New Connection Wizard Setting Connection Name screen will appear 7 Configure the type andname of the icon to appear after registration andclick on the Next button Please click only on the Next button once you are satisfied with the configuration Page 458 ...

Страница 459: ...nformation Configure send receive settings and register faxinformation Procedure 1 Select Start Control Panel andthen double click on the Printers andOther Hardware icon Note o If the control panel is displayed in Classic view and you use Windows 2000 please start fromStep 2 2 Double click on the Printers andFaxes icon The Printers Faxes window will appear 3 Click on Set upfaxing in the Printers a...

Страница 460: ...ted in the Printers and Faxes screen 4 Click on Senda fax under Printer Tasks on the left side of the window If you have not yet configured a faxdevice the FaxConfiguration Wizard window will appear In the window you can enter settings pertaining to the sender yourself Note Page 460 ...

Страница 461: ...6 Select a device to be usedfor fax transmissions enable the device for sending or receiving andthen click on the Next button Note o If Enable Receive is selected the device will be on standby for receiving faxes even if it is not sending or receiving anything and therefore will be in continuous connection to the wireless modem when COM Auto Connect is on Please decide whether to select this optio...

Страница 462: ...figuration Wizard window will appear 8 Click on the Finish button The faxinformation will be have been registered and the FaxConsole window will appear This will complete the faxset up process Related topics Sending a fax and Receiving a fax Page 462 ...

Страница 463: ...sing a mobile telephone under Troubleshooting for how to change the send and receive settings once the service has been configured Procedure 1 Double click on the Fax icon in the Control Panel The FaxConsole window will appear 2 In the Fax Console window click File Sendfax The Send FaxWizard Starting the Send FaxWizard window will appear 3 Click on the Next button Page 463 ...

Страница 464: ...r 4 Enter the name andfax number of the destination party andthen click on the Next button The Send FaxWizard Preparing the Cover Page window will appear 5 Specify the cover page template subject line andnote body text andthen click on the Next button Page 464 ...

Страница 465: ...you wish to sendthe fax immediately select Now andthen click on the Next button The Send FaxWizard Completing the Send FaxWizard window will appear 7 Confirm the destination information andtransmission details andthen click on the Finish button Page 465 ...

Страница 466: ...The software will automatically dial the number and send the fax Once the faxhas been sent FaxMonitor will revert to standby mode Related topic Receiving a fax Page 466 ...

Страница 467: ...ation before you receive a fax the device will be connected to the modemif Enable Receive has been selected or COM Auto Connect has been activated Procedure 1 When a fax arrives the Fax Monitor will start automatically as the fax is received Once the faxhas been received the FaxMonitor will revert to standby mode Note o If you have enabled manual faxreception the message below will appear when a f...

Страница 468: ...An image of the received faxwill be displayed Related topic Sending a fax Page 468 ...

Страница 469: ...h ordinary cable connected printers Printing document and images SPP OPP 2 Not required Allows you to print business card data directly Printing business card data BIP Not required Allows you to print image data directly Printing images directly froma digital camera or other device Note 1 The majority of BluetoothTM wireless technology compatible printers support HCRP If you have selected Express ...

Страница 470: ... to the printer Please make a note of your Bluetooth passkey before you start the set up process Setting up the printer Procedure 1 Turn on the printer 2 Right click on the BluetoothTM wireless technology icon in the task tray andthen click on AddNewConnection Note o Alternatively click Start All Programs Bluetooth Bluetooth Settings and then click on New Connection from the active Bluetooth Setti...

Страница 471: ...devices window will appear Once the programhas finished searching for the devices the Add New Connection Wizard Device Selection window will appear 4 Select the device name of the printer from Device List andthen click on the Next button Page 471 ...

Страница 472: ...dow andthen click on the OK button Once the services have been detected successfully connection to the device and creation of the HCRP port will be performed automatically If you have not yet installed a printer a message prompting you to install a printer will appear 6 Click on the OK button The Add Printer Wizard Starting the Add Printer Wizard window will appear 7 Click on the Next button Page ...

Страница 473: ...t Local printer attachedto this computer remove the check next to Automatically detect andinstall my Plug andPlay printer andthen click on the Next button The Add Printer Wizard Select Printer Port window will appear 9 Select the desiredport andthen click on the Next button Page 473 ...

Страница 474: ... printer to be installed or click on the Use Device button andthen click on the Next button Please install the printer according to the instructions in the windows that follow Once installation is complete a message of confirmation will appear in the Add New Connection Wizard Printer Settings window 11 Click on Next Page 474 ...

Страница 475: ...Please click on the Next button if you are satisfied with the settings Note o You can change the connection icon and icon name Changing the connection icon name Changing the connection icon Printing Try to print fromthe message pad 1 Click File Print The Print screen will appear 2 Select wireless printer from under Select Printer andthen click on the Print button Page 475 ...

Страница 476: ...Note If you have connected to a printer using HCRP or SPP profiles all future BluetoothTM wireless technology connections to that printer will be established automatically once you have printed a document fromyour PC Page 476 ...

Страница 477: ...rinter using icons Printing image files on a printer by right clicking the mouse Note Below is a list of file types extensions of images that can be printed out directly o Bitmap bmp o JPEG jpg jpeg o PNG png Procedure Printing image files on a printer using icons 1 Turn on the printer 2 Click on the Bluetooth Information Exchanger icon on the Desktop Note o Alternatively open Explorer and click o...

Страница 478: ...the list please confirmthat the printer has been turned on and then click on Bluetooth Search Devices A device search will be performed 4 Drag anddropthe file to be sent on topof the icon of the destination printer The file will be sent to the printer If the file has been sent to the printer successfully the message below will appear and the image will be printed out Please click on the OK button ...

Страница 479: ...les to a printer by right clicking the mouse 1 Turn on the printer 2 Right click on the file to be sent andthen click on the destination printer under to Bluetooth Note o If your desired device does not appear in the list please confirmthat the device has been turned on and then click on to Bluetooth Search Other Devices Once the device has been detected the message below will appear Please select...

Страница 480: ...sage below will appear and the image will be printed out Please click on the OK button The message below will appear if the file transmission was unsuccessful Please click on the OK button to close the message and repeat the printing procedure Note o If the printer does not support the BIP profile the message below will appear Page 480 ...

Страница 481: ...siness card data by right clicking the mouse Procedure Printing business carddata using icons 1 Turn on the printer 2 Click on the Bluetooth Information Exchanger icon on the Desktop Note o Alternatively open Explorer and click on the Bluetooth Information Exchanger folder for the same result The Bluetooth Information Exchanger window will appear 3 Double click on the Object Push icon A list of de...

Страница 482: ...sired printer does not appear in the list please confirmthat the printer has been turned on and then click on Bluetooth Search Devices A device search will be performed 4 Drag anddropthe business carddata to be sent on topof the icon of the destination printer Page 482 ...

Страница 483: ...lick on the OK button The message below will appear if the business card transmission was unsuccessful Please click on the OK button to close the message and repeat the printing procedure Printing business carddata by right clicking the mouse 1 Turn on the printer 2 Right click on the business carddata to be sent andthen click on the destination printer under to Bluetooth Page 483 ...

Страница 484: ...lect the destination device and click on the Send button The business card will be sent to the printer If the business card has been sent to the printer successfully the message below will appear and the image will be printed out Please click on the OK button The message below will appear if the business card transmission was unsuccessful Please click on the OK button to close the message and repe...

Страница 485: ...Page 485 ...

Страница 486: ...edure 1 Right click on the BluetoothTM wireless technology icon in the task tray andclick on AddNewConnection Note o Alternatively click Start All Programs Bluetooth Bluetooth Settings and then click on New Connection from the Bluetooth Settings screen that has opened The Add New Connection Wizard Welcome to the Add New Connection Wizard will appear 2 Switch ON the stereo headphones andactivate Di...

Страница 487: ...ce the search for the devices has ended the Add New Connection Wizard Select Device screen will appear 4 Select the device name of the stereo headphones from the list andclick on the Next button The Add New Connection Wizard Searching for Services screen will appear Page 487 ...

Страница 488: ...ck applications o e Conferencing applications o Voice recognition applications Please finish connecting the stereo headphones before launching any of these applications Listening to music or other audio files 1 Playing music or other audio files on your PC Important o Please confirm the points below if you are unable to hear anything despite having properly connected the stereo headphones Click St...

Страница 489: ...connect the stereo headphones fromyour PC Music video playback applications e Conferencing applications Voice recognition applications Please completely disconnect the stereo headphones before launching any of these applications Please refer to the user guide for information on terminating a connection from the stereo headphones Playing music using remote control Music applications and video playb...

Страница 490: ...the appropriate item from the pull down menu of positions where the receive commandis to be displayed and then click on the OK button If the receive command appears but does not function properly sometimes the problemmay be rectified by changing the setting to Do not display The commands supported by this application are shown below Please refer to the headphone user guide for commands that are su...

Страница 491: ...vices that support this function Procedure 1 Double click on the BluetoothTM wireless technology icon in the task tray Launches Bluetooth Settings 2 Select Bluetooth from the menu andclick on Copyright Protection Setting The copyright protection dialog will appear 3 Tick the box next to Only connect to devices that are copyright protectedunder the SCMS T format andclick on the OK button Page 491 ...

Страница 492: ...ask tray andthen click on AddNewConnection Note o Alternatively click Start All Programs Bluetooth Bluetooth Settings and then click on New Connection from the active Bluetooth Settings window The Add New Connection Wizard Welcome to the Add New Connection Wizard window will appear 2 Confirm that Express Mode has been selected andthen click on the Next button The Add New Connection Wizard Searchin...

Страница 493: ...indow will appear 3 Select the device name of the keyboardfrom Device List andthen click on the Next button The Add New Connection Wizard Searching for Services window will appear 4 Use the wireless keyboardto enter the numbers that appear in Bluetooth Passkey PIN Code andthen hit the Enter key Page 493 ...

Страница 494: ...dd New Connection Wizard Connection Name Settings window will appear 5 Enter the type andname of the icon displayedafter registration andthen click on the Next button Please click on the Next button if you are satisfied with the settings Note o You can change the connection icon and icon name Changing a connection icon name Changing a connection icon Page 494 ...

Страница 495: ...ick on the Finish button The settings information will be registered and an icon will appear in the Bluetooth Settings window Note Pressing any key on the wireless keyboard will automatically connect it to the PC thereafter Please connect manually if automatic connection is unsuccessful Page 495 ...

Страница 496: ...passkey will require one If your mouse s user guide does not contain any passkey related information please consult the outlet where you purchased your mouse or the relevant support center 2 Right click on the BluetoothTM wireless technology icon in the task tray andthen click on AddNewConnection Note o Alternatively click Start All Programs Bluetooth Bluetooth Settings and then click on New Conne...

Страница 497: ... devices window will appear Once the programhas finished searching for the devices the Add New Connection Wizard Device Selection window will appear 4 Select the device name of the mouse from Device List andthen click on the Next button Page 497 ...

Страница 498: ...tration andthen click on the Next button Please click on the Next button if you are satisfied with the settings Note o Please use this window to change the connection name and icon Changing the connection icon name Changing the connection icon The Add New Connection Wizard Completing the Add New Connection Wizard window will appear 7 Click on the Finish button The settings information will be have...

Страница 499: ...Note o Clicking on one of the mouse buttons or otherwise operating it will automatically connect it to the PC thereafter Please connect manually if automatic connection is unsuccessful Page 499 ...

Страница 500: ... transfer cannot be used to send or receive business card data Please instead use Object Push to performthese activities Sending files to a PC or PDA using icons Sending files to a PC or PDA by right clicking the mouse Receiving files froma PC or PDA Procedure Sending files to a PC or PDA using icons 1 Turn on the PC or PDA 2 Double click on the Bluetooth Information Exchanger icon on the Desktop ...

Страница 501: ...will be performed o You can also use Image transfer when sending individual image files 4 Use the mouse to drag anddropthe file you wish to sendover the destination icon In this case the file will be sent to a PC named PC 1 Note o When using File transfer you can send individual files as well as entire folders 5 Confirm that the file is being sent The file will be sent to the PC Note o When sendin...

Страница 502: ...ion was unsuccessful Please click on the OK button to close the message and repeat the procedure Note o Files that have been sent will be saved in a file transfer shared folder on the destination device o Additionally with File transfer you can open the shared folder on the destination device using Explorer specify a subfolder and then send the file there o You can use Properties in the Bluetooth ...

Страница 503: ...ear in the list please confirmthat the device has been turned on and then select to Bluetooth Search other devices Once the devices have been detected the message below will appear Please select the destination device and then click on the Send button 3 Confirm that the file is being sent The file will be sent to the PC Note Page 503 ...

Страница 504: ...ssful Please click on the OK button to close the message and then repeat the procedure Note o Files that have been sent will be saved in a file transfer shared folder on the destination device Receiving files from a PC or PDA Your PC is able to receive files that have been saved in the shared folder on the destination PC or PDA Received files will be saved in the shared folder under File transfer ...

Страница 505: ...list of devices will appear in the File transfer window In this case the file will be received fromthe PDA named My Mobile 4 Double click on the PDA 1 icon The file saved in the shared folder in My Mobile will appear 5 Right click on the file you wish to receive andthen select Receive file Page 505 ...

Страница 506: ...med in the same manner as when receiving individual files If the file has been received successfully the message below will appear Please click on the OK button The message below will appear if the file transmission was unsuccessful Please click on the OK button to close the message and repeat the procedure Note o The received file will be saved in the Shared folder under File transfer in the Blue...

Страница 507: ...You can use Properties under the Bluetooth Information Exchanger to specify the location of the Shared folder on the hard drive Page 507 ...

Страница 508: ... be sent and received using Image transfer o Bitmap bmp o JPEG jpg jpeg o PNG png Sending images to a mobile telephone using icons Sending images to a mobile telephone by right clicking the mouse Procedure Sending images to a mobile telephone using icons 1 Turn on the PC or PDA Confirmthat a BluetoothTM wireless technology connection has been enabled before proceeding 2 Double click on the Bluetoo...

Страница 509: ...ansfer window Note o If the desired device does not appear in the list please confirmthat the device has been turned on and then select Bluetooth Search Devices A device search will be performed 4 Drag anddropthe file you wish to sendover the destination icon In this case the image will be sent to a mobile telephone named BT Phone 1 Page 509 ...

Страница 510: ...as unsuccessful Please click on the OK button to close the message and repeat the procedure Sending images to a mobile telephone by right clicking the mouse 1 Turn on the mobile telephone Confirmthat a BluetoothTM wireless technology connection has been enabled before proceeding 2 Right click on the file you wish to send andthen click on its destination from to Bluetooth Page 510 ...

Страница 511: ...devices Once the devices have been detected the message below will appear Please select the destination device and then click on the Send button The image will be sent If the image has been sent successfully the message below will appear Please click on the OK button The message below will appear if the image transmission was unsuccessful Page 511 ...

Страница 512: ...Please click on the OK button to close the message and repeat the procedure Page 512 ...

Страница 513: ...pg jpeg o PNG png Sending images to a PC or PDA using icons Sending images to a PC or PDA by right clicking the mouse Procedure Sending images to a PC or PDA using icons 1 Turn on the PC or PDA Confirmthat a BluetoothTM wireless technology connection has been enabled before proceeding 2 Double click on the Bluetooth Information Exchanger icon on the Desktop Note o Alternatively opening Explorer an...

Страница 514: ...e Image transfer window Note o If the desired device does not appear in the list please confirmthat the device has been turned on and then select Bluetooth Search Devices A device search will be performed 4 Drag anddropthe file you wish to sendover the destination icon In this case the image will be sent to a PC named PC 1 Page 514 ...

Страница 515: ...f the image transmission was unsuccessful Please click on the OK button to close the message and repeat the procedure Note o Images that have been sent will be saved in an image transfer folder on the destination device o Images received using Image transfer in the Bluetooth Information Exchanger will be saved in the Image Box in Image transfer Page 515 ...

Страница 516: ...echnology connection has been enabled before proceeding 2 Right click on the file you wish to send andthen click on its destination from to Bluetooth Note o If the desired device does not appear in the list please confirmthat the device has been turned on and then select to Bluetooth Search other devices Once the devices have been detected the message below will appear Please select the destinatio...

Страница 517: ...ar if the image transmission was unsuccessful Please click on the OK button to close the message and repeat the procedure Note o When you send images by right clicking the mouse the image data that has been sent will be saved in the image transfer shared folder on the destination device This is also the case when you send images using icons Page 517 ...

Страница 518: ...must be supported by the PC or PDA of the other party Selecting a business card and sending it to a PC or PDA using icons Selecting a business card and sending it to a PC or PDA by right clicking the mouse Sending your personal business card Receiving a business card from another party Exchanging business cards Procedure Selecting a business cardandsending it to a PC or PDA using icons Select a bu...

Страница 519: ...ndow Note o If the desired device does not appear in the list please confirmthat the device has been turned on and then select Bluetooth Search Devices A device search will be performed 4 Use the mouse to drag anddropthe business cardyou wish to sendover the destination icon In this case the business card will be sent to a PC named PC 1 Page 519 ...

Страница 520: ...ssage similar to the one below will appear If the business card has been sent successfully the message below will appear Please click on the OK button The message below will appear if the business card transmission was unsuccessful Please click on the OK button to close the message and repeat the procedure Memo o Data that have been sent will be saved in a folder for exchanged business cards on th...

Страница 521: ...othTM wireless technology connection has been enabled before proceeding 2 Right click on the business cardyou wish to send andthen click on its destination from to Bluetooth Note o If the desired device does not appear in the list please confirmthat the device has been turned on and then select to Bluetooth Search other devices Once the devices have been detected the message below will appear Plea...

Страница 522: ...ure to follow the instructions provided If you are using the BluetoothTM Utility a message similar to the one below will appear If the business card has been sent successfully the message below will appear Please click on the OK button The message below will appear if the business card transmission was unsuccessful Please click on the OK button to close the message and repeat the procedure Note o ...

Страница 523: ...e business card registered as your own that is able to be sent 1 Turn on the PC or PDA Confirmthat a BluetoothTM wireless technology connection has been enabled before proceeding 2 Double click on the Bluetooth Information Exchanger icon on the Desktop Note o Alternatively opening Explorer and clicking on the Bluetooth Information Exchanger folder will produce the same result The Bluetooth Informa...

Страница 524: ...ess card will be sent to a PC named PC 1 The business card will be sent Note o When you try to send a business card a message requesting permission to receive the files may appear on the device belonging to the other party i e on the receiving end The content of the message will vary with the software installed on the destination device so please be sure to follow the instructions provided If you ...

Страница 525: ... o Data that has been sent will be saved in a folder for exchanged business cards on the destination device Acquiring a business cardfrom another party You can use your PC to acquire a business card froma party containing their details 1 Turn on the PC or PDA Confirmthat a BluetoothTM wireless technology connection has been enabled before proceeding 2 Double click on the Bluetooth Information Exch...

Страница 526: ...h to acquire andthen click on Receive business card In this case the business card of the other party will be acquired froma PC named PC 1 The business card will be received Note o When you try to acquire a business card a message requesting permission to send the files may appear on the device belonging to the other party i e on the sending end The content of the message will vary with the softwa...

Страница 527: ...ect Push You can use Properties under the Bluetooth Information Exchanger to set the location of the Inboxon the hard drive Exchanging business cards Simultaneously exchange your business card with one belonging to another party 1 Turn on the PC or PDA Confirmthat a BluetoothTM wireless technology connection has been enabled before proceeding 2 Double click on the Bluetooth Information Exchanger i...

Страница 528: ...he desired device does not appear in the list please confirmthat the device has been turned on and then select Bluetooth Search Devices A device search will be performed 4 Right click on the icon of the party with whom you wish to exchange business cards andthen click on Object Push In this case the business cards will be exchanged with a PC named PC 1 Page 528 ...

Страница 529: ...has been successfully sent Note o Business cards that have been sent will be saved in the Inboxof the destination party Once your business card has finished being sent the programwill start receiving the business card belonging to the other party Note o When a business card is to be received a message such as the one below may appear on the device belonging to the other party Please click on the Y...

Страница 530: ...Page 530 ...

Страница 531: ...l in the BluetoothTM Utility to connect the camera to your PC Procedure 1 Click on Start All Programs Bluetooth Remote Camera Note o In Windows 2000 click on Start Programs Bluetooth Remote Camera 2 Turn on the camera andset it to be connectable via BluetoothTM wireless technology Note o Different cameras are operated in different ways depending on the manufacturer and model used Please refer to t...

Страница 532: ... will be connected and images fromthe camera will appear on screen Taking pictures By placing the mouse cursor over the on screen image the camera s operating window will appear You can operate the camera fromthis window Procedure Taking a single picture Page 532 ...

Страница 533: ...t to the PC Note o The remote camera shutter cannot be operated while the camera is connected to the PC o The number of consecutive pictures taken can be set to anywhere between 2 and 16 1 In the Remote Camera window click on Bluetooth Properties Consecutive Image Settings The Change number of consecutive images dialog boxwill appear 2 Click on the buttons to select the number of consecutive image...

Страница 534: ...sferred to the PC Viewing images saves on your PC A Remote Camera folder will be created in the Bluetooth folder under My Documents during initial set up A folder bearing the same name as the camera will be created in it and images will be saved in this folder Click the Explorer button in the Remote Camera window to display the folder where the images have been saved Note This window is an example...

Страница 535: ...c v 3 7 or higher Also please establish a partnership between the devices using a USB or infrared link before you connect via BluetoothTM wireless technology Please refer to the ActiveSync Help or other manuals for information on how to use the application Microsoft Outlook 2002 or another schedule management tool must also be installed on the PC Connecting using ActiveSync Both the PC and PDA mus...

Страница 536: ...select COM7 Note o In the standard set up the port is configured to COM7 refer to Steps 3 and 4 under Preparing the PDA below When using a different port please also change the port number selected in this window Preparing the PDA Procedure 1 Tapon the BluetoothTM wireless technology icon in the bottom right of the screen Page 536 ...

Страница 537: ... model of PDA you use Please refer to the product instruction manuals for further details The Bluetooth Settings window will open The message Connection not registered will appear if no BluetoothTM wireless technology device has been registered Please tap on OK to close the message 2 Double click on Tools Search for peripheral components Page 537 ...

Страница 538: ...PC icon andthen select Update Services A search for services will be carried out and then a list of service names and their connection status will appear as list in the lower window 4 Tapandholdon COM7 from the list of service names andthen select Register ActiveSync Page 538 ...

Страница 539: ...successfully established with a PDA the procedure for establishing a partnership with the PDA will be started by the ActiveSync application on the PC Performing this set up procedure will enable data to be synchronised between your PC and PDA Procedure 1 In the NewPartnership Set Upa Partnership window select Standardpartnership andthen click on the Next button Page 539 ...

Страница 540: ...will appear 2 Select Synchronise with this PC andthen click on the Next button The New Partnership Select Synchronisation Settings window will appear 3 Select the type of information to be synchronisedbetween your PC andPDA andthen click on the Next button Page 540 ...

Страница 541: ...nership Completing Setup window will appear 4 Click on the Finish button When you click on the Finish button ActiveSync will begin to synchronise your information Confirming changes Synchronisation process Page 541 ...

Страница 542: ...tion will be opened and ActiveSync will synchronise your information Finishing an ActiveSync connection Follow the procedure below on your PDA if you want to end an ActiveSync connection manually Procedure 1 Tapandholdon COM7 in the Bluetooth Settings window andselect ActiveSync Release Cancelling a partnership Follow the procedure below fromthe ActiveSync window on the PC if you want to cancel th...

Страница 543: ...lick on the Yes button when the confirmation message appears Note o If you wish to create another ActiveSync connection you will have to repeat the above procedure to re establish a partnership Page 543 ...

Страница 544: ...tion Wizard Note o Alternatively you can click on Start All Programs Bluetooth Bluetooth Settings then click on New Connection in the Bluetooth Settings screen that has opened The Add New Connection Wizard Welcome to the Add New Connection Wizard screen will appear 2 Turn the headset power on Once you have turned on the headset set the mode to enable a connection Important o The procedure for oper...

Страница 545: ...ching for Devices screen will appear Once the device search has been completed the Add New Connection Wizard Select a Device screen will appear 4 Select the name of the headset device from the list then click on the Next button Page 545 ...

Страница 546: ...e Circuit screen will appear and device configuration will be performed Note o If you are connecting to the headset for the first time or if another audio device has not yet been registered the following Found New Hardware Wizard screen will appear fromwhich you can proceed to install the driver If another audio device has already been registered i e the driver has been installed you can proceed t...

Страница 547: ...ion wizard will appear 8 Click on the Finish button Once driver installation is complete the Add New Connection Wizard Enter Connection Name will appear 9 Confirm the information you have entered andclick on the Next button The Add New Connection Wizard Completing the Add New Connection Wizard screen will appear Page 547 ...

Страница 548: ...wing audio related applications have been closed before you connect the headset to your PC o Windows Media Player BeatJam InterVideo WinDVD and other music audio playback software o Windows Messenger and other e conferencing software If you wish to use these applications please terminate the headset connection before you launch them Procedure 1 Right click on the headset icon then click on Connect...

Страница 549: ...connect from the headset Procedure 1 Right click on the headset icon in the Bluetooth Settings screen then click on Disconnect A message will appear requesting confirmation that you wish to disconnect Click on the Yes button The icon on the Bluetooth Settings screen will appear as shown below indicating that the device has been disconnected Page 549 ...

Страница 550: ...ion on connecting the modemstation to a telephone line A Bluetooth passkey PIN code is required for you to connect to the modemstation Please make a note of your Bluetooth passkey before you start the set up process Setting up the modem station Procedure 1 Turn on the wireless modem station 2 Right click the BluetoothTM wireless technology icon in the task tray andthen click on AddNewConnection No...

Страница 551: ...rd Searching for devices window will appear 4 Select the device name of the wireless modem station from Device List andthen click on the Next button The Add New Connection Wizard Searching for Services window will appear Page 551 ...

Страница 552: ...asskey for the modem station under Bluetooth Passkey PIN code andthen click on the OK button Once the programhas finished searching for the devices the Add New Connection Wizard Device Selection window will appear 6 Click on the Next button Certain modems require you to configure initialization commands separately Please click on the Additional initialization Command Settings button enter the init...

Страница 553: ...are provided solely for purpose of explanation Please use your own telephone number ID and password according to the arrangement with your provider The settings will be registered and an icon will appear in the Bluetooth Settings window Connecting to the Internet You can connect to the Internet by following the procedure below if the connection destination registered when you configured the wirele...

Страница 554: ...ct button Important o A connection will be automatically established with the modemstation if COM Auto Connect is available If COM Auto Connect is not available please manually connect to the modem station The following message will appear once you have connected to the Internet 4 Endthe connection The window below will appear if you double click on the icon in the task bar Please click on the Dis...

Страница 555: ...e Bluetooth Settings window right click on the connection destination icon andthen click on Connect from the menu that appears A window indicating that the connection is being established will appear If the connection has been established successfully the connection icon and task tray will appear as shown below You will be able to browse Web pages using your browser and send and receive e mail Pag...

Страница 556: ...e mail the set up method will vary with the application 2 Endthe connection Right click on the icon and then click Disconnect to end the connection The following message will appear Click on the Yes button When the icon appears as shown below the connection will have ended Page 556 ...

Страница 557: ...for you to be able to send and receive faxes The description below is based on a example using Microsoft Fax which is installed with Windows XP as standard If you are going to use a commercially available faxapplication then please refer to the manual that came with the application for information on how to send and receive faxes Setting up the modem station Set up and register the modem station a...

Страница 558: ...Wizard Searching for devices window will appear Once the programhas finished searching for the devices the Add New Connection Wizard Select Device window will appear 4 Select the device name of the wireless modem station from Device List andthen click on the Next button Page 558 ...

Страница 559: ...on for the first time enter the passkey for the device from the Bluetooth Passkey PIN Code window andthen click on the OK button Once the programhas finished searching for the services the Add New Connection Wizard Select Service window will appear 6 Select Fax under Select Service andthen click on the Next button Page 559 ...

Страница 560: ...performed Once the COM port and modem standard 33600 bps type registration is complete the Add New Connection Wizard Setting Connection Name screen will appear 7 Configure the type andname of the icon to appear after registration andclick on the Next button Please click only on the Next button once you are satisfied with the configuration Page 560 ...

Страница 561: ...ion Configure send receive settings and register faxinformation Procedure 1 Select Start Control Panel andthen double click on the Printers andOther Hardware icon Note o If the control panel is displayed in Classic view and you use Windows 2000 please start fromStep 2 2 Double click on the Printers andFaxes icon The Printers Faxes window will appear 3 Click on Install a local fax printer in the Pr...

Страница 562: ...ted in the Printers and Faxes screen 4 Click on Senda fax under Printer Tasks on the left side of the window If you have not yet configured a faxdevice the FaxConfiguration Wizard window will appear In the window you can enter settings pertaining to the sender yourself Note Page 562 ...

Страница 563: ... 6 Select a device to be usedfor fax transmissions enable the device for sending or receiving andthen click on the Next button Note o If Enable Receive is selected the device will be on standby for receiving faxes even if it is not sending or receiving anything and therefore will be in continuous connection to the wireless modem when COM Auto Connect is on Please decide whether to select this opti...

Страница 564: ...figuration Wizard window will appear 8 Click on the Finish button The faxinformation will be have been registered and the FaxConsole window will appear This will complete the faxset up process Related topics Sending a fax and Receiving a fax Page 564 ...

Страница 565: ...g a wireless modem station under Troubleshooting for how to change the send and receive settings once the service has been configured Procedure 1 Double click on the Fax icon in the Control Panel The FaxConsole window will appear 2 In the Fax Console window click File Sendfax The Send FaxWizard Starting the Send FaxWizard window will appear 3 Click on the Next button Page 565 ...

Страница 566: ...r 4 Enter the name andfax number of the destination party andthen click on the Next button The Send FaxWizard Preparing the Cover Page window will appear 5 Specify the cover page template subject line andnote body text andthen click on the Next button Page 566 ...

Страница 567: ...you wish to sendthe fax immediately select Now andthen click on the Next button The Send FaxWizard Completing the Send FaxWizard window will appear 7 Confirm the destination information andtransmission details andthen click on the Finish button Page 567 ...

Страница 568: ...The software will automatically dial the number and send the fax Once the faxhas been sent FaxMonitor will revert to standby mode Related topic Receiving a fax Page 568 ...

Страница 569: ...mstation before you receive a fax the device will be connected to the modemif Enable Receive has been selected or COM Auto Connect has been activated Procedure 1 When a fax arrives the Fax Monitor will start automatically as the fax is received Once the faxhas been received the FaxMonitor will revert to standby mode Note o If you have enabled manual faxreception the message below will appear when ...

Страница 570: ...An image of the received faxwill be displayed Related topic Sending a fax Page 570 ...

Страница 571: ...to the mobile telephone Please make a note of your Bluetooth passkey before you start the set up process Configuring a mobile telephone for use as a modem Procedure 1 Turn on the mobile telephone andset it to be connectable Note o Please refer to the mobile telephone instruction manual for information on how to operate the device 2 Right click on the BluetoothTM wireless technology icon in the tas...

Страница 572: ...izard Searching for devices window will appear 4 Select the device name of the mobile telephone from Device List andthen click on the Next button The Add New Connection Wizard Searching for Services window will appear Page 572 ...

Страница 573: ...or the wireless modem station under Bluetooth Passkey PIN code andthen click on the OK button Once the programhas finished searching for the devices the Add New Connection Wizard Device Selection window will appear 6 Click on the Next button Certain modems require you to configure initialization commands separately Please click on the Additional Initialization Command Settings button enter the ini...

Страница 574: ...re provided solely for purpose of explanation Please use your own telephone number ID and password according to the arrangement with your provider The settings will be registered and an icon will appear in the Bluetooth Settings window Connecting to the Internet You can connect to the Internet by following the procedure below if the connection destination registered when you configured the mobile ...

Страница 575: ...utton Important o A connection will be automatically established with the mobile telephone if COM Auto Connect is available If COM Auto Connect is not available please manually connect to the mobile telephone The following message will appear once you have connected to the Internet 4 Endthe connection The window below will appear if you double click on the icon in the task bar Please click on the ...

Страница 576: ...e Bluetooth Settings window right click on the connection destination icon andthen click on Connect from the menu that appears A window indicating that the connection is being established will appear If the connection has been established successfully the connection icon and task tray will appear as shown below You will be able to browse Web pages using your browser and send and receive e mail Pag...

Страница 577: ...mail the set up method will vary with the application 2 Endthe connection Right click on the icon and then click Disconnect to end a connection The following message will appear Click on the Yes button When the icon appears as shown below the connection will have been ended Page 577 ...

Страница 578: ...s based on a example using Microsoft Fax which is installed with Windows XP as standard If you are going to use a commercially available faxapplication then please refer to the manual that came with the application for information on how to send and receive faxes Setting up the mobile telephone Set up and register the mobile telephone as a faxservice Procedure 1 Turn on the mobile telephone andset...

Страница 579: ...click on the Next button The Add New Connection Wizard Searching for devices window will appear Once the programhas finished searching for the devices the Add New Connection Wizard Select Device window will appear 4 Select the device name of the mobile telephone from Device List andthen click on the Next button Page 579 ...

Страница 580: ...for the first time enter the passkey for the device from the Bluetooth Passkey PIN Code window andthen click on the OK button Once the programhas finished searching for the services the Add New Connection Wizard Select Service window will appear 6 Select Fax under Select Service andthen click on the Next button Page 580 ...

Страница 581: ...performed Once the COM port and modem standard 33600 bps type registration is complete the Add New Connection Wizard Setting Connection Name screen will appear 7 Configure the type andname of the icon to appear after registration andclick on the Next button Please click only on the Next button once you are satisfied with the configuration Page 581 ...

Страница 582: ...nformation Configure send receive settings and register faxinformation Procedure 1 Select Start Control Panel andthen double click on the Printers andOther Hardware icon Note o If the control panel is displayed in Classic view and you use Windows 2000 please start fromStep 2 2 Double click on the Printers andFaxes icon The Printers Faxes window will appear 3 Click on Set upfaxing in the Printers a...

Страница 583: ...ted in the Printers and Faxes screen 4 Click on Senda fax under Printer Tasks on the left side of the window If you have not yet configured a faxdevice the FaxConfiguration Wizard window will appear In the window you can enter settings pertaining to the sender yourself Note Page 583 ...

Страница 584: ...6 Select a device to be usedfor fax transmissions enable the device for sending or receiving andthen click on the Next button Note o If Enable Receive is selected the device will be on standby for receiving faxes even if it is not sending or receiving anything and therefore will be in continuous connection to the wireless modem when COM Auto Connect is on Please decide whether to select this optio...

Страница 585: ...figuration Wizard window will appear 8 Click on the Finish button The faxinformation will be have been registered and the FaxConsole window will appear This will complete the faxset up process Related topics Sending a fax and Receiving a fax Page 585 ...

Страница 586: ...sing a mobile telephone under Troubleshooting for how to change the send and receive settings once the service has been configured Procedure 1 Double click on the Fax icon in the Control Panel The FaxConsole window will appear 2 In the Fax Console window click File Sendfax The Send FaxWizard Starting the Send FaxWizard window will appear 3 Click on the Next button Page 586 ...

Страница 587: ...r 4 Enter the name andfax number of the destination party andthen click on the Next button The Send FaxWizard Preparing the Cover Page window will appear 5 Specify the cover page template subject line andnote body text andthen click on the Next button Page 587 ...

Страница 588: ...you wish to sendthe fax immediately select Now andthen click on the Next button The Send FaxWizard Completing the Send FaxWizard window will appear 7 Confirm the destination information andtransmission details andthen click on the Finish button Page 588 ...

Страница 589: ...The software will automatically dial the number and send the fax Once the faxhas been sent FaxMonitor will revert to standby mode Related topic Receiving a fax Page 589 ...

Страница 590: ...ation before you receive a fax the device will be connected to the modemif Enable Receive has been selected or COM Auto Connect has been activated Procedure 1 When a fax arrives the Fax Monitor will start automatically as the fax is received Once the faxhas been received the FaxMonitor will revert to standby mode Note o If you have enabled manual faxreception the message below will appear when a f...

Страница 591: ...An image of the received faxwill be displayed Related topic Sending a fax Page 591 ...

Страница 592: ... be sent and received using Image transfer o Bitmap bmp o JPEG jpg jpeg o PNG png Sending images to a mobile telephone using icons Sending images to a mobile telephone by right clicking the mouse Procedure Sending images to a mobile telephone using icons 1 Turn on the PC or PDA Confirmthat a BluetoothTM wireless technology connection has been enabled before proceeding 2 Double click on the Bluetoo...

Страница 593: ...ansfer window Note o If the desired device does not appear in the list please confirmthat the device has been turned on and then select Bluetooth Search Devices A device search will be performed 4 Drag anddropthe file you wish to sendover the destination icon In this case the image will be sent to a mobile telephone named BT Phone 1 Page 593 ...

Страница 594: ...as unsuccessful Please click on the OK button to close the message and repeat the procedure Sending images to a mobile telephone by right clicking the mouse 1 Turn on the mobile telephone Confirmthat a BluetoothTM wireless technology connection has been enabled before proceeding 2 Right click on the file you wish to send andthen click on its destination from to Bluetooth Page 594 ...

Страница 595: ...devices Once the devices have been detected the message below will appear Please select the destination device and then click on the Send button The image will be sent If the image has been sent successfully the message below will appear Please click on the OK button The message below will appear if the image transmission was unsuccessful Page 595 ...

Страница 596: ...Please click on the OK button to close the message and repeat the procedure Page 596 ...

Страница 597: ...formation on how to set up the access point A Bluetooth passkey PIN code is required for you to connect to the access point Please make a note of your Bluetooth passkey before you start the set up process Setting up the access point Procedure 1 Turn on the access point andconfirm that a connection has been establishedwith the network 2 Right click the BluetoothTM wireless technology icon in the ta...

Страница 598: ...gramhas finished searching for the devices the Add New Connection Wizard Device Selection window will appear 4 Select the device name of the access point from Device List andthen click on the Next button The Add New Connection Wizard Searching for Services window will appear Page 598 ...

Страница 599: ... OK button Service detection and COM port creation will be performed automatically The Add New Connection Wizard Create Connection Destination window will appear 6 Enter the connection name user name andpassword then click on the Next button Note o The user name and password are entered here to allow you to connect to the access point Page 599 ...

Страница 600: ...ton The Internet Options window will appear 8 Configure the connection method andthen click on the OK button Set the connection destination used for the LAN connection set up in 6 above as the default connection destination and then select Always dial my default connection 9 Click on the Next button Page 600 ...

Страница 601: ... Next button Please click on the Next button if you are satisfied with the settings The Add New Connection Wizard Completing the Add New Connection Wizard window will appear 11 Click on the Finish button The access point icon will be registered in the Bluetooth Settings window This will complete the access point set up process Connecting to a LAN LAP Page 601 ...

Страница 602: ...an example of what happens when you use Direct connection as a connection name under Connect to access point If a name different from the connection name is used that name will appear under Connection Destination o Please simply click on Settings if no user name or password have been entered i e if those fields have been left blank o Please change the connection destination if a different connecti...

Страница 603: ... are going to use has already been set up as a proxy server 1 Select Internet Options from the Tools menu in Internet Explorer The Internet Options window will appear 2 Click on the Connections tab andthen click on the Settings button 3 Enter the IP address andport number of the proxy server under Proxy Server andthen click on the OK button 3 Endthe connection Right click either on the connection ...

Страница 604: ...Click on the Yes button in the disconnection confirmation dialog boxthat appears Page 604 ...

Страница 605: ...mation on how to set up the access point A Bluetooth passkey PIN code is required for you to connect to the access point Please make a note of your Bluetooth passkey before you start the set up process Setting up the access point Procedure 1 Turn on the access point andconfirm that a connection has been establishedwith the network 2 Right click the BluetoothTM wireless technology icon in the task ...

Страница 606: ...gramhas finished searching for the devices the Add New Connection Wizard Device Selection window will appear 4 Select the device name of the access point from Device List andthen click on the Next button The Add New Connection Wizard Searching for Services window will appear Page 606 ...

Страница 607: ...l be performed automatically The Add New Connection Wizard Connection Name Settings window will appear 6 Enter the type andname of the icon displayedafter registration andthen click on the Next button Please click on the Next button if you are satisfied with the settings The Add New Connection Wizard Completing the Add New Connection Wizard window will appear 7 Click on the Finish button Page 607 ...

Страница 608: ...The access point icon will be registered in the Bluetooth Settings window This will complete the access point set up process Connecting to a LAN PAN Page 608 ...

Страница 609: ... to the network Internet Explorer will start automatically and you will be able to exchange data with other computers on the network Note o Please follow the procedure below if you need to set up a proxy server to connect to the Internet the following procedure is not necessary if the PC you are going to use has already been set up as a proxy server 1 Select Internet Options from the Tools menu in...

Страница 610: ...andthen click on the OK button 3 Endthe connection Right click either on the connection icon under the Bluetooth Settings window or on the icon in the task tray and then click on Disconnect Click on the Yes button in the disconnection confirmation dialog boxthat appears Page 610 ...

Страница 611: ...h ordinary cable connected printers Printing document and images SPP OPP 2 Not required Allows you to print business card data directly Printing business card data BIP Not required Allows you to print image data directly Printing images directly froma digital camera or other device Note 1 The majority of BluetoothTM wireless technology compatible printers support HCRP If you have selected Express ...

Страница 612: ... to the printer Please make a note of your Bluetooth passkey before you start the set up process Setting up the printer Procedure 1 Turn on the printer 2 Right click on the BluetoothTM wireless technology icon in the task tray andthen click on AddNewConnection Note o Alternatively click Start All Programs Bluetooth Bluetooth Settings and then click on New Connection from the active Bluetooth Setti...

Страница 613: ...devices window will appear Once the programhas finished searching for the devices the Add New Connection Wizard Device Selection window will appear 4 Select the device name of the printer from Device List andthen click on the Next button Page 613 ...

Страница 614: ...dow andthen click on the OK button Once the services have been detected successfully connection to the device and creation of the HCRP port will be performed automatically If you have not yet installed a printer a message prompting you to install a printer will appear 6 Click on the OK button The Add Printer Wizard Starting the Add Printer Wizard window will appear 7 Click on the Next button Page ...

Страница 615: ...t Local printer attachedto this computer remove the check next to Automatically detect andinstall my Plug andPlay printer andthen click on the Next button The Add Printer Wizard Select Printer Port window will appear 9 Select the desiredport andthen click on the Next button Page 615 ...

Страница 616: ... printer to be installed or click on the Use Device button andthen click on the Next button Please install the printer according to the instructions in the windows that follow Once installation is complete a message of confirmation will appear in the Add New Connection Wizard Printer Settings window 11 Click on Next Page 616 ...

Страница 617: ...Please click on the Next button if you are satisfied with the settings Note o You can change the connection icon and icon name Changing the connection icon name Changing the connection icon Printing Try to print fromthe message pad 1 Click File Print The Print screen will appear 2 Select wireless printer from under Select Printer andthen click on the Print button Page 617 ...

Страница 618: ...Note If you have connected to a printer using HCRP or SPP profiles all future BluetoothTM wireless technology connections to that printer will be established automatically once you have printed a document fromyour PC Page 618 ...

Страница 619: ...rinter using icons Printing image files on a printer by right clicking the mouse Note Below is a list of file types extensions of images that can be printed out directly o Bitmap bmp o JPEG jpg jpeg o PNG png Procedure Printing image files on a printer using icons 1 Turn on the printer 2 Click on the Bluetooth Information Exchanger icon on the Desktop Note o Alternatively open Explorer and click o...

Страница 620: ...the list please confirmthat the printer has been turned on and then click on Bluetooth Search Devices A device search will be performed 4 Drag anddropthe file to be sent on topof the icon of the destination printer The file will be sent to the printer If the file has been sent to the printer successfully the message below will appear and the image will be printed out Please click on the OK button ...

Страница 621: ...les to a printer by right clicking the mouse 1 Turn on the printer 2 Right click on the file to be sent andthen click on the destination printer under to Bluetooth Note o If your desired device does not appear in the list please confirmthat the device has been turned on and then click on to Bluetooth Search Other Devices Once the device has been detected the message below will appear Please select...

Страница 622: ...sage below will appear and the image will be printed out Please click on the OK button The message below will appear if the file transmission was unsuccessful Please click on the OK button to close the message and repeat the printing procedure Note o If the printer does not support the BIP profile the message below will appear Page 622 ...

Страница 623: ...siness card data by right clicking the mouse Procedure Printing business carddata using icons 1 Turn on the printer 2 Click on the Bluetooth Information Exchanger icon on the Desktop Note o Alternatively open Explorer and click on the Bluetooth Information Exchanger folder for the same result The Bluetooth Information Exchanger window will appear 3 Double click on the Object Push icon A list of de...

Страница 624: ...sired printer does not appear in the list please confirmthat the printer has been turned on and then click on Bluetooth Search Devices A device search will be performed 4 Drag anddropthe business carddata to be sent on topof the icon of the destination printer Page 624 ...

Страница 625: ...lick on the OK button The message below will appear if the business card transmission was unsuccessful Please click on the OK button to close the message and repeat the printing procedure Printing business carddata by right clicking the mouse 1 Turn on the printer 2 Right click on the business carddata to be sent andthen click on the destination printer under to Bluetooth Page 625 ...

Страница 626: ...lect the destination device and click on the Send button The business card will be sent to the printer If the business card has been sent to the printer successfully the message below will appear and the image will be printed out Please click on the OK button The message below will appear if the business card transmission was unsuccessful Please click on the OK button to close the message and repe...

Страница 627: ...Page 627 ...

Страница 628: ...edure 1 Right click on the BluetoothTM wireless technology icon in the task tray andclick on AddNewConnection Note o Alternatively click Start All Programs Bluetooth Bluetooth Settings and then click on New Connection from the Bluetooth Settings screen that has opened The Add New Connection Wizard Welcome to the Add New Connection Wizard will appear 2 Switch ON the stereo headphones andactivate Di...

Страница 629: ...ce the search for the devices has ended the Add New Connection Wizard Select Device screen will appear 4 Select the device name of the stereo headphones from the list andclick on the Next button The Add New Connection Wizard Searching for Services screen will appear Page 629 ...

Страница 630: ...ck applications o e Conferencing applications o Voice recognition applications Please finish connecting the stereo headphones before launching any of these applications Listening to music or other audio files 1 Playing music or other audio files on your PC Important o Please confirm the points below if you are unable to hear anything despite having properly connected the stereo headphones Click St...

Страница 631: ...connect the stereo headphones fromyour PC Music video playback applications e Conferencing applications Voice recognition applications Please completely disconnect the stereo headphones before launching any of these applications Please refer to the user guide for information on terminating a connection from the stereo headphones Playing music using remote control Music applications and video playb...

Страница 632: ...the appropriate item from the pull down menu of positions where the receive commandis to be displayed and then click on the OK button If the receive command appears but does not function properly sometimes the problemmay be rectified by changing the setting to Do not display The commands supported by this application are shown below Please refer to the headphone user guide for commands that are su...

Страница 633: ...vices that support this function Procedure 1 Double click on the BluetoothTM wireless technology icon in the task tray Launches Bluetooth Settings 2 Select Bluetooth from the menu andclick on Copyright Protection Setting The copyright protection dialog will appear 3 Tick the box next to Only connect to devices that are copyright protectedunder the SCMS T format andclick on the OK button Page 633 ...

Страница 634: ...ask tray andthen click on AddNewConnection Note o Alternatively click Start All Programs Bluetooth Bluetooth Settings and then click on New Connection from the active Bluetooth Settings window The Add New Connection Wizard Welcome to the Add New Connection Wizard window will appear 2 Confirm that Express Mode has been selected andthen click on the Next button The Add New Connection Wizard Searchin...

Страница 635: ...indow will appear 3 Select the device name of the keyboardfrom Device List andthen click on the Next button The Add New Connection Wizard Searching for Services window will appear 4 Use the wireless keyboardto enter the numbers that appear in Bluetooth Passkey PIN Code andthen hit the Enter key Page 635 ...

Страница 636: ...dd New Connection Wizard Connection Name Settings window will appear 5 Enter the type andname of the icon displayedafter registration andthen click on the Next button Please click on the Next button if you are satisfied with the settings Note o You can change the connection icon and icon name Changing a connection icon name Changing a connection icon Page 636 ...

Страница 637: ...ick on the Finish button The settings information will be registered and an icon will appear in the Bluetooth Settings window Note Pressing any key on the wireless keyboard will automatically connect it to the PC thereafter Please connect manually if automatic connection is unsuccessful Page 637 ...

Страница 638: ...passkey will require one If your mouse s user guide does not contain any passkey related information please consult the outlet where you purchased your mouse or the relevant support center 2 Right click on the BluetoothTM wireless technology icon in the task tray andthen click on AddNewConnection Note o Alternatively click Start All Programs Bluetooth Bluetooth Settings and then click on New Conne...

Страница 639: ... devices window will appear Once the programhas finished searching for the devices the Add New Connection Wizard Device Selection window will appear 4 Select the device name of the mouse from Device List andthen click on the Next button Page 639 ...

Страница 640: ...tration andthen click on the Next button Please click on the Next button if you are satisfied with the settings Note o Please use this window to change the connection name and icon Changing the connection icon name Changing the connection icon The Add New Connection Wizard Completing the Add New Connection Wizard window will appear 7 Click on the Finish button The settings information will be have...

Страница 641: ...Note o Clicking on one of the mouse buttons or otherwise operating it will automatically connect it to the PC thereafter Please connect manually if automatic connection is unsuccessful Page 641 ...

Страница 642: ... transfer cannot be used to send or receive business card data Please instead use Object Push to performthese activities Sending files to a PC or PDA using icons Sending files to a PC or PDA by right clicking the mouse Receiving files froma PC or PDA Procedure Sending files to a PC or PDA using icons 1 Turn on the PC or PDA 2 Double click on the Bluetooth Information Exchanger icon on the Desktop ...

Страница 643: ...will be performed o You can also use Image transfer when sending individual image files 4 Use the mouse to drag anddropthe file you wish to sendover the destination icon In this case the file will be sent to a PC named PC 1 Note o When using File transfer you can send individual files as well as entire folders 5 Confirm that the file is being sent The file will be sent to the PC Note o When sendin...

Страница 644: ...ion was unsuccessful Please click on the OK button to close the message and repeat the procedure Note o Files that have been sent will be saved in a file transfer shared folder on the destination device o Additionally with File transfer you can open the shared folder on the destination device using Explorer specify a subfolder and then send the file there o You can use Properties in the Bluetooth ...

Страница 645: ...ear in the list please confirmthat the device has been turned on and then select to Bluetooth Search other devices Once the devices have been detected the message below will appear Please select the destination device and then click on the Send button 3 Confirm that the file is being sent The file will be sent to the PC Note Page 645 ...

Страница 646: ...ssful Please click on the OK button to close the message and then repeat the procedure Note o Files that have been sent will be saved in a file transfer shared folder on the destination device Receiving files from a PC or PDA Your PC is able to receive files that have been saved in the shared folder on the destination PC or PDA Received files will be saved in the shared folder under File transfer ...

Страница 647: ...list of devices will appear in the File transfer window In this case the file will be received fromthe PDA named My Mobile 4 Double click on the PDA 1 icon The file saved in the shared folder in My Mobile will appear 5 Right click on the file you wish to receive andthen select Receive file Page 647 ...

Страница 648: ...med in the same manner as when receiving individual files If the file has been received successfully the message below will appear Please click on the OK button The message below will appear if the file transmission was unsuccessful Please click on the OK button to close the message and repeat the procedure Note o The received file will be saved in the Shared folder under File transfer in the Blue...

Страница 649: ...You can use Properties under the Bluetooth Information Exchanger to specify the location of the Shared folder on the hard drive Page 649 ...

Страница 650: ...pg jpeg o PNG png Sending images to a PC or PDA using icons Sending images to a PC or PDA by right clicking the mouse Procedure Sending images to a PC or PDA using icons 1 Turn on the PC or PDA Confirmthat a BluetoothTM wireless technology connection has been enabled before proceeding 2 Double click on the Bluetooth Information Exchanger icon on the Desktop Note o Alternatively opening Explorer an...

Страница 651: ...e Image transfer window Note o If the desired device does not appear in the list please confirmthat the device has been turned on and then select Bluetooth Search Devices A device search will be performed 4 Drag anddropthe file you wish to sendover the destination icon In this case the image will be sent to a PC named PC 1 Page 651 ...

Страница 652: ...f the image transmission was unsuccessful Please click on the OK button to close the message and repeat the procedure Note o Images that have been sent will be saved in an image transfer folder on the destination device o Images received using Image transfer in the Bluetooth Information Exchanger will be saved in the Image Box in Image transfer Page 652 ...

Страница 653: ...echnology connection has been enabled before proceeding 2 Right click on the file you wish to send andthen click on its destination from to Bluetooth Note o If the desired device does not appear in the list please confirmthat the device has been turned on and then select to Bluetooth Search other devices Once the devices have been detected the message below will appear Please select the destinatio...

Страница 654: ...ar if the image transmission was unsuccessful Please click on the OK button to close the message and repeat the procedure Note o When you send images by right clicking the mouse the image data that has been sent will be saved in the image transfer shared folder on the destination device This is also the case when you send images using icons Page 654 ...

Страница 655: ...must be supported by the PC or PDA of the other party Selecting a business card and sending it to a PC or PDA using icons Selecting a business card and sending it to a PC or PDA by right clicking the mouse Sending your personal business card Receiving a business card from another party Exchanging business cards Procedure Selecting a business cardandsending it to a PC or PDA using icons Select a bu...

Страница 656: ...ndow Note o If the desired device does not appear in the list please confirmthat the device has been turned on and then select Bluetooth Search Devices A device search will be performed 4 Use the mouse to drag anddropthe business cardyou wish to sendover the destination icon In this case the business card will be sent to a PC named PC 1 Page 656 ...

Страница 657: ...ssage similar to the one below will appear If the business card has been sent successfully the message below will appear Please click on the OK button The message below will appear if the business card transmission was unsuccessful Please click on the OK button to close the message and repeat the procedure Memo o Data that have been sent will be saved in a folder for exchanged business cards on th...

Страница 658: ...othTM wireless technology connection has been enabled before proceeding 2 Right click on the business cardyou wish to send andthen click on its destination from to Bluetooth Note o If the desired device does not appear in the list please confirmthat the device has been turned on and then select to Bluetooth Search other devices Once the devices have been detected the message below will appear Plea...

Страница 659: ...ure to follow the instructions provided If you are using the BluetoothTM Utility a message similar to the one below will appear If the business card has been sent successfully the message below will appear Please click on the OK button The message below will appear if the business card transmission was unsuccessful Please click on the OK button to close the message and repeat the procedure Note o ...

Страница 660: ...e business card registered as your own that is able to be sent 1 Turn on the PC or PDA Confirmthat a BluetoothTM wireless technology connection has been enabled before proceeding 2 Double click on the Bluetooth Information Exchanger icon on the Desktop Note o Alternatively opening Explorer and clicking on the Bluetooth Information Exchanger folder will produce the same result The Bluetooth Informa...

Страница 661: ...ess card will be sent to a PC named PC 1 The business card will be sent Note o When you try to send a business card a message requesting permission to receive the files may appear on the device belonging to the other party i e on the receiving end The content of the message will vary with the software installed on the destination device so please be sure to follow the instructions provided If you ...

Страница 662: ... o Data that has been sent will be saved in a folder for exchanged business cards on the destination device Acquiring a business cardfrom another party You can use your PC to acquire a business card froma party containing their details 1 Turn on the PC or PDA Confirmthat a BluetoothTM wireless technology connection has been enabled before proceeding 2 Double click on the Bluetooth Information Exch...

Страница 663: ...h to acquire andthen click on Receive business card In this case the business card of the other party will be acquired froma PC named PC 1 The business card will be received Note o When you try to acquire a business card a message requesting permission to send the files may appear on the device belonging to the other party i e on the sending end The content of the message will vary with the softwa...

Страница 664: ...ect Push You can use Properties under the Bluetooth Information Exchanger to set the location of the Inboxon the hard drive Exchanging business cards Simultaneously exchange your business card with one belonging to another party 1 Turn on the PC or PDA Confirmthat a BluetoothTM wireless technology connection has been enabled before proceeding 2 Double click on the Bluetooth Information Exchanger i...

Страница 665: ...he desired device does not appear in the list please confirmthat the device has been turned on and then select Bluetooth Search Devices A device search will be performed 4 Right click on the icon of the party with whom you wish to exchange business cards andthen click on Object Push In this case the business cards will be exchanged with a PC named PC 1 Page 665 ...

Страница 666: ...has been successfully sent Note o Business cards that have been sent will be saved in the Inboxof the destination party Once your business card has finished being sent the programwill start receiving the business card belonging to the other party Note o When a business card is to be received a message such as the one below may appear on the device belonging to the other party Please click on the Y...

Страница 667: ...Page 667 ...

Страница 668: ...number of devices that can be used to constitute a single personal area network is seven one server and sixclients A network comprising as many as seven devices could theoretically be built but an operating environment that involves the use of other BluetoothTM wireless technology devices leaving aside other complications might require the network to comprise fewer components By using the PAN prof...

Страница 669: ...k 2 Click the Yes button The PAN server will be activated and an icon will accordingly appear in the tasktray Other devices that use the PAN profile will now be able to connect over the network Important When using the device as the server make sure that all user accounts have a password set for the security reasons The IP address of the server is automatically set up when it starts Please do not ...

Страница 670: ...CP server Operating as a client Connecting to a server as a client is performed fromthe Bluetooth Settings window as described below Procedure 1 Right click on the BluetoothTM wireless technology icon in the task tray andclick on AddNewConnection Note o Alternatively click on Start All Programs Bluetooth Bluetooth Settings and then on New Connection from the Bluetooth Settings window 2 Confirm tha...

Страница 671: ...zard Searching for devices window will appear Once the programhas finished searching for the devices the Add New Connection Wizard Device Selection window will appear 4 Select the name of the device designatedas the server from Device List andthen click on the Next button Page 671 ...

Страница 672: ... New Connection Wizard ConfirmConnection Name window will appear 5 Click on the Next button The registered icon will appear in the Bluetooth Settings window onnecting to a server Procedure 1 Right click on the icon in the Bluetooth Settings window andthen click on Connect Page 672 ...

Страница 673: ...ion to a server Procedure 1 Right click on the icon in the Bluetooth Settings window andthen click on Disconnect A message confirming whether you wish to disconnect will appear Click on the Yes button Once you have disconnected the icon will change to indicate that the device is not connected Page 673 ...

Страница 674: ...Page 674 ...

Страница 675: ... transfer cannot be used to send or receive business card data Please instead use Object Push to performthese activities Sending files to a PC or PDA using icons Sending files to a PC or PDA by right clicking the mouse Receiving files froma PC or PDA Procedure Sending files to a PC or PDA using icons 1 Turn on the PC or PDA 2 Double click on the Bluetooth Information Exchanger icon on the Desktop ...

Страница 676: ...will be performed o You can also use Image transfer when sending individual image files 4 Use the mouse to drag anddropthe file you wish to sendover the destination icon In this case the file will be sent to a PC named PC 1 Note o When using File transfer you can send individual files as well as entire folders 5 Confirm that the file is being sent The file will be sent to the PC Note o When sendin...

Страница 677: ...ion was unsuccessful Please click on the OK button to close the message and repeat the procedure Note o Files that have been sent will be saved in a file transfer shared folder on the destination device o Additionally with File transfer you can open the shared folder on the destination device using Explorer specify a subfolder and then send the file there o You can use Properties in the Bluetooth ...

Страница 678: ...ear in the list please confirmthat the device has been turned on and then select to Bluetooth Search other devices Once the devices have been detected the message below will appear Please select the destination device and then click on the Send button 3 Confirm that the file is being sent The file will be sent to the PC Note Page 678 ...

Страница 679: ...ssful Please click on the OK button to close the message and then repeat the procedure Note o Files that have been sent will be saved in a file transfer shared folder on the destination device Receiving files from a PC or PDA Your PC is able to receive files that have been saved in the shared folder on the destination PC or PDA Received files will be saved in the shared folder under File transfer ...

Страница 680: ...list of devices will appear in the File transfer window In this case the file will be received fromthe PDA named My Mobile 4 Double click on the PDA 1 icon The file saved in the shared folder in My Mobile will appear 5 Right click on the file you wish to receive andthen select Receive file Page 680 ...

Страница 681: ...med in the same manner as when receiving individual files If the file has been received successfully the message below will appear Please click on the OK button The message below will appear if the file transmission was unsuccessful Please click on the OK button to close the message and repeat the procedure Note o The received file will be saved in the Shared folder under File transfer in the Blue...

Страница 682: ...You can use Properties under the Bluetooth Information Exchanger to specify the location of the Shared folder on the hard drive Page 682 ...

Страница 683: ...pg jpeg o PNG png Sending images to a PC or PDA using icons Sending images to a PC or PDA by right clicking the mouse Procedure Sending images to a PC or PDA using icons 1 Turn on the PC or PDA Confirmthat a BluetoothTM wireless technology connection has been enabled before proceeding 2 Double click on the Bluetooth Information Exchanger icon on the Desktop Note o Alternatively opening Explorer an...

Страница 684: ...e Image transfer window Note o If the desired device does not appear in the list please confirmthat the device has been turned on and then select Bluetooth Search Devices A device search will be performed 4 Drag anddropthe file you wish to sendover the destination icon In this case the image will be sent to a PC named PC 1 Page 684 ...

Страница 685: ...f the image transmission was unsuccessful Please click on the OK button to close the message and repeat the procedure Note o Images that have been sent will be saved in an image transfer folder on the destination device o Images received using Image transfer in the Bluetooth Information Exchanger will be saved in the Image Box in Image transfer Page 685 ...

Страница 686: ...echnology connection has been enabled before proceeding 2 Right click on the file you wish to send andthen click on its destination from to Bluetooth Note o If the desired device does not appear in the list please confirmthat the device has been turned on and then select to Bluetooth Search other devices Once the devices have been detected the message below will appear Please select the destinatio...

Страница 687: ...ar if the image transmission was unsuccessful Please click on the OK button to close the message and repeat the procedure Note o When you send images by right clicking the mouse the image data that has been sent will be saved in the image transfer shared folder on the destination device This is also the case when you send images using icons Page 687 ...

Страница 688: ...must be supported by the PC or PDA of the other party Selecting a business card and sending it to a PC or PDA using icons Selecting a business card and sending it to a PC or PDA by right clicking the mouse Sending your personal business card Receiving a business card from another party Exchanging business cards Procedure Selecting a business cardandsending it to a PC or PDA using icons Select a bu...

Страница 689: ...ndow Note o If the desired device does not appear in the list please confirmthat the device has been turned on and then select Bluetooth Search Devices A device search will be performed 4 Use the mouse to drag anddropthe business cardyou wish to sendover the destination icon In this case the business card will be sent to a PC named PC 1 Page 689 ...

Страница 690: ...ssage similar to the one below will appear If the business card has been sent successfully the message below will appear Please click on the OK button The message below will appear if the business card transmission was unsuccessful Please click on the OK button to close the message and repeat the procedure Memo o Data that have been sent will be saved in a folder for exchanged business cards on th...

Страница 691: ...othTM wireless technology connection has been enabled before proceeding 2 Right click on the business cardyou wish to send andthen click on its destination from to Bluetooth Note o If the desired device does not appear in the list please confirmthat the device has been turned on and then select to Bluetooth Search other devices Once the devices have been detected the message below will appear Plea...

Страница 692: ...ure to follow the instructions provided If you are using the BluetoothTM Utility a message similar to the one below will appear If the business card has been sent successfully the message below will appear Please click on the OK button The message below will appear if the business card transmission was unsuccessful Please click on the OK button to close the message and repeat the procedure Note o ...

Страница 693: ...e business card registered as your own that is able to be sent 1 Turn on the PC or PDA Confirmthat a BluetoothTM wireless technology connection has been enabled before proceeding 2 Double click on the Bluetooth Information Exchanger icon on the Desktop Note o Alternatively opening Explorer and clicking on the Bluetooth Information Exchanger folder will produce the same result The Bluetooth Informa...

Страница 694: ...ess card will be sent to a PC named PC 1 The business card will be sent Note o When you try to send a business card a message requesting permission to receive the files may appear on the device belonging to the other party i e on the receiving end The content of the message will vary with the software installed on the destination device so please be sure to follow the instructions provided If you ...

Страница 695: ... o Data that has been sent will be saved in a folder for exchanged business cards on the destination device Acquiring a business cardfrom another party You can use your PC to acquire a business card froma party containing their details 1 Turn on the PC or PDA Confirmthat a BluetoothTM wireless technology connection has been enabled before proceeding 2 Double click on the Bluetooth Information Exch...

Страница 696: ...h to acquire andthen click on Receive business card In this case the business card of the other party will be acquired froma PC named PC 1 The business card will be received Note o When you try to acquire a business card a message requesting permission to send the files may appear on the device belonging to the other party i e on the sending end The content of the message will vary with the softwa...

Страница 697: ...ect Push You can use Properties under the Bluetooth Information Exchanger to set the location of the Inboxon the hard drive Exchanging business cards Simultaneously exchange your business card with one belonging to another party 1 Turn on the PC or PDA Confirmthat a BluetoothTM wireless technology connection has been enabled before proceeding 2 Double click on the Bluetooth Information Exchanger i...

Страница 698: ...he desired device does not appear in the list please confirmthat the device has been turned on and then select Bluetooth Search Devices A device search will be performed 4 Right click on the icon of the party with whom you wish to exchange business cards andthen click on Object Push In this case the business cards will be exchanged with a PC named PC 1 Page 698 ...

Страница 699: ...has been successfully sent Note o Business cards that have been sent will be saved in the Inboxof the destination party Once your business card has finished being sent the programwill start receiving the business card belonging to the other party Note o When a business card is to be received a message such as the one below may appear on the device belonging to the other party Please click on the Y...

Страница 700: ...Page 700 ...

Страница 701: ...c v 3 7 or higher Also please establish a partnership between the devices using a USB or infrared link before you connect via BluetoothTM wireless technology Please refer to the ActiveSync Help or other manuals for information on how to use the application Microsoft Outlook 2002 or another schedule management tool must also be installed on the PC Connecting using ActiveSync Both the PC and PDA mus...

Страница 702: ...select COM7 Note o In the standard set up the port is configured to COM7 refer to Steps 3 and 4 under Preparing the PDA below When using a different port please also change the port number selected in this window Preparing the PDA Procedure 1 Tapon the BluetoothTM wireless technology icon in the bottom right of the screen Page 702 ...

Страница 703: ... model of PDA you use Please refer to the product instruction manuals for further details The Bluetooth Settings window will open The message Connection not registered will appear if no BluetoothTM wireless technology device has been registered Please tap on OK to close the message 2 Double click on Tools Search for peripheral components Page 703 ...

Страница 704: ...PC icon andthen select Update Services A search for services will be carried out and then a list of service names and their connection status will appear as list in the lower window 4 Tapandholdon COM7 from the list of service names andthen select Register ActiveSync Page 704 ...

Страница 705: ...successfully established with a PDA the procedure for establishing a partnership with the PDA will be started by the ActiveSync application on the PC Performing this set up procedure will enable data to be synchronised between your PC and PDA Procedure 1 In the NewPartnership Set Upa Partnership window select Standardpartnership andthen click on the Next button Page 705 ...

Страница 706: ...will appear 2 Select Synchronise with this PC andthen click on the Next button The New Partnership Select Synchronisation Settings window will appear 3 Select the type of information to be synchronisedbetween your PC andPDA andthen click on the Next button Page 706 ...

Страница 707: ...nership Completing Setup window will appear 4 Click on the Finish button When you click on the Finish button ActiveSync will begin to synchronise your information Confirming changes Synchronisation process Page 707 ...

Страница 708: ...tion will be opened and ActiveSync will synchronise your information Finishing an ActiveSync connection Follow the procedure below on your PDA if you want to end an ActiveSync connection manually Procedure 1 Tapandholdon COM7 in the Bluetooth Settings window andselect ActiveSync Release Cancelling a partnership Follow the procedure below fromthe ActiveSync window on the PC if you want to cancel th...

Страница 709: ...lick on the Yes button when the confirmation message appears Note o If you wish to create another ActiveSync connection you will have to repeat the above procedure to re establish a partnership Page 709 ...

Страница 710: ...l in the BluetoothTM Utility to connect the camera to your PC Procedure 1 Click on Start All Programs Bluetooth Remote Camera Note o In Windows 2000 click on Start Programs Bluetooth Remote Camera 2 Turn on the camera andset it to be connectable via BluetoothTM wireless technology Note o Different cameras are operated in different ways depending on the manufacturer and model used Please refer to t...

Страница 711: ... will be connected and images fromthe camera will appear on screen Taking pictures By placing the mouse cursor over the on screen image the camera s operating window will appear You can operate the camera fromthis window Procedure Taking a single picture Page 711 ...

Страница 712: ...t to the PC Note o The remote camera shutter cannot be operated while the camera is connected to the PC o The number of consecutive pictures taken can be set to anywhere between 2 and 16 1 In the Remote Camera window click on Bluetooth Properties Consecutive Image Settings The Change number of consecutive images dialog boxwill appear 2 Click on the buttons to select the number of consecutive image...

Страница 713: ...sferred to the PC Viewing images saves on your PC A Remote Camera folder will be created in the Bluetooth folder under My Documents during initial set up A folder bearing the same name as the camera will be created in it and images will be saved in this folder Click the Explorer button in the Remote Camera window to display the folder where the images have been saved Note This window is an example...

Страница 714: ...tion Wizard Note o Alternatively you can click on Start All Programs Bluetooth Bluetooth Settings then click on New Connection in the Bluetooth Settings screen that has opened The Add New Connection Wizard Welcome to the Add New Connection Wizard screen will appear 2 Turn the headset power on Once you have turned on the headset set the mode to enable a connection Important o The procedure for oper...

Страница 715: ...ching for Devices screen will appear Once the device search has been completed the Add New Connection Wizard Select a Device screen will appear 4 Select the name of the headset device from the list then click on the Next button Page 715 ...

Страница 716: ...e Circuit screen will appear and device configuration will be performed Note o If you are connecting to the headset for the first time or if another audio device has not yet been registered the following Found New Hardware Wizard screen will appear fromwhich you can proceed to install the driver If another audio device has already been registered i e the driver has been installed you can proceed t...

Страница 717: ...ion wizard will appear 8 Click on the Finish button Once driver installation is complete the Add New Connection Wizard Enter Connection Name will appear 9 Confirm the information you have entered andclick on the Next button The Add New Connection Wizard Completing the Add New Connection Wizard screen will appear Page 717 ...

Страница 718: ...wing audio related applications have been closed before you connect the headset to your PC o Windows Media Player BeatJam InterVideo WinDVD and other music audio playback software o Windows Messenger and other e conferencing software If you wish to use these applications please terminate the headset connection before you launch them Procedure 1 Right click on the headset icon then click on Connect...

Страница 719: ...connect from the headset Procedure 1 Right click on the headset icon in the Bluetooth Settings screen then click on Disconnect A message will appear requesting confirmation that you wish to disconnect Click on the Yes button The icon on the Bluetooth Settings screen will appear as shown below indicating that the device has been disconnected Page 719 ...

Страница 720: ... device s are described in the section What you need to know about using BluetoothTM wireless technology Should you still encounter problems after having read through this information please refer to the following list which has been arranged according to application Troubleshooting by application General operation of the BluetoothTM Utility Using a wireless modem station Using an access point Usi...

Страница 721: ...etooth Remote Camera fromWindows 2000 Start Programs Bluetooth Remote Camera Wireless File Transfer fromWindows XP Start All Programs Bluetooth Wireless File Transfer fromWindows 2000 Start Programs Bluetooth Wireless File Transfer Bluetooth Settings Clicking on the NewConnection button brings upthe message Unable to prepare Bluetooth The wireless communication switch is turned off Please switch i...

Страница 722: ...pports the OPP profile Should this occur please click on Bluetooth Profiles under Bluetooth Information Exchanger to configure the Transfer mode Cannot open sharedfolder on remote device using File Transfer The other device may have a certain security level enforced Non connectable mode etc Please confirm the security settings of the other device Please enter the correct password if you are asked ...

Страница 723: ...nterior of the cable has been broken Please replace the cable with another one Please ensure that the two slide switches on the underside of the main unit have been set to the NORMAL and MODEM positions respectively Cannot connect to the Internet The telephone number of the connection i e the telephone number for the access point of your Internet service provider may not be correct Please check th...

Страница 724: ...self Please check the type of telephone line you are using The faxservice may not have been enabled for sending or receiving Please check the settings by following the procedure below 1 Open Printers andFaxes from the Control Panel right click on the Fax icon andthen click on Properties The Faxproperties window will appear 2 Select the Device tab right click on the modem you wish to use andthen cl...

Страница 725: ...4 Select the Receive tab andthen confirm that Enable device to receive has been checked when you wish to receive faxes 5 Click on the OK button Page 725 ...

Страница 726: ...n status Note o If the LAN cable has come loose because it has not been fully inserted into the socket the resulting poor contact may prevent data from being transmitted accurately o Communication will be impossible if the interior of the LAN cable has been broken Please replace the cable with another one The access point may not have been configured correctly and may not be able to maintain the c...

Страница 727: ...and is being used by another device no other device will be able to connect to the printer Cannot print garbledprint output The printer driver of the printer you are using may not have been installed correctly Please refer to your product instruction manual and re install the driver Please check to see if the printer has run out of paper ink or other consumable item If you are using a printer whil...

Страница 728: ...e remove the power adaptor and re connect Soundcuts out cannot hear anything Using a headset with other BluetoothTM wireless technology devices may cause problems such as interruptions in sound reduced transfer speed or errors during file transfer and disconnection of other devices We strongly recommend using the headset on its own not in conjunction with any other device Please confirm that the h...

Страница 729: ... mind Keyboardor mouse cannot be detected If the keyboard or mouse is connected to and is being used by another device the keyboard or mouse will be undetectable even if you search for it Cannot connect to keyboardor mouse If the keyboard or mouse is connected to and is being used by another device no other device will be able to connect to the keyboard or mouse Page 729 ...

Страница 730: ...o the camera Images from the camera can be displayed but no pictures can be taken The memory card in the camera may be full Please make a backup of all your necessary data on alternative media then delete the images fromthe memory card and ascertain how much free space remains Camera images do not appear in window The camera may not have been set to remote camera mode image browse mode configurati...

Страница 731: ... to Synchronising information using ActiveSync and re configure your ActiveSync connection If a port other than COM7 has been used please amend the ActiveSync connection settings accordingly Cannot locate a savedfile The type of file sent to your PDA as well as the profile used to send the file may affect where folders saved on your PDA are located Examples Images transferred to your PDA using Ima...

Страница 732: ... not be correct Please check the telephone number The user ID and or password for the provider with whom you have signed up may have been entered incorrectly Please check the user ID and password The default connection may have been configured with different settings Please set the connection configured for mobile telephone use as the default connection Cannot sendor receive faxes Once you have re...

Страница 733: ...operties window will appear 2 Select the Device tab right click on the modem you wish to use andthen click on Properties 3 Select the Send tab andthen confirm that Enable device to send has been checked Page 733 ...

Страница 734: ...4 Select the Receive tab andthen confirm that Enable device to receive has been checkedwhen you wish to receive faxes 5 Click on the OK button Page 734 ...

Страница 735: ... Dynamic Host Configuration Protocol DHCP is a function that automatically sets up IP addresses This function will allow you to avoid having to set up IP addresses on each computer DUN Profile A profile for Dial up Networking This profile enables you to establish a dial up BluetoothTM wireless technology connection with a wireless modem station mobile telephone or other similar device FAX Profile ...

Страница 736: ...ss a LAN via PPP OPP Abbreviation of Object Push Profile A profile that enables you to exchange business cards with a wireless device Passkey Also known as a PIN code This is a password consisting of up to 16 alphanumeric characters that enables a connection to be established to a wireless device You need to know the passkey in order to connect to a device that requires authentication Even when th...

Страница 737: ...Bluetooth SIG Special Interest Group In order to use the SCMS T feature the remote devices must also support SCMS T SPP Abbreviation of Serial Port Profile A profile that enables communication with a device through a virtual serial port configured for a BluetoothTM wireless technology connection This profile can be used for printers and printer adapters with PDAs using a method different fromHCRP ...

Страница 738: ...Page 738 ...

Отзывы: