


9
A valid password is a character string of 8 to 32 characters
containing both alphabetic and numeric characters. In
addition to alphanumeric characters, the _ (underscore),
- (hyphen), + (plus), @ (at sign), and * (asterisk) characters
can be used.
The login screen appears when the password setup is
finished.
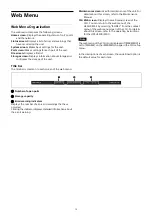
Logging In and Logging Out
To log in to the web menu, enter the user name and
password on the login screen.
You can log in from multiple computers or multiple
browsers using a single user name.
Logging out
Click the [Log Out] button on the [System] screen > [Power]
tab of the web menu.
The user is also logged out when the web browser closes.
Input/Output Settings
Configure the input/output settings in the menu of the CCU
and the web menu.
To record in 4K format using the HKCU-REC55, install the
HZCU-UHDR50 4K/HDR recording license, and select either
UHD-SDI A or SDI-OUT 1 as the 4K output.
If using the HDCU3500, also install HZCU-UHD35 4K/HDR
Processor Software.
Settings configured in the CCU setup menu
Configure the following items in the menu of the CCU. For
details, refer to the operating instructions for the
HDCU5500/3500.
For details about items added to the menu of the CCU when
this unit is installed, see
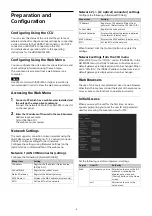
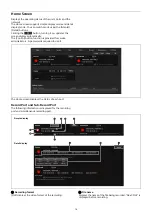
Settings configured in the web menu
1
Display the [System] screen of the web menu, and
click the [Board] tab.
2
Check or configure the following settings using
[Change Current Settings].
Record Settings
Sets the video format of the main signal output.
Sub-Record Settings
Turns simultaneous recording on/off, and sets the
video format for simultaneous recording.
Output Settings
Sets the format of the main signal output from the UHD
SDI B connector and the monitor output signal from the
SDI I/O 3 connector.
3
Check the displayed settings, and click the [Submit]
button. A confirmation message appears. Click [OK].
Depending on the settings, the unit may reboot
automatically to apply the settings.
To configure the settings of each port, use the [Port] screen
of the web menu.
• If the format, HDR, or color space setting is changed from
the menu of the CCU or if [Change Current Settings] is
executed from the web menu during recording to internal
storage or transfer to USB drive/NAS, the change in
settings takes precedence and any recording, playback,
or transfer operation is interrupted.
• If the input/output settings are changed, the values for
[Recording Settings], [Sub-Record Settings], and [Output
Settings] are reset to their initial values.
• The values that can be selected in [Output Settings]
depend on the values selected using [Video Format] in
[Record Settings] and [Sub-Record Settings].
Timecode Settings
Recording port and replay port common
settings
Configure common settings for the recording port and
replay port on the [System] screen > [Setup] tab of the web
menu.
Recording port settings
Configure the recording port settings on the [Port] screen >
[Record] tab of the web menu.
FTP
maintenance
Permission to acquire logs via
FTP.
usr1
Communication with the
PWA-RCT1.
Enter this user name and
password in the server
settings dialog of PWA-RCT1.
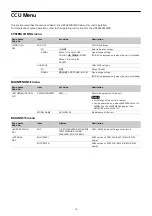
Menu page
Setting
<MULTI FORMAT> in the
SYSTEM CONFIG menu
Select the operating frequency and
format.
<HDR> in the SYSTEM
CONFIG menu
Configure HDR/SDR settings.
<VIDEO I/O> in the
SYSTEM CONFIG menu
Sets the output connector for ISO
REC.
• Select [ISO REC] in [SDI-I/O 3] and
[UHD-SDI B].
Target
User ID
Authority
Notes
Menu item
Description
DF Mode
Sets drop frame mode.
This is set to NDF (fixed) if the CCU
frequency setting is not set to 29.97.
Timer Select
Selects the time data to output to the
timecode display.
TC OUT
Selects the signal to output from the
TIME CODE OUT connector.
This is set to Through (fixed) in the
current version.
Menu item
Description
TCG Source
Selects the operating mode of the
timecode generator.
REGENE Source
Selects the signal to regenerate.
RUN Mode
Selects the timecode run mode.


