background image

15

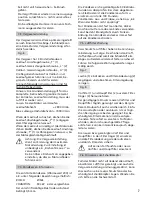
7.7 Decommissioning and storage

If the equipment is to be stored for longer than three months, carry out the following measures:

Drain and clean the fuel tank in a well ventilated location.

Start the engine with an empty fuel tank to drain the carburetter, until the engine stops.

Otherwise oil residues in the fuel mixture can clog the carburetter jets and make subsequent
starting difficult.

Clean the motorised equipment thoroughly (particularly the air inlet opening, the cylinder fins,
the air filter and the area around the fuel filler).

Store the equipment at a dry and secure location. Keep the equipment away from open flames
and similar.

Prevent unauthorised use - particularly by children.

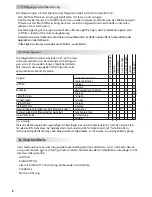
Carburetor

check idle run
adjust idle run

Air filters

                    clean
                    replace

Spark plug                                                                                  adjust electrode gap

replace

Cooling air inlet                                                                         clean
Cylinder head fins                                                                      clean
Fuel tank                                                                                    clean
Fuel tank filter                                                                           replace
All accessible screws (except carburetor adjusting screws)    

 re-tighten

Controls (stop switch, throttle lever)                                        function test
Total machine                                                                             visual check
                                                                                                    clean

7.8  Maintenance schedule

The following information relates to normal conditions. For
especially arduous conditions, for example in case of longer
daily work, the indicated maintenance intervals may need to
be reduced.  Prior to commencement of work

before start working

daily

weekly

after 5 hours

after 50 hours

annually

as required

X

X

X

X

X

X

X

X
X

X

X

X

X

1)

X

X

X

X

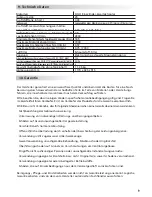
8. Wearing parts

Various components are subject to normal wear and may require timely replacement.
The following wearing parts are excluded from the manufacturer’s warranty:

Air filter

Fuel filter

All rubber components which come into contact with fuel

Spark plug

Starting equipment

(1) = one

Carry out maintenance steps regularly. Ask a service agent to carry out maintenance work, if you
cannot undertake all of them yourself. The equipment owner is also responsible for the
following: Losses caused by inadequate maintenance and repair work or work which has been
carried out too late Consequential losses - even corrosion - caused by unsuitable storage

Содержание 501 2T

Страница 1: ...lire ces instructions attentivement et respectez absolument les consignes de s curit Atenci n Antes de la primera puesta en marcha lea detenidamente este manual de instrucciones y observe imprescindib...

Страница 2: ...2 FIG 1 FIG 2 FIG 8 FIG 3 FIG 5 FIG 4 FIG 6 FIG 7 1 2 3 4 5 6 1 1 1 2 2 3 1 2 1 2 3 1 7 FIG 6...

Страница 3: ...ik und Ausstattung m ssen wir uns daher vorbehalten Aus Abbildungen und Angaben dieser Gebrauchsanweisung k nnen keine An spr che abgeleitet werden Druckfehler in der GBA m ssen wir uns vorbehalten Um...

Страница 4: ...r berdruck langsam abbauen kann und kein Kraftstoff herausspritzt Kraftstoffd mpfe nicht einatmen Nur an gut bel fteten Orten tanken Darauf achten dass kein Kraftstoff oder l ins Erdreich gelangt Umwe...

Страница 5: ...r N he von offenem Feuer gewartet repariert oder aufbewahrt werden Den Tankverschluss regelm ig auf Dichtheit pr fen Nur Z ndkerzen verwenden die einwandfrei sind und vom Hersteller empfohlen sind Das...

Страница 6: ...der Brennraum bereits berfettet In diesem Fall empfehlen wir Stopp Schalter nach au en stellen Z ndung aus Z ndkerzenabdeckung entfernen Darrunterliegenden Z ndkerzenstecker abziehen Z ndkerze herauss...

Страница 7: ...lle 100 Stunden Z ndkerzen Aus und Einbau siehe Kap 6 3 Wenn der Motor nicht anspringt Nur Z ndkerzen mit fest montierter dicker Anschlussmutter am oberen Ende verwenden Sonst besteht Brandgefahr durc...

Страница 8: ...stellschrauben nachziehen Bedienungselemente Stoppschalter Gashebel Funktionspr fung Gesamte Maschine Sichtpr fung reinigen 1 einmalig F hren Sie die Wartungsarbeiten regelm ig durch Beauftragen Sie e...

Страница 9: ...rn die innerhalb der Garantiezeit nach dem Verkaufstag auftreten Bitte beachten Sie dass in einigen L ndern spezifische Garantiebedingungen g ltig sind Fragen Sie im Zweifelsfall Ihren Verk ufer Er is...

Страница 10: ...technology which guarantees you a high level of serv iceability SOLO is committed to continuing product development Appearance applied technol ogy and equipment levels are therefore subject to modifi...

Страница 11: ...clothing Always tighten the filler cap This reduces the risk of the filler cap working itself loose through engine vibrations and fuel spilling out Check for leaks Never start the engine or operate th...

Страница 12: ...s Regularly check the silencer for perfect condi tion Never touch a hot silencer 5 Fuel 5 1 Fuel information The engine of this equipment is a high per formance two stroke engine which must be operate...

Страница 13: ...ion 7 1 General operating information After a run in period of approx five hours check all visible screws and nuts except the carburetter adjusting screws and retighten if necessary Please note that t...

Страница 14: ...spark plugs with a fixed thick con nection nut at the top Otherwise there is a risk of fire through sparks Always firmly push the spark plug cap on to the spark plug 7 5 Air filter maintenance Contami...

Страница 15: ...etor adjusting screws re tighten Controls stop switch throttle lever function test Total machine visual check clean 7 8 Maintenance schedule The following information relates to normal conditions For...

Страница 16: ...antee period after the date of purchase Please note that specific guarantee conditions apply in some countries Ask your sales person if you have any questions As vendor of the products he is responsib...

Страница 17: ...ervice de la machine SOLO travaille continuellement au d veloppement de ses produits Nous nous r servons de ce fait le droit de modifier le contenu de livraison tant au niveau de la forme que de la te...

Страница 18: ...bien a r Veillez ce qu aucun carburant ou huile ne s infiltre dans le sol protection de l environne ment Utilisez une protection de sol adapt e Si du carburant a t renvers nettoyez im m diatement l a...

Страница 19: ...t N utilisez que des bougies d allumage en par fait tat et recommand es par le fabricant V rifiez que le c ble d allumage est parfaite ment connect et que son isolation est intacte Si la bougie est d...

Страница 20: ...ettre le commutateur d arr t en position vers l ext rieur allumage coup de d poser le chapeau de bougie d allumage de d connecter la cosse de bougie d allumage se trouvant en dessous ded visserlabougi...

Страница 21: ...es les 100 heures D pose et repose des bougies d allumage voir chapitre 6 3 Si le moteur ne d marre pas N utilisez que des bougies d allumage pr sentant un gros crou de raccordement fixe sur la partie...

Страница 22: ...s vis pouvant tre atteintes sauf les vis de r glage resserrer El mentsdecommande commutateurd arr t levierd acc l ration v rification du fonctionnement Machine enti re contr le visuel nettoyer 1 une s...

Страница 23: ...itions de garantie sp cifiques applicables dans certains pays Veuillez vous adresser votre vendeur en cas de doute En tant que vendeur du produit il est responsable de la garantie Veuillez comprendre...

Страница 24: ...ones de la m quina SOLO trabaja continuamente en el desarrollo de sus productos Por esa raz n pueden darse cambios en el suministro del producto en cuanto a dise o t cnica y equipamiento Las ilustraci...

Страница 25: ...inhale los vapores de combustible Reposte combustible solamente en lugares bien ventilados Evite que el combustible o el aceite vayan a parar al suelo protecci n del medio ambiente Utilice una superfi...

Страница 26: ...realizarse en las cercan as de llamas desprotegidas Compruebe regularmente la estanqueidad del tap n del dep sito de combustible Utilice nicamente buj as recomendadas por el fabricante y en perfecto e...

Страница 27: ...cendido Arranque el motor con la palanca del estrangulador fig 4 1 en la posici n superior 6 4 Parada del motor Suelte la palanca de aceleraci n y coloque el interruptor de parada en la posici n exter...

Страница 28: ...debe sustituirse cada 100 horas El desmontaje y montaje de la buj a se describe en la secci n 6 3 Si el motor no arranca Utilice nicamente buj as de encendido con tuercas de conexi n gruesas montadas...

Страница 29: ...tornillos de ajuste Reapretar Mandos interruptor de parada palanca de aceleraci n Comprobar funcionamiento M quina completa Comprobar visualmente Limpiar 1 Una sola vez Realice regularmente los trabaj...

Страница 30: ...a T ngase en cuenta que hay algunos pa ses en los cuales rigen unas condiciones espec ficas de garant a En caso de duda consulte al vendedor El vendedor del producto es seg n esta calidad que l ostent...

Страница 31: ...31 Notizen...

Страница 32: ...product without prior or other notice Therefore please note that text and illustrations of this manual are not to be considered binding and do not constitute a basis for legal or other claims Nous no...

Отзывы: