background image

31 of 75 

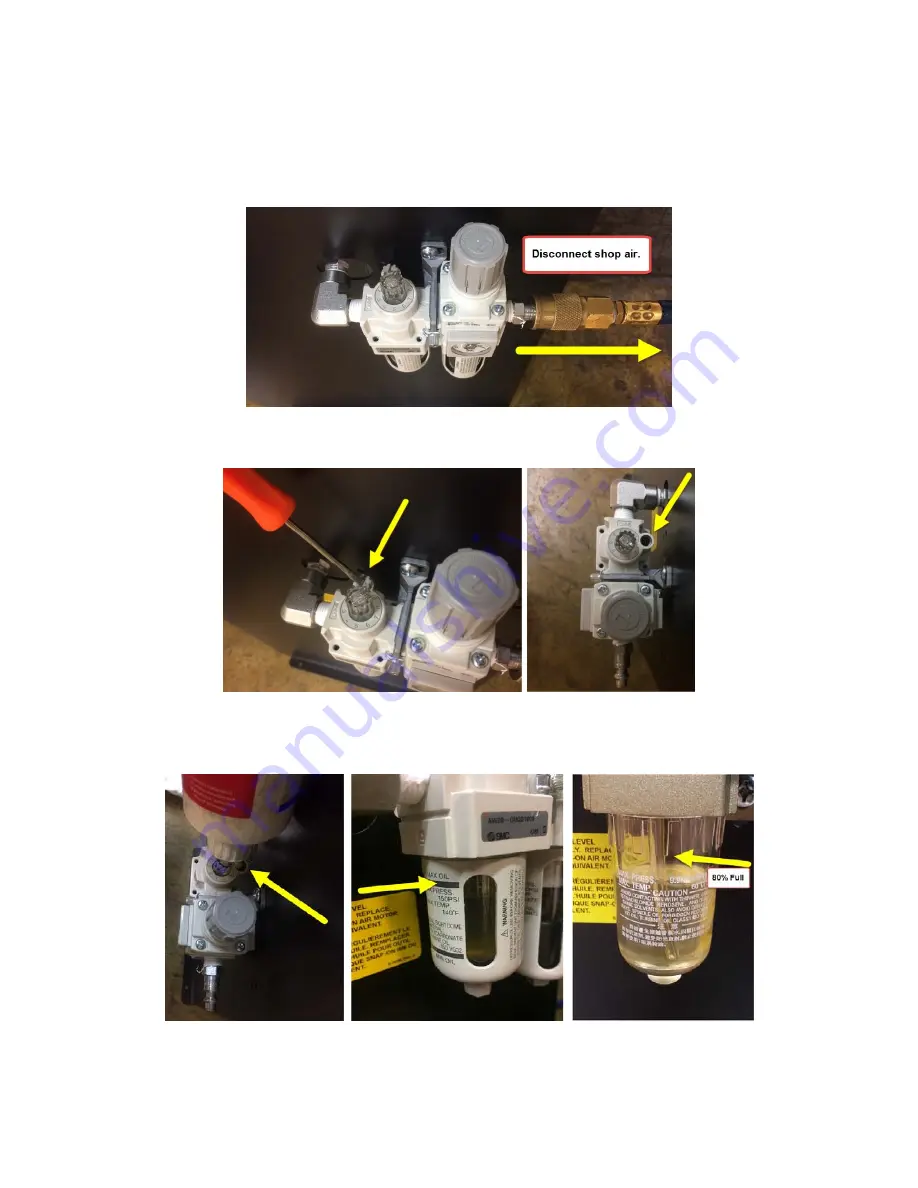
7.10  FILTER/REGULATOR/LUBRICATOR COMMISIONNING  

 
PROCEDURE FOR PREPARING FRL FOR USE WITH LIFT 
 
1.  Disconnect shop air from FRL inlet. Adding Oil to the lubricator cannot take place 

under a pressurized condition. 


2.  Using a slotted screwdriver or an Allen key, remove the filler cap from the top of the 

FRL. 


3.  Fill FRL using Snap-On AirOil #IM6 or equivalent. Oil to be filled to the MAX line 

marked on reservoir. If unit does not have MAX line mark, reservoir should be 80% 
full. 


4.  Replace filler cap to top of FRL. 


Содержание Hofmann ALIGNMENT FPA18210

Страница 1: ...and OPERATION MANUAL READ THIS INSTRUCTION MANUAL THOROUGHLY BEFORE INSTALLING OPERATING SERVICING OR MAINTAINING THE INSTALLING OPERATING SERVICING OR MAINTAINING THE LIFT SAVE THIS MANUAL 4 POST 18...

Страница 2: ...towers 25 7 5 cable to tower installation 26 7 6 Power Pack Installation 27 7 7 Hydraulic Installation 28 7 8 Air Installations 29 7 9 Electrical Connections 30 7 10 Filter Regulator Lubricator Commi...

Страница 3: ...nt and Rear Turn Slip Plates 51 10 14 1 Visual Inspection 51 10 14 2 Clean Rear Slip Plates and Front Turn Tables 51 10 14 3 Maintenance of Rear Steer Plates 51 10 14 4 Maintenance of Rear Steer Plate...

Страница 4: ...The Owner Employer shall establish procedures to periodically maintain the lift in accordance with the lift manufacturer s instructions or ANSI ALI ALOIM 2008 American National Standard for Automotiv...

Страница 5: ...let a cord hang over the edge of the table bench or counter or come in contact with hot manifolds or moving fan blades 6 If an extension cord is necessary a cord with a current rating equal to or mor...

Страница 6: ...ended lifting points Raise the lift until the pads contact the vehicle Check pads for secure contact with the vehicle Check all arm restraints and insure they are properly engaged Raise the lift to th...

Страница 7: ...ce garage lifting SAE J2184 For additional instruction on general requirements for lift operation please refer to Automotive Lift Safety Requirements For Operation Inspection and Maintenance ANSI ALI...

Страница 8: ...8 of 75 SAVE THESE INSTRUCTIONS 2 1 SAFETY WARNING LABELS SAVE THESE INSTRUCTIONS...

Страница 9: ...144 3658 mm Minimum Wheelbase 4 Wheel Alignment 86 2184 mm Overall Length 303 3 8 7706 mm Overall Width 152 1 8 3864 mm Lowered Runway Height 9 1 2 241 mm Maximum Lifting Height to runway surface 72...

Страница 10: ...ift installation and operation A qualified person should be consulted to address seismic loads and other local or state requirements It is the user s responsibility to provide all wiring for electrica...

Страница 11: ...y complete with hydraulic cylinder sheaves and cables 1 Right Side Deck Assembly 1 Front Crossmember Assembly with air cylinder release locks and sheaves 1 Rear Crossmember Assembly with air cylinder...

Страница 12: ...imum of 6 from any cracks An outline matching the dimensions shown in Figure 2 will need to be marked on the floor Refer to Figure 3 for outline dimensions Refer to General Lift Specifications for ove...

Страница 13: ...13 of 75 6 1 TYPICAL BAY LAYOUT Figure 2 Typical Bay Layout...

Страница 14: ...or Call this line 4 4 Make a chalk like parallel to line 1 10 1 2 towards door Call this line 2 5 Make a chalk like parallel to line 4 10 1 2 towards front Call this line 3 Lines 2 and 3 will be the l...

Страница 15: ...15 of 75 Figure 3 Chalk line layout...

Страница 16: ...16 of 75 6 3 IDENTIFICATION OF COMPONENTS 1 Identify and unpack major lift components Towers Crossmembers Runways and place them where they belong according Figure 1 Figure 4 Component Identification...

Страница 17: ...DECK 1 Place the left deck assembly so that the inside edge lies along chalk line B 2 Place the right deck assembly so that the inside edge lies along chalk line C 3 Position both decks so that the fr...

Страница 18: ...o the flange as shown in Figure 6 Ensure the cable studs are seated properly in the counterbore Tighten the hose clamp Figure 6 Cable Flange and Cable Assembly 7 Use Figure 7 as reference during the r...

Страница 19: ...front left cable 2 1360 wrapped around the pulley Push pulley pin further up to hold these in place Install remaining thrust washers and 1 spacer then complete assembly of pulley pin and lock in plac...

Страница 20: ...se in place Wrap around the front right cable 2 1362 on to the pulley Assemble four thrust washers as shown and the top pulley with front right cable 2 1361 wrapped around the pulley Push pulley pin f...

Страница 21: ...the pulley pin exposed above thrust washer Wrap the front left cable 2 1360 around pulley and insert onto pulley pin Push pulley pin further up to hold these in place Install two more thrust washers...

Страница 22: ...ber and out past the safety locks on each side of the crossmember Figure 12 Figure 12 Front Right and Left Cable Installed in Crossmember 3 At the end of each crossmember remove the 3 8 cable retainin...

Страница 23: ...ag labeled E Decks The cables running inside the crossmember must pass between the 1 2 x4 1 2 long bolts used to fasten the crossmember to the deck assemblies See Figure 14 Figure 14 Fastening Crossme...

Страница 24: ...necessary to allow the jackbeams to roll freely 7 3 TOWER ASSEMBLY 1 Each tower will have a safety ladder and hardware packaged inside See Section 12 3 Tower Assembly in parts list 2 Remove the safety...

Страница 25: ...r corners of the lift 3 Slide each tower around the crossmember so that the holes for attaching the slider blocks are roughly halfway inside the channel Figure 16 Tower Installation 4 Place the Glide...

Страница 26: ...o the top plate of their respective towers Secure in place with 7 8 washer and two 7 8 hex nuts See Figure 17 Note During leveling of the lift see Section 6 11 optional 1 and 2 spacers have been inclu...

Страница 27: ...r the 5 16 hardware located in Polybag D inside the hardware kit 2 Mount the power pack to the mounting bracket on the front face of the left front post using the 5 16 18UNC 1 LG hex head bolts and 5...

Страница 28: ...hose guard Remove tape once conpleted 2 Install Flow Control 6 1691 into powerpack See Figure 18 3 Feed the hose guard through the opening on the front left crossmember assembly 4 Connect the end of...

Страница 29: ...bly See figure 21 23 3 At the rear of the lift connect the 1 4 polytube from the deck to the crossmember polytubes using the tee fitting See figure 21 Figure 21 Air Connections 4 Connect the 3 8 polyt...

Страница 30: ...found in each jacking beam box 6 Hook up an air supply to the inlet of the FRL Note customer to supply this fitting 7 9 ELECTRICAL CONNECTIONS CAUTION ALL ELECTRICAL CONNECTIONS SHOULD BE MADE BY A LI...

Страница 31: ...e lubricator cannot take place under a pressurized condition 2 Using a slotted screwdriver or an Allen key remove the filler cap from the top of the FRL 3 Fill FRL using Snap On AirOil IM6 or equivale...

Страница 32: ...g counterclockwise a 1 4 turn iii Adjust by turning screw slowly in either direction to reach the desired drip rate 7 PRESSURE ADJUSTMENT Pull up on the regulator knob and adjust the pressure to 100 p...

Страница 33: ...ositions 1 2 3 and 4 in Figure 26 Use shims under tower base plate as needed Individual towers should also be leveled in both front back and side side directions 7 11 2 Deck Leveling Procedure 1 Raise...

Страница 34: ...bolts at the bottom and top of each safety ladder on the back side of the tower Figure 27 Ladder Leveling 5 Lower the lift onto the mechanical safety locks and verify level as shown in Figure 26 Make...

Страница 35: ...the anchor holes positioned on the base of each post In case longer anchors are required supplied anchors can be hammered through concrete 5 Using a hammer drive each anchor into floor leaving space...

Страница 36: ...g wedge anchor bolts supplied must have a minimum embedment of 3 into concrete floor see Figure 29 NOTE In cases where the floor is extremely out of slope the mechanical safeties may not engage on the...

Страница 37: ...sheave covers over the sheaves in the crossmember assembly These are found in the accessory box Figure 32 Sheave Cover 3 Install the approach ramps using the ramp pins 1 8 x 2 LG cotter pins 1 2 wash...

Страница 38: ...ramps are secured correctly with cotter pins and washers Check all fasteners tighten if necessary Check direction of flow control arrow pointed toward power unit If jack beams are supplied ensure keep...

Страница 39: ...ure the lift is fully lowered and all personnel are clear of th service bay while driving he vehicle onto the lift If the lift is equipped with rolling jacks jacks must be fully lowered and the rear j...

Страница 40: ...floor when fully lowered Observe pinch point warning decals To lower lift if lift has been resting on the safety latches the lift has to be raised high enough for all 4 safety latches to clear the ope...

Страница 41: ...mechanical safeties are designed to engage automatically on the way up Press the up button on the power pack to go up When the desired height is reached release the power pack up button and lower the...

Страница 42: ...to Automotive Lift Safety Requirements For Operation Inspection and Maintenance ANSI ALI ALOIM 10 0 RECOMMENDED INSPECTION AND MAINTENANCE 10 1LUBRICATION SPECIFICATIONS Where hydraulic oil is requir...

Страница 43: ...able Devices 8 6 Latch Plates Ladders 8 6 Air Filter Regulator Lubricator 8 7 Approach Ramps Chocks Wheel Stops 8 12 Anchor Bolts 8 11 2 Turn Tables and Rear Slip Plates 8 13 1 8 13 2 8 13 3 8 13 5 Be...

Страница 44: ...44 of 75 10 2 MAINTENANCE RECORDS Maintenance and Training Performed Date By Notes...

Страница 45: ...able performance of your lift Cables are expendable items and should be replaced as a set 10 3 1 Wire Rope Conditions Guide Typical good cable Figure 15 Rust on sheave stack and ropes Corrugated sheav...

Страница 46: ...vice if one or more of the following criteria are met 1 More than six randomly distributed broken wires in one rope lay or 6 d length 2 More than three broken wires in one strand in one rope lay or 6...

Страница 47: ...les Bushings inside sheaves work best in dry condition Applying oil will diminish their performance and greases will degrade performance even further DO NOT GREASE SHEAVE BUSHINGS OR SHAFTS 10 5 1 Vis...

Страница 48: ...just safety ladders if lift is not level on safety or if safeties do not engage properly Stop using the lift if any malfunction or damage is observed 10 7 AUXILIARY SAFETY MECHANISM With lift not load...

Страница 49: ...k level of oil in power pack reservoir when lift is in the lowered position Add if required Check fluid level of lift power unit and refill if needed If refill was needed inspect all fittings hoses an...

Страница 50: ...acks should be repaired immediately 10 12 COLUMNS 10 12 1 Check Columns Check columns for corrosion giving special attention to the area at the base of the column Check severely corroded areas by peck...

Страница 51: ...Equipped with Plastic Bearing Cage Remove top Slip Plate covers by first removing the four 4 shoulder bolts on each cover Remove polyethylene bearing cages insuring that all the Delrin bearings remai...

Страница 52: ...d result in property damage and or personal injury 11 0 LOCK OUT AND TAG OUT INSTRUCTIONS IMPORTANT This machine does not have integral devices that will isolate the electrical pneumatic stored and hy...

Страница 53: ...preparation for lockout an initial survey must be made to locate and identify all energy isolating devices to be certain which switch valve or other energy isolating devices apply to the machine equip...

Страница 54: ...TANDS THE BLOCKS ARE SECURLY PLACED AND THE COME ALONG IS SECURED BETWEEN THE SCISSORS PRESS THE DOWN BUTTON ON THE CONSOLE AND VERIFY THAT THE LIFT DOES NOT LOWER VERIFY HYDRAULIC PRESSURE HAS BEEN R...

Страница 55: ...agouts in the reverse order as the installation Verify the proper operation of the equipment Notify affected employees that the maintenance service is completed and the machine is ready for operation...

Страница 56: ...temporary air supply to the system 2 Press and hold the safety release button 3 Verbally indicate to all those involved that the lift will now be lowered 4 Slowly push the lowering lever on the power...

Страница 57: ...57 of 75 12 0 PARTS LIST 12 1 LIFT ASSEMBLY...

Страница 58: ...91 FLOW CONTROL 1 16 6 3623 DECAL SAFETY RELEASE 1 17 6 4045 FOUR POST OPERATING INSTRUCTIONS 1 18 6 3031 DECAL UP 1 19 6 3032 DECAL UP 1 20 6 1692 HYDRAULIC HOSE ASSEMBLY 1 21 6 0337 RECOIL HOSE 2 22...

Страница 59: ...59 of 75 12 3 TOWER ASSEMBLY...

Страница 60: ...PLT USS 8 7 6 0058 LOCK WASHER 3 8 8 8 6 0668 HHCS 3 8 UNC X 1 GR 8 8 9 6 0988_ALI WL200C ALI DECAL CAUTION 1 10 6 0988_ALI WL200S ALI DECAL NOTICE 1 11 6 0988_ALI WL200W ALI DECAL WARNING 1 12 6 4086...

Страница 61: ...61 of 75 12 5 DECK ASSEMBLY LEFT SIDE...

Страница 62: ...4 STREET TEE 1 4 NPT M F F 3 14 6 0282 PLUG 1 4 NPT 01CP 4 3 15 6 0015 ELBOW 1 4NPT STREET 90D 1 16 6 0710 ADAPTER 3 8 POLY X 1 4 NPT M 2 17 6 1684 VELOCITY FUES 8 GPM 1 18 6 0021 PLASTIC CAP 3 8 JIC...

Страница 63: ...63 of 75 12 7 CROSSMEMBER ASSEMBLY...

Страница 64: ...2 13 2 1356 SHEAVE PIN WELDMENT 2 14 2 1378 SAFETY SHOE WELDMENT 2 15 2 1376 SLIDER BLOCK WELDMENT 4 16 6 0058 LOCK WASHER 3 8 12 17 6 0668 HHCS 3 8 UNC X 1 GR 8 10 18 6 0625 3 8 ID WASHER REG PLT US...

Страница 65: ...65 of 75 12 9 CYLINDER ASSEMBLY...

Страница 66: ...ROD SEAL 1 ID x 1 7 8 OD x 1 4 6 1892 7 1 ROD WIPER 1 ID x 1 7 8 OD x 3 16 6 0001 8 1 TUBE NUT 2 1343 9 1 KEEPER WASHER 1 1689 10 1 ORING 1 3 8 ID x 1 8 C S 6 1632 11 1 PISTON 2 1344 12 1 ROD SEAL 4 O...

Страница 67: ...67 of 75 12 11 HYDRAULIC AND AIR KIT...

Страница 68: ...4 8 1 1 4 NPT STREET ELBOW 6 0015 9 10FT 3 8 DIA POLY TUBE 6 1400 10 1 FLOW CONTROL 6 1691 11 4FT HOSE GUARD 6 0714 12 1 POWER PACK 230V 1 PH 6 1695 13 1 HYD HOSE ASS Y 3 8 JIC FEMALE 16FT LONG 6 1692...

Страница 69: ...RELEASE BUTTON contains 2 3021 1 FILTER REGULATOR LUBRICATOR ASS Y 6 4142_FM 1 90 DEG ELBOW 1 4 NPT M 3 8 POLY 6 3010 1 AIR VALVE PUSHBUTTON 6 1777 1 SWIVEL ELBOW 1 8 NPT M 1 4 POLY 6 0709 1 PUSHLOCK...

Страница 70: ...70 of 75 12 14CABLE ROUTING...

Страница 71: ...CABLE ASSY 407 5 FRONT LEFT 2 1360 2 1 CABLE ASSY 473 5 FRONT RIGHT 2 1361 3 1 CABLE ASSY 162 REAR LEFT 2 1362 4 1 CABLE ASSY 228 REAR RIGHT 2 1363 5 8 HEX NUT 7 8 14UNF GR5 6 0724 6 4 CABLE SPACER 2...

Страница 72: ...72 of 75 12 16POWER PACK ASSEMBLY...

Страница 73: ...20UNC X 3 4 LG 6 1086 8 1 COUPLING 6 0774 9 1 RELEASE BRACKET HANDLE ASSEMBLY 6 0776 10 1 VALVE CARTRIDGE RELEASE 6 0880 11 1 VALVE CARTRIDGE CHECK 6 1087 12 1 FIXED RELIEF VALVE ASSEMBLY RV 19 6 1319...

Страница 74: ...ETY LADDERS USED ON 4 POST LIFTS ARE PRELOADED REMOVING THE BOLT HOLDING THE BOTTOM PORTION OF THE SAFETY LADDER WITHOUT PROPER PRECAUTIONS CAN RESULT IN INJURY PLEASE CONTACT CUSTOMER SERVICE FOR PRO...

Страница 75: ...led Sliding Waste Collection Oil Tank 26 gal Drive thru Kit Quad Rack Front Turning Radius Plates set of 2 Alignment Pan Cover 4 Post Stainless Steel Turnplates Rollback Kit for Stainless Steel Turnpl...

Отзывы: