19 Implement Lift Service
Control Valve Replacement
19 - 6
WARNING
Be aware that the hydraulic fluid is under pres-
sure. Use caution when disconnecting hydraulic
lines.
WARNING
If ANY hydraulic fluid is injected into the skin, it
must be surgically removed within a few hours
by a doctor familiar with this type of injury, or
gangrene may result.
Lift Control Valve Replacement
1. Park the tractor on a level surface.
2. Turn the ignition key switch to the OFF position,
remove the key, set the parking brake, and turn the
PTO switch off.
3. Disconnect the negative (-) battery cable
(see Section 7, ELECTRICAL SYSTEM SERVICE).
4. Disconnect spark plug wires or glow plug wires to
prevent the possibility of accidental starting while the
PTO is being adjusted.
5. Remove the steering tilt assembly (see Section 8,
POWER STEERING SERVICE).
6. Remove the dash (see Section 14, HOOD, DASH &
FOOT REST SERVICE).
7. Remove the tunnel (foot rest) (see Section 14,
HOOD, DASH & FOOT REST SERVICE).
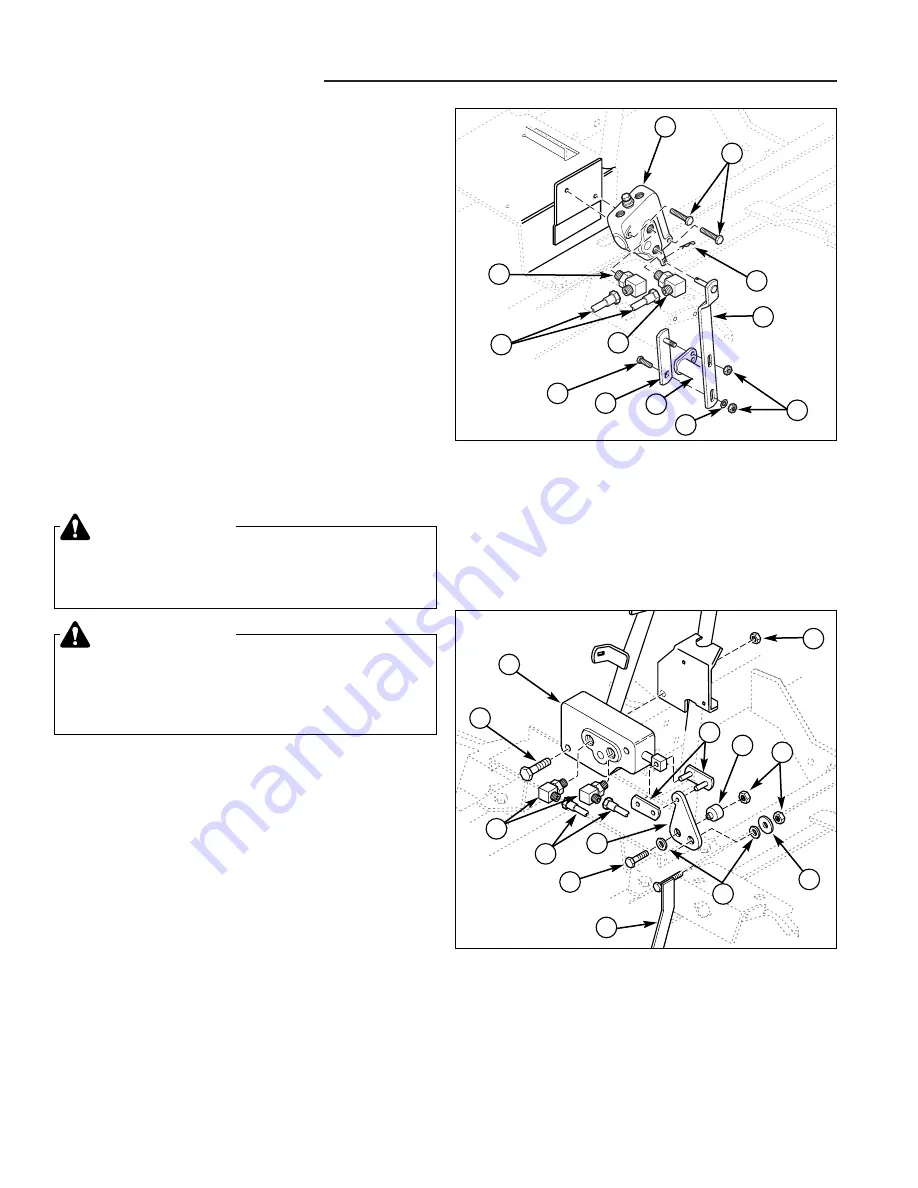
Figure 4. Lift Control Valve (Diesel Engine Models)
A. Lift Control Valve
H. Upper Link Assembly
B. Hex Nut
I. Capscrew
C. Connecting Link
J. Valve Pivot
D. Spacer
K. Hydraulic Hoses
E. Hex Nuts
L. Hydraulic Fittings
F. Washer
M. Capscrew
G. Lock Washers
Figure 3. Lift Control Valve (Gas Engine Models)
A. Lift Control Valve
G. Lift Pedal Assembly
B. Capscrews
H. Lower Link Assembly
C. Cotter Hairpin
I. Capscrew
D. Upper Link Assembly
J. Hydraulic Hoses
E. Hex Nuts
K. Hydraulic Fittings
F. Lock Washer
General
A hydraulic implement lift system is standard equipment
on the Legacy. The lift features an agricultural tractor-
type hydraulic lift cylinder and linkage system. The
hydraulic cylinder is centrally located and protected by
the frame.
PRELIMINARY CHECKS
1. Check fluid level (see Section 3, MAINTENANCE).
2. Check Implement relief pressure (see Section 10,
U-TYPE HYDROSTATIC UNIT SERVICE).
2. Add fluid if needed.
3. Check for bulges in hydraulic hoses.
4. Start engine.
5. Raise and lower implement several times.
6. With implement lowered, turn key to stop.
7. Check for leaks.
8. Replace any leaking fittings or hoses.
B
A
C
D
E
K
J
K
I
H
G
F
B
A
M
L
K
J
I
H
C
D
E
F
G
Not
for
Reproduction
Содержание AGCO Allis 2000 Series
Страница 1: ...USE N o t f o r R e p r o d u c t i o n...
Страница 18: ...1 16 1 General Information Notes N o t f o r R e p r o d u c t i o n...
Страница 24: ...2 Troubleshooting Notes 2 6 N o t f o r R e p r o d u c t i o n...
Страница 52: ...5 Belt Replacement Notes 5 6 N o t f o r R e p r o d u c t i o n...
Страница 101: ...7 33 7 Electrical System Service Troubleshooting Notes N o t f o r R e p r o d u c t i o n...
Страница 114: ...7 46 7 Electrical System Service Notes N o t f o r R e p r o d u c t i o n...
Страница 126: ...8 Power Steering Service Notes 8 12 N o t f o r R e p r o d u c t i o n...
Страница 162: ...11 Transaxle Removal Installation Notes 11 10 N o t f o r R e p r o d u c t i o n...
Страница 206: ...13 Engine Removal Installation Notes 13 36 N o t f o r R e p r o d u c t i o n...
Страница 244: ...17 Miscellaneous Component Service Notes 17 4 N o t f o r R e p r o d u c t i o n...
Страница 304: ...19 Implement Lift Service Notes 19 10 N o t f o r R e p r o d u c t i o n...
Страница 312: ...20 Power Steering Unit Service Notes 20 8 N o t f o r R e p r o d u c t i o n...


