


7
Commissioning
7.1
Overview of the commissioning steps
•
Commissioning of the device with factory default
•
Installing the SOPAS ET configuration software
•
Connection of the device to PC/notebook with the SOPAS ET configuration soft‐
ware
•
Adjustment and configuration of the device to optimize functionality
•
Test of the device for correct functionality in read operation
7.2
SOPAS ET configuration software
The SOPAS-ET configuration software can be used to adapt the device to the reading
situation on site. The configuration data is stored and archived as a parameter set
(project file) on the PC.
7.2.1
Functions of the SOPAS-ET configuration software for the device (overview)
The general functions of the software and its operation are described in the online help
in the SOPAS ET configuration software:
•
Choice of the menu language (German, English)
•
Setting up communication with the device
•
Password-protected configuration for different operating levels
•
Recording of the data in continuous operation (recording and analyzing data of
certain memory areas of the device with the data recorder)
•
Diagnostics for the system
7.2.2
Installing SOPAS ET
NOTE
The configuration software SOPAS ET, the current system prerequisites for the PC, and
the instructions for downloading can be found online at:
b
1.
Start the PC and download the current version from
2.
If installation does not start automatically, launch setup.exe from the download
directory.
3.
Follow the operating instructions to complete the installation.
7.2.3
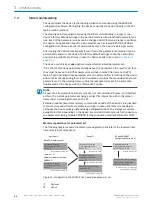
Connecting SOPAS ET to the device
Administrator rights may be required on the PC to install the software.
1.
Start the “SOPAS ET” program after completing the installation. Path: C:\Program
Files (x86)\SICK\SOPAS ET\SopasET.exe or using the Windows search.
2.
Install the device driver (SDD) in the device catalog using the wizard (gear symbol).
The *.jar file can be obtained from the online repository if an Internet connection
is present.
3.
In the device search list, establish a connection between SOPAS ET and the device
using the search settings. To do this, select the CLV6xx family of devices and
select the default IP address 192.168.0.1 when connecting for the first time.
✓
The device is detected and can now be integrated into a project for configuration
purposes.
COMMISSIONING
7
8019588/129Z/2019-02-07 | SICK
O P E R A T I N G I N S T R U C T I O N S | CLV63x, CLV64x, CLV65x
55
Subject to change without notice


