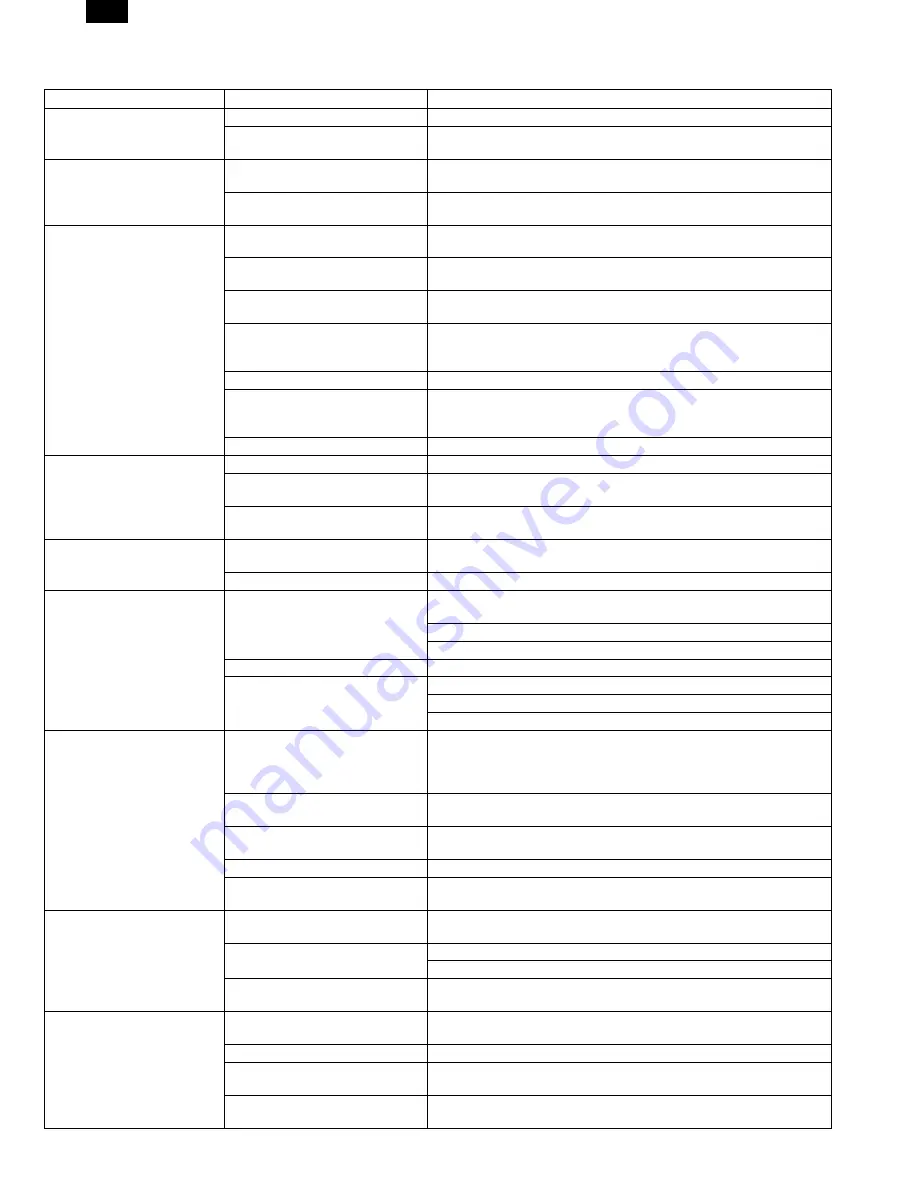
2. Troubleshooting of print operation (Printer mode)
Problem
Cause
Remedy
The ready lamp (green) does
not light up.
The power switch is not turned on.
Turn on the power switch.
The power cord is not connected
properly.
Check the power cord connection.
The GDI driver cannot be
installed.
There is no sufficient free space in
the hard disk of the computer.
Delete unnecessary files and applications to assure enough space.
The operating system is not
compatible.
Use the proper operating system (Windows 95, Windows NT4.0).
The printer does not print.
The interface cable is not
connected properly.
Check the interface cable connection.
(Check that it is of bi-directional.)
The interface cable is defective.
Use the computer and the printer to check that the cable is proper or not.
If necessary, replace the interface cable.
Incorrect port setting
Check Windows control panel printer setting to confirm that the print job
is sent to the proper port (for example, LPT1).
Improper installation of developer
cartridge and photoconductor
cartridge
Check that the developer cartridge and the photoconductor cartridge are
properly installed.
Paper jam
Remove the paper jam.
Incorrect configuration setting of
the printer
Perform the GDi test print. If the test print is made properly, GDI printing
is properly made. Check the application to confirm that the print setting is
proper or not.
Incorrect installation of GDI
Reinstall the GDI software and try printing the test page.
Paper is not fed to the printer.
Improper setting of paper
Set paper properly.
The paper release lever is not
pushed back.
Insert paper into the paper feed tray and push back the paper release
lever.
Too much paper is loaded in the
paper feed tray.
Remove some paper from the paper feed tray.
The whole page of printed
paper is blank.
Improper installation of developer
cartridge
Install the developer cartridge properly.
Developer cartridge empty
Replace he developer cartridge.
Half page of printed paper is
blank.
Too complex page layout
Simplify the paper layout. If possible, remove unnecessary format
commands from the document.
Reduce resolution setting. If currently set to 500dpi, change to 300dpi.
Install an expansion random access memory (RAM) to the computer.
Incorrect setting of page orientation
In the printer setup dialogue box, change the page orientation.
Too many applications are open.
Close all the applications before printing.
Reduce the resolution setting. If it is set to 600dpi, change to 300dpi.
Install an expansion random access memory (RAM) to the computer.
Half page of printed paper is
blank.
The size of paper in the printer is
greater than that specified by the
application or Windows Printing
System.
Set proper paper to the printer.
Scaling is set to a lower level than
100%.
In the printer setup dialogue box, change the scaling.
Incorrect specification of the
interface cable
Check the interface cable specification, or replace the cable with an
EEE-1284 cable.
Incorrect specification of the CPU
Check that the CPU satisfies the specifications.
Insufficient capacity of computer’s
random access memory RAM
Install an expansion random access memory (RAM) to the computer.
The printer prints erroneous
characters or erroneous data.
Improper connection of the
interface cable
Check connection of the interface cable.
The GDI software may cause the
problem.
Cancel the Windows mode and resume the computer.
Turn off the printer and turn it on again.
Incorrect specification of the
interface cable
Check the interface cable specification.
Paper jams occur continuously.
Too much paper on the paper feed
tray
Remove some paper from the paper feed tray.
Paper of unusable kind is used.
Use only the paper which satisfies the specifications.
Improper paper exit is made.
Thick paper must not be printed in the normal face down mode. Use the
face up mode.
The photoconductor cartridge is
not properly installed.
Install the photoconductor cartridge properly.
FO-3800M
10 – 19
Содержание FO-3800M
Страница 115: ...S001 P001 S001 P007 CLN S001 P003 S001 P005 S001 P002 S001 P006 S001 P004 CLN FO 3800M 9 4 ...
Страница 142: ...S009 Ua002 S009 Ua003 S009 Ua004 S009 Ua005 S009 Ua006 S009 Ua001 S009 Ua001 002 S009 Ua001 001 FO 3800M 9 31 ...
Страница 174: ...SMP1 SMP2 FO 3800M 10 25 ...
Страница 175: ...SMP3 SMP4 FO 3800M 10 26 ...
Страница 176: ...SMP5 SMP6 a b D FO 3800M 10 27 ...
Страница 177: ...SMP7 SMP8 FO 3800M 10 28 ...
Страница 178: ...SMP9 SMP10 SMP11 Streaks and dots in the pitch of about 78mm Streaks and dots in the pitch of about 45mm FO 3800M 10 29 ...


