AR-168N/168L UNPACKING AND INSTALLATION 5 - 4
8. Loading the paper tray
Note: Make sure that the paper is not torn, is free of dust, and has no
wrinkles or curled edges.
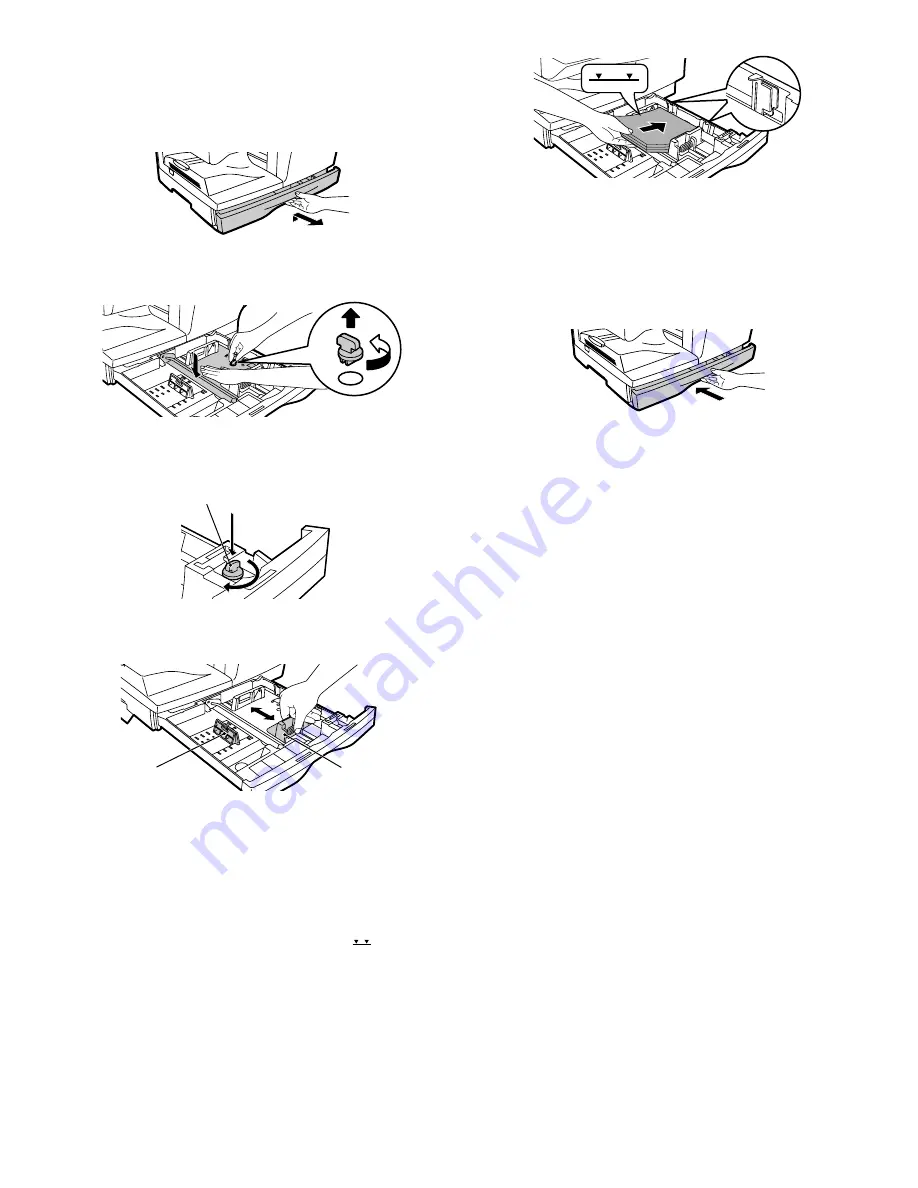
1) Raise the handle of the paper tray and pull the paper tray out until it
stops.
2) Remove the pressure plate lock. Rotate the pressure plate lock in
the direction of the arrow to remove it while pressing down on the
pressure plate of the paper tray.
3) Store the pressure plate lock which has been removed in step 2. To
store the pressure plate lock, rotate the lock to secure it as shown
below.
4) Squeeze the lock lever of the front guide and slide the front guide to
match the width of the paper, and move the left guide to the appro-
priate slot as marked on the tray.
• The front guide is a slide-type guide. Grasp the locking knob on
the guide and slide the guide to the indicator line of the paper to
be loaded.
• The left guide is an insert-type guide. Remove it and then insert it
at the indicator line of the paper to be loaded.
5) Fan the paper and insert it into the tray. Make sure that the edges
go under the corner hooks.
Note:
• Do not load paper above the maximum height line (
).
Exceeding the line will cause a paper misfeed.
• If the paper is not fanned, double-feeds or misfeeds may occur.
• Make sure the stack of paper is straight before loading it. When add-
ing paper, take the remaining paper out and combine it into a single
stack with the new paper.
• Make sure that all the paper in the stack is the same size and type.
• When loading paper, ensure that there is no space between the
paper and the guide, and make sure that the guide is not set too nar-
row and causes the paper to bend. Incorrect loading will cause the
paper to skew or misfeed.
6) Gently push the paper tray back into the machine.
Note:
• If you loaded a different size of paper than was loaded previously in
the tray.
• When not using the machine for an extended period, remove all
paper from the paper tray and store it in a dry place. If paper is left in
the machine for an extended period, the paper will absorb moisture
from the air, resulting in paper jams.
9. Power to copier
1) Ensure that the power switch of the copier is in the OFF position.
Insert the attached power cord into the power cord socket at the
rear of the copier.
2) Plug the other end of the power cord into the nearest outlet.
10. Software for AR-168N/168L
The CD-ROM that accompanies the machine contains the following
software:
MFP driver
Printer driver
The printer driver enables you to use the printer function of the
machine.
The printer driver includes the Print Status Window*. This is a utility
that monitors the machine and informs you of the printing status, the
name of the document currently being printed, and error messages.
* When the machine is connected through the parallel port, the Print
Status Window can only be used when the parallel port is set to ECP
mode. To set the parallel port mode, refer to your computer manual
or ask the manufacturer of your computer.
Scanner driver (USB only)
The scanner driver allows you to use the scanning function of the
machine with TWAIN-compliant and WIA-compliant applications.
Sharpdesk
Sharpdesk is an integrated software environment that makes it easy to
manage documents and image files, and launch applications.
Button Manager
Button Manager allows you to use the scanner menus on the machine
to scan a document.
Note: The scanning feature can only be used with computers that are
running Windows 98/Me/2000/XP and are connected to the
machine by a USB cable. If you are running Windows 95/NT 4.0
or are connected to the machine by a parallel connection, only
the printer function can be used.
Pressure plate lock
Left
guide
Front
guide
05̲UNPAC.fm 4 ページ 2005年11月18日 金曜日 午後5時29分


