


Installing LM100 luminaires
Senstar LM100 Product Guide
Page 27
Tools and equipment
•
)
•
wire stripper
•
wire cutter
•
linesman’s pliers
•
needle-nose pliers
•
ruler
•
ladder or scissor lift suitable for fence height
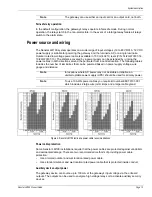
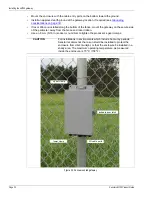
For daisy chain power cable wiring attach the power cable along the top of the fence:
1.
Run the 2 sections of power cable from the top of the fence, down past the luminaire, and cut
the power cables 30 cm (1 ft.) below the base of the luminaire.
2.
Separate the 2 conductors of the power cables for 10 cm (4 in) from the end.
CAUTION
Use minimum 18 AWG outdoor and wet location rated power cable that
clearly distinguishes the 2 conductors to ensure the correct polarity at
each luminaire.
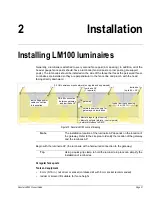
Note
Molex crimp tool p/n 64001-0600 is recommended for use with the
supplied Molex crimp connectors. However, the Klein model 1005 or
equivalent crimp tool is suitable for this application.
Note
For 14 AWG and above use the supplied Molex crimps p/n SD-19160-
001. For 12 AWG and larger use Molex crimps p/n SD-19XXX-001. The
larger Molex crimps are available in kit E8KT0101 (2 crimps per kit).
One kit per luminaire.
Note
In harsh weather environments which include wind blown salt water
spray, Senstar recommends the use of a protective marine type
dielectric grease compound to protect the electrical connections to the
luminaires.
Figure 21: Power connection crimp tools
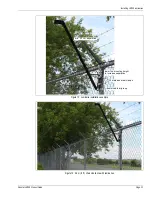
Figure 22: Power cable preparation
Molex SD-19160-001
closed-end connector
Molex 64001-0600 recommended crimp tool
Klein 1005 suitable crimp tool
10 cm (4 in.) 1 : 1 scale
3 cm (1.2 in.) 1 : 1 scale


