8-Rock Noggin Configuration Assembly (Noggin 500 & 1000 only)
Noggin
42
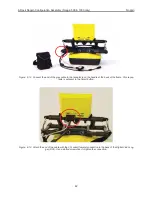
Figure: 8-12 Connect the end of the grey cable to the receptacle on the handle at the back of the frame. This recep-
tacle is adjacent to the Smart button.
Figure: 8-13 Attach the end of the cable with the 37 socket (female) connection to the back of the Digital Video Log-
ger (DVL). Use a slotted screwdriver to tighten the connection.
Содержание Noggin 100
Страница 1: ...User s Guide Copyright 2012 Sensors Software Inc 2011 00022 02 Noggin ...
Страница 2: ......
Страница 4: ......
Страница 8: ......
Страница 17: ...Noggin 2 Noggin Components 3 Figure 2 3 Noggin 100 components ...
Страница 156: ...Appendix D Instrument Interference Noggin D 2 ...
Страница 158: ...Appendix E Safety Around Explosive Devices Noggin E 2 ...
Страница 162: ...Noggin G 4 ...


