


Operations & Installation
2-30
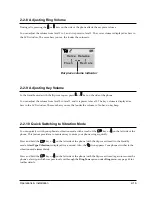
2-7-4 Unique Ring Tones for selected calls
This new feature allows you to distinguish between different callers by assigning unique ring tones to specific
numbers stored in your handset When a call is received from a specified number, you will hear a unique ring
sound that can only be heard when that specific number calls.
Note:
¥ This feature is only available if the telephone systems used by both you and the caller support Caller ID.
Please contact your telephone service provider for more information.
You can choose from ten different tones and assign these as unique ring tones for up to three different callers.
1. In the Standby mode, press the
Menu
soft key.
2. Press the
soft key repeatedly until
Ring
appears, then press the
Select
soft key.
3. Press the
soft key repeatedly until
Unique Ring Tone
appears, then press the
Select
soft key.
The first ring address and its settings (if already registered) are displayed.
4. Press the
soft key to choose the ring address you want, then press the
Options
soft key.
5. Press the
Select
soft key to choose the
Ring Tone
option. Available ring tones are displayed.
6. Press the
soft key to choose the ring tone, then press the
OK
soft key.
7. Press the
Options
soft key.
8. Press the
soft key to select the
Enter Number
option, then press the
Select
soft key.
9. Enter the number you want to designate, then press the
OK
soft key.
10. Enter the name for that number, then press the
OK
soft key. Refer to ÔEntering a NameÕ on page 33.
To Deactivate a NumberÕs Unique Ring Tone
You can selectively deactivate a numberÕs unique ring by erasing that number.
1. In the
Unique Ring Tone
mode (see steps 1 through 3 on opposite page), use the
soft key to select the
ring address containing the number you want to erase.
2. Press the
Options
soft key.
3. Press the
soft key until the
Erase
option is selected, then the
Select
soft key.
4. When you are asked to confirm the setting, press the
Yes
soft key.
Содержание SP-R6100
Страница 3: ......
Страница 50: ...Exploded View Parts List 3 4 3 4 SP R6100 BASE Exploded View 1 7 8 9 10 13 14 15 16 2 3 11 9 12 4 5 6 ...
Страница 52: ...Exploded View Parts List 3 6 3 6 SP R6100 CHARGER Exploded View 6 8 7 1 2 3 4 5 9 ...
Страница 54: ...Exploded View Parts List 3 8 SP R6100 PACKING Exploded View 3 8 3 7 4 1 5 8 2 6 9 ...
Страница 67: ...6 1 6 PCB Diagrams 6 1 SP R6100 Base PCB I ...
Страница 68: ...PCD Diagrams ...
Страница 69: ...6 2 SP R6100 Base PCB II 6 2 ...
Страница 70: ...PCD Diagrams ...
Страница 71: ...6 3 SP R6100 Handy PCB I 6 3 ...
Страница 72: ...PCD Diagrams ...
Страница 73: ...6 4 SP R6100 Handy PCB II 6 4 ...
Страница 74: ...PCD Diagrams ...
Страница 75: ...6 5 SP R6100 Key PCB I PCD Diagrams 6 5 ...
Страница 76: ...6 6 SP R6100 Key PCB II PCB Diagrams 6 6 ...
Страница 77: ...6 7 SP R6100 Charger PCB I 6 7 PCD Diagrams ...
Страница 78: ...6 8 SP R6100 Charger PCB II PCB Diagrams 6 8 ...
Страница 79: ...Schematic Diagrams 7 1 7 Schematic Diagrams 7 1 SP R6100 Hand LOGIC ...
Страница 80: ...Schematic Diagrams 7 2 7 2 SP R6100 Hand RF SL18 9 SL55 SL18 9 SL19 SL7 SL9 5 SL18 9 SL18 9 SL5 5 SL7 5 SL5 ...
Страница 81: ...Schematic Diagrams 7 3 7 3 SP R6100 BASE LOGIC ...
Страница 82: ...Schematic Diagrams 7 4 7 4 SP R6100 Base CLIP ...
Страница 84: ...Schematic Diagrams 7 6 HAND KEY 7 6 ...
Страница 85: ...Schematic Diagrams 7 7 CHRGER 7 7 ...
Страница 88: ...Samsung Electronics Co Ltd ELECTRONICS ...


