2. Product Specifications and Description
2.5. Image Creation
2.5.1. Printing process overview
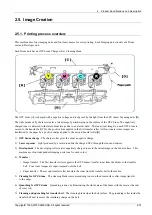
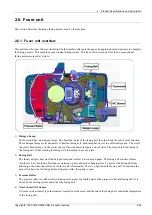
This machine uses four imaging units and four laser beams for color printing. Each Imaging unit consists of a Drum
unit and Developer unit.
Each Drum unit has an OPC drum, Charge roller, Cleaning blade.
The OPC drum [A] is charged with a negative voltage and is exposed by the light from the LSU (Laser Scanning unit) [B].
The light produced by the laser creates a latent image by discharging on the surface of the OPC drum. The negatively
charged toner is attracted to the latent drum image due to an electric field. The toner (real image) on each OPC drum is
moved to the transfer belt[C] by the positive bias applied to the first transfer roller. All four toners (color image) are
transferred to the paper by a positive charge applied to the second transfer roller[D].
1)
OPC drum charge
: The charge roller gives the drum a negative charge.
2)
Laser exposure
: Light produced by a laser diode hits the charged OPC through the lens and mirrors.
3)
Development
: The developing roller carries negatively charged toner to the latent image on the drum surface. This
machine uses four independent imaging units (one for each color).
4)
Transfer :
•
Image transfer : The first transfer rollers opposite the OPC drums transfer toner from the drums to the transfer
belt. Four toner images are super-imposed onto the belt.
•
Paper transfer : The second transfer roller transfers the toner from the transfer belt to the media.
5)
Cleaning for OPC drum
: The cleaning blade remove remaining toner on the drum surface after image transfer
to the paper.
6)
Quenching for OPC drum
: Quenching is done by illuminating the whole area of the drum with the laser at the end
of every job.
7)
Cleaning and quenching for transfer belt
: The cleaning blade clean the belt surface. The grounding roller inside the
transfer belt unit removes the remaining charge on the belt.
Copyright© 1995-2016 SAMSUNG. All rights reserved.
2-37
Содержание CLX-9251 Series
Страница 122: ...2 Product Specifications and Description 2 108 Copyright 1995 2016 SAMSUNG All rights reserved ...
Страница 167: ...3 Disassembly and Reassembly 7 Remove the Cover Side F Copyright 1995 2016 SAMSUNG All rights reserved 3 45 ...
Страница 454: ...4 Troubleshooting 4 269 Copyright 1995 2016 SAMSUNG All rights reserved ...

