background image

Inhaltsverzeichnis / Table of contents / Table des matières

Seite / Page / Page

3

en-Installation- and Operating Instruction

22

. . . . . .

1.

Notes on safe operation

23

. . . . . . . . . . . . . . . . . . . . . . . . . . . . . . . . . . . . . . . . . . . . . . . . . .

2.

Commissioning

24

. . . . . . . . . . . . . . . . . . . . . . . . . . . . . . . . . . . . . . . . . . . . . . . . . . . . . . . . .
2.1

Initial commissioning

24

. . . . . . . . . . . . . . . . . . . . . . . . . . . . . . . . . . . . . . . . . . . . . . .
2.2

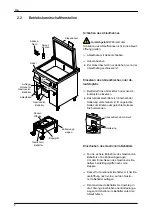
Getting ready for use

25

. . . . . . . . . . . . . . . . . . . . . . . . . . . . . . . . . . . . . . . . . . . . . . .
2.3

Switching the appliance on

26

. . . . . . . . . . . . . . . . . . . . . . . . . . . . . . . . . . . . . . . . . .
2.3.1

Instructions on frying and grilling small quantities

26

. . . . . . . . . . . . . . . . . . . . . . .

2.3.2

Power levels and modes

27

. . . . . . . . . . . . . . . . . . . . . . . . . . . . . . . . . . . . . . . . . . .

2.4

Water supply

28

. . . . . . . . . . . . . . . . . . . . . . . . . . . . . . . . . . . . . . . . . . . . . . . . . . . . . .

2.5

Notes, options for use

29

. . . . . . . . . . . . . . . . . . . . . . . . . . . . . . . . . . . . . . . . . . . . . .

2.6

Removing liquid meals

30

. . . . . . . . . . . . . . . . . . . . . . . . . . . . . . . . . . . . . . . . . . . . .

3.

Finishing work

31

. . . . . . . . . . . . . . . . . . . . . . . . . . . . . . . . . . . . . . . . . . . . . . . . . . . . . . . . . .

4.

Cleaning and maintenance

31

. . . . . . . . . . . . . . . . . . . . . . . . . . . . . . . . . . . . . . . . . . . . . . .

4.1

Cleaning the pan tub

32

. . . . . . . . . . . . . . . . . . . . . . . . . . . . . . . . . . . . . . . . . . . . . . .

4.1.1

Removing fried residues/remains

32

. . . . . . . . . . . . . . . . . . . . . . . . . . . . . . . . . . . .

4.1.2

Removing limescale

33

. . . . . . . . . . . . . . . . . . . . . . . . . . . . . . . . . . . . . . . . . . . . . . .

4.2

Cleaning stainless steel surfaces

33

. . . . . . . . . . . . . . . . . . . . . . . . . . . . . . . . . . . .

5.

Troubleshooting

34

. . . . . . . . . . . . . . . . . . . . . . . . . . . . . . . . . . . . . . . . . . . . . . . . . . . . . . . . .

6.

Technical specifications

35

. . . . . . . . . . . . . . . . . . . . . . . . . . . . . . . . . . . . . . . . . . . . . . . . . .

7.

Installation and connection

35

. . . . . . . . . . . . . . . . . . . . . . . . . . . . . . . . . . . . . . . . . . . . . . .

7.1

Installation

35

. . . . . . . . . . . . . . . . . . . . . . . . . . . . . . . . . . . . . . . . . . . . . . . . . . . . . . . .

7.2

Electrical connection

36

. . . . . . . . . . . . . . . . . . . . . . . . . . . . . . . . . . . . . . . . . . . . . . .

7.3

Connecting cables

36

. . . . . . . . . . . . . . . . . . . . . . . . . . . . . . . . . . . . . . . . . . . . . . . . .

7.4

Water connection (add-on equipment)

37

. . . . . . . . . . . . . . . . . . . . . . . . . . . . . . . .

8.

Maintenance

38

. . . . . . . . . . . . . . . . . . . . . . . . . . . . . . . . . . . . . . . . . . . . . . . . . . . . . . . . . . . .

9.

Notes on waste disposal

38

. . . . . . . . . . . . . . . . . . . . . . . . . . . . . . . . . . . . . . . . . . . . . . . . .

Содержание Marmite 800 Plus

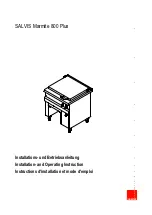
Страница 1: ...SALVIS Marmite 800 Plus Installations und Betriebsanleitung Installation and Operating Instruction Instructions d installation et mode d emploi ...

Страница 2: ...gsstufen und Betriebsarten 10 2 4 Wasserzulauf 11 2 5 Hinweise Nutzungsmöglichkeiten 12 2 6 Flüssige Speisen entnehmen 13 3 Betriebsschluss 14 4 Reinigung und Pflege 14 4 1 Bräterwanne reinigen 15 4 1 1 Entfernen von Bratrückständen 15 4 1 2 Entfernen von Kalk 16 4 2 Edelstahlflächen reinigen 16 5 Störungen und Abhilfe 17 6 Technische Daten 18 7 Aufstellen und Anschließen 18 7 1 Aufstellung 18 7 2...

Страница 3: ...r levels and modes 27 2 4 Water supply 28 2 5 Notes options for use 29 2 6 Removing liquid meals 30 3 Finishing work 31 4 Cleaning and maintenance 31 4 1 Cleaning the pan tub 32 4 1 1 Removing fried residues remains 32 4 1 2 Removing limescale 33 4 2 Cleaning stainless steel surfaces 33 5 Troubleshooting 34 6 Technical specifications 35 7 Installation and connection 35 7 1 Installation 35 7 2 Elec...

Страница 4: ...ent 44 2 4 Arrivée d eau 45 2 5 Consignes possibilités d utilisation 46 2 6 Transvasement des aliments liquides 47 3 Fin de l utilisation 48 4 Nettoyage et entretien 48 4 1 Nettoyage de la cuve de la sauteuse 49 4 1 1 Elimination des restes de cuisson 49 4 1 2 Elimination du calcaire 50 4 2 Nettoyage des surfaces en acier inoxydable 50 5 Pannes et remèdes 51 6 Caractéristiques techniques 52 7 Mise...

Страница 5: ...is schonendem Dünsten und Warmhalten in unterschiedlichen Temperaturbereichen von 60 C bis 250 C Z B Ansetzten von Suppen Soßen Ragouts Gulasch usw Einsatz als Bratplatte für alles Kurzgebratene z B Steaks Schnitzel Filets Fisch Pilzpfannen usw Hinweis Das Gerät ist nach den Vorschriften der VDE GS und europäischen Norm EN gefertigt Eintragen der Typenschilddaten Tragen Sie vor der Aufstellung des...

Страница 6: ...ei tigen können das Gerät ausschalten und den Kundendienst benachrichtigen Verletzungsgefahr D Mit dem Gerät darf nicht frittiert werden D Verbrühungsgefahr Spritzendes heißes Speiseöl oder Speisefett Kein Wasser zu erhitztem Speiseöl oder Speisefett hinzugeben D Verbrühungsgefahr Plötzlich aufsteigender heißer Dampf Beim Hinzugeben von Wasser auf die aufgeheizte Bratfläche mit entsprechender Vors...

Страница 7: ...chwung gegen Endstellung öffnen sonst Beschädigung des Drehge lenkes D Das Gerät nicht mit Wasserleitungsschlauch Hochdruckreiniger Dampf Hochdruckreiniger oder Dampfreiniger abspritzen bzw reinigen D Frontblenden und Geräteverkleidungen nicht mit Schaumreiniger einsprühen Der Schaum reiniger dringt in kleinste Ritzen und zerstört die Elektrik und Elektronik D Nach längeren Stillstandzeiten das Ge...

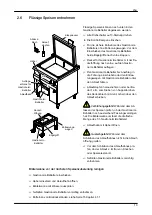
Страница 8: ... gelochte Seite als Sieb verwenden Abdeckblech über Ablauf Halterung Einschieben des Gastronorm Behälters Für die sichere Entnahme des Gastronorm Behälters ohne Entleerungswagen Vor dem Einschieben des Gastronorm Be hälters beide Bügelgriffe nach vorne klappen Deckel für Gastronorm Behälter mit der De ckelöffnung nach vorne auf den Gastro norm Behälter auflegen Den Gastronorm Behälter bis Anschlag...

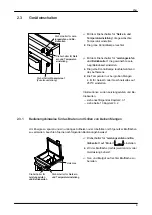
Страница 9: ...1 siehe Seite 10 Kapitel 2 3 2 2 3 1 Bedienungshinweise für das Braten und Grillen von kleinen Mengen Um Energie zu sparen und ein unnötiges Aufheizen oder Überhitzen nicht genutzer Bratflächen zu vermeiden beachten Sie die nachfolgenden Bedienungshinweise Drehschalter für Leistungsstufen und Be triebsarten auf Braten einstellen D 2 3 der Bratfläche rechts werden mit voller Heizleistung beheizt Ga...

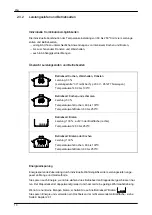
Страница 10: ...50 Temperaturwahl Kochen 60 bis 100 C Temperaturwahl Braten 60 bis 250 C Betriebsart Braten Leistung 100 auf 2 3 der Bratfläche rechts Temperaturwahl 60 bis 250 C Betriebsart Braten oder Kochen Leistung 100 Temperaturwahl Kochen 60 bis 100 C Temperaturwahl Braten 60 bis 250 C Energieeinsparung Energiesparende Zubereitung durch individuelle Wahlmöglichkeit der Leistungsstufen ange passt an Menge un...

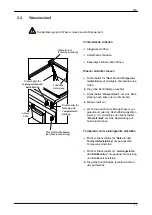
Страница 11: ...gelaufen ist oder die Höchstfüllmenge Mar kierung 6 erreicht ist den Drehschalter Wasserzulauf um eine Raststellung auf Null zurückdrehen Temperatur und Leistungsstufe einstellen Mit dem Drehschalter für Netz ein und Temperatureinstellung die gewünschte Temperatur einstellen Mit dem Drehschalter für Leistungsstufen und Betriebsarten die gewünschte Leistung und Betriebsart einstellen D Die gelbe Ko...

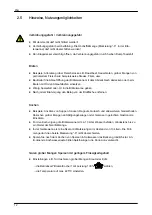
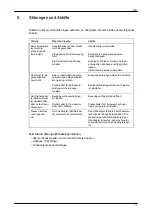
Страница 12: ...dem Bratvorgang den Belag von der Bratfläche entfernen Kochen D Beispiele Ansätze von Suppen Saucen Ragouts Gulasch und alle weiteren Garmethoden Abkochen großer Mengen an Sättigungsbeilagen oder Gemüse in gelochten Gastronorm Einsätzen D Für den Kochvorgang die Bräterwanne mit ca 10 Liter Wasser befüllen mindestens bis zu ein Viertel der Nennfüllmenge D In der Gerätewanne ist eine Skala mit Marki...

Страница 13: ...rbrühungsgefahr Während dem Ab lassen der Speisen prüfen ob der Gastronorm Behälter noch ausreichend Fassungsvermögen hat Die Bräterwanne umfasst die dreifache Menge des 1 1 Gastronorm Behälters Ablaufhahn mit Hebel öffnen Quetschgefahr Während dem Schließen des Ablaufhahnes nicht in die Ablauf öffnung greifen Vor dem Schließen des Ablaufhahnes prü fen ob der Ablauf z B frei von Knochen oder Speis...

Страница 14: ... Gerät nicht mit Wasserleitungsschlauch Hochdruckreiniger Dampf Hochdruckreiniger oder Dampfreiniger abspritzen bzw reinigen D Gebrauchsanweisung der Reinigungsmittelhersteller beachten D Keine scheuernden Putzmittel und beschädigte Reinigungsschaber verwenden Sie erzeugen Kratzer D Edelstahl darf nicht längere Zeit mit konzentrierten Säuren Essigessenz Kochsalzlösung Senf Würzmischungen in Kontak...

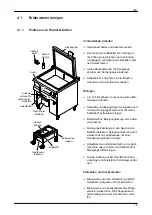
Страница 15: ...e Reinigungslösung kurz aufko chen lassen Reinigungsrückstände in den Gastronorm Behälter ablassen Ablaufrohr während dem Ablassen der Spülmittellauge mit einer Rundbürste gründlich reinigen Ablaufstopfen und Abdeckblech in der Spül maschine oder von Hand mit fettlösendem Reinigungsmittel reinigen Dunkle Flecken auf der Oberfläche mit Es sigreiniger und Edelstahl Topfreiniger entfer nen Klarspülen...

Страница 16: ...assen Ablaufrohr während dem Ab lassen der Spülmittellauge mit einer Rundbürste gründlich reinigen Bräterwanne und das Ablaufrohr gründlich mit Wasser abspülen und trockenreiben Ablaufstopfen und Abdeckblech in der Spülmaschine oder mit fettlösendem Reinigungsmittel reinigen 4 2 Edelstahlflächen reinigen Gastronorm Behälter entleeren und reinigen Nach der Anwendung von scharfen Reinigungsmitteln d...

Страница 17: ...gieoptimierungs Anlage kontrollieren Drehschalter für Betriebsart Leistungsstufe ist ausge schaltet Betriebsart Leistungsstufe und Tempera tur einstellen Der Drehschalter für Wasserzulauf ist eingeschaltet aber es läuft kein Wasser ein Bauseitiger Wasserhahn ge schlossen Bauseitigen Wasserhahn öffnen Drehschalter für Temperatur steht auf 0 Stellung Drehschalter für Temperatur auf nied rigste Tempe...

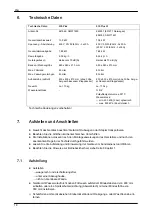
Страница 18: ...200 kPa 2 bar dynamisch max 600 kPa 6 bar statisch Technische Änderungen vorbehalten 7 Aufstellen und Anschließen D Gewicht des Gerätes beachten Gerät mit Hubwagen oder Stapler transportieren D Beachten Sie die örtlichen küchentechnischen Vorschriften D Die Installationen müssen nach den Montageanweisungen des Herstellers und nach den anerkannten Regeln der Technik durchgeführt werden D Lassen Sie...

Страница 19: ...ig vom Netz trennen Die Kontaktöffnung muss dabei mindestens 3 mm betragen D Aus Sicherheitsgründen empfehlen wir Ihnen den Einbau eines Fehlerstrom Schutz schalters FI 10 mA D Für den elektrischen Anschluss die Daten auf dem Typenschild beachten D Das Gerät in das Potentialausgleichsystem einbeziehen Die Wirksamkeit muss nach VDE 0 190 geprüft sein 7 3 Anschlussleitungen anklemmen Schrauben lösen...

Страница 20: ...ankungen auszugleichen und Spritzen beim Einfüllvorgang zu vermeiden bauseits einen Druckminderer vorschalten und auf 200 kPa einstellen D Wir empfehlen Ihnen bei einer Wasserhärte über 10 dKH einen Wasserenthärter im Wasserzulauf zu installieren D Zwischen Wasserenthärter und Gerät darf keine Anschlussleitung aus verzinkten Ei senrohren oder ähnlichem Material verwen det werden sonst Rostgefahr D...

Страница 21: ...tro Fachleuten durchge führt werden D Nur Original Zubehör und Original Ersatzteile verwenden D Wir empfehlen Ihnen einen Wartungsvertrag mit dem Kundendienst abzuschließen Datum Name des Kundendienstes Bemerkungen 9 Hinweise zur Entsorgung D Bei ausgedienten Geräten Netzstecker ziehen Netzkabel abtrennen und entfernen D Altgeräte sind kein wertloser Abfall Durch umweltgerechte Entsorgung können w...

Страница 22: ...aming and keeping food warm working at different temperatures ranging from 60 C to 250 C E g for preparing soups sauces ragouts goulash etc Use as a griddle plate for everything requiring a short fry e g steaks schnitzel filets fish mushroom ra gouts etc Note The appliance has been manufactured in accordance with the VDE GS and European norm EN Entering the type plate data Enter the type plate dat...

Страница 23: ...oubleshooting switch off the appliance and notify customer services Risk of injury D The appliance must not be used for deep frying D Scalding hazard Spraying hot edible oil or fat Do not add water to heated edible oil or fat D Scalding hazard Sudden rising hot vapour Proceed with the appropriate caution when adding water to the heated frying surface D Never allow water to run into the pan tub whi...

Страница 24: ...wise damage the hinge D Do not spray off or clean the appliance with water hoses high pressure cleaners high pressure steam cleaners or general steam cleaners D Do not spray foam cleaner on front panels and appliance panels The foam cleaner gets into the smallest of cracks and destroys the electrical and electronic systems D If the appliance has not been used for a long time have it checked for fu...

Страница 25: ... a sieve Metal cover sheet over drain Holder Inserting the Gastronorm container For safe removal of the Gastronorm con tainer without emptying cart Flip both bow type handles forwards before inserting the Gastronorm container Place the cover for the Gastronorm con tainer with the cover opening forwards onto the Gastronorm container Insert the Gastronorm container into the guide up to the stop or p...

Страница 26: ... chapter 2 3 1 see page 27 chapter 2 3 2 2 3 1 Instructions on frying and grilling small quantities Please observe the following operating instructions in order to save energy and to avoid the unnecessary heating up or overheating of unused frying surfaces Set rotary switch for Power levels and modes to Frying D 2 3 of frying surface right are heated up with full heating capacity Prepare food to b...

Страница 27: ...on for cooking 60 to 100 C Temperature selection for frying 60 to 250 C Mode Frying Power 100 on 2 3 of frying surface right Temperature selection 60 to 250 C Mode Frying or cooking Power 100 Temperature selection for cooking 60 to 100 C Temperature selection for frying 60 to 250 C Saving energy Energy saving preparation has the option of individually selecting the power levels in response to the ...

Страница 28: ...ity of water has run in or the highest fill level level mark 6 has been reached turn back the Water supply rotary switch by one click stop to zero Setting the temperature and the power level Set the desired temperature using the rotary switch for Mains on and temperature set ting Set the desired power and mode using the rotary switch for Power levels and modes D The yellow indicator lamp lights up...

Страница 29: ...After each frying session remove the coating from the frying surface Cooking D Examples Hard remains of soups sauces ragouts goulash and from all other cooking me thods Cooking off large quantities of side dishes or vegetables in perforated Gastronorm trays D For cooking fill the pan tub with approx 10 litres of water to at least a quarter of the speci fied filling amount D In the appliance tub th...

Страница 30: ... Scald hazard While draining foods check that the capacity of the Gastronorm con tainer is large enough The pan tub has three times the holding capacity of the 1 1 Gastro norm container Open the drain tap using the lever Crush hazard Do not reach into the drain opening while closing the drain tap Before closing the drain tap check whether the drain is clear of e g bones or food re mains Remove ful...

Страница 31: ...gh pressure cleaners high pressure steam cleaners or general steam cleaners D Follow the instructions supplied by the manufacturer of the cleaning agent D Do not use any scouring cleaning agent or damaged cleaning scrapers These cause scrat ches D Stainless steel must not be in prolonged contact with concentrated acids vinegar essence salt solution mustard or spice mixtures otherwise the protectiv...

Страница 32: ...low the cleaning solution to boil briefly Drain off cleaning residues into the Gastro norm container Clean the drain pipe tho roughly with a round brush while draining the rinsing agent suds Clean drain plug and metal cover sheet in the dishwasher or by hand with a grease cutting cleaning agent Remove dark spots on the surface with a vinegar cleaner and a stainless steel pot cleaner Rinsing and ru...

Страница 33: ...Gastronorm container Clean the drain pipe thoroughly with a round brush while draining the rinsing agent suds Rinse pan tub and drain pipe thoroughly with water and rub dry Clean drain plug and metal cover sheet in the dishwasher or with a grease cutting cleaning agent 4 2 Cleaning stainless steel surfaces Empty and clean the Gastronorm container After using pungent cleaning agents wash off the cl...

Страница 34: ...k the energy optimising unit Rotary switch for mode power level is switched off Set mode power level and temperature The rotary switch for the water sup ply is switched on but no water is running On site water tap is shut Open the water tap provided on site Rotary switch for temperature stands at 0 Set rotary switch for temperature to the lowest temperature Water only runs slowly The spray regulat...

Страница 35: ...ressure min 200 kPa 2 bar dynamic min 600 kPa 6 bar static We reserve the right to make technical changes 7 Installation and connection D Note the weight of the appliance Transport the appliance with a lift carriage or a forklift truck D Follow the local technical regulations for kitchens D Installations must be carried out in accordance with the manufacturer s instructions following accepted tech...

Страница 36: ...ntact opening must be at least 3 mm D For safety reasons we recommend installing a 10 mA residual current circuit breaker RCCB D Observe the data on the type plate when making the electrical connection D Integrate the appliance into the equipotential bonding system Its efficiency must be checked in accordance with VDE 0 190 7 3 Connecting cables Loosen screws and remove cover You require an energy...

Страница 37: ... for pressure fluctua tions and to avoid spraying when filling con nect a pressure reducing valve in series on site and set to 200 kPa D If the water hardness is greater than 10 dKH we recommend installing a water softening device in the water supply D There must be no connecting pipes made from galvanized iron or similar material bet ween the water softening device and the ap pliance otherwise th...

Страница 38: ...ectri cians D Only use original accessories and original spare parts D We recommend agreeing a maintenance contract with customer service Date Customer service name Remarks 9 Notes on waste disposal D Remove the mains plug on appliances no longer in use Separate and remove the mains cable D Old appliances are not worthless rubbish Valuable raw materials can be recovered from such appliances by env...

Страница 39: ... températures de 60 C à 250 C Par exemple pour la préparation de soupes sauces ragoûts goulaschs etc Utilisation possible comme plaque de cuisson pour tous les aliments saisis tels que les steaks escalopes filets poissons poêlées de champignons etc Remarque Cet appareil a été conçu selon les prescriptions de la VDE GS et la norme européenne EN Inscription des caractéristiques sur la plaque signalé...

Страница 40: ...l appareil et en informer le service après vente Risques de blessures D Ne pas utiliser l appareil comme friteuse D Risques de brûlure Projections d huile ou de graisse alimentaire chaude Ne pas jeter d eau sur de l huile ou de la graisse alimentaire chaude D Risques de brûlure Dégagement soudain de vapeur chaude La plus grande prudence est de mise lors de l ajout d eau sur un plan de cuisson chau...

Страница 41: ...dommagées D Ne jamais pulvériser ou nettoyer l appareil avec un tuyau d eau un nettoyeur haute pression un nettoyeur haute pression à vapeur ou un nettoyeur à vapeur D Ne pas pulvériser de détergent moussant sur les panneaux avant et les recouvrements des appareils Le détergent moussant pénètre dans les plus petites fentes et détruit les élé ments électriques et électroniques D Après un arrêt prol...

Страница 42: ...ré pour la cuisson et le côté per foré comme passoire Tôle de recouvrement sur l évacuation Support Mise en place du bac Gastronorm Pour un retrait en toute sécurité du bac Gastronorm sans chariot d évacuation Rabattre les deux poignées vers l avant avant de mettre le bac Gastronorm en place Mettre le couvercle du bac Gastronorm en place sur le bac Gastronorm ouverture vers l avant Faire glisser l...

Страница 43: ...tre 2 3 2 page 44 2 3 1 Consignes d utilisation pour faire sauter et griller de petites quantités Respecter les consignes d utilisation suivantes en vue d économiser de l énergie et d éviter toute procédure de chauffage ou surchauffe inutiles de surfaces non utilisées de la sauteuse Régler le bouton de réglage Niveaux de puissance et modes de fonctionnement sur Sauter D 2 3 du plan de cuisson à dr...

Страница 44: ...Cuire de 60 à 100 C Sélection de la température en mode Braiser de 60 à 250 C Mode de fonctionnement Sauter Puissance 100 sur 2 3 du plan de cuisson à droite Sélection de la température de 60 à 250 C Mode de fonctionnement Sauter ou Cuire Puissance 100 Sélection de la température en mode Cuire de 60 à 100 C Sélection de la température en mode Braiser de 60 à 250 C Economie d énergie Préparation éc...

Страница 45: ...au de remplissage maximum atteint marque 6 replacer le bouton de réglage Arrivée d eau sur zéro en le tournant d un cran Réglage de la température et du niveau de puissance Régler la température souhaitée au moyen du bouton de réglage Mise en marche et réglage de la température Régler la puissance et le mode fonction nement souhaité au moyen du bouton de réglage Mise en marche et réglage de la tem...

Страница 46: ...s la cuve de la sauteuse D Après chaque utilisation retirer les dépôts du plan de cuisson Cuire D Exemples Préparation de soupes sauces ragoûts goulaschs et autres méthodes de cuis son Cuisson de grandes quantités d accompagnements ou de légumes dans des bacs Gastronorm perforés D Pour la cuisson remplir la cuve de la sauteuse d env 10 litres d eau jusqu à au moins un quart de la quantité nominale...

Страница 47: ...ts vérifier si le bac Gastronorm dispose encore d une capacité suffisante La contenance de la cuve de la sauteuse est égale à trois fois celle d un bac Gastronorm 1 1 Ouvrir le robinet d évacuation au moyen de la manette Risques d écrasement Ne pas toucher à l ouverture d évacuation à la fermeture du ro binet d évacuation Avant de fermer le robinet d évacuation vérifier si l évacuation ne contient...

Страница 48: ...toyeur haute pression un nettoyeur haute pression à vapeur ou un nettoyeur à vapeur D Respecter les instructions d utilisation du fabricant du produit de nettoyage D Ne jamais utiliser de produits abrasifs et de grattoirs endommagés Ceux ci peuvent rayer l appareil D L acier inoxydable ne doit pas rester trop longtemps en contact avec des acides concentrés du vinaigre concentré de la moutarde ou d...

Страница 49: ...lir la solution de nettoyage Evacuer l eau sale dans les bacs Gastro norm Pendant la vidange du produit de rinçage nettoyer soigneusement le tuyau d évacuation au moyen d une brosse ronde Nettoyer la tubulure d évacuation et la tôle de recouvrement au lave vaisselle ou à la main au moyen d un produit de nettoyage dégraissant Eliminer les taches foncées à la surface au moyen d un produit de nettoya...

Страница 50: ...ndant la vidange du produit de rinçage nettoyer soigneusement le tuyau d évacuation au moyen d une brosse ronde Rincer soigneusement la cuve de la sauteuse et le tuyau d évacuation et les sécher Nettoyer la tubulure d évacuation et la tôle de recouvrement au lave vaisselle ou au moyen d un produit de nettoyage dégraissant 4 2 Nettoyage des surfaces en acier inoxydable Vider et nettoyer le bac Gast...

Страница 51: ...ergie Le bouton de réglage du mode de fonctionnement de la puissance est éteint Régler le mode de fonctionnement le ni veau de puissance et la température Le bouton de rég lage de l arrivée d eau est allumé mais l eau ne s écoule pas Le robinet d eau du côté de l installation est fermé Ouvrir le robinet d eau du côté de l installation Le bouton de réglage de la température est réglé sur 0 Régler l...

Страница 52: ...sion sta tique Sous réserve de modifications techniques 7 Mise en place et raccordement D Respecter le poids de l appareil Transporter l appareil au moyen d un chariot élévateur ou à fourche D Respecter les prescriptions locales applicables pour les cuisines D Les installations doivent être réalisées conformément aux instructions de montage du fabri cant et dans le respect des règles techniques co...

Страница 53: ...s doit être d au moins 3 mm D Pour des raisons de sécurité nous vous recommandons l installation d un commutateur de protection FI 10 mA D Respecter les caractéristiques de la plaque signalétique lors du raccordement électrique D Intégrer l appareil au système d équipotentialité Son efficacité doit être contrôlée conformé ment à la VDE 0 190 7 3 Connexion des conduites de raccordement Desserrer le...

Страница 54: ...e D Placer un réducteur de pression en amont du côté d installation et le régler sur 200 kPa en vue de compenser les variations de pression et éviter les projections lors de la procédure de remplissage D Nous vous recommandons d installer un adoucisseur d eau dans l arrivée d eau lors que la dureté de l eau est supérieure à 10 dKH D Ne pas utiliser de conduites de raccorde ment en fer galvanisé ou...

Страница 55: ...réparation D Utiliser uniquement des accessoires et pièces de rechange originaux D Nous vous recommandons de conclure un contrat d entretien avec le service après vente Date Nom du service après vente Remarques 9 Consignes relatives à l élimination D Retirer la fiche de contact des appareils usagés Débrancher le câble de raccordement au réseau et le retirer D Les appareils usagés peuvent être recy...

Страница 56: ...959340 4 2008 1 19 SALVIS AG Nordstrasse 15 CH 4665 Oftringen Tel 41 0 62 788 18 18 Fax 41 0 62 788 18 98 Internet www salvis ch E Mail info salvis ch ...

Отзывы: