background image

O

I

II

Posición del 

interruptor

III

Apagado

300
300

Caudal de aire en 

l/min

550

Apagado

50 constante

60-600

Temperatura en 

grados “C”

60-600

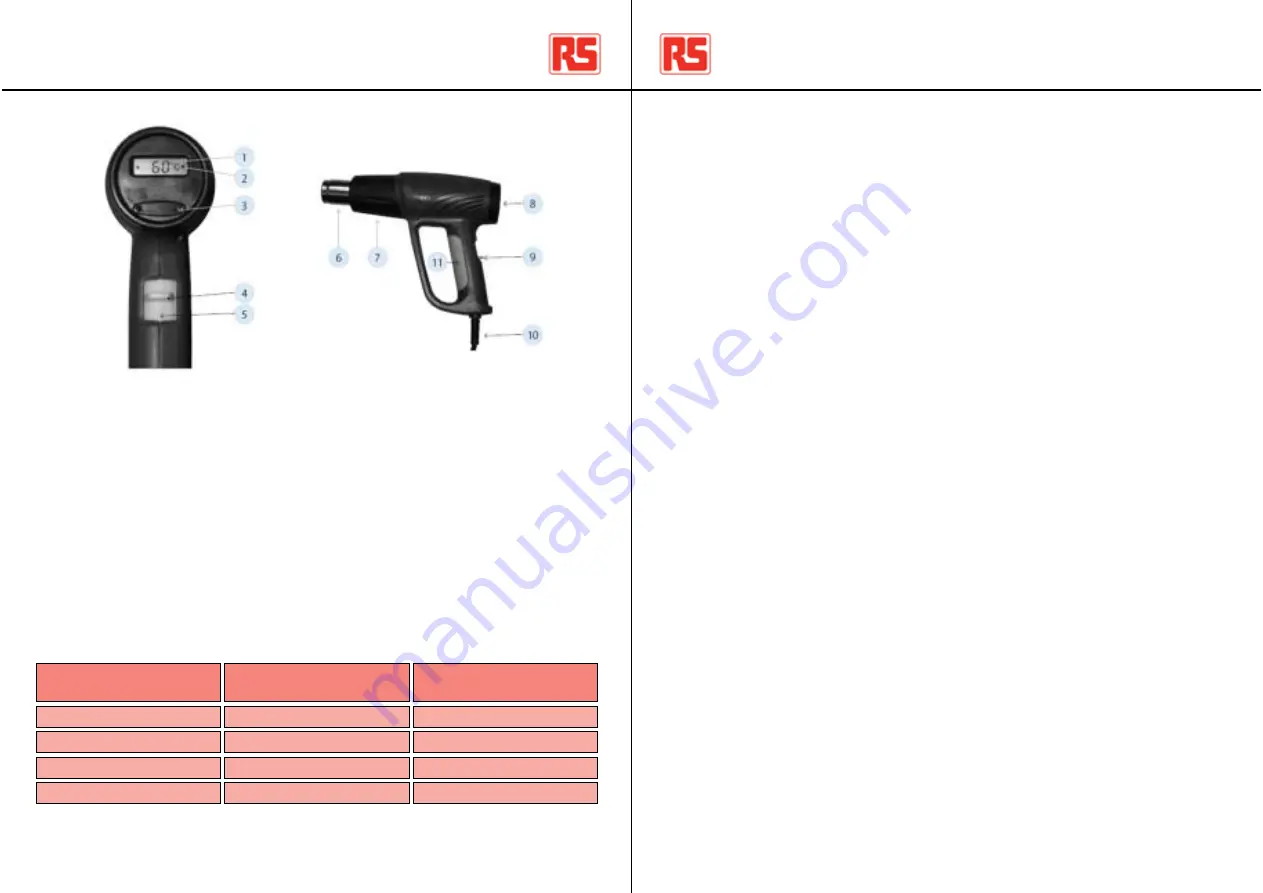
1.   

Pantalla digital

2.   

Flechas parpadeantes que indican la temperatura

3.   

Tecla de ajuste de la la temperatura

4.   

Interruptor de 4 posiciones para potencia / caudal de aire

5.   

3 posiciones marcadas para el caudal de aire

6.   

Boquilla de metal para caudal de aire

7.   

Protección del manguito (separable)

8.   

Superficie del soporte vertical

9.   

Interruptor de 4 posiciones para la potencia / caudal de aire

10. 

Cable de alimentación

11. 

Mango de agarre suave

26

06/05/2009 Version No. 1

Decapadores por aire caliente / ES

Please read and follow these instructions when using the Heat Gun.

Failure to follow these instructions may result in the tool becoming an unnecessary source of 

danger and may cause personal injury.

The Heat Gun should not be used when the tool is wet or damp or in a wet or damp 

atmosphere

Do not use the tool in the rain

Do not use the tool in the presence of an explosive atmosphere

Take care when using the tool near flammable materials and ensure that hot air is not 

directed for too long in the same spot.

Ensure that you are aware of flammable materials, which may be out of sight and may be 

affected indirectly by conducted heat.

Plastic, Paint, Varnish and similar materials can emit toxic gases when heated. Ensure that 

the area is well ventilated when working with these materials and suitable protective 

equipment is worn.

Do not allow the power cord to come in contact with heat, oil, corrosive materials or sharp 

edges.

Do not unplug or carry the tool by its power cord.

When using the Heat Gun in its self-standing vertical position, ensure that it is sitting on a 

flat; non-slip, clean, stable surface and the power cable cannot be accidentally snagged.

Accessories should only be fitted to the Heat Gun nozzle when the tool is cold. 

Take care when changing these accessories.

Following use allow the tool to cool completely as per the instructions before replacing in its 

case.

Store the tool in a dry secure location and out of the reach of children.

Please keep these Instructions and Safety Warnings in a safe place

06/05/2009 Version No. 1

7

Heat Gun Safety Information / UK

Содержание 137-159

Страница 1: ...nstrument is warranted to the original purchaser against defects in material and workmanship for one year from the date of purchase During this warranty period RS Components will at its option replace...

Страница 2: ...e ni transporte la herramienta sujetando s lo el cable de alimentaci n Cuando utilice el decapador por aire caliente en su posici n vertical independiente compruebe que se encuentra sobre una superfic...

Страница 3: ...g vertical position on a flat non slip stable surface away from children and people who may be unaware it could be hot 137 165 137 193 137 159 Code 50 600 50 600 50 600 Temperature Range Digital Heat...

Страница 4: ...mperatura en sentido horario hasta que la H se encuentre junto a la punta de flecha Para apagar el decapador por aire caliente se recomienda ajustar primero en la posici n I si se ha estado utilizando...

Страница 5: ...ing 1 in a clockwise direction to increase the temperature Maximum temperature of 600 degrees C is achieved by fully rotating the Temperature Setting Ring in a clockwise direction until H is adjacent...

Страница 6: ...e la boquilla tambi n se puede disminuir en pasos de 10 grados haciendo presi n en la parte izquierda de la tecla se encender n los mismos indicadores hasta que se alcance la nueva temperatura deseada...

Страница 7: ...sive atmosphere Take care when using the tool near flammable materials and ensure that hot air is not directed for too long in the same spot Ensure that you are aware of flammable materials which may...

Страница 8: ...ventuale presenza di materiali infiammabili non a vista e che possono essere indirettamente colpiti dal calore sprigionato Plastica pittura vernice e materiali analoghi possono emettere gas tossici se...

Страница 9: ...Die D sentemperatur kann in Schritten zu 10 Grad gesenkt werden indem auf die linke Seite des Kippschalters gedr ckt wird Auch hier blinken dieselben Anzeigepfeile bis die neue Zieltemperatur erreicht...

Страница 10: ...ello di impostazione temperatura in senso orario fino a posizionare H sulla punta della freccia Per spegnere la pistola termica si raccomanda di portare l interruttore in posizione I se stata utilizza...

Страница 11: ...nd stabil sein Zudem muss sichergestellt werden dass weder Kinder noch Personen Zugang zur Hei luftpistole haben die sich m glicherweise nicht ber die hohen Temperaturen im Klaren sind 60 600 60 600 6...

Страница 12: ...istola termica posizionarla in posizione verti cale senza supporto su una superficie piana antiscivolo stabile fuori dalla portata dei bam bini e da persone non a conoscenza che l utensile potrebbe es...

Страница 13: ...ht zu lang auf dieselbe Stelle gerichtet ist Achten Sie immer auf entflammbare Materialien die sich m glicherweise au erhalb des Blickfelds befinden und indirekt durch W rmeleitung beeintr chtigt werd...

Страница 14: ...vous que vous avez connaissance de la pr sence de mati res inflammables qui peuvent ne pas tre visibles et risquent d tre affect es indirectement par la chaleur conduite Le plastique la peinture les...

Страница 15: ...teinte Vous pouvez galement diminuer la temp rature au niveau de la buse par d cr ment de 10 degr s en appuyant sur le c t gauche du s lecteur les fl ches d indication clignotent alors jusqu ce que la...

Страница 16: ...glissante et stable Tenez le loign des enfants et des personnes qui n auraient pas connaissance de son d gagement de chaleur 60 600 60 600 60 600 Plage de temp rature Pistolet thermique variateur Pist...

Страница 17: ...glissante et stable Tenez le loign des enfants et des personnes qui n auraient pas connaissance de son d gagement de chaleur 60 600 60 600 60 600 Plage de temp rature Pistolet thermique variateur Pist...

Страница 18: ...teinte Vous pouvez galement diminuer la temp rature au niveau de la buse par d cr ment de 10 degr s en appuyant sur le c t gauche du s lecteur les fl ches d indication clignotent alors jusqu ce que la...

Страница 19: ...vous que vous avez connaissance de la pr sence de mati res inflammables qui peuvent ne pas tre visibles et risquent d tre affect es indirectement par la chaleur conduite Le plastique la peinture les...

Страница 20: ...ht zu lang auf dieselbe Stelle gerichtet ist Achten Sie immer auf entflammbare Materialien die sich m glicherweise au erhalb des Blickfelds befinden und indirekt durch W rmeleitung beeintr chtigt werd...

Страница 21: ...istola termica posizionarla in posizione verti cale senza supporto su una superficie piana antiscivolo stabile fuori dalla portata dei bam bini e da persone non a conoscenza che l utensile potrebbe es...

Страница 22: ...nd stabil sein Zudem muss sichergestellt werden dass weder Kinder noch Personen Zugang zur Hei luftpistole haben die sich m glicherweise nicht ber die hohen Temperaturen im Klaren sind 60 600 60 600 6...

Страница 23: ...ello di impostazione temperatura in senso orario fino a posizionare H sulla punta della freccia Per spegnere la pistola termica si raccomanda di portare l interruttore in posizione I se stata utilizza...

Страница 24: ...Die D sentemperatur kann in Schritten zu 10 Grad gesenkt werden indem auf die linke Seite des Kippschalters gedr ckt wird Auch hier blinken dieselben Anzeigepfeile bis die neue Zieltemperatur erreicht...

Страница 25: ...ventuale presenza di materiali infiammabili non a vista e che possono essere indirettamente colpiti dal calore sprigionato Plastica pittura vernice e materiali analoghi possono emettere gas tossici se...

Страница 26: ...sive atmosphere Take care when using the tool near flammable materials and ensure that hot air is not directed for too long in the same spot Ensure that you are aware of flammable materials which may...

Страница 27: ...e la boquilla tambi n se puede disminuir en pasos de 10 grados haciendo presi n en la parte izquierda de la tecla se encender n los mismos indicadores hasta que se alcance la nueva temperatura deseada...

Страница 28: ...ing 1 in a clockwise direction to increase the temperature Maximum temperature of 600 degrees C is achieved by fully rotating the Temperature Setting Ring in a clockwise direction until H is adjacent...

Страница 29: ...mperatura en sentido horario hasta que la H se encuentre junto a la punta de flecha Para apagar el decapador por aire caliente se recomienda ajustar primero en la posici n I si se ha estado utilizando...

Страница 30: ...g vertical position on a flat non slip stable surface away from children and people who may be unaware it could be hot 137 165 137 193 137 159 Code 50 600 50 600 50 600 Temperature Range Digital Heat...

Страница 31: ...e ni transporte la herramienta sujetando s lo el cable de alimentaci n Cuando utilice el decapador por aire caliente en su posici n vertical independiente compruebe que se encuentra sobre una superfic...

Отзывы: