background image


267

Editing a Sample


Over

view

Sound 1

Sound 2

Sound 3

Pad

Sampler

Menu/System

Appendix

Sequencer


You can specify the portion of the sample that will actually sound. 
You can also specify the region that is to be looped.


1.


Select the sample you want to edit, and access the Sample 
Edit screen.


*

For details on how to select a sample, refer to 


“Selecting a Sample”


(p. 263).


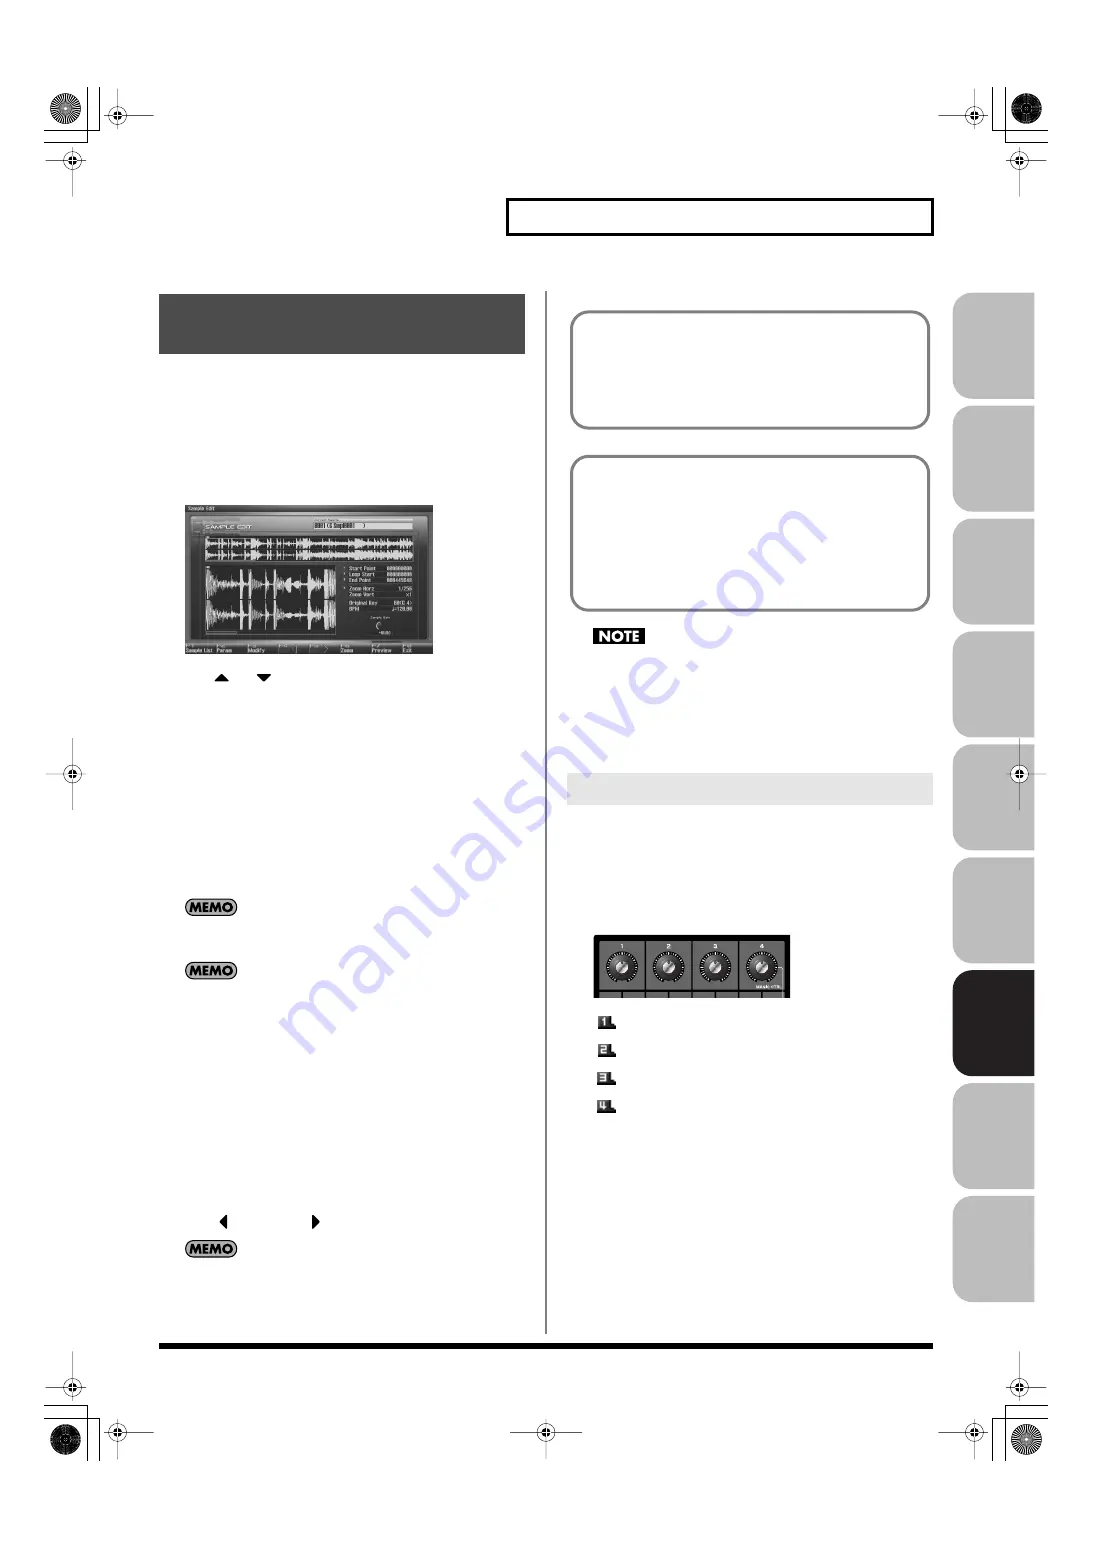
fig.15-003_50


2.


Use 

 or 

 to select the point that you want to set.


Start Point:


This is the point at which playback will start. Set this so that any 
unwanted portion at the beginning of the sample will be 
skipped, and the sound will begin at the desired moment.


Loop Start:


This is the point at which loop playback (second and 
subsequent times) will start. Set this if you want to loop the 
sound from a point other than the start point.


End Point:


This is the point at which playback will end. Set this so that any 
unwanted portion at the end of the sample will not be heard.


By pressing [F7 (Preview)] you can audition the region between 
the start point and end point.


If you hold down [F7 (Preview)] and edit the start/loop/end 
point, the sample will play repeatedly across that point. Since 
the sound in the region you’re specifying will play repeatedly, 
this is a convenient way to check your setting.
(Zooming-in or zooming-out on the waveform will change the 
region that loops.)


3.


Either turn the VALUE dial or use [INC], [DEC] to move the 
point so it’s where you want it to be.


You’ll probably find it convenient to zoom-in when making fine 
adjustments, and zoom-out when making major adjustments (p. 
266).

You can move the point in units of one beat by pressing [F4 

(Beat 

)] or [F5 (Beat 

)]. 


After specifying the start point and end point, you can execute 
Truncate (p. 269) to delete unwanted portions at the beginning 
and end of the sample.


Sample modify menu operations (Chop, Normalize, etc.) apply 
to the entire sample. Even if you specify a start point or end 
point, they will be ignored. If you want to apply the operation 
only to the region between the start point and end point, use 
Truncate to delete unwanted portions of the sample, and then 
perform the sample modify menu operation.

You can use the knobs to edit each point. Using the knobs is 
convenient when you need to make large changes to the value.


1.


Use the CONTROL knobs to specify the following editing 
points.


From the left, the knobs have the following functions.


fig.15-003a


: Start Point

: Loop Start

: End Point

: Zoom-in/zoom-out the horizontal axis of the display


Setting the Start/End Points 

of the Sample


Using the Knobs to Edit the Points

About the beat

Samples contain beat data. Up to 100 beat locations are specified 
for one sample. If the sample contains more than 100 beats, fifty 
beat locations will be specified from the beginning and end of 
the sample, respectively. 

When you want to reset the beat indication 
(Reset Grid function [F7 (Reset Grid)])

From the Sample Edit screen, specify the start point of the 
sample, press [F2 (Sample Param)] to access the Sample Prm 
screen, specify the BPM, and then press [F7 (Reset Grid)]. This 
will reapply the grid to the sample according to the start point 
and BPM you specified. To execute, press [F8 (Execute)].

Fantom-G_r_e.book 267 ページ 2009年7月2日 木曜日 午後2時55分

Содержание Fantom G6

Страница 1: ...04905090 08 02 1N 0 4 9 0 5 0 9 0 0 1 ...

Страница 2: ...ustrial Park Wildey St Michael Barbados TEL 246 430 1100 BRAZIL Roland Brasil Ltda Rua San Jose 780 Sala B Parque Industrial San Jose Cotia Sao Paulo SP BRAZIL TEL 011 4615 5666 CHILE Comercial Fancy II S A Rut 96 919 420 1 Nataniel Cox 739 4th Floor Santiago Centro CHILE TEL 02 688 9540 COLOMBIA Centro Musical Ltda Cra 43 B No 25 A 41 Bododega 9 Medellin Colombia TEL 574 3812529 COSTA RICA JUAN B...

Страница 3: ...om G7 and the Fantom G8 The manual uses the term Fantom G to indicate all these three models 985 The explanations in this manual include illustrations that depict what should typically be shown by the display Note however that your unit may incorporate a newer enhanced version of the system e g includes newer sounds so what you actually see in the display may not always match what appears in the m...

Страница 4: ...ively twist or bend the power cord nor place heavy objects on it Doing so can damage the cord producing severed elements and short circuits Damaged cords are fire and shock hazards 010 This unit either alone or in combination with an amplifier and headphones or speakers may be capable of producing sound levels that could cause permanent hearing loss Do not operate for a long period of time at a hi...

Страница 5: ...lcohol nail polish spray cans etc near the unit Swiftly wipe away any liquid that spills on the unit using a dry soft cloth 101a The unit should be located so that its location or position does not interfere with its proper venti lation 101c This unit for use only with Roland stand KS 18Z Fantom G6 G7 G8 KS G8 Fantom G8 Use with other stands or carts is capable of resulting in instability causing ...

Страница 6: ...g any device other than condenser microphones that require phantom power You risk causing damage if you mistakenly supply phantom power to dynamic microphones audio playback devices or other devices that don t require such power Be sure to check the specifica tions of any microphone you intend to use by referring to the manual that came with it This instrument s phantom power 48V DC 10 mA Max Fant...

Страница 7: ...and for several hours until the condensation has completely evaporated 358 Do not allow objects to remain on top of the keyboard This can be the cause of malfunction such as keys ceasing to produce sound 360 Depending on the material and temperature of the surface on which you place the unit its rubber feet may discolor or mar the surface You can place a piece of felt or cloth under the rubber fee...

Страница 8: ... or subject cards to strong shock or vibration Do not keep cards in direct sunlight in closed vehicles or other such locations storage temperature 25 to 85 C Do not allow cards to become wet Do not disassemble or modify the cards Handling CD ROMs 801 Avoid touching or scratching the shiny underside encoded surface of the disc Damaged or dirty CD ROM discs may not be read properly Keep your discs c...

Страница 9: ... 30 Hold Pedal 31 Control Pedal 31 Overview of the Fantom G 32 How the Fantom G is Organized 32 Basic Structure 32 Different Units of Sound 32 Single Live Studio Modes 33 About Polyphony 34 About Memory 35 About the Internal Effects 36 Types of Effects 36 About the Sequencer 36 Audio and MIDI 36 What is a Song 36 What is a Track 37 Songs and the State of the Sound Generator 37 SMF Standard MIDI Fi...

Страница 10: ... the Live Play Layer Split Screen 59 Selecting a Live Set 60 Selecting Live Sets from the List 60 Using the Live Play Layer Split Screen 61 Selecting a Part 61 Selecting the Part that You want to Sound Keyboard Switch 61 Selecting the Part Played by the Pads 61 Selecting the Sound for a Part 61 Combining and Playing Sounds Together Layer 62 Playing Different Sounds in Different Areas of the Keyboa...

Страница 11: ...t 86 Initializing Patch Tone Settings Patch Initialize Tone Initialize 87 Copying Patch Tone Settings Patch Tone Copy 87 Cautions When Selecting a Waveform 88 Saving Patches You ve Created Write 88 Auditioning the Save Destination Patch Compare 89 Functions of Patch Parameters 89 Settings Common to the Entire Patch General 89 Modifying Waveforms Wave 91 Changing How a Tone Is Sounded TMT 92 Modify...

Страница 12: ...9 Mono Poly Legato 140 Voice Reserve 141 MIDI Rx Filter 141 Selecting the Parameter Controlled by the Realtime Controllers or D Beam Controller Control Setting 142 Keyboard Mode 143 D Beam 143 Knob 145 Slider 145 Switch S1 S2 146 Arpeggio 146 Chord Memory 146 Dynamic Pad 146 Ctrl Switch 147 Changing the Settings of the Patch Assigned to a Part 147 Initializing Live Studio Set Settings Init 148 Sav...

Страница 13: ...ttern Playback 196 Editing the Pad Settings 196 7 TONE SEL SW Using the Pads to Select Tones or Switch Them On Off 197 Checking the Pad Status 197 8 TRACK MUTE Using the Pads to Mute Tracks 197 Checking the Pad Status 197 9 BOOKMARK Using the Pads to Recall Frequently Used Screens 198 Registering a Screen 198 Recalling a Screen 198 10 MIDI TX SW Using the Pads to Turn External MIDI Transmit Channe...

Страница 14: ... a Phrase Load 214 Deleting a Phrase from the Project Delete Phrase 215 Duplicating a Phrase Duplicate 215 Saving a Phrase Save 216 Saving all Phrases Save All 216 Recording MIDI 217 Phrases and Songs 217 Two Methods of Recording 217 Undo function 217 Recording into a Song 218 Selecting a Sound for Recording 218 Erasing the Song Phrases from the Temporary Area Song Clear 218 Specifying the Time Si...

Страница 15: ...gnature of a Phrase Phrase Beat 239 Phrase Modify Menu 239 Aligning a Phrase s Timing Quantize 240 Erasing Unwanted Performance Data Erase 242 Deleting Unwanted Measures Delete 243 Copying Phrases Copy 243 Inserting a Blank Measure Insert 244 Transpose the Key Transpose 244 Changing the Velocity Change Velocity 245 Changing the MIDI Channel Change Channel 246 Modifying the Length of Notes Change D...

Страница 16: ... Emphasis 269 Maximizing the Volume of a Sample Normalize 270 Amp 270 Stretching or Shrinking a Sample Time Stretch 271 Dividing a Sample into Notes Chop 272 Saving a Sample Save 274 Saving all samples Save All 274 Multisample 275 Creating a multisample 275 Creating a multisample in the Patch Edit screen 275 Editing a multisample 276 About the Multisample Edit screen 276 Selecting the notes to edi...

Страница 17: ...gs Settings Common to All Modes 290 How to Make System Function Settings 290 Saving the System Settings System Write 290 Functions of System Parameters 291 Pedal D Beam 291 Keyboard 292 Dynamic Pad 292 Knob Slider 293 Magic Control 294 Switch S1 S2 294 Sync Temp 295 Metronome 297 Sound 297 MIDI 299 USB 300 Scale Tune 300 Preview 300 System Ctrl 301 Screen Saver 301 Input Sampling 301 Startup 302 S...

Страница 18: ...and the Memory 312 Removing the Memory 313 Checking that Memory is Installed Correctly 313 Ajouter de la mémoire 314 Précautions à prendre lors de l ajout de mémoire 314 Installation du module de mémoire 314 Retrait du module de mémoire 315 Troubleshooting 316 Problems Concerning the Entire Fantom G 316 Issues Related to Sound 316 Issues Related to Effects 318 Issues Related to Saving Data 318 Iss...

Страница 19: ...he Fantom G s panels provides an overview of the instrument and explains basic operation Main Features p 20 Panel Descriptions p 22 Making Connections p 25 Overview of the Fantom G p 32 Basic Operation of the Fantom G p 39 Fantom G_r_e book 19 ページ 2009年7月2日 木曜日 午後2時55分 ...

Страница 20: ...very situation It features 256 MB of internal waveform capacity double that of the Fantom X series with broad coverage of everything from acoustic sounds to synth sounds Support for the new ARX series expansion boards featuring the SuperNATURAL sound generator The Fantom G features two slots that support the ARX series which not only allows you to expand the existing sounds but provides an optimal...

Страница 21: ... been enhanced The USB MEMORY connector lets you use USB memory to back up your data The USB MOUSE connector lets you connect a two button wheel mouse for an even more ideal user interface The USB COMPUTER connector handles data transfer between the Fantom G and your computer and also supports USB MIDI and audio This lets the Fantom G connect to various computer based software tools and also lets ...

Страница 22: ...This lets you register favorite sounds for immediate call up a convenient capability for live performances p 54 KEYBOARD ARPEGGIO This turns the arpeggiator on off p 78 HOLD This switches the arpeggiator s Hold function on off p 78 CHORD MEMORY This switches Chord Memory on off p 81 By holding down SHIFT and pressing these buttons you can access the setting screens for chord memory and the arpeggi...

Страница 23: ... p 80 p 82 p 88 p 116 p 148 p 254 p 274 p 290 VALUE Dial Modifies a value By holding down SHIFT and turning the VALUE dial you can modify the value in larger steps CURSOR Buttons These move the cursor up down left right EXIT This returns you to the previous screen or closes an opened window In some screens it cancels the currently executing function ENTER Use this to finalize a value or to execute...

Страница 24: ...nit HOLD Jack An optional pedal switch DP series FS 5U etc can be connected to this jack for use as a hold pedal p 31 This can also be set so it supports the use of half pedaling techniques So after connecting an optional pedal switch DP series etc you can employ pedal work to achieve even finer control in performances in which piano tones are used AUDIO INPUT MIC GUITAR Jack You can connect eithe...

Страница 25: ...to speakers or other devices always turn down the volume and turn off the power on all devices before making any connections to Power outlet Stereo headphones Monitor speakers powered Power amp Mixer etc In order to fully experience the Fantom G s sound we recommend using a stereo amp speaker system If you re using a mono system however make your connections to the Fantom G s OUTPUT A MIX jack L M...

Страница 26: ... Select move the cursor Right click ENTER button list display Wheel VALUE dial scroll Drag move while hold ing down left button Drag the mouse on the area or knob for which you want to input a value Dragging upward or to the right will increase the value and dragging downward or to the left will decrease it Click the button Opens the menu p 280 Click the button EXIT button Click the button Opens t...

Страница 27: ...ot according to the instructions above will result in instability causing possible injury Placing the Fantom G on a Stand Adjust the width of the stand so that the rubber feet of the Fantom G6 G7 straddle the stand Top view Align the front of the Fantom G6 G7 with the front of the stand KS 18Z Adjust so that the height does not exceed 1 meter Adjust the stand to a level no higher than the fourth l...

Страница 28: ...tom G s keyboard gradually increasing the setting of its volume control and then carefully raise the volume of your connected amplifiers or speakers to the desired listening level fig 02 004 1 Before you turn off the power consider these two questions Have the volume controls for the Fantom G and all connected audio devices been turned to their lowest settings Have you saved your Fantom G sounds o...

Страница 29: ...es other than private personal enjoyment is a violation of applicable laws When the Fantom G is powered on when loading a project song 001 the top song in the Song List will be loaded automatically If you don t want a song to be loaded automatically at power on when loading a project delete song 001 as described in Deleting a Song File Song Delete p 210 When you execute a Factory Reset p 284 the d...

Страница 30: ...e keyboard in one octave units over a range of 3 octaves Use KEYBOARD OCT or OCT at the left of the screen to make the desired setting To return to the original setting press both buttons simultaneously Transpose You can transpose the pitch of the keyboard in semitone units 5 6 At the left of the display turn on the KEYBOARD TRANSPOSE button and then use the OCT or OCT button to specify the desire...

Страница 31: ...ries is connected to the rear panel PEDAL CONTROL jack 1 2 you can use the pedal to control the volume or various functions fig 02 011 For details on the setting refer to p 291 Roland Use only the specified expression pedal or pedal switch EV 5 DP series BOSS FS 5U sold separately By connecting any other expression pedals you risk causing malfunction and or damage to the unit The way in which the ...

Страница 32: ...l that makes up each patch fig 04 002 j A tone consists of the following five elements WG Wave Generator This selects the PCM waveform wave that is the basis of the sound and specifies how its pitch will change All of the patches built into the Fantom G consist of combinations of tones that are based on PCM waveforms waves A rhythm tone percussion instrument sound contains four wave generators TVF...

Страница 33: ... a single piano organ etc Choose this mode when you want to edit a patch to create your own original sound Live mode Live mode is designed for live performance It lets you play up to eight patches or either rhythm sets or sample sets simultaneously For example you can create layers p 62 in which a piano sound and strings sound are heard simultaneously or splits p 62 in which your right hand plays ...

Страница 34: ... be turned off starting with the note having the lowest priority of the currently sounding notes This priority is specified by the Patch Priority setting p 90 You can choose either LAST or LOUDEST as the patch priority If you choose LAST notes will be turned off starting with the first played of the currently sounding notes when you exceed the 128 note limit If you choose LOUDEST notes will be tur...

Страница 35: ... FAT or FAT32 file system If you re using Mac OS X format the USB memory using the MS DOS file system FAT32 USB storage You can use a USB cable to connect the Fantom G to your hard disk and save back up projects from internal memory or USB memory to the hard disk of your computer p 285 Samples created using the Fantom G can also be used by software on your computer or conversely you can use your c...

Страница 36: ...rnal input You can choose from six types including equalizer and compressor The Fantom G s sequencer can record audio and MIDI Audio samples Audio is a recording of the sound from a mic or portable audio player connected to the Fantom G s input jacks The recorded audio data is called a sample You can create a song simply by placing samples in an audio track MIDI phrases MIDI records performance da...

Страница 37: ... use phrases to record performance data for use in a live performance You can also use phrases to record your musical ideas Tempo track The tempo track records tempo changes for the song Use it when you want the tempo to change during the song If the tempo is going to stay the same from the beginning to the end of the song you can ignore the tempo track When you record a song on the Fantom G the t...

Страница 38: ...n the same way Samples A sample refers to a waveform wave produced by sampling on the Fantom G A sample consists of waveform data together with parameters such as a start point loop start and loop end The Fantom G can hold up to 2 000 samples for a single project fig 04 011 j About the Sampling Section Sample Sampling Drum sound Sample list 0001 0002 2000 User Sample Wave sample Automatically adde...

Страница 39: ... combining multiple sounds patches rhythm sets sample sets so that you can play them in a live performance You can layer patches so that they sound simultaneously or split them across the keyboard so that they can be played by separate hands To select Live mode 1 Press LIVE fig 04 015_50 Playing in Live Mode p 58 Studio mode This mode is for recording a song using multiple sounds patches rhythm se...

Страница 40: ...ht If you hold down a cursor button and then press the opposite cursor button the cursor will move more rapidly in the direction of the button you pressed first In some cases pressing ENTER while the cursor is displayed will show a list of the parameters you can select This is a convenient way to see the choices you have When a list is displayed you can also use the pads to input your choice p 41 ...

Страница 41: ... if you hold down SHIFT while you press INC or DEC Using the mouse for input Drag up down or left right on the value or knob Dragging up or to the right will increase the value and dragging down or to the left will decrease the value Using the pad for numeric input If you press the NUMERIC pad button the pads will operate as numeric keys Each pad will enter the following values When you ve entered...

Страница 42: ...Cancel Cancels the name entry procedure F8 OK Confirms the name Move the cursor Switch between uppercase and lowercase letters You can use the following characters space A Z a z 0 9 When assigning a name to a song file you can t use spaces lowercase letters or certain symbols Using a mouse to input characters If you re using a USB mouse you can enter characters using a virtual keyboard 1 Click the...

Страница 43: ... Mode Pad number Pad mode Explanation Page reference 1 SAMPLE PAD Play a sample set p 191 2 RHYTHM Play a rhythm set p 192 3 CHORD MEMORY Switch the chord form of the Chord Memory function p 81 p 193 4 ARPEGGIO Switch the style of the Arpeggio function p 78 p 193 5 RPS Play phrases p 194 6 RHYTHM PTN Play rhythm patterns p 196 7 TONE SEL SW Act as tone select and on off switches p 197 8 TRACK MUTE...

Страница 44: ... select the screen to which you want to jump then press F8 Select If you decide to cancel press F7 Cancel List of shortcut menu Shortcut Menu Menu Page Studio Play Live Play Single Play p 66 p 58 p 46 Patch Zoom Edit p 84 Patch Pro Edit p 86 Song Play Song Edit p 205 p 232 Sample Edit p 266 Effects Routing p 151 Sampling p 260 Input Setting p 258 Digital USB Input Level p 301 Master Level p 297 Pa...

Страница 45: ...ator Section 1 Playing Sounds This chapter explains the three modes in which the Fantom G s sound generator can operate Single Mode p 46 Live Mode p 58 Studio Mode p 66 Fantom G_r_e book 45 ページ 2009年7月2日 木曜日 午後2時55分 ...

Страница 46: ... p 50 Number Explanation Page Indicates the current sound generator mode p 39 Indicates the on off status of each effect PFX Patch multi effect MFX1 Multi effect 1 MFX2 Multi effect 2 IFX Input effect CHO Chorus REV Reverb MAS Mastering effect p 150 Indicates the current location of the song and the status of the sequencer p 205 The Menu Exit Shortcut buttons for the USB mouse p 26 Indicates selec...

Страница 47: ... Fantom G includes 256 preset patches USAM User Sample This bank lets you play the Fantom G s internal samples 1 Press SINGLE to access the Single Play screen fig 05 001 e 2 Press CURSOR to move the cursor to the patch bank Turn the VALUE dial or use INC DEC to choose the patch bank USER User PRST Preset GM GM GM2 USAM User Sample Make sure that the patch type is set to Patch If this is set to Rhy...

Страница 48: ...ories for rhythm sets or sample sets Selecting Patches by Category Patch Finder Patch number Patch name Patch type Patch bank Patch category Category Contents No Assign No assign PNO AC Piano Acoustic Piano EP EL Piano Electric Piano KEY Keyboards Other Keyboards Clav Harpsichord etc BEL Bell Bell Bell Pad MLT Mallet Mallet ORG Organ Electric and Church Organ ACD Accordion Accordion HRM Harmonica ...

Страница 49: ...ch category Phrase Preview By pressing F6 User Group you can register a frequently used sound in the user group For details refer to Registering a sound in the User Group screen p 201 If you re using a USB mouse you can click the keyboard symbol in the screen and search using the virtual keyboard that appears in the screen 5 Press F8 Select to confirm your patch selection The Fantom G allows you t...

Страница 50: ...us voices You can also use the pads to select tones and switch them on off p 197 When using a patch for a naturally monophonic instrument such as sax or flute it is effective to play in mono 1 Press SINGLE to access the Single Play screen 2 Press PATCH twice to access the Patch Pro Edit screen 3 Press F1 Up or F2 Down to select the Solo Porta tab A screen like the one shown below appears fig 05 01...

Страница 51: ...Control The Control Setting screen will appear 3 Press F1 Up or F2 Down to select the parameter group 4 Use CURSOR to move the cursor to the parameter 5 Either turn the VALUE dial or use INC DEC to set the value 6 If you want to keep the settings press F7 Sys Write When Single mode is selected controller settings cannot be saved for each individual patch Controller settings are saved as system set...

Страница 52: ...esigned to transcend differences between makers and types of devices these rhythm sets cannot be overwritten However you can modify the settings of the currently selected rhythm set and then save the modified settings in User bank The Fantom G includes nine preset rhythm sets 1 Press SINGLE to access the Single Play screen fig 05 023 efig 05 023 e Make sure that the Patch Type is set to Rhythm If ...

Страница 53: ...Sample If this is set to Patch or Rhythm use CURSOR to move the cursor to the patch type and turn the VALUE dial or press INC DEC to select Sample 2 Press CURSOR to move the cursor to the sample set number 3 Turn the VALUE dial or press INC DEC to select the sample set number 4 Play the keyboard to hear the sound For a sample set the sixteen sample tones are mapped to keys B3 D5 Playing a Sample S...

Страница 54: ...Favorite Play screen to recall sounds 1 Press FAVORITE so it s lit Each time you press FAVORITE you will alternate between the Favorite Play screen FAVORITE lit and the Favorite Edit screen FAVORITE blinking 2 Press or to select the bank that you want to recall 3 Use F1 1 F8 8 to select the step number that you want to recall If you want to select 9 16 hold down SHIFT and press F1 9 F8 16 The sele...

Страница 55: ... a registered sound to a different step 1 In the Favorite Edit screen press or to move the cursor to the step at which the sound you want to move is registered 2 While holding down SHIFT press or to move the sound Here s how to remove a registered sound from the favorites list 1 In the Favorite Edit screen press or to move the cursor to the step whose registration you want to remove 2 Press F7 Rem...

Страница 56: ... be displayed in the Favorite screen 1 Use the USB Storage function to place the text file in the IMPORT folder of the Fantom G s internal memory or the USB memory Exchanging Files with Your Computer USB Storage p 285 2 Access the Favorite Edit screen and press F1 Bank or F2 Bank to select the bank in which you want to display the text 3 Press F6 Util Menu The Favorite Utility Menu window will app...

Страница 57: ...u window will appear 3 Press or to select Remove Text and then press F8 Select A message will appear and the text will be removed from the selected bank Here s how to switch the display font of the imported text The display font will switch each time you perform the following steps 1 Press F6 Util Menu The Favorite Utility Menu window will appear 2 Press or to select Font and press F8 Select The d...

Страница 58: ...T EXP1 EXP2 EXT is turned on for even one part the current part will not sound If you want to sound the current part turn off the keyboard switch for all parts To access the Live Play Layer Split Screen use the following procedure 1 Press LIVE You will enter Live Mode and the Live Play Layer Split Screen appears fig 04 015_50 F key operations in the Live Play Layer Split screen Part group Number o...

Страница 59: ...ive set p 60 Indicates the pad mode p 188 Indicates selects the type bank number and name of the patch rhythm set or sample set for each part p 61 Indicates changes the keyboard switch setting p 61 Indicates changes the key range p 62 Indicates the key range that the Fantom G6 G7 G8 can play Indicates the functions assigned to the realtime con trol sliders 1 8 knobs 1 4 and the S1 S2 switch es In ...

Страница 60: ... Preset 4 Press CURSOR to move the cursor to the live set number 5 Turn the VALUE dial or press INC DEC to select the live set number You can display a list of live sets and select a live set from that list 1 Press LIVE 2 Press F5 LiveSet List The Live Set List screen appears fig 08 004_50 3 Turn the VALUE dial or press or to select the live set 4 Press F8 Select to close the Live Set List screen ...

Страница 61: ... the keyboard switch for more than one part By pressing F6 you can switch to a screen that shows only the parts whose keyboard switch is on The current part will not sound if even one keyboard switch is on If you want to hear the current part turn off the keyboard switch for all parts Use the pad switch to select the part whose rhythm set or sample set will be played by the pads 1 As described in ...

Страница 62: ...ing the key range of each part in the layer results in a split 1 Press LIVE to access the Live Play Layer Split Screen 2 Use CURSOR to move the cursor to KBD and press INC to turn on the keyboard switch for the parts you want to hear 3 Move the cursor to Lower and set the lower limit of the keys that will play the part Move the cursor to Upper and set the upper limit of the keys that will play the...

Страница 63: ...ist Selects the patch sound assigned to each part p 61 F4 Exit Returns to the previous screen F5 LiveSet List Selects a live set p 60 F6 Switches between the Mixer 1 2 screens F7 Selects the eight parts that will be con trolled by the sliders A frame is shown around the currently selected parts By moving this frame outside the screen you can switch the part group that is dis played F8 Part Group E...

Страница 64: ...ting Patches from the List p 49 In the Layer Edit screen you can set the following parameters for each part 1 Press LIVE and then press F8 Layer Edit to access the Layer Edit screen 2 Use CURSOR to move the cursor to the parameter you want to edit 3 Turn the VALUE dial or use INC DEC to set the desired value Using the Layer Edit Screen F key Explanation F3 Internal Internal internal sound generato...

Страница 65: ...roller Control Setting p 142 For details regarding effect settings refer to the pages shown below Making Effect Settings p 151 Applying Effects in Live Mode p 151 For details refer to How Do I Adjust the Volume p 298 Refer to Creating a Live Studio Set p 132 Performing with the Arpeggio Performing with the Realtime Controllers and D Beam Controller Setting Effects Adjusting the Master Level Making...

Страница 66: ...following procedure 1 Press STUDIO You will enter Studio Mode and the Studio Play Screen appears fig 04 015_50 F key operations in the Studio Play screen In the Studio Play screen pressing the F6 a number of times will display the controller status the functions assigned to sliders 1 8 knobs 1 4 switches S1 S2 and the D Beam controller and the Bend Mode of the pitch bend lever Pressing F6 cycles y...

Страница 67: ... fig 08 003 e 3 Turn the VALUE dial or press INC DEC to select a studio set bank USER User PRST Preset 4 Press CURSOR to move the cursor to the studio set number 5 Turn the VALUE dial or press INC DEC to select the studio set number Functions in the Studio Play Screen Number Explanation Page Indicates the current sound generator mode p 39 Indicates the on off status of each effect PFX Patch multi ...

Страница 68: ... modify are temporary and will be lost if you turn off the power switch the tone generator mode or select a different sound If you want to keep the modified sound you must save it in the User bank Saving a Live Studio Set You ve Created Write p 148 The currently selected part is called the current part 1 Press STUDIO The Studio Play screen appears 2 Use CURSOR to select the part The selected part ...

Страница 69: ...n part groups refer to Switching the Displayed Part Group p 67 Use F6 to switch between Mixer 1 2 1 Parts whose Recording Switch is off will not be recorded to audio tracks of the sequencer Nor will they be sampled You can turn this off for a part that you want to hear but not record as audio Normally you will leave this turned on Effects will not be applied to a part whose Recording Switch is off...

Страница 70: ...s regarding effect settings refer to the pages shown below Making Effect Settings p 151 Applying Effects in Studio Mode p 154 For details refer to How Do I Adjust the Volume p 298 Refer to Creating a Live Studio Set p 132 Performing with the Arpeggio Performing with the Realtime Controllers and D Beam Controller Setting Effects Adjusting the Master Level Making Detailed Settings for a Studio Set F...

Страница 71: ...tion 2 Controlling Sounds This chapter explains the realtime controllers the arpeggiator and the chord memory function Real Time Controller p 72 Arpeggios p 78 Chord Memory p 81 Fantom G_r_e book 71 ページ 2009年7月2日 木曜日 午後2時55分 ...

Страница 72: ...pads to produce sound place your hand above the D Beam controller and move it slowly up and down An effect will be applied to the sound depending on the function that is assigned to the D Beam controller 4 To turn off the D Beam controller once again press the button you pressed in step 2 so the indicator goes out If live mode is selected the D Beam controller on off setting is saved for each live...

Страница 73: ...selected this is saved as part of the system settings If you want to save the settings press F7 Sys Write Solo Synth On the Fantom G you can play a monophonic synthesizer whose pitch is controlled by the D Beam 1 Hold down SHIFT and press D BEAM SOLO SYNTH 2 Move the cursor to the parameter that you want to set and turn the VALUE dial or press INC DEC to make the setting 3 If you want to save the ...

Страница 74: ...Filter This reduces the volume of all frequencies above the cutoff frequency Cutoff Freq BPF Band Pass Filter This leaves only the frequencies in the region of the cutoff frequency and cuts the rest HPF High Pass Filter This cuts the frequencies in the region below the cutoff frequency PKG Peaking Filter This emphasizes the frequencies in the region of the cutoff frequency Cutoff Selects the frequ...

Страница 75: ... an octave Range Min Specify the lower limit of the range of the D Beam controller Value 0 127 Range Max Specify the upper limit of the range of the D Beam controller By setting Range Max below Range Min you can invert the range of change Value 0 127 If Live mode is selected The settings for the ASSIGNABLE are saved independently for each live set as part of the live set settings This lets you cre...

Страница 76: ...stem the system settings will be used If it is set to TEMP the settings of the live set or studio set will be used Slider 1 8 Settings 1 Hold down SHIFT and move one of the sliders The Slider screen appears 2 Move the cursor to the parameter that you want to set and turn the VALUE dial or press INC DEC to set it 3 If you want to save your settings press F7 Sys Write Press Exit to return to the pre...

Страница 77: ...itches Value LATCH The on off status will alternate each time you press S1 S2 MOMENTARY The status will be on only while you hold down S1 S2 If Single mode is selected assignable switches are available when the keyboard part is selected You can modify the sound by pressing a pedal that is connected to the rear panel PEDAL CONTROL 1 2 jacks Pedal such as expression pedals DP 8 available separately ...

Страница 78: ...hout continuing to press the keyboard 1 Press HOLD The indicator will light 2 Play a chord on the keyboard 3 If you play a different chord or notes while the arpeggio is being held the arpeggio will change accordingly 4 To cancel Arpeggio Hold press HOLD once again When Using a Hold Pedal If you play an arpeggio while pressing the hold pedal the arpeggio will continue to be played even if you rele...

Страница 79: ...ate Shuffle Resolution Arpeggio Shuffle Resolution Specify the timing resolution in terms of a note value The note value can be specified as either an 16th note or a eighth note Value Keyboard Velocity Arpeggio Keyboard Velocity Specifies the loudness of the notes that you play If you want the velocity value of each note to depend on how strongly you play the keyboard set this parameter to REAL If...

Страница 80: ... more than 500 events the screen will indicate Too Many Data The Arpeggios you create are temporary they are deleted as soon as you turn off the power or select some other Arpeggio You can store 128 arpeggios in the User memory 1 Confirm that the current Arpeggio is the one you want to save 2 Press F7 Write The Arpeggio name entry screen will appear p 42 3 When you have finished entering the name ...

Страница 81: ...Middle C the chord is played using the exact chord structure recorded in the Chord Form This is referenced to the C4 key parallel chords are played by pressing other keys 3 To finish the chord Memory Function press CHORD MEMORY again to turn it off Changing the chord form will change the notes in the chord 1 Hold down SHIFT and press CHORD MEMORY The following screen appears fig 12 001_50 2 Either...

Страница 82: ...rms which determine the constituent notes of chords played using the Chord Memory function but you can also freely create and rewrite them as well 1 Hold down SHIFT and press CHORD MEMORY 2 Turn the VALUE dial to select a chord form 3 Press F6 Chord Edit The Chord Form Edit screen appears 4 Use the keyboard to input the chord that you want to play When you press a key the note will be added in the...

Страница 83: ...nds This chapter explains how to create sounds such as patches live sets and effects Patch p 84 Rhythm Set p 112 Sample Set p 126 Live Set Studio Set p 132 Adding Effects p 150 Effects List p 161 Fantom G_r_e book 83 ページ 2009年7月2日 木曜日 午後2時55分 ...

Страница 84: ...y whether each tone will sound on or not off It is also important to turn off unused tones to avoid wasting voices unnecessarily reducing the number of simultaneous notes you can play Check the Structure setting p 92 The important Structure parameter determines how the four tones combine Before you select new tones make sure you understand how the currently selected tones are affecting each other ...

Страница 85: ...utton to switch the corresponding tone on off You can also use the pads to select tones and switch them on off 7 TONE SEL SW Using the Pads to Select Tones or Switch Them On Off p 197 6 When you have made your selection press EXIT 7 Turn the VALUE dial or press INC DEC to get the value you want If you ve selected two or more tones your editing will modify the parameter values for all selected tone...

Страница 86: ...ction press EXIT 7 Turn the VALUE dial or press INC DEC to get the value you want If you ve selected two or more tones your editing will modify the parameter values for all selected tones by the same amount 8 Repeat steps 3 7 to set each parameter you want to edit 9 If you wish to save the changes you ve made press WRITE to perform the Save operation p 88 If you do not wish to save changes press E...

Страница 87: ... use this feature to make the editing process faster and easier 1 Select that you want to edit and the copy destination patch p 47 2 Press PATCH 3 Press F4 Util Menu The Patch Utility Menu window appears 4 Press or to choose Patch Tone Copy and then press F8 Select If you decide to cancel the operation press F7 Cancel The Patch Tone Copy window appears 5 Press CURSOR to move the cursor select the ...

Страница 88: ...c instruments such as piano and sax extreme timbral changes occur during the first few moments of each note This initial attack is what defines much of the instrument s character For such waveforms it is best to use the complex tonal changes of the attack portion of the waveform just as they are and to use the envelope only to modify the decay portion If you attempt to use the envelope to modify t...

Страница 89: ... dial 5 Press F8 Write A message will ask you for confirmation 6 Press F7 OK once again to execute the Save operation This section explains the functions the different patch parameters have as well as the composition of these parameters Parameters marked with a can be controlled using specified MIDI messages Matrix Control Settings in Matrix Ctrl screen will determine how these parameters are cont...

Страница 90: ...ng of OFF the patch s tuning will be equal temperament A setting of 3 will produce the greatest difference in the pitch of the low and high ranges Value OFF 1 3 The diagram shows the pitch change relative to equal temperament that will occur in the low and high ranges This setting will have a subtle effect on the way in which chords resonate fig 06 011 e Analog Feel Analog Feel Depth Specifies the...

Страница 91: ...ke your finger off the key until the sound disappears This value is added to the release time value of a tone so if the release time value of any tone is already set to 127 maximum positive settings here will not produce any change Velocity Sens Offset Velocity Sensitivity Offset alters the Velocity Sensitivity of the overall patch while preserving the relative differences between the Velocity Sen...

Страница 92: ... 3 and 4 are connected Value 1 10 The following 10 different Types of combination are available fig 06 014 With this type tones 1 and 2 or 3 and 4 are independent Use this type when you want to preserve PCM sounds or create and combine sounds for each tone fig 06 015 This type stacks the two filters together to intensify the characteristics of the filters The TVA for tone 1 or 3 controls the volum...

Страница 93: ... modulator fig 06 023 This type passes the filtered sound of each tone through a ring modulator to create new overtones and also mixes in the sound of tone 2 4 Since the ring modulated sound can be mixed with tone 2 4 tone 1 3 TVA can adjust the amount of the ring modulated sound When TYPE 2 10 is selected and one tone of a pair is turned off the other tone will be sounded as TYPE 1 regardless of ...

Страница 94: ...er key below the lower key the other value will be automatically modified to the same setting Booster The Booster is used to distort the incoming signal fig 06 024 e In addition to using this to create distortion you can use the waveform WG1 of one of the tones as an LFO which shifts the other waveform WG2 upward or downward to create modulation similar to PWM pulse width modulation This parameter...

Страница 95: ...e gradual change in volume If you want notes played outside the specified key velocity range to not be sounded at all set this to 0 Value 0 127 Velocity Range Lower This sets the lowest velocity at which the tone will sound Make these settings when you want different tones to sound in response to notes played at different strengths Value 1 UPPER Velocity Range Upper This sets the highest velocity ...

Страница 96: ... 80 90 100 110 120 130 140 150 160 170 180 190 200 fig 06 030 e Pitch Bend Range Up Specifies the degree of pitch change in semitones when the Pitch Bend lever is all the way right For example if this parameter is set to 12 the pitch will rise one octave when the pitch bend lever is moved to the right most position Value 0 48 Pitch Bend Range Down Specifies the degree of pitch change in semitones ...

Страница 97: ...ote on with the pitch bend lever already moved the pitch will sound at the center position The pitch will change only after the lever has passed through the center position LAST The pitch bend lever will apply only to the last played note CATCH LAST The operation of CATCH and LAST will be combined Bend Mode Control This specifies the CC control change whose value is used to switch the pitch bend l...

Страница 98: ...s also good for use with simulated acoustic instrument sounds the nuance it exhibits differs from that of the LPF2 even with the same TVF Envelope settings If you set LPF2 or LPF3 the setting for the Resonance parameter will be ignored p 98 Cutoff Frequency Selects the frequency at which the filter begins to have an effect on the waveform s frequency components Value 0 127 With LPF LPF2 LPF3 selec...

Страница 99: ... p 91 However this setting is shared by the Level Velocity Sens parameter p 100 Resonance Velocity Sens This allows keyboard velocity to modify the amount of Resonance If you want strongly played notes to have a greater Resonance effect set this parameter to positive settings If you want strongly played notes to have less Resonance use negative settings Value 63 63 TVF Env Velocity Curve Selects o...

Страница 100: ...he cutoff frequency value specified in the TVF screen Value 0 127 TVA Tone Level Sets the volume of the tone This setting is useful primarily for adjusting the volume balance between tones Value 0 127 Level Velocity Curve TVA Level Velocity Curve You can select from seven curves that determine how keyboard playing strength will affect the volume If you do not want the volume of the tone to be affe...

Страница 101: ...nter C to be panned toward the left Larger settings will produce greater change Value 100 100 fig 06 040 e Random Pan Depth Use this parameter when you want the stereo location to change randomly each time you press a key Higher settings will produce a greater amount of change Value 0 63 Alternate Pan Depth This setting causes panning to be alternated between left and right each time a key is pres...

Страница 102: ...ue 0 127 TVA Env Level 1 3 Specify the TVA envelope levels Level 1 Level 3 These settings specify how the volume will change at each point relative to the standard volume the Tone Level value specified in the TVA screen Value 0 127 fig 06 041 e Tone Output Assign Specifies how the direct sound of each tone will be output Value PFX Output through patch multi effects DRY Output without passing throu...

Страница 103: ... the central value pitch or cutoff frequency Positive settings will move the waveform so that modulation will occur from the central value upward Negative settings will move the waveform so that modulation will occur from the central value downward Value 100 50 0 50 100 Delay Time LFO1 LFO2 Delay Time Delay Time LFO Delay Time specifies the time elapsed before the LFO effect is applied the effect ...

Страница 104: ...e for the two tones will be the reverse of each other This allows you to shift back and forth between two different tones or combine it with the Pan setting to cyclically change the location of the sound image When the Structure parameter is set to any value from 2 through 10 the output of tones 1 and 2 will be combined into tone 2 and the output of tones 3 and 4 will be combined into tone 4 This ...

Страница 105: ...ctive when you wish to simulate the hammering on and pulling off techniques used by a guitarist If you choose SUSTAIN the legato effect is applied while you hold down the hold pedal Value OFF LEGATO SUSTAIN LEGATO SUSTAIN Legato Retrigger Legato Retrigger Switch Legato Retrigger is available if the Mono Poly parameter is set to MONO and the Legato Switch parameter has a setting other than OFF The ...

Страница 106: ...a new pitch change will begin This setting specifies the pitch at which the change will begin Value PITCH Starts a new portamento when another key is pressed while the pitch is changing fig 06 048 e NOTE Portamento will begin a new from the pitch where the current change would end fig 06 049 e Portamento Time When portamento is used this specifies the time over which the pitch will change Higher s...

Страница 107: ...eard fig 06 054 e If you have selected a waveform that is a decay type sound i e a sound that fades away naturally even if the key is not released selecting OFF N or OFF D may result in no sound being heard Miscellaneous Settings Misc Note off Delay time Note on No Tone Delay Note off Delay time Note on No sound played Note off Delay time Note on Note off Delay time Note on Tone Delay This produce...

Страница 108: ...N or not OFF Value OFF ON Tone Receive Hold 1 Tone Receive Hold Switch For each tone specify whether MIDI Hold 1 messages will be received ON or not OFF Value OFF ON If NO SUS is selected for Env Mode parameter this setting will have no effect Tone Receive Pan Mode For each tone specify how pan messages will be received Value CONT Whenever Pan messages are received the stereo position of the tone ...

Страница 109: ...ter that is to be controlled when using the Matrix Control The following parameters can be controlled When not controlling parameters with the Matrix Control set this to OFF Up to four parameters can be specified for each Matrix Control and controlled simultaneously In this manual Parameters that can be controlled using the Matrix Control are marked with a Opening and Closing the Filter CUTOFF Cha...

Страница 110: ...A TIME Changes the Env Time 1 parameter of the TVA envelope TVA ENV D TIME Changes the Env Time 2 and Env Time 3 parameters of the TVA envelope TVA ENV R TIME Changes the Env Time 4 parameter of the TVA envelope Splitting Tones That Are Played TMT If the Matrix Control is used to split tones set the TMT Velocity Control parameter to OFF and the TMT Control Switch parameter to ON p 95 If the Matrix...

Страница 111: ...value For either positive or negative settings greater absolute values will allow greater amounts of change Set this to 0 if you don t want to apply the effect Value 63 63 Control Tone 1 4 Tone Control Switch 1 4 Matrix Control Tone selects the tone to which the effect is applied when using the Matrix Control Value OFF The effect will not be applied ON The effect will be applied REVS The effect wi...

Страница 112: ...ve access to all of the parameters use the Patch Pro Edit screen p 114 1 Select the rhythm set whose settings you want to edit p 52 2 Press PATCH The Patch Zoom Edit screen appears fig 07 001_50 F key operations in the Patch Zoom Edit screen How to Make Rhythm Set Settings Editing a Rhythm Set Quickly Patch Zoom Edit F key Explanation Page F1 Group Up Moves the edit group tab upward F2 Group Down ...

Страница 113: ...To switch a wave on off Press a F1 Sw 1 F4 Sw 4 button to switch the corresponding wave on off You can also use the pads to select waves and switch them on off p 197 6 When you have made your selection press EXIT 7 Turn the VALUE dial or Press INC DEC to set a value If you ve selected several waves for editing their values will change while maintaining the difference between them 8 Repeat steps 3 ...

Страница 114: ...have made your selection press EXIT 7 Turn the VALUE dial or Press INC DEC to set a value 8 Repeat steps 3 7 to set each parameter you want to edit 9 If you wish to save the changes you ve made press WRITE to perform the Save operation p 116 If you do not wish to save changes press EXIT to return to the Single Play screen If you return to the Single Play screen without saving the symbol will be di...

Страница 115: ...ected rhythm set You can use this feature to make the editing process faster and easier 1 Select the copy destination Rhythm set p 52 2 Press PATCH 3 Press F4 Util Menu The Rhythm Utility Menu window appears 4 Press or to choose Rhythm Tone Copy and then press F8 Select To cancel press F7 Cancel The Rhythm Tone Copy window appears 5 Using CURSOR to move the cursor select the Source copy source ban...

Страница 116: ...ic instruments such as piano and sax extreme timbral changes occur during the first few moments of each note This initial attack is what defines much of the instrument s character For such waveforms it is best to use the complex tonal changes of the attack portion of the waveform just as they are and to use the envelope only to modify the decay portion If you attempt to use the envelope to modify ...

Страница 117: ... 4 If you wish to change the save destination re specify the save destination rhythm set by turning the VALUE dial 5 Press F8 Write A message will ask you for confirmation 6 Press F7 OK once again to execute the Save operation This section explains the functions the different rhythm set parameters have as well as the composition of these parameters If a number is displayed for the parameter name y...

Страница 118: ...Wave p 116 is selected it will not sustain even if this parameter is set to SUSTAIN Tone Pitch Bend Range Rhythm Tone Pitch Bend Range Specifies the amount of pitch change in semitones 4 octaves that will occur when the Pitch Bend Lever is moved The amount of change when the lever is tilted is set to the same value for both left and right sides Value 0 48 Tone Receive Expression Rhythm Tone Receiv...

Страница 119: ...to synchronize a Phrase Loop to the clock tempo set this to ON This is valid only when selected as the sample for a wave Value OFF ON If a sample is selected for a tone you must first set the BPM tempo parameter of the sample If a sample is selected for a tone Wave Tempo Sync will require twice the normal number of voices Wave FXM Switch This sets whether FXM will be used ON or not OFF Value OFF O...

Страница 120: ...Alternate Pan Switch to ON to pan the Wave according to the Alter Pan Depth parameter p 125 settings or to REV when you want the panning reversed If you do not want the panning to change each time a key is pressed set this to OFF Range OFF ON REV WMT Velocity Control WMT Velocity Control Switch WMT Velocity Control determines whether a different rhythm tone is played ON or not OFF depending on the...

Страница 121: ...nv Depth Adjusts the effect of the Pitch Envelope Higher settings will cause the pitch envelope to produce greater change Negative settings will invert the shape of the envelope Value 12 12 Pitch Env Velocity Sens Keyboard playing dynamics can be used to control the depth of the pitch envelope If you want the pitch envelope to have more effect for strongly played notes set this parameter to a posi...

Страница 122: ... frequency Cutoff Frequency This is suitable for creating percussive sounds emphasizing their higher ones PKG Peaking Filter This emphasizes the frequencies in the region of the cutoff frequency Cutoff Frequency You can use this to create wah wah effects by employing an LFO to change the cutoff frequency cyclically LPF2 Low Pass Filter 2 Although frequency components above the Cutoff frequency Cut...

Страница 123: ...quency set this parameter to positive settings If you want strongly played notes to lower the cutoff frequency use negative settings Value 63 63 Resonance Velocity Sens This allows keyboard velocity to modify the amount of Resonance If you want strongly played notes to have a greater Resonance effect set this parameter to positive settings If you want strongly played notes to have less Resonance u...

Страница 124: ...locity Curve You can select from seven curves that determine how keyboard playing strength will affect the volume If you do not want the volume of the rhythm tone to be affected by the force with which you press the key select FIXED Value FIXED 1 7 fig 06 036 Level Velocity Sens Set this when you want the volume of the rhythm tone to change depending on the force with which you press the keys Set ...

Страница 125: ... want Time 4 to be speeded up for quickly released notes set this parameter to a positive value If you want it to be slowed down set this to a negative value Value 63 63 TVA Env Time 1 4 Specify the TVA envelope times Time 1 Time 4 Higher settings will lengthen the time until the next volume level is reached For example Time 2 is the time over which Level 1 will change to Level 2 Value 0 127 TVA E...

Страница 126: ...wish to modify For details on each parameter refer to the following pages To change the part that you want to edit Press F7 Part Select 4 Turn the VALUE dial or Press INC DEC to set a value 5 Repeat steps 3 4 to set each parameter you want to edit 6 If you wish to save the changes you ve made press WRITE to perform the Save operation p 128 If you do not wish to save changes press EXIT to return to...

Страница 127: ...ted The settings you edit are temporary and will be lost if you turn off the power switch the sound generator mode or select a different sound Initialize means to return the settings of the currently selected sound to a standard set of values or to the factory settings The Initialize operation will affect only the currently selected sound the sounds that are stored in user memory will not be affec...

Страница 128: ...WRITE MENU window appears 3 Select Patch Rhythm Sample Set Press or to select Patch Rhythm Sample Set and then press F8 Select The Sample Set Name window appears fig 07 006_50 4 Assign a name to the sample set For details on assigning names refer to Assigning a Name p 42 5 When you have finished inputting the name press F8 OK A screen will appear allowing you to select the write destination sample...

Страница 129: ...es the direction in which the sample will play Value FWD Play forward REV Play backward Trigger Mode Specifies how the sample will play when you press a pad or key Value GATE The sample will stop playing when you release the pad or key DRUM The sample will continue playing even after you release the pad or key The sample will begin playing when you press the pad and will stop automatically when th...

Страница 130: ...ed for a tone you must first set the BPM tempo parameter of the sample If a sample is selected for a tone Wave Tempo Sync will require twice the normal number of voices Tone Coarse Tune Sample Tone Coarse Tune Selects the pitch at which a sample tone sounds Value 48 48 Tone Fine Tune Sample Tone Fine Tune Adjusts the pitch of the sample tone s sound up or down in 1 cent steps 50 cents Value 50 50 ...

Страница 131: ...y harder set this to a negative value Value 63 63 Tone Output Level Specifies the signal level for each tone Value 0 127 Tone Chorus Send Level Specifies the level of the signal sent to the chorus for each tone Value 0 127 Tone Reverb Send Level Specifies the level of the signal sent to the reverb for each tone Value 0 127 Tone Output Assign Specifies how the direct sound of each tone will be outp...

Страница 132: ... will be displayed at the right of the live studio set name indicating that the patch settings have been edited The settings you edit are temporary and will be lost if you turn off the power switch the sound generator mode or select a different sound Live Set Name Studio Set Name Specifies the name of the live studio set By pressing ENTER you can assign a name to the live studio set Value space A ...

Страница 133: ... In this screen the name of the parameter selected by the cursor is shown in the area in the lower left of the screen The value of the current setting is also shown here 5 Turn the VALUE dial or press INC DEC to get the value you want 6 If you wish to save the changes you ve made press WRITE to perform the Save operation p 148 If you do not wish to save changes press EXIT If you return to the Play...

Страница 134: ...ing the part playing the melody or when you want to play something using a separate sound module Value OFF MUTE The Mute Switch parameter does not turn the part off but sets the volume to minimum so that no sound is heard Therefore MIDI messages are still received Part Level Adjust the volume of each part This setting s main purpose is to adjust the volume balance between parts Value 0 127 Part Pa...

Страница 135: ... Pan If you want Pan messages to also be transmitted when you select a Live Studio Set specify the desired value L64 0 63R for the part If you do not want this message to be transmitted set this to Value L64 0 63R These messages will not be transmitted by parts whose Keyboard Switch is turned off Keyboard Switch Specifies for each part whether or not the keyboard controller section will be connect...

Страница 136: ... 4 Output to the INDIVIDUAL 1 4 jacks in mono without passing through multi effects MFX1 MFX2 Output in stereo through multi effects Studio set only In the case of parts EXP1 EXP2 DRY Output without being passed through the expansion board s MFX EXP Accords with the settings of the expansion board If you ve made settings so that sounds are separately routed to the INDIVIDUAL 1 jack and INDIVIDUAL ...

Страница 137: ...t s sound up or down in semitone steps 4 octaves Value 48 48 EXP 1 and EXP 2 parts will depend on the expansion board that is installed External parts do not have this item Part Fine Tune Adjusts the pitch of the part s sound up or down in 1 cent steps 50 cents Value 50 50 One cent is 1 100th of a semitone EXP 1 and EXP 2 parts will depend on the expansion board that is installed External parts do...

Страница 138: ...h a rhythm set is assigned EXP 1 EXP 2 and External parts do not have this item Part Scale Tune C B Make scale tune settings for each part Value 64 63 Scale Tune is switched on off by means of the Scale Tune Switch parameter p 300 EXP 1 and EXP 2 parts will depend on the expansion board that is installed External parts do not have this item Scale Tune Equal Temperament This tuning divides the octa...

Страница 139: ...e no change produced by setting the Cutoff Offset to a positive value EXP 1 EXP 2 and External parts do not have this item Part Resonance Offset Adjusts the Resonance for the patch rhythm set or sample set assigned to a part Value 64 63 Patches also have a Resonance Offset setting p 91 The final Resonance value is the sum of the tone Resonance value and the patch and part Resonance Offset values I...

Страница 140: ...d polyphonically If you want to use the Mono Poly setting of the patch assigned to the part p 105 set this to PATCH Value MONO POLY PATCH This setting is ignored for parts to which a rhythm set is assigned EXP 1 EXP 2 and External parts do not have this item Part Legato Switch You can add legato when performing monophonically The term legato refers to a playing style in which notes are smoothly co...

Страница 141: ...hannel specify whether MIDI polyphonic key pressure messages will be received ON or not OFF Receive Channel Pressure Receive Channel Pressure Switch For each MIDI channel specify whether MIDI Channel Pressure messages will be received ON or not OFF Receive Modulation Receive Modulation Switch For each MIDI channel specify whether MIDI Modulation messages will be received ON or not OFF Receive Volu...

Страница 142: ... controllers 1 Press LIVE or STUDIO 2 Press F4 Control The Control Setting screen appears fig 09 011_50 3 The parameters are organized into several editing groups Press F1 Up or F2 Down to select the tab for the editing group that contains the parameter you wish to edit 4 Use CURSOR to move the cursor to the parameter that you want to edit 5 Turn the VALUE dial or press INC DEC to get the value yo...

Страница 143: ...s is set to MOMENTARY the parameter will be on only while the D Beam is obstructed and will turn off when you stop obstructing it If this is set to LATCH the parameter will alternately be switched on off each time you obstruct the D Beam Value MOMENTARY LATCH D Beam SOLO SYNTH You can use the D Beam controller to perform in a way similar to on a mono synth Settings for the Solo Synth are saved for...

Страница 144: ...es in the region of the cutoff frequency and cuts the rest HPF High Pass Filter This cuts the frequencies in the region below the cutoff frequency PKG Peaking Filter This emphasizes the frequencies in the region of the cutoff frequency Cutoff Selects the frequency at which the filter begins to have an effect on the waveform s frequency components Value 0 127 Resonance Emphasizes the portion of the...

Страница 145: ...e Max below Range Min you can invert the range of change Value 0 127 Knob Assign 1 4 Specify the functions that will be controlled by the knobs Value OFF Off CC01 31 CC32 OFF 33 95 Control Change AFTERTOUCH Aftertouch PITCH BEND Pitch Bend ARPEGGIO ACCENT Arpeggio accent rate ARPEGGIO SHUFFLE Arpeggio shuffle rate ARPEGGIO OCT UP The range in which the arpeggio is sounded will rise in steps of an ...

Страница 146: ...INT EXP1 EXP2 EXT Arpeggio Part Number Specifies the part that will use the Arpeggio function Value Part1 16 Chord Switch Turns the Chord Memory function p 81 on off Value ON OFF Chord Form Specifies the Chord Form p 81 Value 001 128 Rolled Chord Turns the Rolled Chord function p 82 on off Value ON OFF Rolled Chord Type Specifies the Rolled Chord Type p 82 Value UP Notes will be sounded in order f...

Страница 147: ...ransmitted ON or not OFF Value OFF ON Control Pedal 1 2 Control Pedal 1 2 Switch For each part you can specify whether control messages from a pedal connected to the CONTROL PEDAL 1 2 jacks will be transmitted ON or not OFF Value OFF ON When using patches in Live Studio Mode some settings such as effects settings will be affected by Live Studio Set settings If you wish to edit a patch while hearin...

Страница 148: ...ato Delay 5 Press F8 Select A message will ask you for confirmation 6 Press F7 OK to execute To cancel press F8 EXIT The settings you edit are temporary and will be lost if you turn off the power switch the sound generator mode or select a different sound If you want to keep the modified sound you must save it in the User bank When you modify the settings of a Live Studio Set the Live Studio Play ...

Страница 149: ...ing saved 8 Press F7 OK to execute the save operation To cancel the operation press F8 EXIT When Changing the Settings for the patch rhythm set or sample set assigned to a Part in a Live Studio Set If you ve edited a patch rhythm set or sample set assigned to a part in a live studio set and then try to save the live studio set without first saving the edited patch rhythm set or sample set the foll...

Страница 150: ...e switch for each effect and turn the VALUE dial or use INC DEC to turn the switch on off fig 22 002_50 Specifying the effect applied to the external audio input or an audio track You can change the routing diagram by turning the VALUE dial or using INC DEC in the Part Group field You can switch the part group by holding down SHIFT and pressing or Where Effect Settings are Saved Keyboard part Live...

Страница 151: ...xternal audio input or audio tracks Specifying the effect applied to the external audio input or an audio track p 150 Live mode allows you to use patch FX PFX chorus and reverb These effects will operate according to the effect settings of the live set Specifying How the Sound will be Output Routing p 151 In addition you can apply a multi effect MFX1 to the external audio input or audio tracks Spe...

Страница 152: ...rs refer to MFX PFX Parameter p 161 Value 0 Through 76 PFX Output Level Patch Multi Effects Output Level Adjusts the volume of the sound that has passed through the patch multi effects Value 0 127 PFX Chorus Send Level Patch Multi Effects Chorus Send Level Adjusts the amount of chorus for the sound that passes through patch multi effects If you don t want to add the Chorus effect set it to 0 Value...

Страница 153: ...e output Value MAIN Output to the OUTPUT jacks in stereo REV Output to reverb in mono M R Output to the OUTPUT jacks in stereo and to reverb in mono When set to MAIN or M R the OUTPUT jack from which the sound is output is set in Chorus Output Assign Chorus Output Assign Selects the pair of OUTPUT jacks to which the chorus sound is routed when Chorus Output Select is set to MAIN or M R Value A Out...

Страница 154: ...is sent to the output destination specified by Output Assign Value 0 127 Tone Chorus Send Level Sets the level of the signal sent to chorus for each tone Value 0 127 Tone Reverb Send Level Sets the level of the signal sent to reverb for each tone Value 0 127 Tone Output Assign Specifies how the direct sound of each tone will be output Value PFX Output through patch multi effects PFX DRY Output wit...

Страница 155: ...inal sound will be output for each part This is available only if Part MFX Select is set to DRY Value A B Output to the OUTPUT A MIX jack or OUTPUT B jack in stereo without passing through multi effects 1 4 Output to the INDIVIDUAL 1 4 jacks in mono without passing through multi effects If you ve made settings so that sounds are separately routed to the INDIVIDUAL 1 jack and INDIVIDUAL 2 jack but ...

Страница 156: ...ich the sound is output is set in Chorus Output Assign Chorus Output Assign Selects the pair of OUTPUT jacks to which the chorus sound is routed when Chorus Output Select is set to MAIN or M R Value A Output to the OUTPUT A MIX jacks in stereo B Output to the OUTPUT B jacks in stereo When Chorus Output Select is set to REV this setting will have no effect If the Mix Parallel parameter is set to MI...

Страница 157: ... messages used as common multi effects controls If you want to use common controllers for the entire Fantom G select SYS CTRL 1 SYS CTRL 4 MIDI messages used as System Control 1 4 are set with the Sys Ctrl 1 4 Source parameters p 301 In patch rhythm set sample set there are parameters that determine for each tone rhythm tone whether or not Pitch Bend Controller Number 11 Expression and Controller ...

Страница 158: ... device you would need to send System Exclusive messages MIDI messages designed exclusively for the Fantom G However System Exclusive messages tend to be complicated and the amount of data that needs to be transmitted can get quite large For that reason a number of the more typical of the Fantom G s multi effects parameters have been designed so they accept the use of Control Change or other MIDI ...

Страница 159: ...onding Realtime Control knob far left knob is far right knob is to adjust the value of that parameter fig 22 012_50 For details on these settings refer to Making Effect Settings p 151 Type Reverb Type Selects the type of reverb For details on reverb parameters refer to Reverb Parameters p 185 Value 00 OFF 10 Church In this setting screen you can edit the parameters of the reverb that is selected b...

Страница 160: ...r the mastering effect press the panel WRITE button The settings are saved in the Setting parameter System Studio in the case of Studio mode The mastering effect settings you save here are saved as system settings in the case of Single mode or Live mode In the case of Studio mode they are saved in the studio set Attack Time from when the volume goes up the threshold level until the compressor effe...

Страница 161: ... 17 TREMOLO p 166 18 AUTO PAN p 166 19 STEP PAN p 166 20 SLICER p 167 21 ROTARY p 167 22 VK ROTARY p 167 CHORUS 12 types 23 CHORUS p 168 24 FLANGER p 168 25 STEP FLANGER p 168 26 HEXA CHORUS p 169 27 TREMOLO CHORUS p 169 28 SPACE D p 169 29 3D CHORUS p 169 30 3D FLANGER p 170 31 3D STEP FLANGER p 170 32 2BAND CHORUS p 170 33 2BAND FLANGER p 171 34 2BAND STEP FLANGER p 171 DYNAMICS 8 types 35 OVERD...

Страница 162: ...EQ 4 Band EQ L in R in L out R out Spectrum Spectrum Parameter Value Description Boost Cut Low 60 4 dB These boost and cut each of the High Middle and Low frequency ranges At 60 dB the sound becomes in audible 0 dB is equivalent to the input level of the sound Boost Cut Mid Boost Cut High Anti Phase Low Sw OFF ON Turns the Anti Phase function on and off for the Low frequency ranges When turned on ...

Страница 163: ...e wave SQR square wave SIN sine wave SAW1 sawtooth wave upward SAW2 sawtooth wave downward Rate 0 05 10 00 Hz note Rate of modulation Depth 0 127 Depth of modulation Attack 0 127 Speed at which the cutoff frequency will change This is effective if Modulation Wave is SQR SAW1 or SAW2 Level 0 127 Output level L in R in L out R out Super Filter Super Filter SAW1 SAW2 Parameter Value Description Step ...

Страница 164: ...ut Sync Sw OFF ON Determines whether the LFO for switching the vowels is reset by the in put signal ON or not OFF Input Sync Threshold 0 127 Volume level at which reset is applied Manual 0 100 Point at which Vowel 1 2 switch 49 or less Vowel 1 will have a long er duration 50 Vowel 1 and 2 will be of equal duration 51 or more Vowel 2 will have a longer duration Low Gain 15 15 dB Gain of the low fre...

Страница 165: ...INVERSE The left and right phase will be opposite When using a mono source this spreads the sound SYNCHRO The left and right phase will be the same Select this when inputting a stereo source Resonance 0 127 Amount of feedback R in R out L in L out Phaser Mix 2 Band EQ Phaser 2 Band EQ Mix R in R out L in L out Step Phaser Mix 2 Band EQ Step Phaser 2 Band EQ Mix Cross Feedback 98 98 Adjusts the pro...

Страница 166: ...h Gain 15 15 dB Amount of boost cut for the high frequency range Balance D100 0W D0 100W Volume balance of the original sound D and effect sound W Level 0 127 Output volume L in R in L out R out Ring Mod 2 Band EQ 2 Band EQ Ring Mod L in R in L out R out Step Ring Mod 2 Band EQ 2 Band EQ Step Ring Mod L in R in L out R out Tremolo 2 Band EQ 2 Band EQ Tremolo Parame ter Value Description Mod Wave T...

Страница 167: ...aneously switch the rota tional speed of the low frequency rotor and high frequency rotor SLOW Slows down the rota tion to the Slow Rate FAST Speeds up the rotation to the Fast Rate Woofer Slow Speed 0 05 10 00 Hz Slow speed SLOW of the low frequency rotor Woofer Fast Speed 0 05 10 00 Hz Fast speed FAST of the low fre quency rotor L in R in L out R out Slicer Slicer Rotary L out R out L in R in Wo...

Страница 168: ...d begins until the flanger sound is heard Rate 0 05 10 00 Hz note Frequency of modulation Depth 0 127 Depth of modulation Phase 0 180 deg Spatial spread of the sound Feedback 98 98 Adjusts the proportion of the flanger sound that is fed back into the effect Negative set tings will invert the phase Low Gain 15 15 dB Gain of the low range L in R in Chorus Chorus L out R out 2 Band EQ 2 Band EQ Balan...

Страница 169: ...Spread of the tremolo effect Tremolo Phase 0 180 deg Spread of the tremolo effect Balance D100 0W D0 100W Volume balance between the direct sound D and the trem olo chorus sound W Level 0 127 Output Level Balance W Balance W L in R in L out R out Hexa Chorus Balance D Balance D Tremolo Chorus L in R in L out R out Balance D Balance D Balance W Balance W Parameter Value Description Pre Delay 0 0 10...

Страница 170: ...lay time from when the direct sound begins until the flanger sound is heard Rate 0 05 10 00 Hz note Frequency of modulation Depth 0 127 Depth of modulation Phase 0 180 deg Spatial spread of the sound L R 3D Flanger 2 Band EQ 2 Band EQ R out L out L R 3D Step Flanger 2 Band EQ 2 Band EQ R out L out Feedback 98 98 Adjusts the proportion of the flanger sound that is fed back into the effect Negative ...

Страница 171: ...h Band Flanger Low Band Flanger High Band Flanger Low Band Flanger Split Low Band Feedback High Band Feedback High Band Feedback Low Band Feedback Parameter Range Explanation Split Freq 200 8000 Hz Frequency at which the low and high ranges will be divid ed Low Pre Delay 0 0 100 0 ms Delay time from when the original sound is heard to when the low range flanger sound is heard Low Rate 0 05 10 00 H...

Страница 172: ... Turns the amp switch on off Pre Amp Type JC 120 CLEAN TWIN MATCH DRIVE BG LEAD MS1959I MS1959II MS1959I II SLDN LEAD METAL5150 METAL LEAD OD 1 OD 2 TURBO DISTORTION FUZZ Type of guitar amp Pre Amp Volume 0 127 Volume and amount of distor tion of the amp Pre Amp Master 0 127 Volume of the entire pre amp Pre Amp Gain LOW MIDDLE HIGH Amount of pre amp distortion Pre Amp Bass 0 127 Tone of the bass m...

Страница 173: ...und DUCK Ducking The gate will close when the volume of the original sound increases cutting the original sound Attack 0 127 Adjusts the time it takes for the gate to fully open after being triggered L in R in L out R out Compressor 2 Band EQ 2 Band EQ Compressor L in R in L out R out Limiter 2 Band EQ 2 Band EQ Limiter L in R in L out R out Gate Gate Hold 0 127 Adjusts the time it takes for the g...

Страница 174: ...e delay sound that is to be returned to the in put of delay 2 negative values invert the phase L in R in L out R out 2 Band EQ Pan R Pan L 2 Band EQ Feedback Long Delay R in R out L in L out Feedback 1 Pan L Pan R Delay 1 Feedback 2 Delay 2 Delay2 HF Damp 200 8000 Hz BYPASS Frequency at which the high frequency content of the de layed sound of delay 2 will be cut BYPASS no cut Pan L64 63R Panning ...

Страница 175: ...ce D100 0W D0 100W Volume balance between the direct sound D and the delay sound W Level 0 127 Output level L in R in L out R out Left Tap Right Tap Triple Tap Delay 2 Band EQ 2 Band EQ Balance W Balance D Balance W Balance D Feedback Center Tap L in R in L out R out Quadruple Tap Delay Balance W Balance D Balance W Balance D Delay 1 Delay 2 Delay 3 Delay 4 Feedback 1 2 3 4 L R Parameter Value Des...

Страница 176: ...d D and the effect sound W Level 0 127 Output level Parameter Range Explanation Feedback L in R in Delay L out R out 2 Band EQ 2 Band EQ A B Delay A Delay B L R 3D Delay L 3D Delay R 3D Delay C Level Feedback 2 Band EQ 2 Band EQ L out R out Parameter Value Description Delay Left 0 2600 ms note Adjusts the delay time from the direct sound until the de lay sound is heard Delay Right Delay Center Cen...

Страница 177: ...e dependent distortion to be added This simulates the slight tonal changes that can be detected by signal analysis equipment Increasing this value will increase the distortion L in R in L out R out 2 Band EQ Balance W Balance W Balance D Balance D 2 Band EQ Feedback Time Control Delay Echo Level Echo Level L in R in L out R out Tape Echo Direct Level Direct Level Wow Flutter Rate 0 127 Speed of wo...

Страница 178: ...tes the tuning noise of a radio As this value is raised the tuning drifts fur ther Radio Noise Level 0 127 Volume of the radio noise Balance D100 0W D0 100W Volume balance between the direct sound D and the effect sound W Level 0 127 Output level L in R in L out R out Compressor Lo Fi Lo Fi Compressor 2 Band EQ 2 Band EQ R in R out L in L out Lo Fi Lo Fi Radio 2 Band EQ 2 Band EQ Parameter Value D...

Страница 179: ...100 100 cent Pitch 2 Delay 0 1300 ms note Pitch 2 Feed back 98 98 Pitch 2 Pan L64 63R Pitch 2 Level 0 127 Low Gain 15 15 dB Gain of the low range L in R in Pitch Shifter Pitch Shifter L out R out 2 Band EQ 2 Band EQ L in R in L out R out 2Voice Pitch Shifter Level 1 Balance W Balance D Balance W Balance D Level 1 Pan 2 R Pan 1 L Pan 1 R Pan 2 L High Gain 15 15 dB Gain of the high range Level Balan...

Страница 180: ...ct Negative set tings will invert the phase Flanger Balance D100 0W D0 100W Adjusts the volume balance be tween the sound that is sent through the flanger W and the sound that is not sent through the flanger D Level 0 127 Output Level Parameter Value Description Overdrive Drive 0 127 Degree of distortion Also changes the volume Overdrive Pan L64 63R Stereo location of the over drive sound Delay Ti...

Страница 181: ...Feedback Delay L in R in L out R out Mix Mix Enhancer Enhancer Balance W Balance W Balance D Balance D Enhancer Mix 0 127 Level of the overtones gener ated by the enhancer Delay Time 0 2600 ms note Adjusts the delay time from the direct sound until the de lay sound is heard Delay Feedback 98 98 Adjusts the proportion of the delay sound that is fed back into the effect Negative settings will invert...

Страница 182: ...e between the di rect sound D and the chorus sound W Flanger Pre Delay 0 0 100 0 ms Adjusts the delay time from when the direct sound begins until the flanger sound is heard Flanger Rate 0 05 10 00 Hz note Modulation frequency of the flanger effect Feedback Delay L in R in L out R out Balance W Balance W Balance D Balance D Flanger Balance W Balance W Balance D Balance D Feedback Feedback Flanger ...

Страница 183: ...rberant sound moves from right to left SWEEP2 the reverberant sound moves from left to right Pre Delay 0 0 100 0 ms Adjusts the delay time from the direct sound until the re verb sound is heard L in R in L out R out Reverb 2 Band EQ Balance W Balance W Balance D Balance D 2 Band EQ L in R in L out R out Gated Reverb 2 Band EQ Balance W Balance W Balance D Balance D 2 Band EQ Gate Time 5 500 ms Adj...

Страница 184: ...chorus sound is heard Feedback 0 127 Adjusts the amount of the chorus sound that is fed back into the effect Filter Type OFF LPF HPF Type of filter OFF no filter is used LPF cuts the frequency range above the Cutoff Freq HPF cuts the frequency range below the Cutoff Freq Cutoff Freq 200 8000 Hz Basic frequency of the filter Phase 0 180 Spatial spread of the sound Type 02 DELAY Delay Left 0 1000 ms...

Страница 185: ... Adjusts the amount of damping applied to the frequency range selected with HF Damp With a setting of 0 there will be no reduc tion of the reverb s high frequency content Type 05 GM2 REVERB Character 0 7 Type of reverb 0 5 reverb 6 7 delay Pre LPF 0 7 Cuts the high frequency range of the sound coming into the reverb Higher values will cut more of the high frequencies Level 0 127 Output level of re...

Страница 186: ...h Gain 15 15 dB Amount of high frequency boost cut Parameter Range Explanation Sens 0 127 Depth of the enhancer effect Mix 0 127 Volume of the harmonics that are generated Parameter Range Explanation Attack 0 127 Time from when the input ex ceeds the Threshold until the volume begins to be com pressed Threshold 0 127 Volume level at which compres sion will begin Post Gain 0 18 dB Level of the outp...

Страница 187: ...05 Pads Using the Pads This chapter explains how to use the pads Fantom G_r_e book 187 ページ 2009年7月2日 木曜日 午後2時55分 ...

Страница 188: ...l continue sounding If you press other pads in this state they will also continue sounding 3 The sound will stop when you once again press a blinking pad If you press HOLD all pads will stop sounding The Hold function won t work in the following situations For a rhythm set in which Tone Env Mode p 108 is set to NO SUS For a sample set in which One Shot Mode p 118 is turned on For a sample set in w...

Страница 189: ...stem Setup screen and use the Pad Roll Resolution field to specify the speed at which repeated strikes occur when using the Roll function Editing settings common to all pads System settings p 190 Pad Roll Resolution p 292 You can use the pad ROLL BANK button to switch banks in the following pad modes 1 Press ROLL BANK ROLL BANK will blink and pads that correspond to selectable banks will blink The...

Страница 190: ... appear For details on each parameter refer to Dynamic Pad p 292 3 To save the settings press F7 Sys Write 4 Press F8 Exit to return to the Pad Setting screen Here s how to exchange two selected pads This function is available only if the pad mode is 2 RHYTHM 3 CHORD MEMORY 4 ARPEGGIO 5 RPS 6 RHYTHM PTN or 9 BOOKMARK 1 Press PAD SETTING 2 Press F2 Pad Exchg 3 Select the two pads you want to exchan...

Страница 191: ...le tone pan Sets the panning of the sample tone L64 is far left 0 is center and 63R is far right Value L64 0 63R Direction Specifies the playback direction of the sample Value FWD Play forward REV Play in reverse Trigger Mode Specifies how the sample will play when you press a pad or a key Value GATE The sample will stop playing when you release the pad or key DRUM The sample will continue playing...

Страница 192: ...will be used If you set this to a value of 1 127 that velocity value will be used to play the sound generator Value SYSTEM 1 127 Quick Setup When the pad mode is 2 RHYTHM you can use this function to make basic settings For efficient work flow choose the quick setup that is closest to your needs and then make detailed settings for each pad as desired 1 In the Pad Setting screen press F3 Quick Setu...

Страница 193: ... Value 001 128 You can save the pad settings by pressing F7 Write This pad mode allows you to use the pads to switch styles for the Arpeggio function p 78 1 Press PAD MODE and then press pad 4 ARPEGGIO 2 Use the Arpeggio function as described in Playing Arpeggios p 78 3 Press pads 1 16 to switch between different styles for the Arpeggio function Pads that can be selected will light You can press P...

Страница 194: ...l or use INC DEC to specify the tempo value 5 00 300 00 If you hold down SHIFT and turn the VALUE dial you ll be able to adjust the value below the decimal point You can also specify the tempo by repeatedly pressing F6 Tap Tempo at the desired tempo Tap Tempo function If you press F7 Click to turn it on the click will sound 4 When you ve finished making settings press F8 Close You can press PAD SE...

Страница 195: ... trigger pad BEAT If you press the trigger pad while the song is playing or recording the phrase will begin playing at the beginning of the next beat MEASURE If you press the trigger pad while the song is playing or recording the phrase will begin playing at the beginning of the next measure The Trigger Quantize parameter is a setting maintained within each song Velocity Sens Velocity sensitivity ...

Страница 196: ... the pads will play Value 01 64 Rhythm Pattern Set Numbers are stored on an individual Live Studio Set basis Using Rhythm Pattern Set Assign Source p 292 you can choose to have the Rhythm Pattern Set Number follow the setting of each Live Studio Set TEMP or follow the Fantom G s global settings SYS Rhythm Pattern Specifies the phrase that is assigned to each pad 1 16 Value OFF 0001 2000 Note Numbe...

Страница 197: ...one 4 This function is convenient when you re creating a patch p 84 A patch consists of up to four tones You can use this function to turn off unused tones or to turn off the other tones when you want to hear only the sound of a specific tone By pressing PAD SETTING you can check the current pad status This pad mode allows you to use the pads to directly mute silence up to sixteen tracks in the so...

Страница 198: ...lled If you want to delete a registered screen hold down PAD SETTING in the screen of step 1 and press the pad whose registration you want to clear You can press ROLL BANK to switch banks 1 8 p 189 In the Pad Setting screen you can press F2 Pad Exchg to exchange two pads Pad Exchange p 190 This pad mode allows you to use the pads to turn external MIDI transmit channels 1 16 on off 1 Press PAD MODE...

Страница 199: ...dividually switch the patch multi effect of each part 1 16 on off 1 Press PAD MODE and then press pad 12 PATCH MFX SW When you press a pad the patch multi effect of the corresponding part will be switched on off The number of parts will depend on the sound generator mode A pad will be lit when the corresponding effect is on or blinking when it is off Pads not used in this pad mode will be dark By ...

Страница 200: ... BANK to switch banks 1 3 p 189 Press a pad to switch the corresponding part between muted play The number of internal sound generator parts will depend on the sound generator mode The number of parts on an expansion board will depend on the expansion board Pads whose corresponding part is muted will blink The pads of other parts will be lit Unused pads will be dark By pressing PAD SETTING you can...

Страница 201: ...ou switch live sets or studio sets 1 Press PAD SETTING 2 The User Group screen will appear Proceed to step 4 of Registering a sound in the User Group screen below Registering a sound in the User Group screen Here s how to register a patch in the patch list screen Using the same procedure steps 3 and following you can use the live set list screen p 60 to register a live set in the user group or the...

Страница 202: ...s single live or studio For details on the Favorite function refer to Creating a List of Frequently Used Sounds Favorite p 54 1 Press PAD MODE and then press pad 16 FAVORITE You can press a pad 1 16 to select the sound setting that s registered in that pad By pressing ROLL BANK you can switch banks 1 16 p 189 If you want to use the pads to successively select live sets or studio sets set the syste...

Страница 203: ...his chapter explains how to use the sequencer to play record and edit songs Playing Back a Song p 204 Recording MIDI p 217 Recording Audio p 228 Editing Songs p 232 Saving a Song p 254 Fantom G_r_e book 203 ページ 2009年7月2日 木曜日 午後2時55分 ...

Страница 204: ...14 You can audition phrases from within a Fantom G project Here s how to play a Fantom G song Here s how to access the Song List and load a song from the project When you load a song the temporary area p 35 of the sound generator will be in the state it was when you created the song Before loading a song you should save the patch or live set or studio set that you were editing 1 Press SONG The Son...

Страница 205: ...Assigns a name to the track p 235 Track Edit Insert Inserting a Blank Mea sure p 237 Track Edit De lete Deleting Unwanted Mea sures p 237 Track Edit Copy Copying Measures p 237 Tempo Track Changes the tempo p 235 Beat Track Changes the time signa ture p 236 Save As SMF Save As an SMF File p 256 F8 Song Edit Opens the Song Edit screen where you can edit a song p 232 F key Explanation Page SHIFT F1 ...

Страница 206: ...ginning of the song Press Jump to the JUMP marker Press JUMP Song playback will pause if you jump to the beginning or end of the song while playing back You can mute a track so that it will not produce sound during playback 1 Press SONG The Song Play screen will appear 2 Turn the VALUE dial or use to select the track that you want to mute 3 Use to move the cursor to PLAY fig 17 001 4 Press DEC to ...

Страница 207: ...he tempo is stored on an individual Live Studio Set basis Using Tempo Assign Source p 296 you can choose to have the tempo follow the setting of each Live Studio Set TEMP or follow the Fantom G s global settings SYS 1 Press TEMPO The Tempo window will appear fig 17 004_50 2 Turn the VALUE dial or use INC DEC to specify the playback tempo By holding down SHIFT and turning the VALUE dial you can mak...

Страница 208: ...place up to sixteen markers in a song at units of one measure This will make song editing easier since it will be easier for you to see the structure of your song or to move quickly to the location of a marker Here s how to view and edit a list of the markers in a song 1 Press SONG The Song Play screen will appear 2 Press F6 Marker The Marker window will appear The buttons perform the following op...

Страница 209: ...dial or using INC DEC to change the value in the Track Order field you can change the order in which the currently selected track is displayed If you re using a USB mouse you can also change the track display order from the Song Play screen by clicking the button shown in the illustration 6 Press F8 Close to close the Zoom Track Order window Here s how to assign a name of a track In the Song Play ...

Страница 210: ...he multi effect MFX1 2 Send the sound through the multi effect and output it in stereo This also allows you to apply chorus or reverb to the sound that has passed through the multi effect Here s how to delete a song file from the project 1 Press SONG The Song Play screen will appear 2 Press F1 Song List The Song List screen will appear 3 Turn the VALUE dial or use INC DEC or to select the song tha...

Страница 211: ...hat s saved in the project If a song you re editing is open save the song before you continue p 254 1 Press SONG The Song Play screen will appear 2 Press F7 Song Util The Song Utility Menu window will appear 3 Use to choose Song Clear and press F8 Select To cancel press F7 Cancel A confirmation message will appear 4 Press F7 OK to execute If you decide not to execute press F8 EXIT Erasing the Curr...

Страница 212: ...nd listen to a standard MIDI file SMF that you copied as described in Copying a Standard MIDI File SMF from Your Computer to the Fantom G p 212 When playing SMF data we recommend that you put the sound generator in Studio mode The Fantom G is GM GM2 compatible so if the music data is compatible with GM GM2 it will automatically play back with the appropriate sounds 1 Press SONG The Song Play scree...

Страница 213: ... if you turn off the power If you want to keep the phrase press WRITE to save it p 216 You can access the SMF List and import a standard MIDI file SMF from the project into a song You can then use the imported SMF as a Fantom G song 1 Press SONG The Song Play screen will appear 2 Press F2 SMF List The SMF List screen will appear 3 Turn the VALUE dial or use INC DEC or to select an SMF file 4 Press...

Страница 214: ...se MIDI Phrase List F key Explanation Page F1 Load Loads a phrase from the project into memo ry p 214 F2 Save Saves the selected phrase to the project p 216 F3 Util Menu Save All Save all phrases p 216 Delete Phrase Deletes the phrase file from the project p 215 Duplicate Duplicates the phrase p 215 F6 Edit Returns to the previous screen F7 Preview Auditions the selected phrase p 214 F8 Phrase Edi...

Страница 215: ...ll appear 6 Press F7 OK If you decide to cancel press F8 EXIT This operation will duplicate a phrase to a vacant number in the list You can use this to create variations by modifying an existing phrase 1 Press SONG The Song Play screen will appear 2 Press F3 Phrase List The MIDI Phrase List screen will appear 3 Turn the VALUE dial or use INC DEC or to select a phrase 4 Press F3 Util Menu The Phras...

Страница 216: ...ever turn off the power while writing is in progress 7 Press F7 OK to execute If you decide to cancel press F8 EXIT You can t save a phrase by overwriting an existing phrase This operation will save all phrases of the phrase list into the project 1 Press SONG 2 Press F3 Phrase List The MIDI Phrase List screen will appear Phrases without the symbol and phrases with the symbol have not been saved 3 ...

Страница 217: ...ests one by one This method is suitable when you need to enter notes at a precise timing such as when recording drums or bass You can t step record directly into a song You can use step recording to record a phrase This cancels the result of the following edit recording operations reverting to the original state Phrase modify p 239 Microscope p 250 Phrase recording realtime step p 220 Track Edit p...

Страница 218: ...g This means that Studio mode is the appropriate choice when recording or playing back an ensemble performance using multiple instruments such as drums bass and piano We recommend that you turn the Keyboard Switch p 69 off for all parts If this is on multiple parts of your performance will be recorded to a single phrase which is not what you want when creating a song Selecting Studio mode p 66 Sel...

Страница 219: ...e button at least three times in quarter note intervals of the desired tempo 3 When you ve finished making settings press F8 Close Here s how to select the MIDI track on which you ll record and specify the recording start measure You can record on any of the tracks 1 128 that indicates MIDI You are free to simultaneously record MIDI data for multiple sound generator parts on the same MIDI track an...

Страница 220: ...piano We recommend that you turn the Keyboard Switch p 69 off for all parts If this is on multiple parts of your performance will be recorded to a single phrase which is not what you want when creating a song Selecting Studio mode p 66 Selecting a Studio Set p 67 Selecting a sound for each part p 68 Here s how to specify the tempo at which you ll record the phrase Tempo or time signature settings ...

Страница 221: ...pear 2 Press F3 Phrase List The MIDI Phrase List screen will appear 3 Turn the VALUE dial or use INC DEC or to select the phrase that you want to record If a phrase already exists in the selected number The existing phrase will be overwritten by your new recording If there is no phrase in the selected number A new phrase will be recorded Proceed to Realtime Recording p 222 Proceed to Step Recordin...

Страница 222: ...e Rec Standby window will appear In this window you can set various parameters related to realtime recording 3 Use CURSOR to move the cursor to the various parameters and turn the VALUE dial or use INC DEC to set them For details on the parameters refer to Realtime Rec Standby Parameters p 223 In the Realtime Rec Standby windows you can press F6 to switch between recording MIDI and audio In the Re...

Страница 223: ...ecording will begin when you reach the recording start location WAIT NOTE As an alternative to pressing PLAY you can play the keyboard strike a pad or press the Hold pedal to start recording Tempo Rec Switch Specifies whether tempo changes will be recorded ON or not recorded OFF If you want the tempo to change during the song you can record those tempo changes in the tempo track If tempo changes h...

Страница 224: ...llowing downbeat Value 0 100 When you use realtime recording all of your sequencer data will normally be recorded If you want to avoid recording a specific type of data you can turn its Recording Select setting OFF 1 Press REC 2 Press F7 Rec Select The Recording Select window appears 3 Use or to select the sequencer data MIDI messages that will be recorded Note Note messages These MIDI messages re...

Страница 225: ...down that key To erase notes of a specific key range hold down the top and bottom keys of that range Data for that range will be erased for as long as you hold down those keys 4 Press F8 Close to close the Realtime Erase window You will return to the normal recording state The Rehearsal function lets you temporarily suspend recording during realtime recording This is convenient when you want to pr...

Страница 226: ...ecord Start Point Specifies the location measure beat tick at which recording will begin 5 Press F8 Start or PLAY The REC indicator will light and the Step Rec Note screen appears 6 Specify the note that you want to input Use or to select the desired parameter Note Type Specifies the length of the notes that you want to input in terms of a note value The length of the note value indicates the leng...

Страница 227: ...g press STOP The REC indicator will go dark You can Undo the result of recording p 217 Inputting a Chord Press the chord The cursor will move to the next step when you release all keys or pads Moving the input location Pressing F8 will move the input location forward by the current Note Type value Pressing F7 will move the input location backward by the current Note Type value Hold down SHIFT and ...

Страница 228: ...screen select a track and a record start location and then record After recording the sample will be assigned to the record start location of the track Sampling p 258 You can use the Sampling function to record audio The samples you record will be added to the sample list You can create a song by freely placing these samples in an audio track of the song Importing from your computer p 287 You can ...

Страница 229: ...nge the order in which the tracks are displayed Changing the Track Display Zoom and Display Order Zoom Track Order p 209 3 Use to specify the measure at which you ll start recording The recording start measure is shown in the Measure field located at the top of each PLAY screen If the track already contains a sample Each audio track always plays only one sample per track If samples overlap in a tr...

Страница 230: ... If you re recording from the AUDIO INPUT turn the rear panel LEVEL knob p 24 to adjust the input level from your external source This adjustment is not needed if you re using DIGITAL IN If the volume of the external input is too high the PEAK indicator will light In this case turn down the LEVEL knob until the PEAK indicator no longer lights If the recording level is too high the level meter in t...

Страница 231: ... INPUT jack L mono MIC GUITAR MIC GUITAR jack USB AUDIO USB connector Audio Rec Channel Audio recording channel When recording an audio track selects whether the recorded track will be stereo or mono Value MONO Recording in mono STEREO Recording in stereo Count In Selects how recording will begin Value OFF Recording will begin as soon as you press PLAY 1 MEAS When you press PLAY there will be a co...

Страница 232: ...nsert Inserts a sample phrase at the specified lo cation p 233 F2 Delete Deletes the selected sample phrase from the track p 234 F3 Copy Copies the selected sample phrase p 234 F4 Edit If a sample is selected Opens the Sample Edit screen p 266 If a phrase is selected Opens the Phrase Edit screen p 238 F5 Loop Opens the Loop window where you can specify the loop region p 208 F6 Marker Opens the Mar...

Страница 233: ...n the left mouse button and move it Here s how to insert a sample phrase at the location you specify Samples will automatically be selected for an audio track and phrases will automatically be selected for a MIDI track 1 Access the Song Edit screen p 232 2 Use to select the track into which you want to insert a sample phrase 3 Specify the location at which you want to insert a sample phrase The bu...

Страница 234: ... currently selected sample phrase will be copied immediately following itself If you re using a USB mouse you can copy a sample phrase by holding down SHIFT and clicking the sample phrase with the mouse Here s how to edit the currently selected sample phrase If a sample is selected The Sample Edit window will appear If a phrase is selected The Phrase Edit window will appear 1 Access the Song Edit ...

Страница 235: ...oose Track Name and press F8 Select To cancel press F7 Cancel 5 Assign the name For details on assigning a name refer to Assigning a Name p 42 6 Press F8 Write to finalize the name If you want the tempo to change during the song insert new tempo change data into the tempo track Following the location at which you insert the tempo change the song will play at that tempo However if you want to creat...

Страница 236: ...beat track Following the location at which you insert the beat change the song will play at that time signature You can t change the time signature in the middle of a measure The time signature can be changed only at the beginning of a measure 1 Access the Song Edit screen p 232 2 Press F7 Song Util The Song Edit Utility Menu window will appear 3 Use to choose Beat Track and press F8 Select To can...

Страница 237: ... want to edit all tracks select ALL Measure For Edit Range Specifies the measure location at which the blank measures are to be inserted and the number of blank measures to be inserted Beat Time Signature Specify the time signature This function deletes a specified area of sequencer data and moves the subsequent data to fill the gap As a result the measure length will be shortened by the number of...

Страница 238: ...n p 238 2 Press PLAY or F7 Play Editing a Phrase Phrase Edit Opening the Phrase Edit Screen F key Explanation Page F1 Clear Erases the currently edited phrase The phrase file itself that s saved in the project will not be deleted p 239 F2 Save Saves the phrase to the project p 239 F3 Modify Quantize Corrects the timing of the phrase p 240 Erase Erases unwanted performance data p 242 Delete Deletes...

Страница 239: ...rase Edit screen p 238 2 Press F6 Phrase Beat 3 Use the cursor buttons and the Value dial to specify the time signature of the phrase 4 Press F8 Close 1 Access the Phrase Edit screen p 238 2 Press F3 Modify The Phrase Modify Menu window will appear fig 19 008_50 3 Use to choose the desired function and then press F8 Select Quantize p 240 Erase p 242 Delete p 243 Copy p 243 Insert p 244 Transpose p...

Страница 240: ...recording Use this when you want to produce a shuffle or swing rhythmic feel TEMPLATE The Fantom G provides 71 quantize templates These templates contain various quantize settings for applying rhythmic feels of many different musical categories Select the template you want for quantization If your sequencer data notes are too far off from accurate time Template Quantize may not work that efficient...

Страница 241: ...g beats small dynamics 010 Dance pushing beats large dynamics 011 Dance pushing beats light swing 012 Dance pushing beats heavy swing 013 Fusion small dynamics 014 Fusion large dynamics 015 Fusion light swing 016 Fusion heavy swing 017 Fusion dragging beats small dynamics 018 Fusion dragging beats large dynamics 019 Fusion dragging beats light swing 020 Fusion dragging beats heavy swing 021 Fusion...

Страница 242: ...touch Pitch Bend System Exclusive Tune Request Range Min Range Max If you have set the Status parameter to NOTE P AFT C C or PROG specify the range Set Range Min to the lowest value of the range and Range Max to the highest value of the range To erase all notes or polyphonic aftertouch data set Range Min to C 1 and Range Max to G9 To erase C4 set Range Min and Range Max to C4 To erase C3 through C...

Страница 243: ...e data from the copy source with the existing data in the copy destination REPLACE Musical data in the copy destination will be erased i e overwritten when the copy takes place Only the sequencer data of the MIDI channels specified by the Channel parameter will be overwritten and data of other MIDI channels will remain Copy Times Specifies the number of times that the data will be copied to the co...

Страница 244: ...sed For example if you want to transpose notes in the range of C3 through C4 set Range Min to C3 and Range Max to C4 You can also specify the key range by pressing keys on the keyboard Bias Specifies the transpose amount in semitone steps Set a positive value to raise the pitch or a negative value to lower the pitch If you do not want to transpose set this to 0 Value 127 127 Inserting a Blank Meas...

Страница 245: ... parameter to add a fixed bias amount to all velocities If you want to increase the velocity values by 10 set this to 10 Value 99 99 Magnify Set this parameter if increases or decreases in velocity variations are desired For less velocity variation use settings of 99 or less For more velocity variation set it to 101 or greater With a setting of 100 velocity values do not change Value 0 200 Range M...

Страница 246: ...o change the MIDI channel of C4 set Range Min and Range Max to C4 To change C3 through C4 set Range Min to C3 and Range Max to C4 To change the MIDI channel of all controller numbers set Range Min to 0 and Range Max to 127 To change the MIDI channel of all program numbers set Range Min to 1 and Range Max to 128 To change number 4 set Range Min and Range Max to 4 To change numbers 3 through 14 set ...

Страница 247: ...t this parameter if you wish to increase or decrease all durations by a fixed amount If you want to extend all duration by 10 set this to 10 Value 4800 4800 Magnify Set this parameter if you wish to increase or decrease durations by a specified ratio When set to 100 no change is made A value of 101 or higher increases the duration values of 99 or lower decrease the duration For example to halve du...

Страница 248: ...e tick If you set For to ALL all measures will be specified Bias Specify the amount number of ticks by which the sequencer data will be moved Value 4800 4800 Status Selects the type of data to be shifted in time Value ALL NOTE Poly Aftertouch Control Change Program Change Channel Aftertouch Pitch Bend System Exclusive Tune Request Range Min Range Max If you set the Status parameter to NOTE P AFT C...

Страница 249: ... Poly Aftertouch Control Change Channel Aftertouch Pitch Bend Range Min Range Max If you set the Status parameter to P AFT or C C specify the range of data Set Range Min to the lowest value of the range and Range Max to the highest value of the range To thin out all polyphonic aftertouch data set Range Min to C 1 and Range Max to G9 To thin out C4 set Range Min and Range Max to C4 To thin out C3 t...

Страница 250: ... 7 Use to select the parameter that you want to edit 8 Turn the VALUE dial or use INC DEC to change the value Notes the note name note number of polyphonic aftertouch data and the on velocity or off velocity of a note can also be specified by pressing a note on the keyboard If you press ENTER the performance data currently indicated by will be transmitted from the MIDI OUT connector In the case of...

Страница 251: ...ight types of sequencer data The recorded location measure beat tick is displayed at the far left of each data item and the MIDI channel number is displayed beside it Note These MIDI messages represent notes From the left the parameters are Note Number which indicates the name of the note On Velocity which specifies the force with which the key is pressed Duration which specifies the duration of t...

Страница 252: ...F none of the sequencer data will be displayed If you press F7 ALL ON all of the sequencer data will be displayed 5 Press F8 Close to close the View Select window You can insert new sequencer data into a desired location of a phrase For details on the sequencer data that can be inserted refer to Sequencer Data Handled by Phrases p 251 1 Access the Microscope screen for the phrase into which you wa...

Страница 253: ... to the measure beat and tick fields 5 Turn the VALUE dial or Press INC DEC to specify the location to which the data will be moved 6 Press F8 Execute to move the sequencer data Sequencer data can be copied to the desired location This is convenient when you want to use the same sequencer data at multiple locations Data recorded in the tempo track p 235 or beat track p 236 can also be copied in th...

Страница 254: ...atically saved when you save the song If you want to save phrases individually Saving a Phrase Save p 216 If you want to save samples individually Saving a Sample Save p 274 1 In the Song Play screen or Song Edit screen press WRITE The WRITE MENU window appears 2 Use to select Song and then press F8 Select The Song Name window will appear 3 Assign a name to the song For details on how to assign a ...

Страница 255: ...original phrases As necessary use the Normalize operation p 270 to raise the volume The resampled sample will be lost if you turn off the power If you want keep the sample press WRITE to save it p 274 A sample you created by resampling can be copied to your computer The sample will be a WAV file which you can use to create a CD or MP3 on your computer 1 Verify the number of the sample you resample...

Страница 256: ...ernal memory the SMF file will be saved in the FantomG Prj SEQ SMF folder The filename extension will be MID whether you select Save SMF Format 0 or Save SMF Format 1 The two cannot be distinguished in this way When you save data in SMF format the sound setup data will not be saved In order to ensure that the correct sounds are played you must record the appropriate bank select and program numbers...

Страница 257: ...07 Sampler This chapter explains how to sample sounds and edit samples Sampling p 258 Editing a Sample p 263 Fantom G_r_e book 257 ページ 2009年7月2日 木曜日 午後2時55分 ...

Страница 258: ...ess CURSOR to select the parameter that you want to set 4 Turn the VALUE dial or press INC DEC to set the value See Functions of Input Setting Parameters p 258 for each parameter s functions 5 Play back the external input source 6 If you use AUDIO INPUT turn the LEVEL knob rear panel p 24 to adjust the volume If you re using DIGITAL AUDIO IN or USB AUDIO this adjustment is not necessary If the vol...

Страница 259: ... 0 127 Mix In Reverb Send Level Depth of reverb applied to the external input sound Set this to 0 if you don t want to apply reverb Value 0 127 1 Hold down SHIFT and press MIX IN The Input Effect Setup screen appears fig 14 003_50 2 Press CURSOR to move the cursor to a parameter 3 Turn the VALUE dial or press INC DEC to set the value Input Effect Type Selects the input effect type In this settings...

Страница 260: ...ng will end Value MANUAL Continue sampling until you press STOP BEAT Stop sampling after the specified number of beats at the current tempo BPM TIME Sample the specified length of time Sampling Procedure Mode Explanation Sampling F1 Sampling Sample a sound from an external in put source Operating the keyboards pads D beam or sequencer will not play the internal sound generator Re Sampling F2 Re Sa...

Страница 261: ...nt settings p 267 will be automatically adjusted after sampling is performed so any silent portions at the beginning or end of the sampled sound are excluded 4 Play the external input source 5 If you use AUDIO INPUT turn the LEVEL knob rear panel p 24 to adjust the volume If you re using DIGITAL IN this adjustment is not necessary If the volume of the external source is too high the PEAK indicator...

Страница 262: ...ctly fig 14 009 Button lit Skip back sampling can be performed in this state Button unlit Skip back sampling cannot be performed Not operating You cannot use skip back sampling if there is insufficient free memory Button blinking Skip Back Sampling will be executed 1 Play the Fantom G s keyboard or pads or connect an instrument or some other device to the AUDIO IN jacks or DIGITAL AUDIO IN and inp...

Страница 263: ... samples in the list If you press F5 Mark All when all samples in the list already have a check mark the check marks will be cleared from all samples Selecting a Sample Sample List Selecting a Sample F key Explanation Page F1 Load Loads a sample from the project into memory p 264 F2 Save Saves the selected sample to the project p 274 F3 Util Menu Save All Saves all samples p 274 Load All Loads all...

Страница 264: ... to select Load All and then press F8 Select To cancel press F7 Cancel A message will ask you for confirmation 5 Press F7 OK to execute To cancel press F8 EXIT This operation erases unloads the sample from sample memory The sample file itself that is saved in the project will not be deleted 1 Press SAMPLE The Sample Edit screen will appear 2 Press F1 Sample List The Sample List display appears fig...

Страница 265: ...ial INC DEC or to select a sample 4 Press F3 Util Menu The Sample Utility Menu window will appear 5 Press or to select Delete Sample and then press F8 Select To cancel press F7 Cancel A message will ask you for confirmation 6 Press F7 OK to execute To cancel press F8 EXIT Audio files WAV AIFF from your computer can be imported into memory as samples Importing Audio file Import Audio p 287 Deleting...

Страница 266: ... high frequency range p 269 Normalize Maximizes the volume p 270 Amp Applies a volume enve lope p 270 Time Stretch Stretches shrinks the sample p 271 Chop Divides the sample p 272 F4 Beat Specifies the start end point of the sample in units of a beat p 267 F5 Beat Specifies the start end point of the sample in units of a beat p 267 F6 Zoom Zooms the waveform display p 266 F7 Preview Auditions the ...

Страница 267: ...djustments and zoom out when making major adjustments p 266 You can move the point in units of one beat by pressing F4 Beat or F5 Beat After specifying the start point and end point you can execute Truncate p 269 to delete unwanted portions at the beginning and end of the sample Sample modify menu operations Chop Normalize etc apply to the entire sample Even if you specify a start point or end poi...

Страница 268: ... TEMPO Specifies the original tempo of the sample When setting the BPM tempo value you can hold down SHIFT and turn the VALUE dial or use INC DEC to adjust the value to the right of the decimal point Value 5 00 300 00 In order to synchronize the tempo Wave Temp Sync p 92 must be turned on Time Stretch Type Specifies how the tempo will be synchronized Decreasing this value will optimize the sound f...

Страница 269: ...pressing F7 OK to execute will create the edited sample in the lowest unused sample number in the list In some cases the audio quality will be improved if you boost the high frequency range of an imported sample Also the high frequency range of the sample may be emphasized when you use a sampler made by another manufacturer In this case you can minimize the change in tonal character by attenuating...

Страница 270: ... Modify The Sample Modify Menu window will appear 3 Press or to select Amp and then press F8 Select To cancel press F7 Cancel 4 Use VALUE dial or INC DEC to set the value Rate Specifies the rate of volume boost This specifies how much boost will be applied relative to the current volume The entire sample you select will be boosted Value 0 400 5 If you want to specify a point press F5 Point to ligh...

Страница 271: ...ngth of the sample as a time value Rate Specifies the length relative to the current length of the sample Value 50 0 200 0 Type Lower settings of this value will make the sound more suitable for faster phrases and higher settings will make the sound more suitable for slower phrases Value TYPE01 TYPE10 Quality Adjust Make fine adjustments to the tonal quality of the Time Stretch Value 1 10 5 Use VA...

Страница 272: ...to 15 locations at which to divide the sample i e the sample will be divided into a maximum of 16 pieces 8 Audition the sample as described in the section Auditioning the Divided Samples p 273 If you want to re make settings move or delete the point p 273 9 Press F8 Execute A message will ask you for confirmation 10 To execute the division press F7 OK To cancel press F8 EXIT When you execute the C...

Страница 273: ...ing to your settings and the points will be specified A maximum of 15 division points will be set 16 regions To cancel press F7 Cancel 9 Audition the sample as described in the section Auditioning the Divided Samples p 273 If you want to re make settings move or delete the point Moving a Dividing Point p 273 10 Press F8 Execute A message will ask you for confirmation 11 To execute the division pre...

Страница 274: ...ask you for confirmation Never switch off the Fantom G while data is being saved 9 Press F7 OK to execute the save operation To cancel the operation press F8 EXIT You can t save by overwriting another sample You can also save a sample by pressing the WRITE button to access the WRITE MENU and then choosing Sample Here s how to save all samples of the sample list into the project 1 Press SAMPLE 2 Pr...

Страница 275: ... number For details on making this setting refer to How to Make Patch Settings p 84 If you want to use a stereo multisample specify the same number for L and R 5 Press F4 Util Menu The Song Utility Menu window will appear 6 Use to choose Multisample Edit and press F8 Select The Multisample Edit window will appear 7 Edit the multisample For details on editing refer to Editing a multisample p 276 8 ...

Страница 276: ...ple from a key to another key p 277 11 Specifies the original key of the sample p 278 12 Opens the Tone Switch Select window p 277 13 Moves the split point p 277 14 Returns a multisample to the last written state p 277 15 Erases all notes p 278 16 Assigns a sample to the current zone p 278 17 Sorts samples in a multisample in the order of their original key p 278 18 Moves all samples to left or ri...

Страница 277: ...e key to which the copy source sample is assigned You can also select the note by using VALUE dial or INC DEC The Sample Data area shows information about the sample assigned to the current note 2 Press F4 Copy so it lights in red 3 Press the copy destination key If you specify a region by pressing more than one key the data will be copied to the region between the lowest and highest keys you pres...

Страница 278: ...ey window will open The buttons have the following functions VALUE dial INC DEC Change the original key of the sample assigned to the current note F7 Preview The sample will play at its current original key while you continue holding down the button F8 Close Closes the Sample Original Key window Keyboard When you play the keyboard the original key of the sample assigned to the most recently presse...

Страница 279: ...08 Various Settings Menu and System This chapter explains the menus and system settings Menu Reference p 280 System Settings p 290 V LINK p 305 Fantom G_r_e book 279 ページ 2009年7月2日 木曜日 午後2時55分 ...

Страница 280: ...ss ENTER The Project Menu will appear 3 Turn the VALUE dial or use CURSOR to choose Load Project and then press F8 Select You can also press F1 Load to execute this 4 Press F1 Internal or F2 USB Memory to select the load source area internal memory or USB memory 5 Use or to select the project that you want to load 6 Press F8 Load A confirmation message will appear 7 Press F7 OK to execute If you d...

Страница 281: ...nal memory or USB memory under a different name 1 Press MENU to access the Menu window 2 Turn the VALUE dial or use CURSOR to choose Project and then press ENTER The Project Menu will appear 3 Turn the VALUE dial or use CURSOR to choose Save As Project and press F8 Select You can also press F3 Save As to execute this 4 Press F1 Internal or F2 USB Memory to select the save destination area internal...

Страница 282: ...s An error message may appear if the data cannot be successfully saved such as when there is insufficient space in internal memory Error Messages p 322 lists the various errors that may appear and explains the appropriate response If you selected USB memory according to the default settings projects will be named using a sequential number like this FantomG001 FantomG002 etc but you are free to cha...

Страница 283: ...you execute the Restore Project operation 1 Press MENU to access the Menu window 2 Turn the VALUE dial or use CURSOR to choose Project and then press ENTER The Project Menu will appear 3 Turn the VALUE dial or use CURSOR to choose Restore Project and then press F8 Select You can also press F6 Restore to execute this A confirmation message will appear 4 Press F7 OK to execute If you decide to cance...

Страница 284: ... process has been completed 4 When the display indicates Factory Reset Completed press F7 OK This formats initializes the USB memory that s connected to the rear panel USB MEMORY connector If the format of the USB memory is other than FAT it won t be recognized by the Fantom G Nor will the Fantom G be able to format it In this case use your computer to format the USB memory using the FAT or FAT32 ...

Страница 285: ...uter 2 Use a USB cable to connect the Fantom G to your computer 3 Turn on the power POWER ON switch of the Fantom G When the Fantom G is connected to your computer you can select the area on the Fantom G to which a connection is to be made either the internal user area or the USB memory 1 Press MENU 2 Turn the VALUE dial or use CURSOR to select USB Storage and then press ENTER The USB Storage scre...

Страница 286: ...Mac OSX Users 1 Drag the Fantom G drive icon into the trash 2 Press EXIT Cautions Regarding Folders and Files Standard MIDI Files Place the files in the following folder FantomG Prj SEQ SMF folder FantomG Prj is the name of the project folder in the Fantom G s internal memory Multiple projects can be saved in USB memory By default the project folder names will be numbered as FantomG001 Prj FantomG...

Страница 287: ... MIDI file MID to the following folder of the Fantom G s internal memory or the USB memory FantomG Prj SEQ SMF folder FantomG Prj is the name of the project folder in the Fantom G s internal memory Multiple projects can be saved in USB memory By default the project folder name will be numbered as FantomG001 Prj FantomG002 Prj etc but the portion preceding the filename extension will be the project...

Страница 288: ... area internal memory or USB memory 8 Press or to select the file that you want to import 9 Press F8 Select The file you want to import will be displayed To cancel press F7 Cancel 10 Press F8 Execute The file will be imported To cancel press F7 Cancel The changed wallpaper setting is temporary and will be lost when you turn off the power If you want to keep the setting press F7 Sys Write to write ...

Страница 289: ...e imported and the Sample List screen will appear To cancel press F8 EXIT The imported file will be added to the sample list as a sample This sample is temporary and will be lost when you turn off the power If you want to keep it press WRITE to save the data p 274 By pressing F4 Mark or F5 Mark All you can add marks to the list allowing you to perform operations such as Delete or Import on multipl...

Страница 290: ... want to edit 7 To save the settings you modified press F7 Sys Write and perform the Write operation If you do not want to save press EXIT to return to the previous screen Changes you make to the System function settings are only temporary they will be discarded as soon as the power is turned off If you want to keep any changes you ve made in the system settings you must save them in internal syst...

Страница 291: ...e selected USER GROUP UP The user group patch of the next number or bank will be selected USER GROUP DOWN The user group patch of the previous number or bank will be selected FAVORITE UP The favorite patch live set studio set of the next number or bank will be selected FAVORITE DOWN The favorite patch live set studio set of the previous number or bank will be selected PANEL SWITCH The result will ...

Страница 292: ...ce Value REAL 1 127 Pad Sens Pad Sensitivity Specifies the relation between your striking force and the velocity that is produced Value LIGHT It will be easy to produce the maximum velocity without having to strike very hard MEDIUM This is the standard pad sensitivity setting HEAVY You will have to strike quite strongly to produce the maximum velocity Pad Aftertouch Sens Pad Aftertouch Sensitivity...

Страница 293: ...ssign SYS or the setting of the live set or studio set TEMP Value SYS TEMP Knob 1 4 Assign Specify the functions that will be controlled by the knobs Value OFF Off CC01 31 CC32 OFF 33 95 Control Change AFTERTOUCH Aftertouch PITCH BEND Pitch Bend ARPEGGIO ACCENT Arpeggio accent rate ARPEGGIO SHUFFLE Arpeggio shuffle rate ARPEGGIO OCT UP The range in which the arpeggio is sounded will rise in steps ...

Страница 294: ...hether the S1 S2 switches will follow the system settings SYS or the settings of the live set or studio set TEMP Value SYS TEMP Switch S1 S2 Assign Specify the functions that will be controlled by the S1 S2 switches Value Live Set OFF CC01 CC31 CC32 OFF CC33 CC95 AFTERTOUCH MONO POLY PFX SWITCH MFX SWITCH RESERVE CHORUS SWITCH REVERB SWITCH MASTERING SWITCH MASTER KEY UP MASTER KEY DOWN SCALE TUNE...

Страница 295: ...ration Value MASTER The Fantom G will be the master Use this setting when you want other devices to follow the operation of the Fantom G SLAVE The Fantom G will be the slave Use this setting when you want the Fantom G to receive MMC MIDI Machine Control from an external device and operate accordingly MMC MIDI Machine Control is a specification that allows MIDI messages to be used to control device...

Страница 296: ... Use the tempo of each Live Studio Set SYS Switching the Live Studio Set will not change the tempo the song s tempo will be used Types of MTC The types of MTC that can be selected by the Fantom G are shown below Select the same frame rate as that set for the external device When not using a video device then any frame rate may be selected as long as the rates are the same on both devices being syn...

Страница 297: ...r pedal and so on or not disconnected ON Normally this is left ON but if you wish to use the Fantom G s keyboard and controllers to control only external sound modules set it to OFF Value OFF ON Master Tune Adjusts the overall tuning of the Fantom G The display shows the frequency of the A4 note center A Value 415 3 466 2 Hz Master Level Adjusts the volume of the entire Fantom G Value 0 127 Master...

Страница 298: ...ch Remain function is valid only for the most recently selected sound Notes of a sound selected earlier may be interrupted The Patch Remain setting does not apply to sounds of an expansion board Control Remain Control Remain Switch Specifies whether changes in the sound and volume produced by received MIDI data such as volume and pan CC 5 7 10 65 68 71 74 RPN 0 1 2 MONO ON POLY ON and by the vario...

Страница 299: ...sing Switch Specifies whether Active Sensing messages will be transmitted ON or not OFF Value OFF ON Transmit Edit Data Transmit Edit Data Switch Specify whether changes you make in the settings of a patch live set or studio set will be transmitted as system exclusive messages ON or will not be transmitted OFF Value OFF ON Soft Through Soft Through Switch Thru function re transmits all messages re...

Страница 300: ...d successively one by one CHORD The notes specified by Note Number 1 4 parameter will sound simultaneously PHRASE The Phrase associated with the patch s type category is played USB Scale Tune Preview Equal Temperament This tuning divides the octave into 12 equal parts and is the most widely used method of temperament used in Western music The Fantom G employs equal temperament when the Scale Tune ...

Страница 301: ...ccurs correctly reconnect the external device or turn the Fantom G s MIX IN switch off Digital USB Input Level If you ve set Input Select to DIGITAL IN or USB AUDIO this adjusts the input level Value 0 127 Mix In Switch Turns the external input on off Value OFF ON Default File Type Specifies the file format used when saving a sample Value WAV AIFF Pre Sample Time The length of sound preceding the ...

Страница 302: ... a project STUDIO The Fantom G will be in Studio mode when load a project LIVE The Fantom G will be in Live mode when load a project Sequencer Auto Track Switch In the Realtime Rec Standby window when recording a song this function will automatically select the same track number as the part you re recording For example if the current part of the sound generator is part 3 MIDI track 3 of the song w...

Страница 303: ...r Computer USB Storage p 285 3 Press MENU to access the menu 4 Turn the VALUE dial to select System and then press ENTER 5 Press F5 Wallpaper The Wallpaper screen will appear Sixteen different images can be shown as the background The imported file will overwrite the currently selected image If you want to delete an imported file select an image 1 16 and press F2 Delete 6 Press F1 Import BMP 7 Pre...

Страница 304: ...E dial or use CURSOR to choose System and then press ENTER 3 Press F6 Appearance The Appearance screen will appear Transparent Switch Specifies whether windows in the screen will be transparent ON or not OFF Value ON OFF Transparency Specifies the degree of transparency for windows in the screen Higher values produce greater transparency Value 1 120 Display related Settings Appearance Fantom G_r_e...

Страница 305: ...n which the Fantom G is connected to the motion dive tokyo Performance Package Use a MIDI cable to connect the Fantom G s MIDI OUT connector to the MIDI IN connector of the Edirol MD P1 To prevent malfunction or speaker damage minimize the volume on all your equipment and turn off the power before you make connections fig 29 001 e 1 In the left of the panel press V LINK so the indicator is lighted...

Страница 306: ...or of the image Brightness Ctrl Control change number that controls the brightness of the image VFX1 4 Ctrl Control change number that controls the video effect Fade Ctrl Control change number that controls the output fade Value OFF CC1 CC5 CC7 CC10 CC11 CC71 74 CC91 93 Channel Aftertouch PAD MODE Selects whether the pads will switch clips or palettes Value CLIP PALETT Press F1 Clip switches clips...

Страница 307: ...Appendix Installing the Expansion Boar p 308 Expanding the DIMM Memory p 312 Troubleshooting p 316 Error Messages p 322 About MIDI p 323 Specifications p 326 Fantom G_r_e book 307 ページ 2009年7月2日 木曜日 午後2時55分 ...

Страница 308: ...rews When turning the unit upside down get a bunch of newspapers or magazines and place them under the four corners or at both ends to prevent damage to the buttons and controls Also you should try to orient the unit so no buttons or controls get damaged When turning the Fantom G8 upside down at least two persons are required to safely lift and turn the Fantom G8 Make sure to have a firm grip to p...

Страница 309: ...after inserting an expansion board 1 Turn on the power as described in Turning On the Power p 28 2 When the Fantom G starts up an install confirmation screen for the newly inserted expansion board will appear Press F8 Execute to execute the install confirmation process If you decide to cancel press F7 Cancel If the install confirmation screen does not appear when you start up for the first time it...

Страница 310: ...ébrancher l appareil avant de commencer l installation de la carte ARX series 915 F N installez que les cartes de circuits imprimes spécifiées ARX series Enlevez seulement les vis indiquées Lorsque vous déposez le Fantom G face vers le bas placez des piles de journaux ou de magazines sous les quatre coins ou des deux côtés pour le soutenir Ainsi les boutons manettes et autres pièces ne seront pas ...

Страница 311: ...te d expansion 1 Mettre l appareil sous tension de la façon décrite à la rubrique Turning On the Power p 28 2 Au démarrage du Fantom G un message s affichera pour confirmer la présence de la carte d expansion installée récemment Appuyer sur F8 Exécuter pour exécuter le processus de confirmation Pour annuler la procédure appuyez sur F7 Annuler Si l écran de confirmation ne s affiche pas lors du pre...

Страница 312: ...f the screw may be stripped To remove a screw rotate the screwdriver counter clockwise To tighten the screws rotate the screwdriver clockwise Be careful that the screws you remove do not drop into the interior of the Fantom G Be careful not to cut your hand on the edge of the cover or the opening edge while removing the cover Do not touch any of the printed circuit pathways or connection terminals...

Страница 313: ...r as described in Turning On the Power p 28 2 Press MENU to open the Menu window 3 Turn the VALUE dial or use CURSOR to select System and then press ENTER 4 Press ENTER 5 Press F4 Info 6 Press F1 Up or F2 Down to select Memory Info Verify that the screen correctly shows the amount of memory you installed 7 Press EXIT to exit the System screen If the correct amount of memory is not shown it is poss...

Страница 314: ...e des aiguilles d une montre Pour serrer les vis tourner le tournevis dans le sens des aiguilles d une montre Assurez vous que les vis que vous retirez ne tombent pas à l intérieur du Fantom G Faites attention de ne pas vous couper sur le bord du couvercle ou de l ouverture lorsque vous retirez le couvercle 911 F Ne pas toucher aux circuits imprimés ou aux connecteurs 912 F Ne jamais forcer lors d...

Страница 315: ...ez de la difficulté à insérer le module de mémoire inclinez le légèrement et insérez une extrémité à la fois 5 Ramenez les clips blancs vers le haut et appuyez dessus jusqu à ce que le module de mémoire soit verrouillé en place fig 31 005 6 À l aide des vis retirées à l étape 2 remettez le couvercle en place Pour retirer le module de mémoire procédez à l inverse de la procédure d installation 1 Ap...

Страница 316: ...properly in the specified slot p 308 p 310 Has the volume been lowered by pedal operations or by MIDI messages volume messages or expression messages received from an external MIDI device Could the Favorite Level be set to 0 p 54 In the case of Live Studio mode the value of volume messages Volume and expression messages Expression can be viewed in the Part Information window p 132 Have the samples...

Страница 317: ...annot be increased further The upper time limit for each is the maximum value that can be set other than the numerical value for the beat Even when I set the Pan for a Patch completely to one side sound still comes from the other channel The Fantom G s internal effects are in stereo so if you have effects applied to a Patch even if the Pan is set all the way to one side you will still be able to h...

Страница 318: ...hanges in volume and noise from this may be audible as a result Multi effect 43 TAP DELAY or other delay time value is set to the note and then the tempo is slowed down does the delay time not change beyond a fixed length Such Delay time settings have an upper limit so if the upper limit of a value set to the note is exceeded when the tempo is retarded that upper value cannot rise any further The ...

Страница 319: ...rogram Change number will play Try resettling the tone using the panel controls Furthermore when selecting tones from an external MIDI device be sure to send the Bank Select MSB LSB and the Program Change as a single set for reliable reproduction First sending the MSB and LSB the order in which these are sent does not matter followed by the Program Change In some cases you may be unable to hear an...

Страница 320: ...mit channel of the external MIDI device and the Fantom G s MIDI Receive channel are matched When the Bend Range for a Patch is increased 48 the pitch does not rise sufficiently even when a MIDI Pitch Bend message is received While Patch Bend Ranges can be set anywhere between 0 and 48 when certain Waves in which the pitch is raised in the direction are used the pitch may stop rising at a fixed poi...

Страница 321: ...e effect settings appropriate Some types of effect may increase the level louder than the original sample or may intentionally distort the sound Some effects will also cause noise to be emphasized Temporarily turn off effects and check whether the sample itself contains noise or distortion Then adjust the effect settings appropriately Are multiple samples being played simultaneously Even if the le...

Страница 322: ...Fantom G is playing this operation cannot be execut ed Stop playback before you execute the operation Permission Denied The file is protected Playback Tempo Range Over Tempo values exceed the allowable limit and data is created in which the closest time available within the allowable range is specified Read Error Failed to load data from USB memory Make sure that USB memory is correctly connected ...

Страница 323: ...on intended for that device out of the variety of information that is being transmitted to it fig 33 004 e MIDI uses sixteen channels 1 through 16 Set the receiving device so that it will receive only the channel that it needs to receive Example Set the Fantom G to send Channel 1 and Channel 2 then set sound module A to receive only Channel 1 and sound module B only Channel 2 With this setup you c...

Страница 324: ... O Reverb O Chorus O X X O X O 1 O X X X X X X X X X O 1 X 1 16 1 16 Mode 3 Mode 3 4 M 1 O O 0 127 0 127 O 1 O 1 O 1 O 1 0 127 O 1 X X X X X O O X O 123 127 O X Bank select Modulation Portamento time Data entry Volume Panpot Expression Hold 1 Portamento Sostenuto Soft Legato foot switch Resonance Release time Attack time Cutoff Decay time Vibrato rate Vibrato depth Vibrato delay General purpose co...

Страница 325: ...O 0 127 O O O O O O O O 1 O 1 X O O 1 O 1 O O X 2 O 3 O X All channel 1 16 X X O O 0 127 0 127 O 1 O 1 O 1 O 1 0 127 O 1 O 2 O 1 X O O 1 O 1 O O X O 123 127 3 O X 1 O X is selectable 2 Not stored transmitted when received but can be created and transmitted using Microscope 3 Mode Messages 123 127 are recorded and transmitted after all currently sounding notes are turned off The All Note Message it...

Страница 326: ...16 systems 76 types Multi Effects MFX 2 systems 78 types Chorus 1system 3 types Reverb 1system 10 types Input Effects 1system 6 types Mastering Effects 1system 3 band compressor Sampling Section Data Format 16 bit linear File Type WAV AIFF Sampling Frequency 44 1 kHz fixed Maximum Sampling Time When sampling memory isn t expanded 32 MB mono 360 sec approx stereo 180 sec approx When sampling memory...

Страница 327: ...AC Inlet Expansion Slots Expansion of sound generator ARX expansion boards 2 slots Expansion of sampling memory DIMM 1 slot supports Unbuffered non Registered PC133 CL 2 3 128 MB 256 MB 512 MB 1 GB 3 3 V External Storage Device USB Flash Memory Power Supply AC 117 V AC 230 V AC 240 V 50 60 Hz AC 220 V 60 Hz Power Consumption 30 W Dimensions G6 1 066 W x 411 D x 142 H mm 42 W x 16 3 16 D x 5 5 8 H ...

Страница 328: ... 3 4 94 C CD 255 Change Channel 246 Change Duration 247 Change Velocity 245 Channel Aftertouch 251 Chop 272 Chord Form 81 82 146 193 Chord Memory 22 146 193 Chord Memory Function 81 Chord Switch 146 Chorus 36 159 Chorus Level 153 156 Chorus Output Assign 153 156 Chorus Output Select 153 156 Chorus Send Level 74 144 Chorus Sw 153 156 Chorus Type 153 156 Clear 239 Clock Source 295 Coarse Tune 137 Co...

Страница 329: ...46 292 E Edit 234 Effect 36 EFFECT SW 199 EFFECTS ROUTING 23 Emphasis 269 Empty Sample 322 Empty Song 322 ENTER 23 Envelope 32 Equal Temperament 138 300 Erase 242 252 EXIT 23 EXP 1 23 EXP 2 23 EXPANSION 23 Expansion boards 35 Expression Receive Expression Switch 141 External Bank Select LSB 135 External Bank Select MSB 135 External Level 135 External Pan 135 External Program Number External Progra...

Страница 330: ...76 Knob 4 Assign 294 Knob Assign 1 4 145 Knob Assign Select 293 Knob Assign Source 293 Knob Slider Mode 293 Knob Slider 293 KS 18Z 27 KS G8 27 L Layer 62 Layer Edit Screen 64 Legato 140 Legato Retrigger Legato Retrigger Switch 105 Legato Switch 105 Level 74 144 160 Level Sample tone level 191 Level Velocity Curve 124 Level Velocity Curve TVA Level Velocity Curve 100 Level Velocity Sens 124 131 Lev...

Страница 331: ...r Screen 207 MMC Mode 295 MMC Output MMC Output Switch 295 MODE 22 Modulation Lever 23 Mono 140 Mono Poly 105 Monophonic 50 Motif Arpeggio Motif 79 Move 233 253 MP3 255 MTC 295 MTC Error Level 296 MTC Frame Rate 295 MTC Offset Time Frame 296 MTC Offset Time Hour 296 MTC Offset Time Minute 296 MTC Offset Time Second 296 MTC Sync Output MTC Sync Output Switch 295 Multi 158 Multi effect 36 Multi Effe...

Страница 332: ...ance Offset 139 Part Reverb Send Level 137 152 155 Part Scale Tune C B 138 PART SELECT 200 Part Transpose 137 Part Velocity Sens Offset 136 Part Vibrato Delay 139 Part Vibrato Depth 139 Part Vibrato Rate 139 Part View 51 133 Part Voice Reserve 141 Patch 23 33 47 84 Patch Bank 134 Patch Category 89 Patch Coarse Tune 90 Patch Finder 48 Patch Fine Tune 90 Patch Initialize 87 Patch Level 89 152 155 Pa...

Страница 333: ...e Lower 145 Rate LFO1 LFO2 Rate 103 Rate Detune LFO1 LFO2 Rate Detune 103 Ratio 160 Read Error 322 Realtime Controller 75 76 Realtime Erase 225 Realtime Recording 222 Realtime Time Stretch 92 119 130 REC 23 Rec End Point 223 Rec End Point Recording end point 231 Rec End Switch 223 Rec End Switch Recording end switch 231 Rec Length 223 Rec Length Recording length 231 Rec Length Too Short 322 Rec Mo...

Страница 334: ...t 266 Sample Length Too Short 322 Sample List 263 Sample Memory Full 322 Sample Number 191 Sample Number L Mono 130 Sample Number R 130 SAMPLE PAD 191 Sample Pad Part Number 146 Sample Pad Part Switch 136 Sample Parameters 268 Sample Set 33 53 126 Sample Set Initialize 127 Sample Set Level 129 Sample Set Name 129 Sample Set Parameter 129 Samples 36 38 SAMPLING 23 Sampling Section 38 Save 216 254 2...

Страница 335: ...22 System Write 290 T TEMPO 23 Tempo Change 236 Tempo Rec Switch 223 Tempo Sync Wave Tempo Sync 130 Tempo Track 37 235 TEMPO VALUE 23 Temporary Area 35 Threshold 160 Tie 227 Time Stretch 271 Timing 241 TMT 92 TMT Control Switch 95 TMT Velocity Control TMT Velocity Control Switch 95 Tone 32 Tone Chorus Send Level 125 131 152 154 Tone Coarse Tune 96 Tone Coarse Tune Rhythm Tone Coarse Tune 121 Tone ...

Страница 336: ...TVF Cutoff Key follow 99 TVF Depth LFO1 LFO2 TVF Depth 104 TVF Env 124 TVF ENV TVF Envelope 100 TVF Env Depth 100 124 TVF Env Level 0 4 100 TVF Env Level 0 4 TVF Envelope Level 0 4 124 TVF Env Time 1 Velocity Sens 99 123 TVF Env Time 1 4 100 TVF Env Time 1 4 TVF Envelope Time 1 4 124 TVF Env Time 4 Velocity Sens 99 123 TVF Env Time Key Follow 100 TVF Env Velocity Curve 99 123 TVF Env Velocity Sens...

Страница 337: ...Wave Number L Mono 91 119 Wave Number R 91 119 Wave Pan 120 Wave Pitch Key Follow 96 Wave Random Pan Switch 120 Wave Tempo Sync 92 119 Waveform LFO1 LFO2 Waveform 103 WG Wave Generator 32 Windows 40 WMT 120 WMT Velocity Control WMT Velocity Control Switch 120 Write 23 80 88 116 128 148 Write Error 322 Y You Cannot Erase This Message 322 You Cannot Move This Message 322 Z Zoom 266 Zoom In 227 Zoom ...

Страница 338: ...o or television reception which can be determined by turning the equipment off and on the user is encouraged to try to correct the interference by one or more of the following measures Reorient or relocate the receiving antenna Increase the separation between the equipment and receiver Connect the equipment into an outlet on a circuit different from that to which the receiver is connected Consult ...

Страница 339: ...rial San Jose Cotia Sao Paulo SP BRAZIL TEL 011 4615 5666 CHILE Comercial Fancy II S A Rut 96 919 420 1 Nataniel Cox 739 4th Floor Santiago Centro CHILE TEL 02 688 9540 COLOMBIA Centro Musical Ltda Cra 43 B No 25 A 41 Bododega 9 Medellin Colombia TEL 574 3812529 COSTA RICA JUAN Bansbach Instrumentos Musicales Ave 1 Calle 11 Apartado 10237 San Jose COSTA RICA TEL 258 0211 CURACAO Zeelandia Music Ce...

Страница 340: ...HIFT JUMP Accesses the Marker window p 208 SHIFT Jumps to the previous marker p 208 SHIFT Jumps to the next marker p 208 SHIFT REC When in the Phrase Edit screen or MIDI Phrase List screen p 226 initiates step recording Other SHIFT MIX IN Accesses the Input Setting screen p 258 SHIFT EXIT Undo p 217 Song Play screen SHIFT DEC INC Changes the number of tracks displayed p 209 SHIFT Changes the numbe...

Отзывы: