background image

Copying

30

2

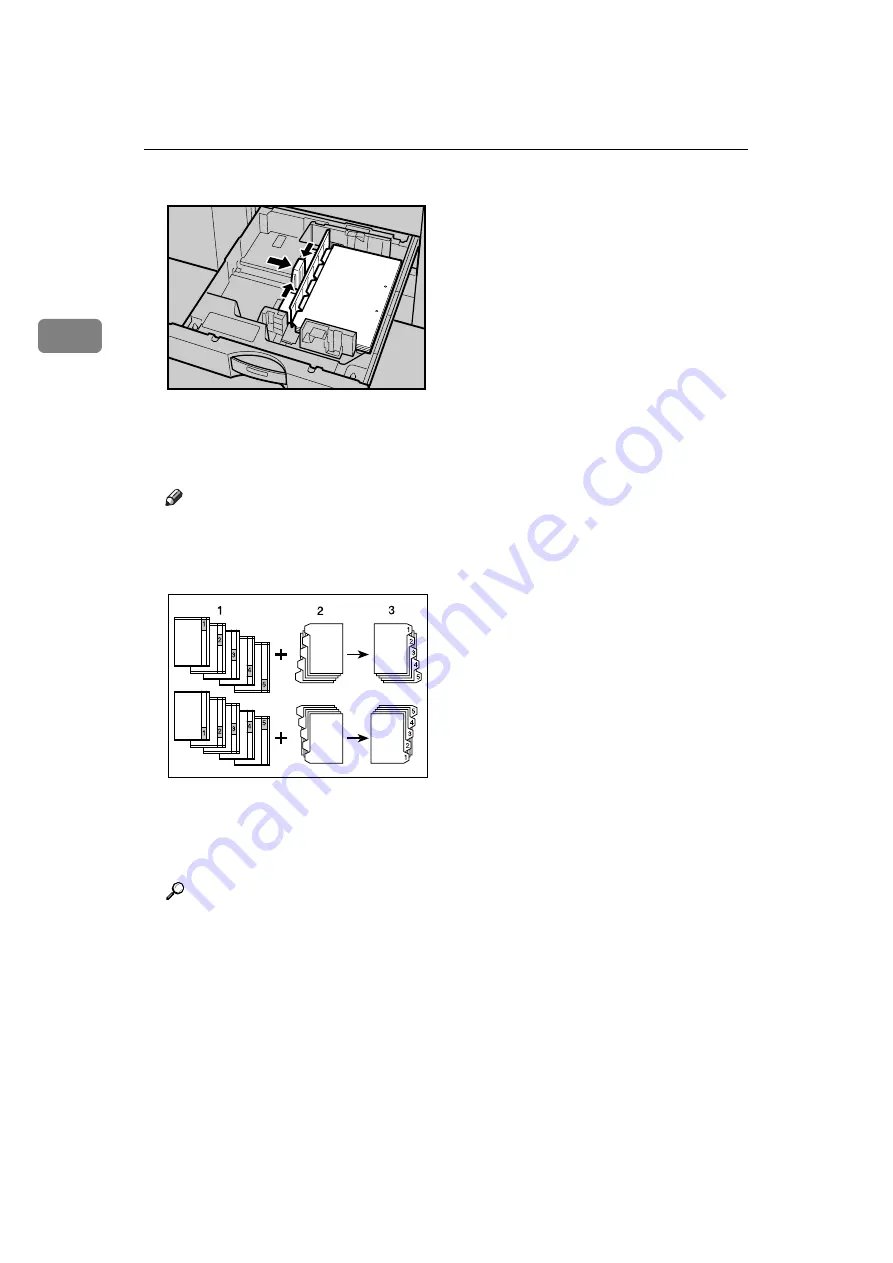
Adjust the back fence position so that the tab sheet holder will fit the tab stock.

A

Select the paper tray where the tab stock is set.

B

Place originals, and then press the 

{

Start

}

 key.

Note

Check the position of the index tab to avoid cropping the image.

Set the tab stock with the side to be copied facing down.

Tab stock is always fed starting from the top tab.

A

Originals

B

Tab stock

C

Copies

Reference

“Tray Paper Settings”, General Settings Guide

BFC010S

GCINDX2E

Содержание Aficio MP 6000

Страница 1: ... Read this manual carefully before you use this machine and keep it handy for future reference For safe and correct use be sure to read the Safety Information in this manual before using the machine Getting Started Entering Text Appendix 1 2 3 ...

Страница 2: ... emitter This equipment does not emit hazardous light since the beam is totally enclosed during all customer modes of operation and maintenance Caution Use of controls or adjustments or performance of procedures other than those specified in this manual might result in hazardous radiation exposure Notes The model names of the machines do not appear in the following pages Check the type of your ma ...

Страница 3: ...and explains how to replace paper toner and other consumables Copy Document Server Reference Explains Copier and Document Server functions and operations Also refer to this manual for explanations on how to place originals Facsimile Reference Explains Facsimile functions and operations Printer Reference Explains Printer functions and operations Scanner Reference Explains Scanner functions and oper...

Страница 4: ...d administrator authentication PostScript 3 Supplement Explains how to set up and use PostScript 3 UNIX Supplement For UNIX Supplement please visit our Web site or consult an authorized dealer Other manuals Manuals for DeskTopBinder Lite DeskTopBinder Lite Setup Guide DeskTopBinder Introduction Guide Auto Document Link Guide Note Manuals provided are specific to machine types PostScript 3 Suppleme...

Страница 5: ...taple copies See Copy Document Server Reference You can print documents created in applications See Printer Reference You can print documents from Windows 2000 XP Vista TCP IP IPP Win dows Server 2003 2003 R2 TCP IP IPP NetWare UNIX TCP IP and Macintosh AppleTalk environments because the machine supports all these multi protocol You can scan originals and send scan files to a computer See Scanner ...

Страница 6: ...ile Format Converter optional you can even download documents stored in copy and printer functions to your computer See Network Guide For more information about the machine s settings see Network Settings General Settings Guide For more information about Document Server in printer mode see Saving and Printing Using the Document Server Printer Reference For more information about Document Server in...

Страница 7: ...ee Printing Deleting Received and Stored Documents Facsimile Reference Transmission You can send a fax from your computer over the network Ethernet or wire less LAN to this machine which then forwards the fax via its telephone con nection LAN Fax To send a fax print from the Windows application you are working with select LAN Fax as the printer and then specify the destination You can also check t...

Страница 8: ...d computers that have e mail ad dresses can receive e mail messages via Internet Fax IP Fax The IP Fax function sends or receives documents between two facsimiles di rectly via a TCP IP network To send a document specify an IP address or host name instead of a fax number IP Fax Transmission This machine can receive documents sent via Internet Fax IP Fax Recep tion Using a VoIP gateway this machine...

Страница 9: ... to the other the sub machine so that copies can be made on both machines simul taneously Connect Copy You can complete large volume copy runs in shorter time See Connect Copy Copy Document Server Reference Even if one machine runs out of paper or stops because of a paper jam the other machine can still continue to finish the job See Connect Copy Copy Document Server Reference ANP002S ...

Страница 10: ...nner Ref erence You can send scanned documents to other network folders Scan to Folder See Sending Scan Files to Folders Scanner Reference You can use this machine as a delivery scanner for the ScanRouter delivery application Network delivery scanner You can save scan files in the deliv ery server or send them to a folder in a computer on the same network For details about the machine s settings s...

Страница 11: ...rase the data on the hard disk to prevent the information from leak ing out See the manual for the DataOverWriteSecurity Unit optional and Security Reference Monitoring the Machine Via Computer You can monitor machine status and change settings using a computer Using SmartDeviceMonitor for Admin SmartDeviceMonitor for Client or a Web browser you can use a computer to view the machine s status such...

Страница 12: ...notify that unauthorized copying is being attempted If the document is copied on a machine without the Copy Data Security Unit the hidden text becomes conspicuous in the copy showing that the copy is unauthorized See the printer driver Help and Printer Reference Using the printer driver you can embed text in the printed document for un authorized copy prevention If the document is copied on this o...

Страница 13: ...nformation 4 Safety During Operation 4 Safety Precautions to be Followed 4 Positions of RWARNING and RCAUTION labels 9 ENERGY STAR Program 13 Energy Saving Functions 14 Machine Types 15 1 Getting Started Guide to Components 17 Options 19 Control Panel 21 Display Panel 23 Simplified Display 24 When the Authentication Screen is Displayed 25 User Code Authentication Using the Control Panel 25 User Co...

Страница 14: ...iceMonitor for Client 47 Copy Paper 48 Recommended Paper Sizes and Types 48 Unusable Paper 51 Paper Storage 52 Specifications for the Main Unit 53 Document Server 57 Auto Document Feeder 58 Specifications for Options 59 Mailbox 59 Booklet Finisher 60 3 000Sheet 50Sheet Staple Finisher 63 3 000Sheet 100Sheet Staple Finisher 65 Punch Unit Booklet Finisher 3 000Sheet 50Sheet Staple Finisher 67 Punch ...

Страница 15: ...terference in a residential in stallation This equipment generates uses and can radiate radio frequency ener gy and if not installed and used in accordance with the instructions may cause harmful interference to radio communications However there is no guarantee that interference will not occur in a particular installation If this equipment does cause harmful interference to radio or television re...

Страница 16: ...J 07006 Telephone number 973 882 2000 Product Name Multi Function Peripheral ModelNumber 8060 8070 8080 MP6000 MP7000 MP 8000 LD260 LD270 LD280 Aficio MP 6000 Aficio MP 7000 Aficio MP 8000 Note to users in Canada Note This Class B digital apparatus complies with Canadian ICES 003 Remarque concernant les utilisateurs au Canada Avertissement Cet appareil numérique de la classe B est conforme à la no...

Страница 17: ...ead these notes They can be found in the Safety Information section of this manual Indicates points to pay attention to when using the machine and explanations of likely causes of paper misfeeds damage to originals or loss of data Be sure to read these explanations Indicates supplementary explanations of the machine s functions and instruc tions on resolving user errors This symbol is located at t...

Страница 18: ...not followed could result in death or serious injury R CAUTION Indicates a potentially hazardous situation which if instructions are not followed may result in minor or moderate injury or damage to property Keep the machine away from flammable liquids gases and aerosols A fire or an electric shock might occur Keep the machine away from humidity and dust Otherwise a fire or an elec tric shock might...

Страница 19: ...Disconnect the power plug by pulling the plug not the cable if the power cable or plug becomes frayed or otherwise damaged If the power cord is damaged exposure of the core disconnection etc contact your service representative to change a new one Oper ating the machine with a damaged power cord may cause an electric shock or fire It is dangerous to handle the plug with wet hands Doing this may re ...

Страница 20: ...it in place Other wise the machine might move or come down to cause an injury Contact your service representative if you need to lift the machine such as when relocating it to another floor Do not attempt to lift the machine with out the assistance of your service representative The machine will be dam aged if it topples or is dropped resulting in malfunction and risk of injury to users The machin...

Страница 21: ... the machine can be operated safely But take care not to touch the machine during operation An injury might occur Fire and breakdown can result from heavy accumulation of dust inside this machine Consult your service representative for details about and charges for cleaning the machine s interior Do not incinerate used toner or toner containers Toner dust might ig nite when exposed to an open flam...

Страница 22: ...m or replacing toner If your skin comes into contact with toner wash the affected area thoroughly with soap and water If toner gets on your clothing wash with cold water Hot water will set the toner into the fabric and may make removing the stain impossible When loading paper take care not to trap or injure your fingers Keep your hands clear of the booklet finisher tray when pulling out or push in...

Страница 23: ...safety please follow the instructions and handle the machine as indicated The inside of the machine could be very hot Do not touch the parts which a label is put on Otherwise an injury might occur Keep your hands clear of the finisher tray when removing paper jam You might trap your fingers if you do not BFN050S BFN051S BFN052S ...

Страница 24: ...de of the machine could be very hot Caution should be taken when removing misfed paper Do not touch the parts a label indicates The inside of the machine could be very hot Caution should be taken when removing misfed paper BFN053S BFN054S BFN055S BFN056S ...

Страница 25: ...ers if you do not Keep your hands clear of the booklet finisher tray when pulling out or pushing in the finisher s staple unit or removing paper jam You might trap your fingers if you do not Do not touch the paper exit section of the finisher It could cause injury BFN057S BFN058S BFN059S BFN060S ...

Страница 26: ...12 Do not touch Surface may be very hot BFN061S BFN062S ...

Страница 27: ...achine waits before entering Sleep Mode is 1 minute This default time can be changed The machine can print jobs from computers and receive faxes while in Sleep Mode Note The default settings can be changed For details see Timer Settings Gener al Settings Guide Reference Timer Settings General Settings Guide Copier Only Printer and Scanner Installed Type 1 Type 2 Type 3 Type 1 Type 2 Type 3 Electri...

Страница 28: ...rtain which model you have see the inside front cover Type 1 Type 2 Type 3 Copy speed 60 copies minute 120 copies minute for con nect copy A4K 81 2 11 K 70 copies minute 140 copies minute for con nect copy A4K 81 2 11 K 80 copies minute 160 copies minute for con nect copy A4K 81 2 11 K ...

Страница 29: ...16 ...

Страница 30: ... 2 Exposure glass Place originals face down here 3 Control panel See Control Panel 4 Front cover Open to access the inside of the machine 5 Copy tray optional Copied or printed paper is delivered here 6 Main power switch If the machine does not operate after turning on the operation switch check if the main power switch is turned on 7 Operation switch Press this switch to turn the power on the On ...

Страница 31: ...entilation holes by placing an object near it or leaning things against it If the machine overheats a fault might occur 2 Bypass tray Use to print on OHP transparencies label paper adhesive labels translucent pa per postcards and custom size paper Reference p 21 Control Panel ACC015S ...

Страница 32: ... paper 5 Large Capacity Tray LCT Holds 4000 sheets of paper 6 Interposer Inserts cover or slip sheets into the cop ies 7 3 000Sheet 50Sheet Staple Finisher Sorts stacks staples and punches copies 6 Finisher upper tray 7 Finisher shift tray 8 Booklet Finisher The saddle stitch function can staple the copies in the center and fold them into booklets 3 Finisher upper tray 4 Finisher shift tray 5 Fini...

Страница 33: ...tored by copier and printer functions See Downloading Stored Documents Copy Document Server Reference Bluetooth Allows you to expand the interface Copy Data Security Unit If a document containing embedded text for unauthorized copy guard is cop ied protected pages are grayed out in the copy DataOverWriteSecurity Unit Allows you to erase data on the hard disk Copy Connector Allows you to connect co...

Страница 34: ...Guide 3 Function keys Press to display the operation screen of one of the following functions Copy Document Server Printer Scanner Facsimile The indicator of the selected function goes on See Changing Modes 4 Display panel Shows the operation status error mes sages and function menus 5 Clear Modes key Press to clear previously entered copy job settings 6 Program key copier and scanner mode Press t...

Страница 35: ... of cop ies or data for a selected function 19 Alert indicator Lights continuously if an error has oc curred 20 Data In indicator facsimile and printer mode Flashes when the machine is receiving print jobs or LAN Fax documents from a computer See Facsimile Reference and Printer Reference 21 Registered Program key Other Function key Calls up registered functions 22 Communicating indicator Re ceivin...

Страница 36: ...ecify an item by lightly pressing them When you select or specify an item on the display panel it is highlighted like Keys appearing as cannot be used Important A force or impact of more than 30 N about 3 kgf will damage the display panel By default the copying screen is displayed when you turn the power on The following display is of a machine with the options fully installed ...

Страница 37: ... initial display to the simplified display Letters and keys are displayed at a larger size making operations easier Simplified Display 1 Key Color Press to change the key color and in crease the brightness of the display panel Note To return to the initial display press the Simplified Display key again Certain keys do not appear on the simplified display BFN041S ANP075S ...

Страница 38: ...ication is set the screen for entering a user code is displayed instead Note Authentication has failed appears if the authentication failed Check the lo gin user name and login password User Code Authentication Using the Control Panel When user authentication is set the following screen appears Enter a user code up to eight digits and then press OK Note To log off do one of the following Press the...

Страница 39: ...r a login user name and then press OK C Press Enter for Login Password D Enter a login password and then press OK E Press Login When the user is authenticated the screen for the function you are using ap pears Note Authentication has failed appears if the authentication failed Check the login user name and login password If user code authentication is enabled a different screen appears See Au then...

Страница 40: ...s set A Press the Login Logout key B Press Yes Login Using a Printer Driver When Basic Authentication Windows Authentication LDAP Authentication or Integration Server Authentication is set make encryption settings in the printer properties of the printer driver and then specify a login user name and pass word For details see the printer driver Help Note When logged on using a printer driver you do...

Страница 41: ... Web Image Monitor A Click Login B Enter a login user name and password and then click Login Note For user code authentication enter a user code in User Name and then click OK Log Off Using Web Image Monitor A Click Logout to log off Note Delete the cache memory in the Web Image Monitor after logging off ...

Страница 42: ...ting For the setting procedure see General Features Gener al Settings Guide System Reset The screen specified in Function Priority appears automatically or interrupt copying is cancelled after a certain period of time has elapsed This function is called System Reset See General Features General Settings Guide You can change the System Reset time See Timer Settings General Settings Guide BFN020S ...

Страница 43: ...for a certain period See Timer Settings General Settings Guide Turning On the Main Power Turn on the main power as follows A Make sure the power code is firmly plugged into the wall outlet B Open the switch cover and turn on the main power switch The main power indicator turns on Note Do not turn off the main power immediately after it has been turned on Otherwise it may result in damage to the ha...

Страница 44: ... switch is pressed check if the main power switch is on If not turn it on Turning Off the Power Turn off the power as follows A Press the Operation switch The On indicator goes off Note In the following cases the indicator will not go off but will instead blink when you press the operation switch During communication with external equipment When the hard disk is active BFN043S BFN043S ...

Страница 45: ... power cord only after you have turned off the main power switch Not doing this may result in damage to the hard disk or mem ory A Make sure the On indicator is not lit B Open the switch cover and turn off the main power switch The main power indicator goes off Note The On indicator does not go off but blinks in direct dialing mode even if you press the Operation switch When this happens check the...

Страница 46: ...to Off The machine automatically turns itself off when the job is finished after a cer tain period of time has elapsed without any operation This function is called Auto Off You can change the Auto Off time See Timer Settings General Settings Guide Note The Auto Off Timer function will not operate in the following cases When a warning message appears When the service call message appears When pape...

Страница 47: ...Getting Started 34 1 ...

Страница 48: ...ursor position the entered character is shown before that character Available Characters You can enter the following characters Alphabetic characters ABCDEFGHIJKLMNOPQRSTUVWXYZabcdefghijklmnopqrstuvwxyz Symbols Numerals 0123456789 Keys You can change the entry screen using the keys below Note When entering uppercase or lowercase letters continuously use Shift Lock to lock the case ANP041S ...

Страница 49: ...w A Press Shift to switch between uppercase and lowercase B Press the letters you want to enter Deleting Characters A Press Backspace or Delete All to delete characters Entering Symbols A Press Symbol Entry to enter into the Symbols mode B Press the symbols you want to enter ...

Страница 50: ...use a User Text that is registered in Program Change Delete User Text For details about registering User Texts see General Features General Set tings Guide A Press User Text B Select the User Text you want to use Reference General Features General Settings Guide ...

Страница 51: ...Entering Text 38 2 ...

Страница 52: ... ex haust air and is not a malfunction Do not turn off the power when the machine is in operation The machine might fail to produce good copy images if condensation forms inside due to rapid temperature change Do not open the covers of the machine when it is in operation If you do mis feeds might occur Do not move the machine when the power is on If you operate the machine improperly or a failure ...

Страница 53: ...DeviceMonitor for Admin For the system administrator to manage network printers DeskTopBinder SmartDeviceMonitor for Client For users to manage their network print status Printer Utility for Mac This utility allows users to download and manage a variety of fonts as well as manage printers For details about this utility see PostScript Supplement Note Documentation about using the machine is include...

Страница 54: ...t Windows Server 2003 Web Edition Microsoft Windows Server 2003 R2 Standard Edition Microsoft Windows Server 2003 R2 Enterprise Edition Microsoft Windows Server 2003 R2 Datacenter Edition 5 Versions 8 6 to 9 2 of the Mac OS Mac OS X Classic mode is supported 6 Mac OS X 10 1 or later Native mode 7 Requires Service Pack 4 or later 8 Requires Service Pack 6 or later 9 The Adobe PostScript 3 printer d...

Страница 55: ...rs and PPD files Adobe PostScript printer drivers and the PPD files are included on the CD ROM provided with this machine Adobe PostScript printer drivers allow the computer to communicate with the printer using a printer language PPD files allow the printer driver to enable specific printer functions PPD files PPD files are included on the CD ROM provided with this machine PPD files allow the pri...

Страница 56: ...WAIN scanner this driver must be installed File path The following drivers are included on the CD ROM labeled Scanner Post Script Drivers and Utilities provided with this machine DRIVERS TWAIN System requirements Hardware PC AT compatible machines that support the following operating system properly Operating system Microsoft Windows 2000 XP Vista Microsoft Windows Server 2003 2003 R2 Display reso...

Страница 57: ...oad the LAN Fax driver from the supplier s Web site Select this ma chine and the operating system you are using and then download it This driver is required to use LAN Fax functions File path The driver is included in the following folders on the CD ROM labeled Printer Drivers and Utilities DRIVERS LAN FAX XP_VISTA System requirements Hardware PC AT compatible Operating systems Microsoft Windows 2...

Страница 58: ... requirements Hardware PC AT compatible machines that support the operating system properly Operating system When installing all functions of DeskTopBinder Microsoft Windows 2000 Professional SP1 or later 2000 Server SP1 or lat er 2000 Advanced Server SP1 or later XP Professional XP Home Edi tion XP Media Center Edition Tablet PC Edition Vista Ultimate Vista Enterprise Vista Business Vista Home Pr...

Страница 59: ... results of print jobs executed from the computer Note SmartDeviceMonitor for Admin Help Operating system Protocol stack Windows 2000 TCP IP provided with Windows 2000 IPX SPX provided with Windows 2000 NetWare Client provided with Windows 2000 Novell Client provided with Windows 2000 or Win dows NT Windows XP TCP IP provided with Windows XP IPX SPX provided with Windows XP NetWare Client provided...

Страница 60: ...tored in the following folder on the CD ROM labeled Printer Drivers and Utilities NETWORK DEVMON CLIENT DISK1 Operating environment of the printer driver Applicable computer Machines which properly work with the applicable OS below PC AT compatible machine Applicable OS Microsoft Windows 2000 XP Vista Microsoft Windows Server 2003 2003 R2 Note See DeskTopBinder Lite Scanner Reference or Help of De...

Страница 61: ... 1 000 sheets Tray 2 3 52 3 127 9 g m2 14 34 lb 3 A3L A4KL A5KL 81 2 13 L 81 4 13 L B4 JISL B5 JISKL 11 17 L 81 2 14 L 81 2 11 L 51 2 81 2 L 8 13 L 71 4 101 2 L 8K 267 390 mm L 16K 195 267 mm KL 3 A3L B4 JISL A4KL B5 JISKL A5KL 81 2 13 L 81 4 13 L 11 17 L 81 2 14 L 81 2 11 KL 51 2 81 2 KL 8 13 L 71 4 101 2 L 8K 267 390 mm L 16K 195 267 mm KL 550 sheets 4 11 15 L 10 15 L 81 2 11 K 51 2 81 2 K 11 14...

Страница 62: ...41 7 lb 20 sheets 157 216 g m2 41 7 57 6 lb 5 B4 JISL A4K B5 JISKL A5K B6 JISL A6L 11 17 L 81 2 14 L 81 2 11 KL 51 2 81 2 KL 81 2 13 L 81 4 13 L 8 13 L 71 4 101 2 KL 11 15 KL 11 14 L 10 15 L 10 14 L 81 4 14 L 8 101 2 KL 8 10 KL 5 B4 JISL A4KL B5 JISKL A5KL B6 JISL A6L 81 2 11 KL 51 2 81 2 K 81 2 13 L 81 4 13 L 8 13 L 71 4 101 2 KL 11 15 L 11 14 L 10 15 L 10 14 L 81 4 14 L 8 101 2 KL 8 10 KL 6 Cust...

Страница 63: ...printers When you load OHP transparencies check the front and back of the sheets and place them correctly or a misfeed might occur Set the paper direction to L For details see Copy Document Server Reference When you use OHP transparencies fan them for each use If multiple sheet feeding occurs load sheets one by one When you load label paper set the paper direction to K If you load paper of the sam...

Страница 64: ... Hemmed paper Envelopes Do not copy on the side of paper that has been already copied onto or mis feed might occur or a fault might occur To prevent misfeeds do not use the following kinds of paper Bent folded or creased paper Perforated paper Slippery paper Torn paper Rough paper Thin paper with low stiffness Paper with a dusty surface If you copy onto rough grain paper the image might be blurred...

Страница 65: ...s should always be followed Do not store paper where it will be exposed to direct sunlight Avoid storing paper in humid areas humidity 70 or less Store on a flat surface Do not store paper vertically In high temperature high humidity conditions or low temperature low hu midity conditions store paper in a vinyl bag ...

Страница 66: ...development system Fusing Heating roll pressure system Resolution Scanning original 600 dpi Printing 1200 dpi Exposure glass Stationary original exposure type Original reference position Rear left corner Warm up time Type 1 2 30 seconds or less 20 C 68 F Warm up time Type 3 60 seconds or less 20 C 68 F Originals Sheet book objects Maximum original size A3L 11 17 L Long length 1260 mm Minimum origi...

Страница 67: ...7 9 g m2 17 34 lb Non reproduction area Leading edge 4 2 mm Trailing edge 2 2 mm Left edge 2 1 5 mm Right edge 0 5 mm First copy time Type 1 4 2 seconds or less A4K 81 2 11 K 100 reproduction feeding from tray 1 on the expo sure glass First copy time Type 2 3 3 5 seconds or less A4K 81 2 11 K 100 reproduction feeding from tray 1 on the expo sure glass Copying speed Type 1 33 copies minute A3L 11 1...

Страница 68: ...m 1 1 The Complete system consists of the mainframe Booklet Finisher or 3 000 Sheet 100 Sheet Staple Finisher large capacity tray LCT and interposer Dimensions W D H up to exposure glass 690 790 985 1165 1 mm 27 2 31 1 38 8 45 9 1 1 When the ADF is included Type 1 Type 2 Type 3 Warm up about 1 39 kW about 1 39 kW about 1 39 kW Stand by about 0 296 kW about 0 296 kW about 0 296 kW During printing a...

Страница 69: ...ray LCT and interposer Weight Approx 206 kg 454 lb Type 1 Type 2 Type 3 Stand by Less than 51 dB A Less than 51 dB A Less than 51 dB A Copying Less than 70 dB A Less than 71 dB A Less than 72 dB A Type 1 Type 2 Type 3 Stand by Less than 51 dB A Less than 51 dB A Less than 51 dB A Copying Less than 75 dB A Less than 75 dB A Less than 75 dB A Type 1 Type 2 Type 3 Stand by Less than 45 dB A Less than...

Страница 70: ...pi Scanner Approx 2 000 pages 200 dpi Text ITUT No 4 chart 1 Maximum number of stored documents 3 000 documents Maximum pages of stored documents 10 000 pages Maximum number of pages per document 2 000 pages Capacity Memory Sorting 5 GB A4 81 2 11 Approx 2 000 sheets at maximum 2 Capacity Others 7 2 GB 1 Scanning Conditions ITUT No 4 chart 200 dpi Text A4 MMR 2 The capacity differs depending on th...

Страница 71: ...ginals 11 17 L 51 2 81 2 KL 2 sided originals Original weight 1 sided originals 40 127 9 g m2 11 34 lb 2 sided originals 52 127 9 g m2 14 34 lb Number of originals to be set 100 sheets 81 4 g m2 22 lb or less than 12 mm 0 4 Maximum power consumption Less than 110W power is supplied from the main unit Dimensions W D H 680 560 180 mm 26 8 22 7 1 Weight Approx 18 kg 39 7 lb Note Specifications are su...

Страница 72: ...er size A3L B4 JISL A4KL B5 JISKL A5KL 1 11 17 L 81 2 14 L 81 2 11 KL 51 2 81 2 KL 1 1 These sizes cannot be detected automatically Paper capacity 100 sheets 80 g m2 20 lb per tray Paper weight 52 127 9 g m2 14 34 lb Power consumption Approx 48W power is supplied from the main unit Dimensions W D H 540 600 660 mm 21 3 23 6 26 Weight Approx 15 kg 33 lb ...

Страница 73: ... Z fold 250 sheets A4KL B5 JISKL A5KL B6 JISL A6L 81 2 11 KL 51 2 81 2 KL 80 g m2 20 lb 50 sheets A3 B4 JIS 81 2 14 80 g m2 20 lb With Z fold 30 sheets A3 B4 JIS 80 g m2 20 lb 20 sheets A4KL B5 JISKL A5KL B6 JISL A6L 81 2 11 KL 51 2 81 2 KL 80 g m2 20 lb Finisher Shift Tray Paper size Without Z fold A3L B4 JISL A4KL B5 JISKL A5KL B6 JISL A6L 11 17 L 11 14 L 10 15 L 10 14 L 81 2 14 L 81 2 13 L 81 2...

Страница 74: ... lb With Z fold 64 80 g m2 17 21 3 lb Staple capacity Without Mixed Size 50 sheets A4KL B5 JISKL 81 2 11 KL 80 g m2 20 lb 30 sheets A3L B4 JISL 11 17 L 81 2 14 L 80 g m2 20 lb With Mixed Size 30 sheets A3L B4 JISL A4K B5 JISK 11 17 L 81 2 11 K 80 g m2 20 lb With Z fold 5 sheets A3L B4 JISL 11 17 L 80 g m2 20 lb Stack capacity after stapling Without Mixed Size 150 40 sets 13 50 sheets A4K 81 2 11 K...

Страница 75: ...r Saddle stitching 30 sets 2 5 sheets A3L B4 JISL A4L B5 JISL 11 17 L 81 2 14 L 81 2 11 L 12 18 L 80 g m2 20 lb 15 sets 6 10 sheets A3L B4 JISL A4L B5 JISL 11 17 L 81 2 14 L 81 2 11 L 12 18 L 80 g m2 20 lb 10 sets 11 15 sheets A3L B4 JISL A4L B5 JISL 11 17 L 81 2 14 L 81 2 11 L 12 18 L 80 g m2 20 lb Saddle stitch position Center 2 position Power consumption Approx 96W power supplied from main unit...

Страница 76: ...0 lb 50 sheets A3 B4 JIS 81 2 14 80 g m2 20 lb Finisher Shift Tray Paper size A3L B4 JISL A4KL B5 JISKL A5KL B6 JISL A6L 11 17 L 11 14 L 10 15 L 10 14 L 81 2 14 L 81 2 13 L 81 2 11 KL 81 4 14 L 81 4 13 L 8 13 L 8 101 2 KL 8 10 KL 51 2 81 2 KL 71 4 101 2 KL 12 18 L Paper weight 52 256 g m2 14 68 lb Stack capacity 3 000 sheets A4K 81 2 11 K 80 g m2 20 lb 1 500 sheets A3L B4 JISL A4L B5 JISKL 11 17 L...

Страница 77: ... 2 19 sheets A4K 81 2 11 K 80 g m2 20 lb 100 30 sets 15 50 sheets A4L B5KL 81 2 11 L 80 g m2 20 lb 100 sets 2 14 sheets A4L B5KL 81 2 11 L 80 g m2 20 lb 100 33 sets 15 30 sheets other size paper 80 g m2 20 lb 100 sets 2 14 sheets other size paper 80 g m2 20 lb With Mixed Size mode 50 sets 2 30 sheets A4K A3L B5 JISK B4 JISL 81 2 11 K 11 17 L 80 g m2 20 lb Staple position 4 position Top Top Slant B...

Страница 78: ... Without Z fold 500 sheets A4KL B5 JISKL A5KL B6 JISL A6L 81 2 11 KL 51 2 81 2 KL 80 g m2 20 lb 250 sheets A3L B4 JISL 11 17 L 81 2 14 L 12 18 L 80 g m2 20 lb With Z fold 30 sheets A3 B4 JIS 80 g m2 20 lb 20 sheets A4KL B5 JISKL A5KL B6 JISL A6L 81 2 11 KL 51 2 81 2 KL 80 g m2 20 lb Finisher Shift Tray Paper size Without Z fold A3L B4 JISL A4KL B5 JISKL A5KL B6 JISL 11 17 L 11 14 L 10 15 L 10 14 L...

Страница 79: ...aple paper weight Without Z fold 64 80 g m2 17 20 lb With Z fold 64 80 g m2 17 20 lb Staple capacity Without Z fold 100 sheets A4KL B5 JISKL 81 2 11 KL 80 g m2 20 lb 50 sheets A3L B4 JISK 11 17 L 80 g m2 20 lb With Z fold 10 sheets A3L B4 JISL 11 17 L 80 g m2 20 lb Stack capacity after stapling 200 30 sets 10 100 sheets A4KL B5 JISKL 81 2 11 KL 80 g m2 20 lb 150 sets 2 9 sheets A4KL B5 JISKL 81 2 ...

Страница 80: ...pe 2 holes L A3 B4 A4 B5 A5 11 17 81 2 14 81 2 11 51 2 81 2 2 4 holes type 2 holes K A4 B5 A5 81 2 11 51 2 81 2 2 4 holes type 4 holes L A3 B4 11 17 2 4 holes type 4 holes K A4 B5 81 2 11 4 holes type 4 holes L A3 B4 A4 B5 A5 11 17 81 2 14 81 2 11 51 2 81 2 4 holes type 4 holes K A4 B5 A5 81 2 11 51 2 81 2 2 3 holes type 2 holes L A3 B4 A4 B5 A5 11 17 81 2 14 81 2 11 51 2 81 2 2 3 holes type 2 hol...

Страница 81: ...ize 2 4 holes type 2 holes L A3 B4 JIS A4 B5 JIS A5 B6 JIS A6 11 17 81 2 14 81 2 11 51 2 81 2 2 4 holes type 2 holes K A4 B5 JIS A5 81 2 11 51 2 81 2 2 4 holes type 4 holes L A3 B4 JIS 11 17 2 4 holes type 4 holes K A4 B5 JIS 81 2 11 4 holes type 4 holes L A3 B4 JIS A4 B5 JIS A5 B6 JIS 11 17 81 2 14 81 2 11 51 2 81 2 4 holes type 4 holes K A4 B5 JIS A5 81 2 11 81 2 51 2 2 3 holes type 2 holes L A3...

Страница 82: ...2 14 L 81 2 11 L Paper weight Without Z fold 52 256 g m2 14 68 3 lb With Z fold 64 80 g m2 17 21 lb Power consumption Maximum 100W Dimensions W D H 177 620 960 mm 6 9 24 4 37 8 Weight Approx 55 kg 121 3 lb Copy Tray Paper capacity A3 11 17 250 sheets B4 JIS 81 2 14 500 sheets A4 81 2 11 500 sheets B5 JIS 51 2 81 2 250 sheets Dimensions W D H 390 330 130 mm 15 4 13 5 1 Weight Approx 650 g 1 4 lb ...

Страница 83: ...main unit Dimensions W D H option unit 314 458 659 mm 12 4 18 25 9 Weight Approx 20 kg 44 lb Interposer Paper size A3L B4 JISL A4KL B5 JISKL A5KL 11 17 L 81 2 14 L 8 1 2 11 KL 5 1 2 8 1 2 KL Paper weight 64 216 g m2 17 58 lb Paper Capacity 200 sheets 80 g m2 20 lb Power consumption Max Approx 48 W power supplied from main unit Dimensions W D H 500 620 200 mm 19 7 24 4 7 9 Weight Approx 12 kg 26 5 ...

Страница 84: ... Finisher option You can tidy the printout with Booklet Finisher or 3 000Sheet 50Sheet Staple Finisher Paper size A3L B4L A4KL B5K A5KL 11 17 L 81 2 14 L 81 2 11KL 51 2 81 2 K Power consumption Max 16 W power supplied from main unit Dimensions W D H 108 452 130 mm 4 3 17 8 5 2 Weight Approx 2 kg 4 4 lb Output Jogger 3 000Sheet 100Sheet Staple Finisher option You can tidy the printout with 3 000She...

Страница 85: ...TopBinder SmartDeviceMonitor for Client 47 Display 23 Display panel 21 Document Server 57 Dos and don ts 39 E Energy saver 33 Energy Saver key 21 Energy saving 14 33 Energy saving functions 14 ENERGY STAR Program 13 Enter 35 36 Entering symbols 36 Entering text 35 36 Enter key key 21 Entry screen 35 Environments where the machine can be used 4 Exposure glass 17 Extension unit 19 External option 19...

Страница 86: ... iii Printer Scanner unit 20 Program key 21 Punch unit 67 68 R Registered Program key 21 Regulatory Information 2 S Safety during operation 4 Safety information 4 Safety precautions 4 Sample Copy key 21 Scanner functions iii Screen contrast knob 21 Security functions ix Simplified Display 24 Simplified Display key 21 Sleep mode 14 SmartDeviceMonitor for Admin 46 Software 40 Software on CD ROM 40 S...

Страница 87: ...74 EN USA D052 7352 V Ventilation holes 17 Viewing the contents of the CD ROM 40 W WARNING labels 9 What you can do with this machine iii Z Z folding unit 19 69 ...

Страница 88: ... registered trademarks or trademarks of Novell Inc Other product names used herein are for identification purposes only and might be trademarks of their respective companies We disclaim any and all rights to those marks The proper names of the Windows operating systems are as follows The product name of Windows 2000 are as follows Microsoft Windows 2000 Professional Microsoft Windows 2000 Server M...

Страница 89: ...Operating Instructions About This Machine Type for 8060 MP 6000 LD260 Aficio MP 6000 Type for 8070 MP 7000 LD270 Aficio MP 7000 Type for 8080 MP 8000 LD280 Aficio MP 8000 EN USA D052 7352 ...

Страница 90: ...ded 2 Sided Copies one 2 sided page on one 2 sided page 10 Operation switch 11 Login Logout key 12 Simplified Display key 13 Sample Copy key 14 Start key Press to start copying or to scan or print documents stored on the Document Server Chapter references in this guide refer to the bundled OI CD Copy Document Server Reference cPlease put this guide above your machineg Copyright 2007 Printed in Jap...

Страница 91: ... D Press Exit Before the transmission is started A Press Change TX Info B Press Check Stop Transmission File C Select the file you want to cancel D Press Stop Transmission and then press OK E Press Exit twice cPlease put this guide above your machineg cPlease put this guide above your machineg Chapter references in this guide refer to the bundled OI CD Facsimile Reference and General Settings Guid...

Страница 92: ...t icon directly or On the File menu click Print C Select the printer you want to use in the Name or Select Printer list and then click the Properties button or Print Settings tab D Make the settings you require and then click OK E Set a number of copies F Click OK A Start your Web browser B In your browser s address bar enter the following http machine s IP address C Select one of the following fu...

Страница 93: ...e How to scan to Document Server A Press the Scanner key B Press Select Stored File The list of stored files is displayed Press Manage Delete File Viewing a list of stored files in the Document Server 3 Storing Files Using the Scanner Function 3 Storing Files Using the Scanner Function E Select destination s In total 500 destinations can be specified For e mail Before selecting the destination be ...

Страница 94: ...y Information in About This Machine before using the machine When the Machine Does Not Operate As Wanted Troubleshooting When Using the Copy Document Server Function Troubleshooting When Using the Facsimile Function Troubleshooting When Using the Printer Function Troubleshooting When Using the Scanner Function Adding Paper Toner and Staples Clearing Misfeeds Remarks 1 2 3 4 5 6 7 8 ...

Страница 95: ...ase contact your local dealer Depending on which country you are in certain units may be optional For details please contact your local dealer Caution Use of controls or adjustments or performance of procedures other than those specified in this manual might result in hazardous radiation exposure Two kinds of size notation are employed in this manual With this machine refer to the inch version For...

Страница 96: ...and explains how to replace paper toner and other consumables Copy Document Server Reference Explains Copier and Document Server functions and operations Also refer to this manual for explanations on how to place originals Facsimile Reference Explains Facsimile functions and operations Printer Reference Explains Printer functions and operations Scanner Reference Explains Scanner functions and oper...

Страница 97: ...ing the enhanced security functions or user and administrator authentication PostScript 3 Supplement Explains how to set up and use PostScript 3 UNIX Supplement For UNIX Supplement please visit our Web site or consult an authorized dealer Other manuals Manuals for DeskTopBinder Lite DeskTopBinder Lite Setup Guide DeskTopBinder Introduction Guide Auto Document Link Guide Note Manuals provided are s...

Страница 98: ...Function 17 When You Cannot Make Clear Copies 23 When You Cannot Make Copies As Wanted 25 Display During Connect Copy 30 If Connect Copy Is Canceled 30 If You Cannot Exit from Connect Copy 31 When Memory Is Full 32 3 Troubleshooting When Using the Facsimile Function Adjusting the Volume 33 Messages Displayed When Using the Facsimile Function 35 When You Cannot Send or Receive Fax Messages as Wante...

Страница 99: ...annot Browse the Network to Send a Scan file 74 When the TWAIN Driver Cannot Be Started 74 When Stored Files Cannot Be Edited 75 When the Network Delivery Function Cannot Be Used 75 Operations Are Not Possible When Messages Are Displayed 75 Messages Displayed When Using the Scanner Function 76 When a Message Is Displayed on the Control Panel 76 When a Message Is Displayed on the Client Computer 82...

Страница 100: ...eet 50 Sheet Staple Finisher and Booklet Finisher 118 3 000 Sheet 100 Sheet Staple Finisher 119 Booklet Finisher Saddle Stitch 120 Removing Punch Waste 121 3 000 Sheet 50 Sheet Staple Finisher and Booklet Finisher 121 3 000 Sheet 100 Sheet Staple Finisher 122 8 Remarks Where to Put Your Machine 125 Machine Environment 125 Moving 126 Power Connection 127 Access to the Machine 128 Maintaining Your M...

Страница 101: ...vi ...

Страница 102: ...read these notes They can be found in the Safety Information section of About This Machine Indicates points to pay attention to when using the machine and explanations of likely causes of paper misfeeds damage to originals or loss of data Be sure to read these explanations Indicates supplementary explanations of the machine s functions and instruc tions on resolving user errors This symbol is loca...

Страница 103: ...2 ...

Страница 104: ...curs See p 105 Removing Jammed Paper B Add Paper indicator Appears when paper out condition occurs See p 87 Loading Paper D Add Toner indicator Appears when toner runs out See p 99 Adding Toner d Add Staple indicator Appears when staples run out See p 118 Removing Jammed Staples y Empty Hole Punch Receptacle indicator Appears when the hole punch receptacle is full See p 121 Removing Punch Waste L ...

Страница 105: ...gs Guide Beep pattern Meaning Cause Two long beeps Machine has warmed up A control panel or screen key was pressed Single short beeps are pro duced only when valid keys are pressed Single short beep Panel screen input ac cepted A control panel or screen key was pressed Single short beeps are pro duced only when valid keys are pressed Single long beep Job completed A Copier Document Server Features...

Страница 106: ...inal Misfeed Displays state of and solutions for original misfeeds Paper Misfeed Displays state of and solutions for paper jams Cover Open Indicates whether front cover duplex unit etc is open Data Storage You can check the following items under Data Storage HDD Remaining Memory Displays the amount of available hard disk drive memory HDD File s Displays the total number of jobs stored in the hard ...

Страница 107: ... mail account Machine IPv4 Address Displays the machine s IPv4 address Machine IPv6 Address Displays the machine s IPv6 address Inquiry You can check the following items under Inquiry Machine Repairs Displays the machine number and contact number that are required for service Sales Representative Displays the sales representative s telephone number Supply Order Displays the contact number for plac...

Страница 108: ... previous screen returns Note No Staple Punch Receptacle Full Output Tray Full Original Misfeed Paper Misfeed and Cover Open appear only when these errors occur For details about how to locate and remove misfeeds see Locating Jammed Paper or Removing Jammed Paper Reference p 106 Locating Jammed Paper p 105 Removing Jammed Paper ...

Страница 109: ...tion Documents and reports do not print out The paper output tray is full Remove the paper from the tray Documents and reports do not print out There is no copy paper left Add more paper See p 87 Loading Pa per An error has occurred The function whose indi cator is lit is defective Record the code number shown in the display and contact your service repre sentative See When a Message Ap pears of e...

Страница 110: ...screen by pressing the Printer or Scanner key Functions other than the copier function are not yet ready Wait a little longer The machine has just been turned on and the User Tools screen is dis played but the User Tools menu has items missing Functions other than the copier function are not yet ready Time required varies by function Func tions appear in the User Tools menu when they become ready ...

Страница 111: ...type Wait for the machine to get ready Original images are printed on the reverse side of the paper You may have loaded the paper incorrectly Load paper correctly Place paper in the paper tray with the print side down Load paper into the bypass tray with the print side up See p 93 Orientation Fixed Paper or Two Sided Paper Misfeeds occur frequently The tray s side fence may not be locked Remove th...

Страница 112: ...er your login user name and user password See When the Authentica tion Screen is Displayed About This Machine You do not have the privileges to use this func tion is displayed The use of the function is restricted to authenticat ed users only Contact the administrator You do not have the privileges to use this func tion continues to be displayed even though you have entered a valid user code This ...

Страница 113: ...y Paper About This Machine Using curled paper often causes misfeeds soiled paper edges or slipped po sitions while performing staple or stack printing When using curled paper take the stiffness out of the paper with your hands to straighten out the curl or load the paper upside down Also to prevent paper from curling lay paper on a flat surface and do not lean it against the wall ...

Страница 114: ...preceding operation Operation is performed automatically once the preceding operation ends The operation must be started once the preceding operation ends Simul taneous operations are not possible Function you want to se lect Copier Interrupt Copying Facsimile Printer Scanner TWAIN Document Server DeskTopBinder Web Document Server Function in progress Transmission Operation Manual Reception Operat...

Страница 115: ...from Document Server 4 6 6 6 Function you want to se lect Copier Interrupt Copying Facsimile Printer Scanner TWAIN Document Server DeskTopBinder Web Document Server Function in progress Transmission Operation Manual Reception Operation Transmission Reception Data Reception Print Operations for Copying Stapling Sort Operations for Copying Copying Scanning an Original for Memory Transmission Memory ...

Страница 116: ...nisher 3 000 Sheet 100 Sheet Staple Fin isher or Booklet Finisher is installed on the machine you can specify the out put tray where documents are delivered See Output tray settings General Settings Guide While printing is in progress scanning a document using another function may take more time DeskTopBinder Printing from Document Server 4 Sending a Fac simile from Doc ument Server Web Document S...

Страница 117: ...When the Machine Does Not Operate As Wanted 16 1 ...

Страница 118: ...roper original is placed Select paper manually not in Auto Pa per Select mode and do not use Auto Reduce Enlarge function See Sizes difficult to detect Copy Document Server Reference Cannot detect original size Improper original is placed Place the original on the exposure glass See Placing Originals on the Exposure Glass and Sizes difficult to detect Copy Document Server Reference Cannot detect o...

Страница 119: ... L 11 14 L 10 15 L 10 14 L Letter 81 2 11 K Ex ecutive 71 4 101 2 K 8 101 2 K 8 10 K 8KL 16KK Select one of these sizes 4 holes Metric version A3L B4L A4K B5K 11 17 L 11 15 L 11 14 L Let ter 81 2 11 K Executive 71 4 101 2 K 8 101 2 K 8KL 16KK Narrow 2 2 version A3L B4L A4KL B5KL A5KL B6L 11 17 L 11 15 L 11 14 L 10 15 L 10 14 L Legal 81 2 14 L Let ter 81 2 11 KL Half Letter 51 2 81 2 KL Executive 7...

Страница 120: ...antity See Max Copy Quantity General Settings Guide File being stored exceeded max number of pages per file Copying will be stopped The scanned originals have too many pages to store as one document Press Exit and then store again with an appropriate number of pages Magazine or Book let mode is not available due to mixed image mode You selected the Maga zine or Booklet function for originals scann...

Страница 121: ...t login user name and login pass word Authentication has failed The machine cannot per form authentication Contact the administrator The selected file s con tained file s without access privileges Only file s with ac cess privileges will be deleted You have tried to delete files without the authori ty to do so Files can be deleted by the person who created the file To delete a file which you are n...

Страница 122: ... Sub machine is in Interrupt mode The sub machine is in In terrupt mode Press the Interrupt key on the sub ma chine to cancel Interrupt mode Sub machine does not have the same paper setting s Paper type or tray set tings on the two ma chines do not match Make the same settings on both ma chines The Cover Sheet setting s of the sub machine is different from the main machine Cover settings on the tw...

Страница 123: ...t print from the sub machine Sub machine will be disconnected The sub machine has stopped due to power failure or communication error Continue copying using the main ma chine Z fold is availa ble only when Sort mode is se lected in Connect Copy Sort has not been selected with Z fold Select the Sort function Message Cause Solution ...

Страница 124: ... copies The exposure glass scan ning glass or ADF is dirty Clean them See p 129 Maintaining Your Machine The same copy area is dirty whenever making copies Original type is set to Text Photo and an orig inal with text and photo graphs that can hardly be distinguished from each other is loaded Select Generation Copy and then begin copying See Generation Copy Copy Document Server Reference Copies ar...

Страница 125: ... original is not set cor rectly When using the exposure glass face the originals down When using the ADF face them up A moiré pattern is pro duced on copies Your original has a dot pattern image or many lines Place the original on the exposure glass at a slight angle Black spots appear on the copy of a photographic print Because of high humidi ty thephotographic print has stuck to the exposure gla...

Страница 126: ... has been fold ed creased Use recommended paper Use paper that has been stored in the recommend ed temperature and humidity condi tion See Copy Paper About This Machine Misfeeds occur frequently Printed paper is being used Use recommended paper Do not use paper that has been already copied or printed onto See Copy Paper About This Machine Copy paper becomes creased The paper is damp Use paper that...

Страница 127: ... and cancel copy settings including stapling The copy is grayed out or a text pattern appears in the background of the copy You have copied a copy guarded document pro tectedfromunauthorized copying Check the document See Using Data Security for Copying Printer Reference Images are skewed The side fence in the pa per feed tray is not locked Make sure the side fence is locked See p 94 Changing the ...

Страница 128: ...larger than the origi nals or select the proper reproduction ratio Problem Cause Solution The stamp position is wrong The paper orientation is wrong Check the paper orientation and stamp position Problem Cause Solution You cannot make a book from Booklet or Maga zine mode by folding copies You selected a setting Open to left or Open to right that does not match the orientation of originals In Copi...

Страница 129: ...ment Server Features See Input Output General Settings Guide When using Duplex copy is made Top to Bot tom even though Top to Top is selected You placed the originals in the wrong orientation Place the original in the correct orienta tion See Original Orientation Copy Document Server Reference Problem Cause Solution Exceeded max number of pages per file Do you want to store the scanned pages as 1 ...

Страница 130: ...printer screen and then delete unnecessary files stored under Sample Print Locked Print Hold Print or Stored Print You want to check print quality before making a large print run You can print a single copy without specifying the setting again Check print quality by printing out only the first set using the Sample Copy key Original is be ing scanned by another function Please wait ap pears Copier ...

Страница 131: ...t dis played The cable connecting the two machines is damaged Contact your service representative Connect Copy is not dis played The L is lit Follow the instructions displayed Connect Copy appears faded Functions that cannot be used with Connect Copy have been set Press the Clear Modes key to clear the settings Problem Cause Solution The machine cancels Connect Copy The main machine s main power i...

Страница 132: ...tions displayed There is no response when you press Connect Copy A paper misfeed has oc curred on either the main or sub machine To cancel Connect Copy Press the Clear Stop key on the main machine and then press Stop There is no response when you press Connect Copy A paper misfeed has oc curred on one of the ma chine or toner or other supplies need to be re placed Follow the instructions displayed...

Страница 133: ...ution Memory is full nn originals have been scanned Press Print to copy scanned originals Do not remove remaining originals n in the message repre sents a changeable number The scanned originals ex ceeds the number of pag es that can be stored in memory Press Print to copy scanned originals and cancel the scanning data Press Stop to cancel the scanning data and not copy Press Continue to scan and ...

Страница 134: ...the volume of the following sounds that the machine makes On Hook Mode Heard when the On Hook is pressed At Transmission Heard when Immediate transmission is performed At Reception Heard when the machine receives a document At Dialing Heard after pressing the Start key until the line connects to the destination At Printing Heard when a received document is printed A Press the User Tools Counter ke...

Страница 135: ...er Tools Counter key The standby display appears Note You can adjust the On Hook volume when you press the On Hook See On Hook Dial Facsimile Reference When you press Check on the Adjust Sound Volume screen you will hear a confirmation sound so you can check the volume If you press Cancel the volume setting is canceled The display returns to that of step D You can set the volume level to between 0...

Страница 136: ...ith facsim ile Data will be initialized There is a problem with the fax Record the code number shown in the display and contact your service repre sentative Other functions can be used Remove the paper from Internal Tray 1 The Internal Tray 1 is full Remove the paper If the other tray is also full the tray name shown in the display changes Remove paper from the tray indicated in the display Origin...

Страница 137: ... have permission to delete Connection with LDAP server has failed Check the server status A network error has oc curred and connection has failed Try the operation once more If the mes sage is still shown the network may be crowded Check the information of System Settings See System Settings General Settings Guide LDAP server au thentication has failed Check the settings The user name or pass word...

Страница 138: ...ease re enter The entered e mail ad dress is wrong Make sure the e mail address is correct and then enter it again You do not have the privileges to use this func tion Use of this function is re stricted Contact the administrator Authentication has failed Wrong login user name or password Confirm correct login user name or password Authentication has failed Authentication is not possible from this...

Страница 139: ...s ma chine Contact the administrator Check whether there are any network problems 13 25 In Effective Protocol IPv4 is not enabled or an incorrect IP address has been registered In System Settings under Interface Settings select Effective Protocol and then check IPv4 is pro grammed to Active You can also use the Web Image Monitor for con firmation See the Web Image Mon itor s Help In System Setting...

Страница 140: ...y network problems 14 09 E mail transmission was refused by SMTP authen tication POP before SMTP authentication or login authentication of the computer in which the folder for transfer is specified Check that the machine e mail ad dress is correctly programmed from FileTransfer under SystemSettings See File Transfer General Settings Guide You can also use the Web Image Monitor for confirmation See...

Страница 141: ... the Web Image Monitor See the Web Image Monitor s Help Consult the administrator Check whether there are any network problems 15 02 Cannot log on to the POP3 IMAP4 server Check that the user name and pass word of the E mail Account are cor rectly programmed using File Transfer under System Settings See File Transfer General Settings Guide You can also use the Web Image Monitor for confirmation Se...

Страница 142: ...age Monitor See the Web Image Monitor s Help Check that the LAN cable is correct ly connected to the machine Consult the administrator Check whether there are any network problems 15 12 Cannot log on to the POP3 IMAP4 server Check that the user name and pass word of the E mail Account are cor rectly programmed from File Transfer under System Settings See File Transfer General Settings Guide You ca...

Страница 143: ... not displayed and then the Facsim ile key no longer lights See Parameter Settings General Settings Guide If you reconnect the machine to the network be sure to set Display with User Parameters If the paper tray runs out of paper Add paper appears on the display ask ing you to add more paper If there is paper left in the other trays you can re ceive documents as usual even if the message appears o...

Страница 144: ...nnot be sent In Facsimile Features under Send Set tings set Max E mail Size to Off or set the maximum e mail size to larger val ue Then re send the document When using On Hook Dial or Manual Dial Receiving da ta appears and transmission is not al lowed If the machine fails to de tect the size of the origi nal when Start key is pressed it performs a re ceiving operation Press Scan Size in Scan Sett...

Страница 145: ...received fax docu ments In Facsimile Features un der Reception Settings Store has been selected for Reception File Setting Print the fax documents using a Web browser or the Print Stored RX File function See Printing Received and Stored Documents and Printing fax information using a Web browser Facsimile Reference The machine failed to print received fax docu ments Add Paper indicator is lit Load ...

Страница 146: ...on The exposure glass or scanning glass is dirty Clean them See p 129 Maintaining Your Machine Background of received images appears dirty Im ages from the back of the page appear Image density is too high Adjust scan density See Image Densi ty Contrast Facsimile Reference Printed or sent images are spotty The ADF exposure glass or scanning glass is dirty Clean them See p 129 Maintaining Your Mach...

Страница 147: ...n lost ask the senders to resend the docu ments If Auto Documents have been lost reprogram them See p 48 Turn ing Off the Main Power In the Event of Power Failure When a correct password is entered you cannot print documents that ap pear in the confidential box or bulletin board box or transmit print out stored documents Documents are locked by a security function if in correct passwords are en te...

Страница 148: ... error occurs during reception ask the sender to resend the document Note If an error happens frequently contact your service representative The Page column gives the total number of pages The Page not sent or Page not received column gives the number of pages not sent or received successfully You can display a destination with the User Parameters See Parameter Set tings General Settings Guide You...

Страница 149: ...e data loss Keep the machine plugged in and the main power switch on for about 24 hours after the power loss Even if the main power switch is turned off the contents of the machine memory for example programmed numbers will not be lost However if power is lost for about one hour because the main power switch is turned off there is a power cut or the power cable is removed contents of the Fax memor...

Страница 150: ...arameters See Pa rameter Settings General Settings Guide If Error Mail Notification cannot be sent the Error Report E Mail is printed by the machine If an error occurs when an e mail is received via SMTP the SMTP server sends an error e mail to the originator of the document Error Report E Mail The Error Report E Mail is printed by the machine when it is unable to send an Error Mail Notification S...

Страница 151: ...Troubleshooting When Using the Facsimile Function 50 3 ...

Страница 152: ...o matically recognized The USB cable is not con nected properly Turn off the power of the machine re connect the USB cable and then turn it on again Windows has already configured the USB set tings Check whether the com puter has identified the machine as an unsup ported device Open Windows Device Manager and then under Universal Serial Bus control lers remove any unauthorized devic es Unauthorize...

Страница 153: ... section describes the procedure under Windows 2000 A On the Start menu point to Settings and then click Printers B Double click the Add Printer icon C Follow the instructions in Add Printer Wizard If the CD ROM drive is D the source files of the printer driver are stored in the following location RPCS Printer Driver and Utilities CD ROM D DRIVERS RPCS XP_VISTA Language DISK1 PCL 5e Printer Driver...

Страница 154: ...tScript 3 Scanner Driver and Utilities CD ROM D DRIVERS PS XP_VISTA Language DISK1 If the installer starts click Cancel to quit Windows Vista This section describes the procedure under Windows Vista A On the Start menu click Control Panel B Click Hardware and Sound C Click Add a printer on the Printers area D Follow the instructions in Add Printer Wizard If the CD ROM drive is D the source files o...

Страница 155: ...ready message The machine is ready for use No action is required Printing The machine is printing Wait a while Waiting The machine is waiting for the next data to print Wait a while Offline The machine is offline To start printing switch the ma chine online by pressing Online key Please wait The machine is preparing the development unit Wait a while Resetting job The machine is resetting the print...

Страница 156: ...ould notbeperformedbecause the file system could not be obtained Decrease the number of files sent to the machine File system is full PDF file do not print out because the capacity of file system is full Delete all unnecessary files from the hard disk or decrease the number of files sent to the machine Problem with Hard Disk An error has occurred in the hard disk drive Turn off the main power swit...

Страница 157: ...ogin user name and password Contact the administrator Parallel I F board has a prob lem An error has occurred in the parallel interface board Turn off the main power switch and back on again If the message appears again contact your service representa tive Printer font er ror An error has occurred in the font settings Contact your service representative Memory Overflow Maximum capacity of PCL 5e 6...

Страница 158: ...en retry the op eration Auto registration of user informa tion has failed Automatic registration of information for LDAP Au thentication or Windows Authentication failed be cause the address book is full Contact the administrator Cannot store data of this size The paper size exceeded the capacity of the docu ment server Reduce the paper size of the file that you want to send to a size that the doc...

Страница 159: ...o send Exceeded max number of files of Document Server Cannot store Themaximum file capacity of the document server was exceeded Delete some of the files stored in the document server Exceeded max number of files to print for tempo rary stored jobs While printing a Sample Print Locked Print Hold Print or Stored Print file the maximum file capacity was exceeded Delete unneeded files stored in the m...

Страница 160: ... your service representative Hardware Problem HDD An error has occurred in the hard disk drive Turn off the main power switch and back on again If the message ap pears again contact your service representative Hardware Problem Parallel I F An error has occurred in the parallel interface board Turn off the main power switch and back on again If the message ap pears again contact your service repres...

Страница 161: ...gs dialog box and then on the Image Adjustments tab specify a lower value for Resolution Memory Overflow The memory is full On the RPCS printer driver s Print Quality tab open the Change User Settings dialog box and then on the Image Ad justments tab specify a lower value for Resolution In Printer Features under Sys tem set Memory Usage to Font Priority If this message continues to appear after ta...

Страница 162: ...heck the paper orientation paper quantity print orientation and sta ple position Certain settings can produce print results that might not be as expected The entered pass word is incorrect The password of the en crypted PDF file has been entered incorrectly Enter the correct password The print job has been cancelled be cause capture file s could not be stored Exceed ed max memory The HDD became fu...

Страница 163: ... Print General Settings Guide You do not have a privilege to use this function This job has been cancelled The entered login user name or login password is not correct Check that the user name and pass word are correct You do not have a privilege to use this function This job has been cancelled The logged in user is not allowed to use the selected function Contact the administrator Z fold error Z ...

Страница 164: ...ed in the error log If a new error is added when there are 50 errors already stored the oldest error is deleted However if the earliest error is a Sample Print Locked Print Hold Print or Stored print error it is not deleted The error is stored separately until the number of er rors reaches 30 If the main power switch is turned off the log is deleted A Press the Printer key to display the printer s...

Страница 165: ...hould use depends on the computer Be sure to use the correct one If the cable is damaged or worn replace it See Con necting to the Interfaces General Set tings Guide Printing does not start The interface cable was connected after the ma chine was switched on Connect the interface cable before turn ing on the machine Printing does not start If the machine is operat ing in an extended wire less LAN ...

Страница 166: ...connected to a computer via a cable check the computer print port settings are cor rect See Confirming the Connec tion Method Printer Reference When it is networked with a com puter Contact the administrator The status indicator of the printer is lit The cause is displayed on the display of the control panel Check the error message on the display panel and take required action See p 54 Messages Di...

Страница 167: ... following port s list confirm the correct port is selected For Windows XP Professional or Windows Server 2003 A Click the Start button and then click Printers and Faxes B Click the icon of the machine On the File menu click Properties C Click the Ports tab D In the Print to the following port s list confirm the correct port is selected For Windows XP Home Edition A Click the Start button and then...

Страница 168: ...ire page is faded If the Toner saving check box is selected in the printer driver settings the entire page will be faded when printed For the RPCS printer driver Toner saving is lo cated on the Print Quality tab For the Post Script 3 printer driver see PostScript 3 Supplement See the printer driver Help Fine lines are fuzzy of inconsistent thick ness or color or do not appear Super fine lines have...

Страница 169: ...ed in the recom mended temperature and humidity condition See Copy Paper About This Machine Misfeeds occur fre quently The paper is too thick or too thin Use recommended paper See Copy Paper About This Machine Misfeeds occur fre quently The copy paper is wrinkled or has been folded creased Use recommended paper Use paper that has been stored in the recommended temperature and humidity condition Se...

Страница 170: ...inter Wait for a moment Making the following setting on the printer driver may reduce the computer s workload PCL 5e 6 Select the lower value for Resolution on the Print Quality tab in the printer proper ties dialog box PostScript 3 Select the lower value in Resolution The location of this setting is given below If your operating system is Windows select Optimize for Speed in PostScript Output Op ...

Страница 171: ...s do not match Make the following settings with the printer driver Change the Dithering setting on the Image Adjustments tab in the Change User Set tings dialog box on the Print Quality tab in the RPCS printer driver See the printer driver Help Optional components connected to the ma chine are not recog nized when using Windows 2000 XP Vista and Windows Server 2003 Bidirectional commu nication is ...

Страница 172: ...ted PDF files enter the password in the PDF Menu or on Web Im age Monitor For details about PDF Menu see PDF Menu General Settings Guide For details about Web Image Monitor see the Web Image Monitor Help PDF files do not print out cannot perform PDF Direct Print PDF files cannot be printed if they are print disabled via PDF File Security Change the PDF File Security setting PDF files do not print ...

Страница 173: ...ght have occurred Interference from IEEE 802 11b wireless LAN devicescanreduce communication speed Bluetooth trans missionspeedsare not high Remove the machine from close proximity with IEEE 802 11b wireless LAN devices If there are active IEEE 802 11b wireless LAN devices or other Bluetooth devices nearby relocate the machine or disable those devices Problem Cause Solution ...

Страница 174: ...ed When the original is placed directly on the exposure glass the side to be scanned must face down When the original is fed via the ADF the side to be scanned must face up See Placing Originals Copy Docu ment Server Reference Images are scanned in rotated If you set the original with its up per edge backward and save gray scale images as a TIFF or JPEG file they are scanned in rotated When placin...

Страница 175: ...d This section describes likely causes of and possible solutions for the TWAIN driver failing to operate Problem Cause Solution The stored file is locked and is not accessible The file which is password pro tected is locked because the pass word was incorrectly entered ten times Contact the administrator Problem Cause Solution The network cannot be browsed when specify ing the destination fold er ...

Страница 176: ...Contact the administrator Problem Cause Solution The network delivery function cannot be used The delivery software may be an old version or a security setting may be specified Contact the administrator The network delivery function cannot be used The network delivery function setting is not correct Specify it correctly See Settings Required to Use the Network De livery Scanner General Settings Gu...

Страница 177: ...ge is still shown the network may be crowded Check the information of System Settings See System Settings General Settings Guide LDAP server au thentication has failed Check the settings The user name and pass word differ from those set for LDAP Authentica tion Make settings correctly for the user name and the password for LDAP serv er authentication The destination list has been up dated Specifie...

Страница 178: ...set to allow you to use the function Contact the administrator Exceeded max number of standby files Try again after the current file is sent The maximum number of standby files was exceed ed There are 100 files waiting in the send ing queue for e mail Scan to Folder or delivery functions Wait until files have been sent Exceeded time limit for LDAP server search Check the server status A network er...

Страница 179: ...us displayed or whose information is be ing changed with Desk TopBinder Canceltransmission Waiting status cleared or the DeskTopBinder setting and then delete the file Cannot cancel sending all se lected file s Certain file s are currently be ing sent You cannot cancel a file currently being sent You can only cancel files waiting to be sent You cannot cancel files already sent or currently being s...

Страница 180: ...en cancelled Check Max E mail Size in Scanner Features Themaximume mailsize has been exceeded Increase the size of Max E mail Size Set Divide Send E mail to Yes per Page or Yes per Max Size See Send Settings General Settings Guide Sending the data has failed The data will be re sent later A network error has oc curred and a file was not sent correctly Wait until sending is retried automati cally a...

Страница 181: ...n be used in Document Serv er at the same time The maximum number of files that can be stored in the document server has been exceeded Check the files stored by the other func tions and then delete unneeded files See Document Server Copy Docu ment Server Reference Entered protec tion code for destination is incorrect Please re enter The correct protect desti nation code was not en tered Make sure ...

Страница 182: ...the scanned data or press Cancel to delete Because there is not enough free hard disk space in the machine for delivering or sending by e mail while storing in the Document Server only some of the pages could be scanned Specify whether to use the data or not Memory is full Cannot scan The scanned data will be deleted Because of insufficient hard disk space the first page could not be scanned Try o...

Страница 183: ...ss Start key again The scanned data exceed ed maximum data capac ity Specify the scan size and resolution again Note that it may not be possible to scan very large originals at a high resolution See Relationship between Resolution and File Size Scanner Ref erence Exceeded max page capacity per file Press Send to send the scanned data or press Cancel to delete The number of scanned pages exceeded m...

Страница 184: ...s machine Contact your service representative Scanner is not available Check the scanner con nection status The machine s main power switch is off The machine is not connected to the net work correctly Set the main power switch to On Check whether the machine is con nected to the network correctly Deselect the personal firewall func tion of the client computer Use an application such as telnet to ...

Страница 185: ... Reference Insufficient mem ory Reduce the scanning area When a paper misfeed occurs in the machine duringprinting scanning cannot be performed After the misfed paper has been re moved proceed with scanning Cannot find XXX scanner used for the previous scan YYY will be used instead XXX and YYY indi cate scanner names The main power switch of the previ ously used scanner is not set to On The machin...

Страница 186: ...than the scanner function is being used such as the copier func tion Wait for a while and reconnect Insufficient mem ory Close all other applica tions then re start scanning Memory is insufficient Close all the unnecessary applica tions running on the client compu ter Uninstall the TWAIN driver and then reinstall it after restarting the computer No User Code is registered Con sult your system admi...

Страница 187: ...Troubleshooting When Using the Scanner Function 86 5 ...

Страница 188: ...ypass tray see Copying from the Bypass Tray Copy Document Server Reference Loading Paper into Tray 1 Tandem Tray The following procedure describes loading paper into Tray 1 Important When paper loaded in the right side of Tray 1 runs out paper on the left is automatically shifted to the right While the paper is moving a message in structing you to wait appears Do not pull out the tray at this time...

Страница 189: ... Square the paper and place it print side down Whole tray pulled out Left half of the tray pulled out C Carefully push the paper tray fully in Note You can load paper even while making copies from Tray 1 You can pull out the left half of the tray while copying is in ANS051S ANS052S ANS053S ...

Страница 190: ... paper over the limit mark A Carefully pull out the paper tray until it stops B Square the paper and load it print side down C Carefully push the paper tray fully in Note If you load a paper size that is not selected automatically you will need to specify the paper size with the control panel Following paper sizes that are not selected automatically The tray can hold up to 550 sheets Reference p 9...

Страница 191: ...ortant The LCT loads A4K B5K 81 2 11K paper Align the paper neatly and press its edge to the right and left plate Poorly loaded paper causes misfeeds Check that the paper edges are aligned at the left side Do not stack paper over the limit mark A Open the top cover of the large capacity tray LCT B Load the paper in the tray along the edge on the left ANS031S ANS032S ...

Страница 192: ... the Booklet Finisher Saddle Stitch load sheets print side down Load paper in the interposer in the same orientation as paper in the paper tray The staple or punching location will be on the left side of the paper when you are facing the machine Do not place anything on top of or leave documents on the sensor This may lead to the paper size not being correctly scanned or paper jams When using the ...

Страница 193: ...r Toner and Staples 92 6 A Load paper orderly B Adjust the side fence to the paper size Note To set the paper in the interposer align the orientation of originals in the ADF as shown below AMS056S AMS057S ANR026S ...

Страница 194: ...aper are placed Select On in Letterhead Setting under Copier Document Server Features and then place the original and paper as shown below See Letterhead Setting General Settings Guide When printing with the printer function placement orientation is the same For printing using the printer function load paper in the same orientation Orig orientation Paper orientation Note For System Settings specif...

Страница 195: ...en curled or warped paper before loading For details about paper sizes and types see Copy Paper About This Ma chine Changing the Paper Size in Tray 2 and 3 The following procedure describes how to change a paper size in Tray 2 and 3 Important If a paper tray is pushed vigorously when putting it back into place the posi tion of the tray s side fence may slip out of place Check the top of the paper ...

Страница 196: ...ock on the side fence D While pressing down the release lever slide the side fence until they are aligned the paper size you want to load E Slide the end fence until it is aligned with the size of paper to you want to load ANS023S ANS024S ANS025S ...

Страница 197: ...h against the edge of the paper Changing to a Size that is Not Automatically Detected If you load a paper size that is not selected automatically you need to specify the paper size with the control panel This section describes how to load these paper taking 11 15 L as an example Important Following paper sizes that are not selected automatically 11 15 L 11 14 L 10 15 L 81 4 14 L 8 101 2 L 210 340L...

Страница 198: ...g the Paper Size 97 6 B Press System Settings C Press Tray Paper Settings tab D Select the tray for which you want to change the paper settings Press either of Tray Paper Size Tray 2 and Tray Paper Size Tray 3 ...

Страница 199: ...yed F Press the User Tools Counter key The initial display is shown Note If you want to print on paper that is selected automatically after printing on a paper size that is not selected automatically you must return the set ting to Auto Detect Reload the paper repeat step A to D and select Au to Detect in step E The setting is returned to Auto Detect ...

Страница 200: ...er and move into a fresh air environment Consult a doctor if necessary If toner or used toner gets into your eyes flush immediately with large amounts of water Consult a doctor if necessary If toner or used toner is swallowed dilute by drinking a large amount of wa ter Consult a doctor if necessary Avoid getting toner on your clothes or skin when removing a paper jam or replacing toner If your ski...

Страница 201: ...a flat surface Note You can still make about 1000 copies after the messages D Toner Car tridge is almost empty and Replace Toner Cartridge appear cyclically but replace toner early to prevent poor copy quality You can check name of the required toner name and the replacement proce dure using the D Add Toner screen Press System Status to check contact number for consumables order For sys tem status...

Страница 202: ...e display lights Note that even if there is no toner left you can still send fax documents Important If number of communications executed after the toner has run out and not listed in the automatically output Journal exceeds 200 communication is not possible A Make sure that the machine is in facsimile mode B Press Exit and then perform transmission operation The error message disappears Note The ...

Страница 203: ...aple cartridge other than that recommended Refill the stapler according to the finisher type Check the type if you are un sure For details about type of finisher see Options About This Machine 3 000 Sheet 50 Sheet Staple Finisher and Booklet Finisher The following procedure describes how to add staples to the 3 000 Sheet 50 Sheet Staple Finisher and Booklet Finisher ANS059S ...

Страница 204: ...pper unit of the cartridge there are staples remain ing inside the cartridge Use all the staples do not add more 3 000 Sheet 100 Sheet Staple Finisher The following procedure describes how to add staples to the 3 000 Sheet 100 Sheet Staple Finisher ANS048S ...

Страница 205: ...Adding Paper Toner and Staples 104 6 Booklet Finisher Saddle Stitch The following procedure describes how to add staples to the Booklet Finisher ANS060S ...

Страница 206: ...the operation switch If you do your copy settings will be lost To prevent misfeeds do not leave any torn scraps of paper inside the ma chine Contact your service representative if misfeeds occur frequently The inside of the machine could be very hot Do not touch any parts other than specified in this document when removing misfed paper Otherwise it may cause burn injury The fusing section of this ...

Страница 207: ...r If a misfeed happens remove the misfed paper or original following the proce dures stated on the sticker on the rear of main unit front cover A misfeed has occurred in the place corresponding to the letter displayed on the control panel ANS101S ...

Страница 208: ...ed paper is entirely removed restore the machine to its original state Note More than one misfeed may be indicated When this happens check all the areas indicated Reference p 108 When A Is lit p 108 When B Is lit p 108 When C Is lit p 109 When D Is lit p 109 When E Is lit p 110 When F Is lit p 111 When N Is Lit p 112 When P Is Lit p 113 When Q Is lit p 114 When R Is Lit p 117 When W Is lit p 117 W...

Страница 209: ...is section describes how to remove jammed paper when A is lit When B Is lit This section describes how to remove jammed paper when B is lit When C Is lit This section describes how to remove jammed paper when C is lit BFQ001S ANS003S BFQ008S ...

Страница 210: ...Removing Jammed Paper 109 7 When D Is lit This section describes how to remove jammed paper when D is lit When E Is lit This section describes how to remove jammed paper when E is lit BFQ002S BFQ003S ...

Страница 211: ...Clearing Misfeeds 110 7 When F Is lit This section describes how to remove jammed paper when F is lit BFQ004S ...

Страница 212: ...Removing Jammed Paper 111 7 When N Is Lit This section describes how to remove jammed paper when N1 N3 is lit when Z Folding Unit is installed When N1 is lit When N2 or N3 is lit ANS008S ANS009S ...

Страница 213: ...Clearing Misfeeds 112 7 When P Is Lit This section describes how to remove jammed paper when P1 P2 is lit When P1 is lit When P2 is lit ANS010S ANS011S ...

Страница 214: ...Removing Jammed Paper 113 7 When Q Is lit This section describes how to remove jammed paper when Q is lit when Inter poser is installed ANS012S ...

Страница 215: ...Clearing Misfeeds 114 7 When R Is Lit This section describes how to remove jammed paper when R1 R12 is lit 3 000 Sheet 50 Sheet Staple Finisher BFQ005S ...

Страница 216: ...Removing Jammed Paper 115 7 3 000 Sheet 100 Sheet Staple Finisher BFQ009S ...

Страница 217: ...Clearing Misfeeds 116 7 Booklet Finisher Saddle Stitch BFQ006S BFQ007S ...

Страница 218: ...es how to remove jammed paper when U is lit when Large Capacity Tray LCT is installed Note Inside the finisher or inside the front cover there is a sticker explaining how to remove misfed paper If a detailed removal instruction appears on the right of the screen follow it You can also use the procedure indicated in System Status to remove jammed paper ANS017S ANS018S ...

Страница 219: ... jammed staples staples will not be ejected the first few times you try to use the stapler Remove the jammed staples according to the finisher type Check the type if you are unsure For details about type of finisher see Options About This Machine 3 000 Sheet 50 Sheet Staple Finisher and Booklet Finisher The following procedure describes how to remove jammed staples from the 3 000 Sheet 50 Sheet St...

Страница 220: ...Removing Jammed Staples 119 7 3 000 Sheet 100 Sheet Staple Finisher The following procedure describes how to remove jammed staples from the 3 000 Sheet 100 Sheet Staple Finisher BFQ010S ...

Страница 221: ...Clearing Misfeeds 120 7 Booklet Finisher Saddle Stitch The following procedure describes how to remove jammed staples from the Booklet Finisher ANS062S ...

Страница 222: ...played you cannot use the Punch function 3 000 Sheet 50 Sheet Staple Finisher and Booklet Finisher The following procedure describes how to remove punch wastes from the 3 000 Sheet 50 Sheet Staple Finisher and Booklet Finisher A Open the front cover of finisher B Pull out the punch waste box carefully and then remove punch waste ANS064S ADB033S ...

Страница 223: ...l the punch waste box in Step C the Hole Punch Re ceptacle is full message continues to be displayed If the message is still displayed reinstall the punch waste box 3 000 Sheet 100 Sheet Staple Finisher The following procedure describes how to remove punch wastes from the 3 000 Sheet 100 Sheet Staple Finisher A Open the front cover of finisher ADB034S ANS019S ...

Страница 224: ...all the punch waste box D Close the finisher front cover Hole Punch Receptacle is full disappears Note If you do not reinstall the punch waste box in Step C the Hole Punch Re ceptacle is full message continues to be displayed If the message is still displayed reinstall the punch waste box ANS020S ANS021S ...

Страница 225: ...Clearing Misfeeds 124 7 ...

Страница 226: ... and level base The machine must be level within 5 mm 0 2 inches both front to rear and left to right To avoid possible buildup of ozone make sure to locate this machine in a large well ventilated room that has an air turnover of more than 30 m3 hr person Keep the machine away from humidity and dust Otherwise a fire or an elec tric shock might occur Do not place the machine on an unstable or tilte...

Страница 227: ... plug from the socket grip the plug to avoid damaging the cord thereby reduc ing the risk of fire or electric shock Close all covers and trays including the front cover and bypass tray Keep the machine level and carry it carefully taking care not to jolt or tip it Rough handling may cause a malfunction or damage the hard disk or mem ory resulting in loss of stored files Do not take off the holding...

Страница 228: ...ord Power sources not specified on the inside front cover of this manual and extension cords are electric shock or fire hazards Power cords that are damaged broken modified trapped under heavy objects pulled hard or bent severely are electric shock and fire haz ards If the power cord is damaged exposure of the core disconnection etc contact your service representative to change a new one Oper atin...

Страница 229: ...near the power source providing the clearance areas shown 1 Rear 5 cm 2 or more 2 Right 4 cm 1 6 or more 3 Front 70 cm 27 5 or more 4 Left 10 cm 4 or more Note For the required space when options are installed contact your service repre sentative ZGVY510E ...

Страница 230: ... substances get inside the machine or melt plastic parts a failure might occur Do not clean parts other than those explicitly specified in this manual Other parts should only be cleaned by your service representative How to maintain Cleaning the machine Wipe the machine with a soft damp cloth and then wipe it with a dry cloth to remove the water Cleaning the Exposure Glass The following procedure ...

Страница 231: ...er The following procedure describes how to clean the exposure glass cover Cleaning the Auto Document Feeder The following procedure describes how to clean the ADF A Clean the white sheet of the ADF Clean 1 and 2 B Pull the lever AMJ031S ZGUH700J ...

Страница 232: ...Maintaining Your Machine 131 8 C Wipe the scanning glass ZGUH710J ...

Страница 233: ... Cleaning the Auto Document Feeder 130 Cleaning the Exposure Glass 129 Cleaning the Exposure Glass Cover 130 Clearing Misfeeds 105 Combine 25 Connect Copy 30 31 32 Connect Copy is Canceled 30 Copy Function 17 D Data Storage 5 Display During Connect Copy 30 Document Server 9 Duplex 25 E Edit 25 Enquiry 5 Environment 125 Environments to avoid 126 Error Log 63 Error Mail Notification 49 Error Occurs ...

Страница 234: ...g Surface 93 Problems Operating the Machine 9 Punch Waste 121 R Reception 43 Removing Jammed Paper 105 Removing Jammed Staples 118 Removing Punch Waste 121 S Scanner Function 73 Scanning is Not Done as Expected 73 Server Generated Error E mail 49 Stamp 25 Status Messages 54 Stored Files Cannot Be Accessed 74 Stored Files Cannot be Edited 75 T Toner 99 101 Transmission 43 Transmission Reception 43 ...

Страница 235: ...134 EN USA D052 7452 ...

Страница 236: ...or identification purposes only and might be trademarks of their respective companies We disclaim any and all rights to those marks The proper names of the Windows operating systems are as follows The product names of Windows 2000 are as follows Microsoft Windows 2000 Professional Microsoft Windows 2000 Server Microsoft Windows 2000 Advanced Server The product names of Windows XP are as follows Mi...

Страница 237: ...Operating Instructions Troubleshooting Type for 8060 MP 6000 LD260 Aficio MP 6000 Type for 8070 MP 7000 LD270 Aficio MP 7000 Type for 8080 MP 8000 LD280 Aficio MP 8000 EN USA D052 7452 ...

Страница 238: ...anual carefully before you use this machine and keep it handy for future reference For safe and correct use be sure to read the Safety Information in About This Machine before using the machine Placing Originals Copying Connect Copy Document Server Appendix 1 2 3 4 5 ...

Страница 239: ...y questions concerning the legality of copying or printing cer tain items consult with your legal advisor Notes Some illustrations in this manual might be slightly different from the machine Certain options might not be available in some countries For details please contact your local dealer Depending on which country you are in certain units may be optional For details please contact your local d...

Страница 240: ...explains how to replace paper toner staples and other consumables Copy Document Server Reference Explains Copier and Document Server functions and operations Also refer to this manual for explanations on how to place originals Facsimile Reference Explains Facsimile functions and operations Printer Reference Explains Printer functions and operations Scanner Reference Explains Scanner functions and ...

Страница 241: ...ing the enhanced security functions or user and administrator authentication PostScript 3 Supplement Explains how to set up and use PostScript 3 UNIX Supplement For UNIX Supplement please visit our Web site or consult an authorized dealer Other manuals Manuals for DeskTopBinder Lite DeskTopBinder Lite Setup Guide DeskTopBinder Introduction Guide Auto Document Link Guide Note Manuals provided are s...

Страница 242: ...chine type and options Reference p 2 Functions Requiring Optional Configurations Types of Duplex Copies 1 Sided 2 Pages 2 Sided 1 Page See p 70 Duplex 2 Sided 1 Page 2 Sided 1 Page See p 70 Duplex 1 Sided 4 Pages Combine 2 Sided 1 Page See p 78 Two Sided Combine GCSHVY9J ...

Страница 243: ... Sided 1 Page See p 78 Two Sided Combine A Front B Back 1 Sided 16 Pages Combine 2 Sided 1 Page See p 78 Two Sided Combine A Front B Back 2 Sided 2 Pages Combine 2 Sided 1 Page See p 78 Two Sided Combine ANP020S GCSHVY5E GCSHVY1E ...

Страница 244: ...Combine 2 Sided 1 Page See p 78 Two Sided Combine A Front B Back 2 Sided 8 Pages Combine 2 Sided 1 Page See p 78 Two Sided Combine A Front B Back Bound Originals 2 Sided 1 Page See p 83 Booklet Magazine GCSHVY2E GCSHVY6E ...

Страница 245: ... Back Bound Originals 2 Sided Pages See p 83 Booklet Magazine Mix 1 2 Sided See p 90 Mix 1 2 Sided Creating a Booklet or Magazine 1 Sided 4 Pages Booklet See p 83 Booklet Magazine Open to left GCKONZ0J GCBOOK0E ...

Страница 246: ...vii Open to right 2 Sided 2 Pages Booklet See p 83 Booklet Magazine Open to left Open to right 1 Sided Magazine See p 83 Booklet Magazine Open to left GCBOOK1E GCAH010E GCAH020E GCBOOK3E ...

Страница 247: ...viii Open to right 2 Sided Magazine See p 83 Booklet Magazine Open to left Open to right GCBOOK4E GCAH030E GCAH040E ...

Страница 248: ...ning Multiple Pages onto a Single Page See p 74 One Sided Combine 1 Sided 2 Pages Combine 1 Sided 1 Page 1 Sided 4 Pages Combine 1 Sided 1 Page 1 Sided 8 Pages Combine 1 Sided 1 Page GCSHVY7E GCSHVY8J GCSHVY3J ...

Страница 249: ...x 2 Sided 1 Page Combine 1 Sided 1 Page 2 Sided 2 Pages Combine 1 Sided 1 Page 2 Sided 4 Pages Combine 1 Sided 1 Page GCSHVYOJ GCSHVYBJ GCSHVY4J ...

Страница 250: ... Originals Such as Books Bound Originals 1 Sided 2 Pages See p 81 Series Copies Bound Originals 2 Sided 1 Page See p 83 Booklet Magazine Front Back Bound Originals 2 Sided Pages See p 83 Booklet Magazine CP2B0100 ...

Страница 251: ...xii Copying 2 Sided Pages onto 1 Sided Pages See p 81 Series Copies 2 Sided 1 Page 1 Sided 2 Pages CP2B0200 ...

Страница 252: ...ended Originals 9 Originals not recommended for the Auto Document Feeder ADF 10 Sizes Detectable by the Auto Paper Select 11 Sizes difficult to detect 12 Missing Image Area 13 Placing Originals 14 Original Orientation 14 Placing Originals on the Exposure Glass 16 Placing Originals in the Auto Document Feeder 17 Batch Mode 19 SADF Mode 20 Mixed Sizes Mode 21 Original Size 22 Regular sizes 22 Custom...

Страница 253: ... Reduce Enlarge 52 Size Magnification 54 Directional Magnification 55 Entering the ratio with the number keys 55 Specifying a ratio with o and n 56 Directional Size Magnification inch 57 Sort 58 Sample Copy 60 Changing the number of sets 61 Stack 61 Staple 62 Punch 65 Z fold 67 Using the Z fold support tray 68 Z fold positions and Z folding copies 69 Duplex 70 Originals and copy orientation 73 One...

Страница 254: ...ion 122 Image Repeat 123 Double Copies 125 Centering 126 Positive Negative 128 Covers 129 Designate 131 Chapters 132 Blank Slip Sheets 133 Slip Sheets 135 Storing Originals in the Document Server 137 Programs 139 Storing a Program 139 Changing a Stored Program 140 Deleting a Program 141 Recalling a Program 141 Programming Defaults in Initial Display 142 3 Connect Copy What is Connect Copy 143 How ...

Страница 255: ... Address Book 165 Registering or changing a user name when using a user name not registered to the Address Book 166 Registering or changing a user name when no name is registered to the Address Book 167 Changing a file name 167 Setting or changing a password 168 Changing User Name File Name or Password of a Stored Document 169 Checking the Details of a Stored Document 170 Searching for a Stored Do...

Страница 256: ...otes could result in moderate or minor injury or damage to the machine or to property Be sure to read these notes They can be found in the Safety Information section of About This Machine Indicates points to pay attention to when using the machine and explanations of likely causes of paper misfeeds damage to originals or loss of data Be sure to read these explanations Indicates supplementary expla...

Страница 257: ...Sheet Staple Finisher Staple 3 000Sheet 50Sheet Staple Finisher booklet finisher or 3 000Sheet 100Sheet Staple Finisher Staple Saddle Stitch Booklet finisher Punch 3 000Sheet 50Sheet Staple Finisher booklet finisher or 3 000Sheet 100Sheet Staple Finisher Z fold Booklet finisher or 3 000Sheet 100Sheet Staple Finisher with Z folding unit Connect Copy Copy Connector Note The tab sheet holder is requi...

Страница 258: ...ages 3 You can register up to three fre quently used reduce enlarge ratios other than the fixed reduce enlarge ratios See Reproduction Ratio General Settings Guide 4 Numbers of originals scanned into memory copies set and copies made 5 Displays contents of the shortcut keys You can register frequently used functions in these keys See General Features General Settings Guide 6 Displays Sort Stack St...

Страница 259: ...o the simplified display Letters and keys are displayed at a larger size making operations easier Example of a simplified display 1 Key Color Press to increase screen contrast This is available only for the simplified display Note To return to the initial display press the Simplified Display key again Certain keys do not appear on the simplified display BFC023S BFC022S ...

Страница 260: ...in two or more trays the machine automatically shifts to the other when the first tray runs out of pa per when Apply Auto Paper Select is selected This function is called Auto Tray Switching This setting specifies whether to use Auto Tray Switching or not Paper Display You can choose to have the available paper trays and sizes shown on the initial display Original Type Display You can have the ori...

Страница 261: ...ck side The margin is set to the same value of Back Margin Left Right 1 Sided 2 Sided Auto Margin TtoB In 1 sided to 2 sided Duplex mode you can specify the margins on the back side The value set for Back Margin Top Bottom is used Erase Border Width You can specify the width of the erased border margins with this function Erase Original Shadow in Combine In Combine mode you can specify whether to ...

Страница 262: ...ted Date Stamp Format You can select the date format for Date Stamp mode Font You can select the Date Stamp font Size You can set the Date Stamp size Superimpose You can have the Date Stamp printed in white when it overlaps black parts of the image Stamp Setting You can specify how Date Stamp is printed Page Numbering Stamp Format You can select the page number format given priority when Page Numb...

Страница 263: ...ncrements of 1 second Rotate Sort Auto Paper Continue Specify to continue copying when paper of the required orienta tion has run out during rotate sort Copy Eject Face Method in Glass Mode You can specify the way in which copies are delivered when copy ing an original placed on the exposure glass Copy Eject Face Method in Bypass Mode You can specify the way in which copies are delivered when copy...

Страница 264: ... version Inch version Note The maximum number of originals that can be placed in the ADF is about 100 paper weight is 80 g m2 20 lb The weight range for originals when using Mixed Sizes mode is 52 81 g m2 13 8 21 5 lb Original location Original size Original weight Exposure glass Up to A3 ADF One sided originals A3L B6 JIS Japanese Industrial Standard KL 40 128 g m2 35 110 kg Two sided originals A...

Страница 265: ...Curled folded or creased originals Pasted originals Originals with any kind of coating such as thermal fax paper art paper alu minum foil carbon paper or conductive paper Originals with perforated lines Originals with indexes tags or other projecting parts Sticky originals such as translucent paper Thin or highly flexible originals Thick originals such as postcards Bound originals such as books Tr...

Страница 266: ...esentative 4 8K 390 mm 267 mm 16K 267 mm 195 mm Inch version Detectable size Undetectable size 1 If you wish to switch to detectable paper size from 11 17 L to 11 15 L from 81 2 14 L to 81 2 13 L from 81 2 11 L to 8 10 L from 81 2 11 K to 71 4 101 2K contact your service representative Size A3 L B4 JIS L A4 K L B5 JIS K L A5 K A5 L B6 JIS K L 11 17 L 8 1 2 13 L 8 13 L 8K L 4 16K K L 4 8 1 4 13 L 8...

Страница 267: ...etect It is difficult for the machine to automatically detect the sizes of the following types of originals so select the paper size manually Originals with indexes tags or other projecting parts Transparent originals such as OHP transparencies or translucent paper Dark originals with a lot of text and drawings Originals which partially contain a solid image Originals which have solid images at th...

Страница 268: ... place originals in the ADF or on the exposure glass correctly margin of a few millimeters on all four sides might not be copied A 0 5 mm or more Max 3 5 mm 0 02 or more Max 0 14 B 2 2 mm 0 08 0 08 C 2 1 5 mm 0 08 0 06 D 4 2 mm 0 16 0 08 GCGENK2E ...

Страница 269: ... that will be copied onto paper Note For original sizes you can set see Originals Reference p 9 Originals Original Orientation When using the ADF place the original face up When using the exposure glass place the original face down A ADF B Exposure glass When copying A3K B4 JISK or 11 17 K size originals select as the Original Orientation The machine then rotates the copy image by 90 This is usefu...

Страница 270: ...originals with the Staple function selected A Press Special Original B Select the original orientation or and then press OK Note It is recommended that you use the Original Orientation function with the Auto Paper Select or Auto Reduce Enlarge function AMG017S ...

Страница 271: ...of the ADF might open or be damaged A Lift the ADF Be sure to lift the ADF by more than 30 degrees Otherwise the size of the original might not be detected correctly B Place the original face down on the exposure glass The original should be aligned to the rear left corner Start with the first page to be copied A Positioning mark B Scale C Lower the ADF BFB009S ...

Страница 272: ...zes See Mixed Sizes Mode When placing custom size originals See Custom sizes A Adjust the guide to the original size B Set the aligned originals face up into the ADF Do not stack originals beyond the limit mark The last page should be on the bottom Be sure not to block the sensor or load the original untidily Doing so may cause the machine to detect the size of the scanned image incorrectly or dis...

Страница 273: ...ighten curls in the originals before placing them on the ADF To prevent multiple sheets from being fed at once fan the original before placing it on the ADF Set the original squarely Reference p 19 Batch Mode p 20 SADF Mode p 21 Mixed Sizes Mode p 23 Custom sizes ...

Страница 274: ... C Place the first part of the original and then press the Start key D After the first part of the original has been fed place the next part then press the Start key Note When SADF is displayed in step B set Batch with Switch to Batch See Input Output General Settings Guide To copy subsequent originals in this mode repeat step D When the Sort Combine or 1 Sided 2 Sided mode has been set press the ...

Страница 275: ... Settings Guide A Press Special Original B Press SADF and then press OK C Place one page of an original and then press the Start key D When the machine instructs you to place another original place the next page The second and subsequent pages will be fed automatically without pressing the Start key Note When the Sort Combine or 1 Sided 2 Sided mode has been set press the q key after all originals...

Страница 276: ...The sizes of the originals that can be placed in this mode are follows Metric version A3L and A4K B4 JISL and B5 JISK A4L and A5K Inch version 11 17 L and 81 2 11 K 81 2 11 L and 51 2 81 2 K You can place originals of two different sizes in the ADF at the same time A Press Special Original B Select Mixed Sizes and then press OK C Align the rear and left edges of the originals as shown in the illus...

Страница 277: ...f the originals Regular sizes Select the size of the originals from the regular sizes A Press Special Original B Press Original Size C Press Regular Size D Select the size of original and then press OK twice E Place the original and then press the Start key ...

Страница 278: ...ced with this function A Press Special Original B Press Original Size C Press Custom Size D Enter the horizontal size of the original with the number keys and then press the q key E Enter the vertical size of the original with the number keys and then press the q key F Press OK twice G Place the originals and then press the Start key Note If you make a mistake in step D or E press Clear or the Cle...

Страница 279: ...Placing Originals 24 1 ...

Страница 280: ...tication is set enter your login user name and user password so that the machine accepts copy jobs Ask the user ad ministrator for the login user name and login password For details see When the Authentication Screen is Displayed About This Machine A Make sure Ready appears on the screen If any other function is displayed press the Copy key on the left side of the control panel Initial copy screen...

Страница 281: ...s press the Clear Stop key or Cancel on the screen To confirm settings press Check Modes Reference When the Authentication Screen is Displayed About This Machine Administrator Tools General Settings Guide Interrupt Copy Use this function to interrupt a long copy job to make urgently needed copies Important You cannot use the Interrupt Copy function when fax originals are being scanned or the scann...

Страница 282: ...he Start key to continue copying from where it left off Left Original Beeper The beeper sounds and an error message is displayed when you leave your orig inals on the exposure glass after copying Note For details see General Features General Settings Guide Reference General Features General Settings Guide Copy Face Up Copies are delivered in opposite order to the default order setting Important Be...

Страница 283: ...se order of original A Press Reverse Ejection Face Up Down B Place originals and then press the Start key Note For details about the default delivery order setting see Supplementary Information Reference p 185 Supplementary Information General Features General Settings Guide BFC008S ...

Страница 284: ... set the position of the index tab See Tray Paper Settings General Settings Guide a Original width b Index width Important The tab stock can be placed in trays 2 and 3 When setting tab stock always use the optional tab sheet holder Set tab stock so that it will be fed from the side without the tab first GCINDX0E GCINDX1E BFC009S ...

Страница 285: ...tock is set B Place originals and then press the Start key Note Check the position of the index tab to avoid cropping the image Set the tab stock with the side to be copied facing down Tab stock is always fed starting from the top tab A Originals B Tab stock C Copies Reference Tray Paper Settings General Settings Guide BFC010S GCINDX2E ...

Страница 286: ... job is finished the next copy job will start automatically A Press New Job when Copying appears B Be sure message Ready appears and then set up the next copy job C Place the originals and then press the Start key All originals are scanned When the preset job is complete a job preset confirmation dialog box appears D Press Exit You return to the copy screen After the current copy job the next copy...

Страница 287: ...on when Interrupt Copy is active Documents printed using the facsimile function and scanner function are not displayed in the job list Job List Screen This section explains displays and icons that appear in the Job List screen The Job List screen varies depending on whether Job Order is selected with Print Priority for the System Settings For details about the setting procedure see General Feature...

Страница 288: ...the function used to print jobs Job printed using copy function Job printed using printer function Job printed using Document Server function Job printed using DeskTopBinder Job printed using Web Image Monitor Reference General Features General Settings Guide Checking Jobs in the Print Queue You can check the contents of jobs in the print queue A Press Job List B Select the job you want to check C...

Страница 289: ...Order of Jobs You can change the order in which print jobs in the job list are served A Press Job List B Select the job whose order you want to change C Press Change Order D Change the order using Top Previous or Next E Press OK ...

Страница 290: ...Suspending is displayed at the left of the jobs in the job list that are suspended Note To resume the suspended jobs press Resume Printing This function is available only if Job Order is specified Deleting Jobs You can delete jobs that are queued or currently printing A Press Job List B Select the job you want to delete C Press Delete Reservation D Press Yes Note To delete multiple print jobs sele...

Страница 291: ...e history and contents of printed jobs A Press Job List B Press Job History A list of completed and canceled print jobs appears C Select the job whose contents you want to check D Press Details to check the contents of the displayed jobs E Press Exit ...

Страница 292: ...the above be sure to specify the size When copying on OHP transparencies or paper heavier than 105 g m2 about 27 9 lb you need to specify the type and size of paper with Special Original The maximum number of sheets you can load into the bypass tray depend on paper type Load only as much paper as can be held between the paper guides on the bypass tray When paper larger than 433 mm 17 1 inches in s...

Страница 293: ...pass tray Overloading the bypass tray can result in misfeeds and skewed images Swing out the extender to support paper sizes larger than A4L or 81 2 11 L To prevent multiple sheets from being fed at once fan paper before placing it on the tray A Extender C Press the q key D Select the size and type of the paper E Press OK F Place the originals and then press the Start key G When the copy job is fi...

Страница 294: ...ar Size Paper Makes copies onto regular size paper from the bypass tray A Open the bypass tray and then align the paper guide to the paper size B Insert the paper face up until you hear the beep The bypass tray is automatically selected C Press the q key D Press Select Size E Select the paper size F Press OK twice ...

Страница 295: ... is automatically selected C Press the q key D Press Custom Size E Enter the horizontal size of the paper with the number keys and then press q F Enter the vertical size of the paper with the number keys and then press q G Press OK Note If you make a mistake in step E or F press Clear or the Clear Stop key and then enter the value again To register the custom size entered in step F press Program a...

Страница 296: ...e copied sheets one by one A Open the bypass tray and then align the paper guide to the paper size B Insert the paper face up until you hear the beep The bypass tray is automatically selected C Press the q key D Select paper type OHP Transparency in the Special Paper settings E Select the paper size and then press OK to return to the initial display F Place the originals and then press the Start k...

Страница 297: ...Insert the paper face up until you hear the beep The bypass tray is automatically selected C Press the q key D Press Thick Paper E Select the paper size F Press OK G Place the originals and then press the Start key H When the copy job is finished press the Clear Modes key to clear the settings Note For thick paper print speed is slower when compared to printing on plain paper If you have selected ...

Страница 298: ...per will be copied so that background will not be reproduced Manual image density You can adjust the general density of the original in seven increments Combined auto and manual image density Adjusts the density of an image only for dark texture originals Auto image density The machine automatically adjusts the image density by scanning the densities of originals Dark texture originals such as new...

Страница 299: ...ty is selected press Auto Density to cancel it B Press W or V to adjust the image density The density indicator moves Combined auto and manual image density Adjusts the density of an image only for dark texture originals A Make sure Auto Density is selected B Press W or V to adjust the density The density indicator moves ...

Страница 300: ...hat are printed on paper e g magazines When copying copies or originals generated by printers Pale When you want to reproduce originals that have lighter lines in pencil or faintly copied slips Faint lines are copied with greater clarity Generation Copy When originals are copies generation copies the copy image can be repro duced sharply and clearly A Select the original type Note You can select t...

Страница 301: ...ic version Inch version Note Only the paper trays set to No Display or Recycled Paper in Paper Type and also set to Yes in Apply Auto Paper Select in Tray Paper Settings can be se lected in Auto Paper Select mode Reference p 10 Originals not recommended for the Auto Document Feeder ADF Tray Paper Settings General Settings Guide Original location Original size and orientation Exposure glass A3L B4 ...

Страница 302: ...elected See Tray Paper Settings General Settings Guide Reference Tray Paper Settings General Settings Guide Manual Paper Select Choose the tray containing the paper you wish to copy onto a paper tray bypass tray or Large Capacity Tray LCT A Select the tray containing the paper you wish to copy onto a paper tray by pass tray or Large Capacity Tray LCT The indicator corresponding to the selected pap...

Страница 303: ...Auto Tray Switching is With Image Rotation You cannot use the Rotated Copy function if this setting is changed to Without Image Rotation or Off See General Features General Settings Guide Depending on the settings for the Punch Staple or Z fold functions you may not be able to use the Rotated Copy function Reference p 37 Copying from the Bypass Tray p 47 Auto Paper Select p 52 Auto Reduce Enlarge ...

Страница 304: ... the base point Shown below are the resulting copy images that differ depending on how the original is scanned A Base point when placed on the exposure glass B Base point when placed in the ADF A Press Reduce Enlarge B Select a ratio and then press OK C Place the originals and then press the Start key Note To select a preset ratio on the initial display in step A press the shortcut reduce enlarge ...

Страница 305: ...on you can also provide the Reduce Enlarge copy with a margin A Press Create Margin displayed on the initial display B If you do not wish to combine it with the Reduce Enlarge function place your originals and then press the Start key Reference General Features Reproduction Ratio General Settings Guide Zoom You can change the reproduction ratio in increments of 1 ...

Страница 306: ...in increments of 1 Pressing and hold ing down the relevant key changes the ratio in increments of 10 D Press OK E Place the originals and then press the Start key Note If you have incorrectly entered the ratio in step C readjust it with o or n Entering the ratio with the number keys Enter a ratio using the number keys A Press Reduce Enlarge B Press Number keys C Enter the desired ratio with the nu...

Страница 307: ...is canceled and the image cannot be rotated automatically This is useful to copy different size originals to the same size paper If the orientation in which your original is placed is different from that of the paper you are copying onto the machine rotates the original image by 90 degrees and fits it on the copy paper Rotated Copy For example to reduce A3 11 17 L originals to fit onto A4 81 2 11 ...

Страница 308: ...the Start key Reference p 11 Sizes Detectable by the Auto Paper Select p 46 Selecting Copy Paper Original location Original size and orientation Exposure glass A3L B4 JISL A4KL B5 JISKL A5K 81 2 13 L ADF A3L B4 JISL A4KL B5 JISKL A5KL B6 JISKL 81 2 13 L 8KL 16KKL Original location Original size and orientation Exposure glass 11 17 L 81 2 14 L 81 2 11 KL 81 2 51 2 K ADF A3L A4KL 11 17 L 81 2 14 L 8...

Страница 309: ...Size Magnification C Enter the length of the original with the number keys and then press the q key You can enter sizes between 1 to 999 mm 0 1 to 99 9 in 1 mm 0 1 steps D Enter the length of the copy with the number keys and then press the q key E Press OK twice F Place the originals and then press the Start key Note To change the length after pressing the q key in step D select Original or Copy ...

Страница 310: ...y a Horizontal ratio b Vertical ratio Entering the ratio with the number keys Enter a ratio using the number keys A Press Reduce Enlarge B Press Direct Mag C Press Horizontal D Enter the desired ratio with the number keys and then press the q key E Press Vertical F Enter the desired ratio with the number keys and then press the q key G Press OK twice H Place the originals and then press the Start ...

Страница 311: ...ired ratio using o or n Pressing o or n changes the ratio in increments of 1 Pressing and hold ing down the relevant key changes the ratio in increments of 10 F Press Vertical G Specify the desired ratio using o or n H Press OK twice I Place the originals and then press the Start key Note If you have incorrectly entered the ratio in steps E or G readjust it with o or n ...

Страница 312: ...sure and specify the lengths of the original and copy by comparing A with a and B with b A Press Reduce Enlarge B Press Dir Size Mag Inch C Enter the horizontal size of the original with the number keys and then press the q key You can enter sizes between 1 to 9999 mm 0 1 to 99 9 in 1 mm 0 1 steps D Enter the horizontal size of the copy with the number keys and then press the q key E Enter the ver...

Страница 313: ... the new value Sort The machine assembles copies as sets in sequential order Important To use the Rotate Sort function two paper trays with paper identical in size and different in orientation KL are required See Tray Paper Settings General Settings Guide You cannot use the bypass tray with Rotate Sort Sort Copies are assembled as sets in sequential order Rotate Sort Every other copy set is rotate...

Страница 314: ...als on the exposure glass start with the first page to be copied When placing originals in the ADF set the first page on top When placing originals on the exposure glass or in the ADF using the Batch function press the q key after all the originals have been scanned E Press the Start key Note To confirm the type of finishing press the Sample Copy key in step D Reference Input Output General Featur...

Страница 315: ...e Copy key One copy set is delivered as a sample C If the sample is acceptable press Continue The number of copies made is smaller than the specified number by one Note If you press Suspend after checking the results you can return to step A You can change the settings for Staple Punch Duplex 1 Sided 1 Sided 1 Sided 2 Sided Orientation Margin Adjust Cover Sheet and Desig nate However depending on ...

Страница 316: ...layed press the Clear Stop key B Press Change Quantity C Enter the number of copy sets with the number keys and then press the q key D Press Continue Copying starts again Note The range of print copies enterable in step C depends on when the Clear Stop key is pressed Stack This function groups together copies of each page in a multi page original Every other page stack is shifted for ease of separ...

Страница 317: ...dle Stitch without having the stapler cartridge for Saddle Stitch set in the booklet finisher a paper misfeed might occur You cannot use the bypass tray with this function Original orientation and stapling position Place originals in the ADF in the orientation in which they can be read nor mally When placing the original on the exposure glass keep the same orien tation but set the original facing ...

Страница 318: ...Copier Functions 63 2 3 000Sheet 50Sheet Staple Finisher 3 000Sheet 100Sheet Staple Finisher Booklet finisher ANP014S ANP015S ...

Страница 319: ... placing originals on the exposure glass start with the first page to be copied When placing originals in the ADF set the first page on top When placing originals on the exposure glass or in the ADF using the Batch function press the q key after all the originals have been scanned If you specify Saddle Stitch you must specify the Magazine function For details about Magazine see Booklet Magazine Pr...

Страница 320: ... Punch You can make punch holes in copies Important The 4 hole punch type is only capable of punching in the 4 hole format You cannot use the bypass tray with this function 2 holes 3 holes 4 holes GCPNCH1E GCPNCH3E GCPNCH0E ...

Страница 321: ...ions is as follows This table shows the punch hole positions not the orientation of delivery Not available for vertical 2 hole left and horizontal 2 hole top for A3 B4 JIS or 11 17 size paper Orientation in which original is set Punch hole positions Exposure glass ADF Standard 2 holes K L 3 holes K L 4 holes K L 90 Turn 2 holes K L 3 holes K L 4 holes K L ...

Страница 322: ...nting might be slower than normal when using the Punch function of the 3 000Sheet 50Sheet Staple Finisher or the Booklet Finisher on a Type 3 machine Z fold Makes two parallel folds one of which faces in and the other facing out Note You cannot use the bypass tray with this function Reference General Features General Settings Guide ACC010S ...

Страница 323: ...y of the booklet finisher or the 3 000Sheet 100Sheet Staple Finisher 3 000Sheet 100Sheet Staple Finisher Finisher upper tray Finisher shift tray Fit the hooks of the Z fold support tray into the holes in the finisher s shift tray Booklet Finisher Finisher upper tray Fit the hooks of the Z fold support tray into the dents in the finisher s upper tray ANO069S ANO070S ANO066S ...

Страница 324: ...finisher The Z fold support tray is lowered to complete the installation Note Remove the Z fold support tray when outputting prints to the finisher s shift tray without using the Z fold function If you leave the Z fold support tray in place prints are not stacked properly Z fold positions and Z folding copies The above table shows Z fold positions The orientation of the paper does not in dicate or...

Страница 325: ...iginals and then press the Start key Duplex Important You cannot use the bypass tray with this function The maximum paper weight that can be used with duplex copying is 64 127 9 g m2 17 1 34 1 lb There are two types of duplex copies 1 Sided 2 Sided Copies 2 one sided pages onto 1 two sided page ...

Страница 326: ...to 1 two sided page Original orientation and completed copies Copy images differ according to the orientation in which you place the origi nals K or L The table shows the orientation of images on the front and back of copies not the orientation of delivery GCRYOU1E ...

Страница 327: ...st page to be copied When placing originals in the ADF set the first page on top You can also select 1 Sided 2 Sided or 2 Sided 2 Sided directly by pressing the copy function key in step A In that case proceed to step E To change originals and copy orientation in step C press Orientation When placing originals on the exposure glass or in the ADF using the Batch function press the q key after all t...

Страница 328: ...ed when copying Duplex job Top to Top Top to Bottom A Select orientation Top to Top or Top to Bottom and then press OK Note The default setting is Top to Top You can change the default orientation with Copier Features Reference General Features General Settings Guide Duplex1 Duplex2 ...

Страница 329: ...is function There are six types of One Sided Combine 1 Sided 2 Pages Combine 1 Side Copies 2 one sided originals to one side of a sheet 1 Sided 4 Pages Combine 1 Side Copies 4 one sided originals to one side of a sheet 1 Sided 8 Pages Combine 1 Side Copies 8 one sided originals to one side of a sheet GCSHVY7E GCSHVY8J GCSHVY3J ...

Страница 330: ...Side Copies 1 two sided original to one side of a sheet 2 Sided 2 Pages Combine 1 Side Copies 2 two sided originals to one side of a sheet 2 Sided 4 Pages Combine 1 Side Copies 4 two sided originals to one side of a sheet GCSHVYOJ GCSHVYBJ GCSHVY4J ...

Страница 331: ...age position of combine Open to left K originals Open to top L originals Placing originals and copying Originals read from left to right Originals read from top to bottom A Press Dup Combine Series B Press Combine GCSHUY1E GCSHUY2E Combine5 Combine6 ...

Страница 332: ...ginals to combine E Select the paper size F Press OK G Place the originals and then press the Start key Note You can also select 1 sided Comb 2 orig or 1 sided Comb 4 orig directly by pressing the copy function key in step A In that case proceed to step G Reference p 73 Originals and copy orientation Edit General Settings Guide ...

Страница 333: ...nnot use the bypass tray with this function There are six types of Two Sided Combine 1 Sided 4 Pages Combine 2 Sides Copies 4 one sided originals to one sheet with two pages per side 1 Sided 8 Pages Combine 2 Sides Copies 8 one sided originals to one sheet with four pages per side A Front B Back GCSHVY9J GCSHVYAE ...

Страница 334: ...one sheet with eight pages per side A Front B Back 2 Sided 2 Pages Combine 2 Sides Copies 2 two sided originals to one sheet with two pages per side 2 Sided 4 Pages Combine 2 Sides Copies 4 two sided originals to one sheet with four pages per side A Front B Back GCSHVY5E GCSHVY1E GCSHVY2E ...

Страница 335: ...ght pages per side A Front B Back A Press Dup Combine Series B Press Combine C Select 1 Sided or 2 Sided for Original and then press Combine 2 Sides for Copy D Select the number of originals to combine E Select the paper size F Press OK G Place the originals and then press the Start key GCSHVY6E ...

Страница 336: ...a bound original onto two sheets Important You cannot use the Book 1 Sided function from the ADF The following table shows the paper sizes of two facing pages of a bound original book and one sided copy when copying at a ratio of 100 Metric version Inch version There are two types of Series Copies Book 1 Sided You can make one sided copies from two facing pages of a bound original book AMA020S AMA...

Страница 337: ... Series B Press Series C Select 2 Sided 1 Sided or Book 1 Sided and then press OK If you selected 2 Sided 1 Sided you can change the orientation D Place the original on the exposure glass and then press the Start key Note If you selected Book 1 Sided press the q key after all originals have been scanned ...

Страница 338: ... Open to Left or Open to Right with Orienta tion Booklet Magazine in advance See Edit General Settings Guide The following table shows the paper sizes for Book 2 Sided when copying at a ratio of 100 Metric version Inch version There are six types of Booklet Magazine 1 Sided Booklet Make copies in page order for a folded booklet as shown Open to left BFC002S BFC003S GCBOOK0E ...

Страница 339: ...Copying 84 2 Open to right 2 Sided Booklet Make two sided originals to copies in page order for a folded booklet as shown Open to left Open to right GCBOOK1E GCAH010E GCAH020E ...

Страница 340: ...originals to make copies in page order when they are folded and stacked Open to left Open to right 2 Sided Magazine Copies two or more originals of two sided to make copies in page order when they are folded and stacked Open to left GCBOOK3E GCBOOK4E GCAH030E ...

Страница 341: ...ng 86 2 Open to right Book 2 Sided Copies a two page spread original onto one sheet with one page per side Front Back 2 Sided Copies each two page spread original as it is onto both sides of a sheet GCAH040E ...

Страница 342: ...booklet As shown below fold a copy along the centerline and open A Open to left B Open to right How to fold and unfold copies to make a magazine As shown below fold and stack copies to make a magazine and open Open to left Open to right GCBOOK2E GCBOOK5E GCBOOK6E ...

Страница 343: ...Book 2 Sided and Front Back 2 Sided D Select the paper E Press OK F Place the originals and then press the Start key Note When placing originals on the exposure glass or in the ADF using the Batch function press the q key after all the originals have been scanned The machine sets the reproduction ratio automatically to meet the paper size Reference Edit General Settings Guide ...

Страница 344: ...ides This function is useful for originals full of image Important Before using this function register 3 Edges Full Bleed as a copy function key See General Features General Settings Guide A Press 3 Edges Full Bleed B Place the originals and then press the Start key Reference General Features General Settings Guide BFC033S ...

Страница 345: ...n press the Start key F If you specify 2 Sided for either the originals or copies press Change Set ting if the number of originals that you want to scan is odd or if you want to change the settings for the next originals Place the next originals and then repeat steps C to E Note When placing originals on the exposure glass or in the ADF using the Batch function press the q key after all the origin...

Страница 346: ...iginals A Point from which the machine begins scanning You can move the scanning position up to 30 mm 1 2 inches in 1 mm 0 1 inch increments upward downward to left and to right A Top 0 30 mm 0 1 2 B Right 0 30 mm 0 1 2 C Bottom 0 30 mm 0 1 2 D Left 0 30 mm 0 1 2 A Press Edit Stamp B Press Scan Position ...

Страница 347: ...inal Press or to set the top or bottom position Press or to set the left or right position Then press OK E Place the originals and then press the Start key Note If you make a mistake press or press Clear to set a new value If you don t need to set the scanned position of the back of the original in step C press OK and go to step E The scanning position for the back is valid only when you are copyi...

Страница 348: ...e back side pages Press and when set ting the left and right margins and and when setting the top and bot tom margins and then press OK Margin on the back side of the page is valid when 1 Sided 2 Sided or Com bine 2 Sides is selected E Place the originals and then press the Start key Note You can set the binding margin up to 30 mm 1 2 inches in 1 mm 0 1 inch increments If you make a mistake press ...

Страница 349: ...of the original image This function comes in the following modes Border Erases the original s edge margin from the copy Center Erases the original s center margin from the copy Center Border Erases both the original s center and edge margins from the copy Inside Erases a designated area of the copy image ...

Страница 350: ...Edit under User Tools Menu Copier and Document Server Features The relationship between the original orientation and the erased part is as follows A Erased part B 2 99 mm 0 1 3 9 Reference Edit General Settings Guide Border Erase same width This mode erases the edge margin of the original image A Press Edit Stamp B Press Erase C Press Erase Center Border D Press Same Width L original K original ...

Страница 351: ...on the back of the original press 2 Sided Set ting and Back Erasing the image on the back is valid when you copy 2 Sided originals F Press OK twice G Place the originals and then press the Start key Note To change the value entered in step E press n and o to set a new value Border Erase different width This mode erases the edge margin of the original image A Press Edit Stamp B Press Erase C Press ...

Страница 352: ... the width in increments of 10 mm 1 inch If you select to erase the image on the back of the original press 2 Sided Set ting and Back Erasing the image on the back is valid when you copy 2 Sided originals F Press OK twice G Place the originals and then press the Start key Center Erase This mode erases the center margin of the original image A Press Edit Stamp B Press Erase C Press Erase Center Bor...

Страница 353: ...o erase the image on the back of the original press 2 Sided Set ting and Back Erasing the image on the back is valid when you copy 2 Sided originals F Press OK twice G Place the originals and then press the Start key Center Border Erase same width This mode erases both the center and edge margins of the original image A Press Edit Stamp B Press Erase C Press Erase Center Border D Press Erase Cente...

Страница 354: ...he image on the back is valid when you copy 2 Sided originals G Press Border and then set the erase border width with n and o Pressing n or o changes the width in increments of 1 mm 0 1 inch Pressing and holding down the relevant key changes the width in increments of 10 mm 1 inch H Press OK twice I Place the originals and then press the Start key Center Border Erase different width This mode eras...

Страница 355: ...ge on the back of the original press 2 Sided Set ting and Back Erasing the image on the back is valid when you copy 2 Sided originals G Press OK twice H Place the originals and then press the Start key Inside Erase This mode erases a designated area of the copy image A Specify the point where the machine starts scanning X1 Y1 and where it stops scanning X2 Y2 You can input lengths of 0 432 mm 0 17...

Страница 356: ... the original press 2 Sided Set ting and Back Erasing the image on the back is valid when you copy 2 Sided originals I Press OK If you want to go on to erase another area repeat from steps D to I J Press OK K Place the originals and then press the Start key Outside Erase This mode erases all areas of the copy image other than the area you have selected A Specify the point where the machine starts ...

Страница 357: ... q If you select to erase the image on the back of the original press 2 Sided Set ting and Back Erasing the image on the back is valid when you copy 2 Sided originals I Press OK twice J Place the originals and then press the Start key Background Numbering Use this function to have numbers printed on the background of copies If this function is used in conjunction with Sort same numbers are printed...

Страница 358: ... q key E Press OK twice F Place the originals and then press the Start key Note To change the value entered in step D press the Clear or the Clear Stop key to set a new value Reference Stamp General Settings Guide Preset Stamp Messages are stamped on copies Important You cannot use the bypass tray with this function Only one message can be stamped at a time GCSTMP1E ...

Страница 359: ...or Internal Use Only CONFIDENTIAL DRAFT Stamp position and original orientation The stamp positions differ according to the orientation in which you place your originals A Press Edit Stamp B Press Stamp C Press Preset Stamp D Select the desired message You can change the position size and density of the stamp GCSTMP5E ...

Страница 360: ...ed settings press OK G Press OK H Place the originals and then press the Start key Reference Stamp General Settings Guide Changing the stamp position size and density Changes the stamp position size and density A Press Change under Stamp Position B Select the position for print size and density and then press OK ...

Страница 361: ...ed Important You have to program a user stamp before using this function You cannot use the bypass tray with this function Only one message can be stamped at a time Stamp position and original orientation The user stamp positions differ according to the orientation in which you place your originals GCSTMP0E GCSTMP6E ...

Страница 362: ...D Select the desired stamp type You can change the stamp position E Press All Pages or 1st Page Only to select the print page F After you specify all desired settings press OK G Press OK H Place the originals and then press the Start key Reference Stamp General Settings Guide ...

Страница 363: ...Copying 108 2 Changing the user stamp position Changes the stamp position A Press Change under Stamp Position B Select the desired position and then press OK ...

Страница 364: ... wide However if the value exceeds the maximum value of the area 5 000 mm2 7 75 inch2 it is corrected within the range of the area automatically A Exposure glass Important Up to four frequently used images can be stored in memory A Make sure that the machine is in copier mode B Press the User Tools Counter key C Press Copier Document Server Features D Press Stamp E Press User Stamp ZGVX040E BFC018...

Страница 365: ...mp on the exposure glass and then press Start Scanning The original will be scanned and the stamp will be registered L Press Exit M Press Exit The display returns to the User Tools Counter Inquiry menu screen N Press Exit Exits settings and gets ready to copy Note Stamp numbers with m already have settings in them Stamp numbers that are not registered yet are marked with Not Programmed If the user...

Страница 366: ... B Press the User Tools Counter key C Press Copier Document Server Features D Press Stamp E Press User Stamp F Press Program Delete Stamp G Press Delete and then press the stamp number you want to delete H Select Yes and then press Exit I Press Exit The display returns to the User Tools Counter Inquiry menu screen J Press Exit Exits settings and gets ready to copy BFC018S ...

Страница 367: ...ot use the bypass tray with this function The following five date print styles are available MM DD YYYY MM DD YYYY DD MM YYYY DD MM YYYY YYYY MM DD Stamp position and original orientation The date stamp positions differ according to the orientation in which you place your originals AMG062S AMG023S ...

Страница 368: ... stamp format You can change the style and position of the date to be stamped E Press All Pages or 1st Page Only to select the print page F After you specify all desired settings press OK G Press OK H Place the originals and then press the Start key Reference Stamp General Settings Guide ...

Страница 369: ...format of date to be stamped A Press Change Format under Current Date B Select the date format and then press OK Changing the date stamp position Changes the stamp position A Press Change under Stamp Position B Select the desired position and then press OK ...

Страница 370: ...opies Important You cannot use the bypass tray with this function There are six types of page numbering P1 P2 1 5 2 5 1 2 P 1 P 2 1 2 1 1 1 2 Stamp position and original orientation The page stamp positions differ according to the orientation in which you place your originals CP2G0100 GCSTMP8E ...

Страница 371: ... Page Numbering D Select the format You can specify the stamp position pages to be stamped and numbering E After you specify all desired settings press OK F Press OK G Place the originals and then press the Start key Reference Stamp General Settings Guide ...

Страница 372: ...d settings press OK D Place the originals and then press the Start key Specifying the first printing page and start number P1 P2 1 2 P 1 P 2 1 2 The following explains the example when P1 P2 is selected The steps are the same for other cases A Press Change under Change Numbering B Press First Printing Page enter the original sheet number from which to start printing and then press the q key ...

Страница 373: ...ws when the first printing page is 2 and the start number is 3 D Press Last Number enter the number of the page at which to stop number ing with the number keys and then press the q key If you want to number all pages to the end press to the End E When page designation is complete press OK F Press OK twice G Place the originals and then press the Start key GCANPE2J ...

Страница 374: ...he end press to the End The last number is the last page number to print For example if Total Pages is ten if you want to print up to seven pages and do not want to print from page 8 on enter 7 for Last Number Normally you do not need to enter the number E Press Total Pages enter the total number of original pages with the number keys and then press the q key F When page designation is complete pr...

Страница 375: ...chapter number from which to start numbering D Press First Printing Number enter the page number from which to start print ing with the number keys and then press the q key E When page designation is complete press OK F Press OK twice G Place the originals and then press the Start key Note To change the number entered in step B press Clear or the Clear Stop key and then enter a new number To chang...

Страница 376: ... 2 Stamp Text You can stamp important text on copies up to 64 letters Stamp position and original orientation The stamp text positions differ according to the orientation in which you place your originals GCSTMT0E AFU109S ...

Страница 377: ...Page Only to select the print page G Press OK twice H Place originals and then press the Start key Note If the main power is turned off the text is cleared To save the typed text you can program them Reference Stamp General Settings Guide Changing the stamp position A Press Change under Stamp Position B Select the desired position and then press OK ...

Страница 378: ...ng table Original A5K Copy paper A4K Original A5L Copy paper A4L Original 51 2 81 2 K Copy paper 81 2 11 K or Original 51 2 81 2 L Copy paper 81 2 11 L Original A5K Copy paper A4L Original A5L Copy paper A4K Original 51 2 81 2 K Copy paper 81 2 11 L or Original 51 2 81 2 L Copy paper 81 2 11 K 4 repeats 71 16 repeats 35 2 repeats 100 8 repeats 50 32 repeats 25 Repeat1 Repeat2 Repeat3 Repeat4 Repea...

Страница 379: ... Select the size of copy paper and the reproduction ratio B Press Edit Stamp C Press Edit Image D Press Image Repeat E Press OK F Place the originals and then press the Start key Reference Edit General Settings Guide ...

Страница 380: ...ray with this function Originals with a size of A5L B6 JISKL and 51 2 81 2 L cannot be detect ed properly on the exposure glass Be sure to select the copy paper manually or place the originals in the ADF The following table shows original and copy paper sizes when copying at a ratio of 100 Metric version Inch version ANP062S AMG016S ...

Страница 381: ...ize F Place the originals and then press the Start key Note Edit General Settings Guide Centering You can make copies with the image moved to the center of the copy paper Important You cannot use the bypass tray with this function The original sizes and orientations for centering are listed below GCCNTR0E ...

Страница 382: ...hen press the Start key Original location Original size and orientation Exposure glass A3L B4 JISL A4KL B5 JISKL A5K 81 2 13 L ADF A3L B4 JISL A4KL B5 JISKL A5KL B6 JISKL 81 2 13 L 8KL 16KKL Original location Original size and orientation Exposure glass 11 17 L 81 2 14 L 81 2 11 KL 81 2 51 2 K ADF A3L A4KL 11 17 L 81 2 14 L 81 2 11 KL 51 2 81 2 KL 10 14 L 71 4 101 2 L ...

Страница 383: ... Negative If your original is black and white copy images are inverted A Press Edit Stamp B Press Edit Image C Press Positive Negative D Press OK E Select the paper F Place the originals and then press the Start key GCHATN1E ...

Страница 384: ...bypass tray If you have selected Interposer for Cover Sheet Tray in System Settings you cannot copy on the cover sheets that you have specified for this function When selecting Copy select whether the front and back covers are copied 1 Sided or 2 Sided Covers function includes Front Cover and Back Cover Front Cover The first page of your originals is copied on specific paper sheet for covers or a ...

Страница 385: ...ont or back cover sheet using the Tray Paper Settings in System Settings The cover sheet should be the same size and orientation as the copy paper B Press Cover Slip Sheet C Select Copy or Blank for the front or back cover sheet and then press OK D Select the paper tray that contains the sheet paper to copy the originals E Place the originals and then press the Start key Reference Tray Paper Setti...

Страница 386: ... copy on the slip sheets that you have specified for this function A Set the tray you want to use for slip sheets The paper for slip sheets should be of the same size and orientation as the copy paper B Press Cover Slip Sheet C Press Designate Chapter D Select Designate Copy or Designate Blank E Press the key to select the chapter number To select pages 11 to 20 chapter press 11 20 F Enter the pag...

Страница 387: ...ginals and then press the Start key Reference Tray Paper Settings General Settings Guide Chapters The pages you specify with this function will appear on the front of copy sheets Important Before selecting this function press Dup Combine Series and select 1 Sided 2 Sided or Combine This function can be used only when you use the Duplex 1 Sided 2 Sided or Combine function A Press Cover Slip Sheet B...

Страница 388: ...tion repeat steps D to E G Select the paper tray that contains the sheet paper to copy the originals H When you finish specifying page location press OK twice I Place the originals and then press the Start key Blank Slip Sheets You can insert a blank slip sheet before or after a specified page A Set the tray for the blank slip sheet The paper for slip sheets should be of the same size and orientat...

Страница 389: ...th the number keys H Press Number of Sheets and use the number keys to enter the number of sheets you wish to insert and then press the q key I To specify another location where to insert sheets repeat steps E to H J Select the paper tray containing the paper to copy the originals K When you have finished specifying all settings press OK twice L Place originals and then press the Start key Referen...

Страница 390: ... inserted This function can be used to automatically insert a slip sheet between OHP transparencies or as a stacking function You can also copy onto slip sheets Important If 1 Sided 2 Sided is set change it to 1 Sided 1 Sided When placing OHP transparencies in the bypass tray Copy Blank ...

Страница 391: ...ect the paper tray that contains the sheet paper to copy the originals When copying onto OHP transparencies use the bypass tray E Place the originals and then press the Start key Note When loading OHP transparencies on the bypass tray press the q key and then select OHP Transparency in the special paper settings Reference p 41 When Copying onto OHP Transparencies Tray Paper Settings General Settin...

Страница 392: ...disk of this machine Thus you can print them later ap plying necessary conditions Important Machine failure can result in data loss Important data stored on the hard disk should be backed up The manufacturer shall not be responsible for any dam age that might result from loss of data A Press Store File B Enter a user name file name or password if necessary C Press OK D Place your originals ...

Страница 393: ...n three days for the automatic deletion For more information about changing settings see Administrator Tools General Settings Guide To check if the document has been stored press the Document Server key to display the document selection screen If you want to store another document do so after copying is complete For further information about the Document Server see Using the Docu ment Server For d...

Страница 394: ... paper tray of the same size the paper tray prioritized with the Copier Fea tures will be selected first See Tray Paper Settings General Settings Guide Programs are not cleared by turning the power off or by pressing the Clear Modes key Reference p 142 Programming Defaults in Initial Display Tray Paper Settings General Settings Guide Storing a Program Stores a program A Edit the copy settings B Pr...

Страница 395: ...Changing a Stored Program Changes program settings A Check the program settings B Set the contents of a program C Press the Program key D Press Program E Press the program number you want to change F Press Yes G Enter the program name You can enter up to 40 characters H Press OK Thescreenreturnstotheprogramscreen showingtheprogramnumberfollowedby the program name The screen returns to the initial ...

Страница 396: ... is deleted and the screen returns to the copy screen Recalling a Program Recalls a stored program to make copies using the stored settings A Press the Program key B Press Recall C Press the program number you want to recall The stored settings are displayed D Place the originals and then press the Start key Note Only programs with m against them contain a program in step C ...

Страница 397: ...heet Dup Combine Se ries Reduce Enlarge and Finishing A Specify scan settings and any other settings you require on the initial display B Press the Program key C Press Program as Defaults D Press Program E When a confirmation dialog appears press Yes The current settings are programmed as defaults The screen returns to the ini tial display Note To restore the factory default settings on the initia...

Страница 398: ...opies can be made on both simultaneously High speed copying for greater productivity Large volume copy runs can be completed in shorter time For instance when two 80 copies minute machines are connected together a speed of 160 copies minute can be achieved paper size of A4K 81 2 11 K Reducing time loss Even if one machine stops due to a paper jam or runs out of toner or paper the other machine can...

Страница 399: ...ray LCT However tousetheStapleandPunchfunctions theoptionalfinisherandpunch unit must be installed on both machines To use the Saddle Stitch function the optional booklet finisher must be installed on both machines To use the Z fold function the optional Z folding unit and booklet finisher must be installed on both machines Interrupt Copy You can use the Interrupt function on the sub machine but n...

Страница 400: ... type and orientation of the paper set on both machines 3 Numbers of originals Displays the number of originals scanned into memory of the main machine 4 Number of sets Displays the number of sets of copies 5 Number of copies Display the number of copies for the main machine Press this area to display the total number of copies for two machines Display during Connect Copy Note The connect copy fun...

Страница 401: ... been selected on the main machine the sub machine will still continue to show the initial copy display To switch to the Connect Copy initial display follow the procedure below A Press the Other Function key B The Connect Copy initial display is shown on the sub machine BFC019S ...

Страница 402: ...s that is registered on the main machine and then press the q key See Administrator Tools General Settings Guide When Basic Authentication Windows Authentication LDAP Authentica tion or Integration Server Authentication is set enter a login user name and password For the login user name and password consult your Administra tor See When the Authentication Screen is Displayed About this Machine In C...

Страница 403: ...e automat ically disabled E Enter the required number of copies using the number keys The maximum copy quantity that can be set is 999 When the number of originals or copies is small copying will be done on only the main machine F Press the Start key on the main machine When placing originals page by page on the exposure glass press the q key after you have finished scanning all the originals When...

Страница 404: ...r of that particular set To interrupt ADF scanning press the Clear Stop key on the main ma chine and then select Stop in response to the message that appears To stop copying press the Clear Stop key on the main machine and then select Stop in response to the message that appears When the memory to store originals exceeds the maximum an error mes sage appears For details see When Memory Is Full Tro...

Страница 405: ...d of time has lapsed after job completion This is called Auto Reset Note When the Auto Reset time of the sub machine lapses when it is processing an Interrupt Copy job the sub machine will return to its original position and the Interrupt Copy job will be canceled Reference Timer Settings General Settings Guide Auto Off The machine automatically turns itself after a certain period of time has laps...

Страница 406: ...he main machine Connect Copy mode is canceled and the main machine returns to its initial condition Printing Stored Documents Using Connect Print You can print a document stored in the Document Server using the Connect Print function Important The main machine is the one on which the document is stored A Press the Document Server key B Select the document to be printed The selected document is hig...

Страница 407: ...D press Save Print Settings If you are selecting multiple files you can check the file names and print ing order by pressing T and U to scroll through the list Press Select File to return to the Select Files to Print display If you have entered a wrong value press the Clear Stop key and enter again When using the Sort function you can check the print results by making a sample copy on the main mac...

Страница 408: ... and then press New Job B Confirm that Ready is displayed and then press Connect Copy C Place the originals in the main machine D Confirm that Ready is displayed and then make settings for the job E Press the Start key on the main machine When placing originals on the exposure glass press the q key when you have finished scanning all the originals When placing multiple originals in the ADF wait ti...

Страница 409: ...f eight jobs Preset jobs in Connect Copy mode can only be changed when the main ma chine has finished scanning the originals Preset jobs in Connect Copy mode can only be changed when copying has yet to begin on either machine Reference p 31 Job Preset ...

Страница 410: ...e One of the machines is copying Original A Using the idle machine as the main machine Connect Copy A Make Connect Copy settings for Original B on machine 2 the idle machine B Machine 2 begins copying Original B Machine 1 also starts copying Original B when it has finished with Original A A Sub machine B Main machine ANP049S ANP026S ANP027S ...

Страница 411: ...ettings for Original B on machine 1 the machine currently in use B When machine 1 has finished with Original A Connect Copy is activat ed and both machines begin copying Original B A Main machine B Sub machine When Both Machines are in Use One machine is copying Original A and the other Original B ANP028S ANP029S ANP050S ...

Страница 412: ...Connect Copy Job Preset A Make Connect Copy settings for Original C on machine 1 B When machine 1 has finished with Original A it begins copying Origi nal C C When machine 2 has finished with Original B it also begins copying Original C A Main machine B Sub machine ANP030S ANP031S ANP032S ...

Страница 413: ... Copy settings for Original C on machine 1 B When machine 1 has finished with Original A it begins copying Origi nal C If machine 1 finishes copying its allotment of Original C before machine 2 finishes with Original B machine 1 will take over to copy the remainder of Original C A Main machine B Sub machine ANP033S ANP034S ...

Страница 414: ...mputer List display Available Printing Available Transmission Unavailable Facsimile Functions Storing method Fax List display Available Printing Available Transmission Available The data can be transferred by the facsimile feature For details see Send ing Stored Documents Facsimile Reference Scanner Functions Storing method Scanner List display Unavailable When documents are stored with the scanne...

Страница 415: ...played 2 The currently selected screen s title is displayed 3 The number of the originals being read with the memory as well as the number of paper sets and copies made are displayed 4 Keys for the operation are displayed 5 An icon that corresponds to a stored function is displayed The following icons appear in the list of the Document Server to indicate the function used to store a document Note ...

Страница 416: ...Press to increase screen contrast This is available only for the simplified display Note To return to the initial display press the Simplified Display key again Certain keys do not appear on the simplified display Preview Display This section explains the items that appear on the preview display and how to preview stored documents To preview stored documents select the documents you want to previe...

Страница 417: ...eview 5 Display Page Used to display the currently opened page number total number of pages and page size 6 Switch Used to turn the page of the selected doc ument 7 Display Position When the image is enlarged the position on the document indicated by this key is displayed Note When the preview is already selected from another function the preview screen function may become unusable The preview dis...

Страница 418: ... after op erations are complete and it can be accessed by other users To stop this be sure to press the Clear Modes key to cancel the document selection The user name used when adding a document to the Document Server is to identify the document creator and type It is not to protect confidential docu ments from others When turning on the fax transmission or scanning by the scanner make sure that a...

Страница 419: ...C Enter the user name document name and password When not changing a document name the name will be automatically set D Set the original E Specify the original scanning conditions F Press the Start key The original is scanned The document is saved in the Document Server BFC020S ...

Страница 420: ... Clear Stop key To restart a paused scanning job press Continue in the confirmation display To delete saved images and cancel the job press Stop When a password is set the lock icon appears on the left side of the file name After scanning stored documents appear on the Select Files to Print dis play If this display does not appear press Scanning Complete When placing an original on the exposure gl...

Страница 421: ...lowing describes the procedure for registering or changing a user name to be attached to a stored document A Display the original scan screen B Press User Name The user name input screen appears C Select the user name and then press Manual Entry The user name change screen will appear D Enter the user name and then press OK ...

Страница 422: ...original scan screen B Press User Name The user name input screen will appear C Enter the user name and then press OK Changing a file name The following describes the procedure for changing a name to be attached to a stored document A Display the original scan screen B Press File Name The document name change screen will appear C Press Delete All to delete the document name to be automatically set...

Страница 423: ... limits are exceeded the list will display up to 15 characters for the document name Setting or changing a password The following describes the procedure for setting or changing a password to be attached to a stored document A Display the original scan screen B Press Password C Enter the password using the number keys and then press OK You can use four to eight digits for specifying the password D...

Страница 424: ...nt name or password is to be changed When a password is set enter it and then press OK C Press File Management D Press Change User Name Change File Name or Change Password E From the respective change screens enter the new user name document name or password and then press OK F Press OK Note Depending on the security settings Change Access Priv is displayed in stead of Change User Name Fordetailsa...

Страница 425: ...he Document Server key B Select the document whose details are to be displayed When a password is set enter it and then press OK C Press Details Details of the document will be displayed Note When you have selected two or more documents you can view the infor mation of the documents in the order of U T Pressing Exit restores the document selection screen ...

Страница 426: ...ling DeskTopBinder Lite enables searching and reordering of stored documents from computers For more information about DeskTopBinder Lite see Instruction Manual and Help of DeskTopBinder Lite Searching by file name The following describes the procedure for searching for a stored document by the document name A Press the Document Server key B Press File Name C Enter the document name to be searched...

Страница 427: ...ser name select the user name When using a not registered user name proceed to the next step D When the user name is not registered press Manual Entry and then enter it to be displayed from the input screen Then press OK E Press OK A document name that matches completely from the starting character will be searched and displayed on the document selection screen Note Pressing Display All displays e...

Страница 428: ...t to be printed When a password is set enter it and then press OK C When printing two or more documents at a time repeat step B Up to 30 documents can be printed D When specifying printing conditions press To Printing Screen The printing condition screen will appear User name document name and the order of printing of the document will be displayed E Enter the number of print copies using the numb...

Страница 429: ...g results see Copier Functions Book binding style 2 Sided Top to Top 2 Sided Top to Bottom Maga zine Booklet Treatment of front cover Cover Slip Sheet Edit Stamp Finishing Sort Rotate Sort Stack Staple Punch When printing two or more copies while selecting the sort function you can confirm the finish by printing only one copy When printing two or more documents at a time you can print them as a si...

Страница 430: ...umber keys D Press the q key E Press Continue Printing will be resumed Note The range of print copies enterable in step C depends on the timing of your pressing the Clear Stop key Sample Print When print copies are massive you can print a single copy in advance to check appropriateness of the printing order of the selected documents and the printing conditions Important This feature is enabled whe...

Страница 431: ...order to confirm the print results you can print the first page alone of the doc ument selected from the document selection screen When two or more documents are selected the first page of the respective doc uments is printed A Select the document to be printed confirmed When a password is set enter it and then press OK B Press Print Specified Page C Press 1st Page D Press the Start key Note You c...

Страница 432: ... Start key Note You can search the target document using in step A User Name or File Name situated in the left side of the screen In the display order field of step A you can sort the documents by User Name File Name Date Press the item to be used for the sorting To cancel the selection in step A press the highlighted document again Printing a specified range You can print the pages in the specifi...

Страница 433: ... sort the documents by User Name File Name Date Press the item to be used for the sorting To cancel the selection in step A press the highlighted document again Deleting a Document The following describes the procedure for deleting a stored document Important The Document Server can store up to 2000 documents As the number of stored documents reaches 2000 storing of a new document becomes unavail ...

Страница 434: ...d in the left side of the screen In the display order field you can sort the documents by User Name File Name Date Press the item to be used for the sorting When you could not identify the target document from the document name print the first page alone of the document in order to confirm the print results To cancel your selection press the highlighted document again For the Web Image Monitor sta...

Страница 435: ...s For exam ple If the address is 192 168 001 010 you must enter it as 192 168 1 10 to connect to the machine Top page of Web Image Monitor will be displayed C Click Document Server The list of documents in the Document Server will be displayed D Click of the document you want to confirm Information of the document will be displayed E Confirm contents of the document Note You can change the documen...

Страница 436: ...ct to the machine Top page of Web Image Monitor will be displayed C Click Document Server The list of documents in the Document Server will be displayed D Click of the document you want to download E Select PDF JPEG or Multi page TIFF for the file format F Click OK G Click OK in the confirmation window Note You can change the document list display format in step D Click Thumbnails Icons or Details...

Страница 437: ...Document Server 182 4 ...

Страница 438: ...mbination of the copy features may or may not be available depend ing on the order of its setup Blank space Combination available Combination unavailable Precedence is given to the function selected earlier Combination unavailable Precedence is given to the function selected later The following lists the combinations of functions BFC035S ...

Страница 439: ...ch Top Top Slant Bottom of Staple with 2 holes top of Punch 3 Top 2 of Staple with Right Fold Left 2 of Staple with Bottom Fold Bottom of Staple with Bottom Fold Top Slant of Staple with Bottom Fold Saddle Stitch of Staple with Z fold 4 Front Cover with 2 Sided 1 Sided 5 Auto Paper Select with Back Cover 6 Left of punch with Bottom Fold Top of punch with Right Fold ...

Страница 440: ...ets to adjust the total Bypass Tray Copy The following paper sizes can be selected as the standard sizes A3L B4 JISL A4KL B5 JISKL A5KL B6 JISL A6L 81 2 13 L 81 4 13 L 8 13 L 81 4 14 L 8 101 2 KL 8 10 KL 71 4 101 2 KL 11 15 L 11 14 L 10 15 L 10 14 L 11 17 L 81 2 14 L 81 2 11 KL 51 2 81 2 KL When the beeper is turned off it will not sound if you insert paper into the bypass tray See System Settings...

Страница 441: ...A5 B4 JIS B6 JIS 25 Inch version 400 Area ratio 16 times 200 Area ratio 4 times 51 2 81 2 11 17 155 Area ratio 2 times 51 2 81 2 81 2 14 129 81 2 11 11 17 121 81 2 14 11 17 93 85 8 13 81 2 11 78 81 2 14 81 2 11 73 11 15 81 2 11 65 11 17 81 2 11 50 Area ratio 1 4 times 11 17 51 2 81 2 25 You can select a ratio regardless of the size of an original or copy paper With some ratios parts of the image m...

Страница 442: ...3L A6L B6 JISL 11 17 51 2 81 2 and 12 18 Paper sizes and orientations that can be used in the Rotate Sort function are A4KL B5 JISKL and 81 2 11 KL The following table shows the numbers of copies that the tray can hold Re move copies from the tray when the maximum is exceeded Copy tray 3 000Sheet 100Sheet Staple Finisher upper tray 3 000Sheet 100Sheet Staple Finisher shift tray Paper Size and Orie...

Страница 443: ...ber of Copies A4K 81 2 11 K 3000 sheets 80 g m2 20 lb A3L B4 JISL A4L B5 JISL 11 17 L 81 2 14 L 81 2 11 L 12 18 L 1500 sheets 80 g m2 20 lb A5K 500 sheets 80 g m2 20 lb A5L B6 JISL 51 2 81 2 L A6L 100 sheets 80 g m2 20 lb Paper Size and Orientation Number of Copies A4 81 2 11 or smaller 250 sheets 80 g m2 20 lb B4 JIS 81 2 14 or larger 50 sheets 80 g m2 20 lb Paper Size and Orientation Number of C...

Страница 444: ... Combine 2 Sides specify K paper for L orientation originals and specify L paper for K orienta tion originals To specify Left 2 Top 2 or Slant together with Double Copies specify K paper for L orientation originals and specify L paper for K orientation originals If a finisher is installed the mixed sizes function and the auto paper selec tion function become available These functions make it possi...

Страница 445: ...100Sheet Staple Finisher Finisher shift tray without Z folding unit Paper Size and Orientation Stapler Capacity A3L B4 JISL 11 17 L 81 2 14 L 50 sheets 80 g m2 20 lb A4KL B5 JISKL 81 2 11 KL 100 sheets 80 g m2 20 lb Paper Size and Orientation Stapler Capacity A3L B4 JISL 11 17 L 81 2 14 L 30 sheets 80 g m2 20 lb A4KL B5 JISKL 81 2 11 KL 50 sheets 80 g m2 20 lb Paper Size and Orientation Stapler Ca...

Страница 446: ...ax 3000 sheets 20 to 50 leaf binding 150 to 60 sets Max 3000 sheets A4L B5 JISKL 81 2 11 L 2 to 14 leaf binding 100 sets Max 1500 sheets 15 to 50 leaf binding 100 to 30 sets Max 1500 sheets Other sizes 2 to 14 leaf binding 100 sets Max 1500 sheets 15 to 30 leaf binding 100 to 33 sets Max 1500 sheets Paper Size and Orientation Number of Sheets Number of Stapled Copies A4K 81 2 11 K 2 to 12 leaf bin...

Страница 447: ...s the paper and folds it like a book then delivers the paper folded Punch When using Punch and Combine Double Copies or Auto Reduce En large the message Blank part will appear Check orientation may ap pear because of the orientation of the original and the copy paper If this occurs change the orientation of the copy paper Punchable paper sizes are as follows Z fold You cannot use the following cop...

Страница 448: ...y paper can be automatically selected and stapled using the Mixed Siz es mode and Auto Paper Select function Load the paper you want to use in the paper trays beforehand Paper sizes that can be stapled when using the Mixed Sizes mode are as follows A3L and A4K A4L and A5K B4 JISL and B5 JISK 11 17 L and 81 2 11 K 81 2 11 L and 51 2 81 2 K Depending on the Z fold settings you may not be able to use...

Страница 449: ... of copied paper is blank During copying the image is shifted to allow for the binding margin Front and back image quality of copies may differ Combine In this mode the machine selects the reproduction ratio automatically This reproduction ratio depends on copy paper sizes and the number of originals The reproduction ratios you can specify are 25 400 If the calculated ratio is under the minimum ra...

Страница 450: ...ned is less than a multiple of 4 the last page is copied blank In Magazine mode the copying may take some time after scanning originals When the optional booklet finisher is installed if you select Saddle Stitch function in Magazine mode the machine staples and folds the paper in the center then delivers the paper folded Image Repeat Depending on the paper size ratio and orientation parts of repea...

Страница 451: ... appear to overlap the copied image in some cases Margin Adjustment If you set a binding margin that is too wide part of the image may not be copied When making copies in the Combine mode the binding margin is added to the copies after the combination is finished Preset Stamp You can change the size and density of the stamp with User Tools De pending on the setting density may change Depending on ...

Страница 452: ...nal With 1 Sided 2 Sided using the Combine function With the Magazine or Booklet function Page Numbering per copy With 1 Sided 2 Sided using the Combine function If you combine this function with the Duplex Top to Top function and se lect P1 P2 or 1 5 2 5 page numbers on the back are printed as follows A Front B Back GCANPE0E GCANPE1E GCANPE2E GCSTMPBE ...

Страница 453: ...tings Guide Designate When Combine 1 Sided 2 Sided has been selected specified pages will always be copied on the front of copies in the same way as in Chapters mode Slip sheet If you do not copy onto slip sheets they are excluded from the number of copies counted Copy Face Up Copies are delivered face down in the same order as the original if Thin Paper Plain Paper 1 Plain Paper 2 Middle Thick or...

Страница 454: ...the main machine while you are mak ing settings Connect Copy will be canceled Even if the sub machine is in Energy Saver mode the main machine can still connect to make copies When an interrupt job on the sub machine has finished press the Inter rupt key Connect Copy jobs are displayed on the Job List of the sub machine How ever they cannot be deleted from the sub machine In Connect Copy both mach...

Страница 455: ...ed 81 Book to 2 Sided 83 Border Erase 94 95 96 98 99 Bypass tray 39 40 185 C Center 97 98 99 126 Center Border Erase 94 98 Center Erase 94 97 Centering 99 126 185 Changing a file name 167 169 Changing a password 168 169 Changing a stored program 140 Changing a user name 165 166 167 169 Changing the number of print copies while printing is in progress 175 Changing the number of sets 61 Changing the...

Страница 456: ...and unfold copies to make a magazine 83 How to read this manual 1 I Image density 43 Image Repeat 123 185 Initial display 142 Input Output 5 Insert Sheet 133 Inside Erase 100 Interrupt Copy 26 144 Interrupting printing 174 Invert 128 J Job List 32 Job List screen 32 Job Preset 31 K Key Color 4 L Last Number 117 119 Left Original Beeper 27 M Machine types and options 144 Magazine 83 Manual image de...

Страница 457: ...61 185 Stamp 5 Stamp position 103 105 106 108 112 114 115 117 Stamp size 105 Stamp Text 121 Staple 62 185 Stapler 62 Storing a program 139 Storing data 163 Storing originals in the Document Server 137 Symbols 1 T Tab stock 29 Text 45 Text Photo 45 Two Sided Combine 78 U User Stamp 106 108 109 111 Using Connect Copy 147 Using Job Preset in Connect Copy 153 Using the Document Server 163 Using the id...

Страница 458: ... in the United States and or other countries Adobe Acrobat Acrobat Reader PostScript and Reader are either registered trademarks or trade marks of Adobe Systems Incorporated in the United States and or other countries Other product names used herein are for identification purposes only and might be trademarks of their respective companies We disclaim any and all rights to those marks Copyright 200...

Страница 459: ...Operating Instructions Copy Document Server Reference Type for 8060 MP 6000 LD260 Aficio MP6000 Type for 8070 MP 7000 LD270 Aficio MP7000 Type for 8080 MP 8000 LD280 Aficio MP8000 EN USA D052 7254 ...

Страница 460: ...machine and keep it handy for future reference For safe and correct use be sure to read the Safety Information in About This Machine before using the machine Transmission Other Transmission Features Reception Changing Confirming Communication Information Storing a Document Fax via Computer Appendix 1 2 3 4 5 6 7 ...

Страница 461: ...le for direct indirect special incidental or consequential damages as a result of handling or oper ating the machine Notes Some illustrations in this manual might be slightly different from the machine Certain options might not be available in some countries For details please contact your local dealer Caution Use of controls or adjustments or performance of procedures other than those specified i...

Страница 462: ...s and explains how to replace paper toner and other consumables Copy Document Server Reference Explains Copier and Document Server functions and operations Also refer to this manual for explanations on how to place originals Facsimile Reference Explains Facsimile functions and operations Printer Reference Explains Printer functions and operations Scanner Reference Explains Scanner functions and op...

Страница 463: ... administrator authentication PostScript 3 Supplement Explains how to set up and use PostScript 3 UNIX Supplement For UNIX Supplement please visit our Web site or consult an authorized dealer Other manuals Manuals for DeskTopBinder Lite DeskTopBinder Lite Setup Guide DeskTopBinder Introduction Guide Auto Document Link Guide Note Manuals provided are specific to machine types PostScript 3 Supplemen...

Страница 464: ...dial 22 Dual Access 22 Simultaneous Broadcast 22 Immediate Transmission 23 Sending multiple originals using the exposure glass 25 Displaying Confirmation of Transmission 26 IP Fax Functions 27 Terminology 29 Notes on Using IP Fax 30 Functions Not Available for IP Fax Transmission 30 Internet Fax Functions 31 Notes on Using Internet Fax 32 Functions Not Available by E mail Transmission 33 Functions...

Страница 465: ...Destinations 79 Programming Destinations in the Address Book 81 Registering Entered Destinations to the Address Book 83 Searching for a Destination in the Address Book 84 Search by Destination Name 85 Search by Fax Number IP Fax Destination 87 Search by E mail Address 90 Search Using Advanced Search 92 Search by Registration Number 95 On Hook Dial 97 Manual Dial 99 Sender Settings 101 Advanced Fea...

Страница 466: ... Memory Reception 146 Substitute Reception 147 Receiving documents unconditionally 148 Receiving documents according to parameter specified settings 148 Reception Modes 150 Manual Reception 150 Auto Reception 150 Switching the Reception Mode 151 Receiving Internet Fax Documents 152 Auto E mail Reception 152 Manual E mail Reception 153 Received Images 153 Reception Functions 155 Routing Received Do...

Страница 467: ... Memory 173 Deleting a Destination from a Simultaneous Broadcast 174 Adding a Destination 176 Changing the Transmission Time 178 Changing the SMTP Server Setting 180 Printing a File from Memory 183 Printing a List of Files in Memory Print TX File List 185 Resending a File 187 Checking the Transmission Result Transmission File Status 189 Confirming on Display 189 Confirming by Report 190 Confirming...

Страница 468: ...cuments from File List 227 Specifying documents by User Name 227 Specifying documents by File Name 228 Displaying a preview 228 Printing Stored Documents 229 Changing Stored Document Information 231 Changing a user name 233 Changing the file name 234 Changing the password 234 Deleting a Stored Document 235 6 Fax via Computer Sending Fax Documents from Computers 237 Before Use 238 Using the Softwar...

Страница 469: ... SmartDeviceMonitor for Admin 257 LAN Fax Operation Messages 257 Viewing Fax Information Using a Web Browser 258 Viewing Printing and Deleting Received Fax Documents Using a Web Image Monitor 259 Viewing received fax documents using a Web browser 259 Printing fax information using a Web browser 260 Deleting fax information using a Web browser 260 Programming Destination Information from Web Browse...

Страница 470: ...y The REN for this product is part of the product identifier that has the format US AAAEQ TXXXXX The digits represented by are the REN with out a decimal point e g 03 is a REN of 0 3 E If this equipment causes harm to the telephone network the telephone company will notify you in advance that temporary discontinuance of service may be required But if advance notice is not practical the tele phone ...

Страница 471: ...l the devices does not exceed five Note to users in the United States of America Note This equipment has been tested and found to comply with the limits for a Class B digital device pursuant to Part 15 of the FCC Rules These limits are designed to provide reasonable protection against harmful interfer ence in a residential installation This equipment generates uses and can radiate radio frequency ...

Страница 472: ...mber provided may not be a 900 number or any other number for which charges exceed local or long distance trans mission charges In order to program this information into your FAX machine you should complete the following steps Follow the FAX HEADER programming procedure in the Programming chapter of the operating instructions to en ter the business identification and telephone number of the termin...

Страница 473: ...Save these instructions IMPORTANTES MESURES DE SÉCURITÉ Certaines mesures de sécurité doivent être prises pendant l utilisation de matéri al téléphonique afin de réduire les risques d incendle de choc électrique et de blessures En voici quelquesunes Ne pas utiliser l appareil près de l eau p ex près d une balgnoire d un lava bo d un évier de cuisine d un bac à laver dans un sous sol humide ou près...

Страница 474: ...nts to pay attention to when using the machine and explanations of likely causes of paper misfeeds damage to originals or loss of data Be sure to read these explanations Indicates supplementary explanations of the machine s functions and instruc tions on resolving user errors This symbol is located at the end of sections It indicates where you can find fur ther relevant information Indicates the n...

Страница 475: ...mile Auto Reset Timer in System Settings You can have the machine return to standby mode after each transmission us ing User Parameters switch 17 bit 3 in the Facsimile Features menu To manually return to the standby display do one of the following If you have placed the original in the Auto Document Feeder ADF and have not pressed the Start key remove the original If you have not placed an origin...

Страница 476: ...d Internet Fax When Internet Fax Settings is set to On in the Facsimile Features menu appears When Fax is selected you can specify fax numbers or IP Fax destinations When Internet Fax is selected you can specify e mail addresses 6 Displays the entered number of a destination 7 Allows you to store documents in the Document Server 8 Press to display various informa tion about communication See Chang...

Страница 477: ...ammed as a group destination Note The display will differ depending on installed optional units You can change Internet Fax Settings under Initial Settings in the Facsim ile Features menu Information about documents sent using the facsimile function cannot be checked in Job List Use Change TX Info To use the Internet Fax or IP Fax functions the optional printer scanner unit must be installed Refer...

Страница 478: ...o the simplified display Letters and keys are displayed at a larger size making operations easier Example of a simplified display 1 Key Color Press to increase screen contrast This is available only for the simplified display Note To return to the initial display press the Simplified Display key again Certain keys do not appear on the simplified display BFT021S BFT014S ...

Страница 479: ...tion Select a destination list to be used in Search Destination Communication Page Count Checks the transmission and reception and totals on the display Adjust Sound Volume Adjust the sound volume during On Hook Mode and Immediate Transmission Box Setting The following functions are for delivery and transfer of documents Personal Box Infor mation Box and Transfer Box Box Setting Print List You can...

Страница 480: ...received fax docu ments are to be forwarded to a programmed receiver Reception File Setting Selects whether received documents are saved on the hard disk to be printed later or printed immediately without being saved Stored Reception File User Setting The administrator can be specified for man aging documents stored on the machine after fax documents are received SMTP RX File Delivery Settings Thi...

Страница 481: ...ameter settings Program Closed Network Code Register an ID required for Closed Network communication Program Memory Lock ID Program a Memory Lock ID to be entered be fore printing documents when the Memory Lock function is activated Internet Fax Settings You can select to display the Internet Fax icon or not Select Dial Push Phone Use this function to select a line type when the machine is connect...

Страница 482: ... age that is sent or stored is entirely grayed out For details ask the administrator Important When a document that was printed using the Data Security for Copying func tion is scanned the machine does not beep and an entry is not added to the unauthorized copying log Sending or storing a document that has been printed using the Data Security for Copying function takes longer than normal ...

Страница 483: ...14 ...

Страница 484: ...ransmission starts automatically after the original is stored in memory This is convenient when you are in a hurry and want to take the document away with you You can also send the same original to several destinations Immediate Transmission Immediately dials the destination number and while scanning the original sends it It is very convenient when you want to send an original quickly or when you ...

Страница 485: ... the Clear Modes key is pressed See Registering a priority function using a program Reference p 21 Parallel Memory Transmission p 22 Simultaneous Broadcast p 268 Registering a priority function using a program Selecting Type of Transmission You can select the transmission type standard fax IP Fax or Internet Fax Press the tab in the standby display to select the transmission type When sending to a...

Страница 486: ... about one hour all the documents stored in memory are de leted As soon as the main power switch is turned on the Power Failure Re port is printed to help you identify deleted files Simply turning off the power by pressing the operation switch does not delete stored documents See Troubleshooting When Using the Facsimile Function Troubleshooting If memory is full 0 appears in Memory at the upper ri...

Страница 487: ...press the Clear Stop key and then enter the correct number To select a destination from the Address Book see Using the Address Book to Specify Destinations E When sending the same original to several destinations broadcasting press Add to specify the destinations You do not have to press Add when adding a destination using the destina tion list ...

Страница 488: ... you can specify for all files in cluding files in memory see Maximum Values For the maximum number of documents you can store in memory for Memory Transmission see Maximum Values For the maximum number of pages you can store in memory using A4 Standard ITU T q1 Chart see Maximum Values Reference p 47 Scan Type p 49 Resolution p 58 Density Contrast p 64 Sending Over a Fax Line p 67 Sending by IP F...

Страница 489: ...l face down on the exposure glass C Specify a destination D Make the scan settings you require E Press the Start key The machine starts scanning F Place the next original on the exposure glass within 60 seconds after the ma chine has finished scanning the first original G Repeat steps D to F for all originals H Place the last original and then press the q key The machine dials the destination and ...

Страница 490: ... is in progress When two or more destinations are specified When an original is placed on the exposure glass and then sent When you send documents stored in the Document Server Note You can turn this function on or off with the User Parameters switch 07 bit 2 in the Facsimile Features menu Standard Memory Transmission may be used instead of Parallel Memory Transmission depending on the optional eq...

Страница 491: ...e first destination and then specify the next destination by pressing Add If you dial several destinations for the same document broadcasting the docu ments are sent in the order in which they were dialed If the fax document could not be transmitted the machine redials that destination after the last destination specified for broadcasting For example if you specify four destinations A through D fo...

Страница 492: ...ble with standard fax transmission and IP Fax transmission Important Internet Fax is executed in only Memory Transmission that starts transmis sion automatically after storing documents in memory If you switch the type of transmission to Internet Fax while the machine is in the Immediate Trans mission mode the transmission mode is automatically switched to the Mem ory Transmission mode Group canno...

Страница 493: ...tion from the Address Book see Using the Address Book to Specify Destinations E Press the Start key The machine dials a destination Note Documents are not stored in memory Reference p 47 Scan Type p 49 Resolution p 58 Density Contrast p 64 Sending Over a Fax Line p 67 Sending by IP Fax p 76 Using the Address Book to Specify Destinations p 78 Specifying Group Destinations p 79 Selecting Destination...

Страница 494: ...ed TX B Place the first page face down on the exposure glass C Specify a destination D Make the scan settings you require E Press the Start key F Place the next original on the exposure glass within 10 seconds after the ma chine has finished scanning the first original G Repeat steps D to F for all originals H Place the last original and then press the q key ...

Страница 495: ...n this screen you can check the destination transmission mode and other transmission settings before transmitting A Press Check Modes and then check the transmission settings The following display appears B After checking the settings on the display press Exit ...

Страница 496: ...he network protocol Specify an IPv4 address or host name instead of a fax number for sending When using a gatekeeper specify its alias telephone number Specify addresses of the gatekeeper or SIP server proxy server register server redirect server as appro priate in Initial Settings in the Facsimile Features menu When using a SIP server you can send by specifying SIP user name You can also transmit...

Страница 497: ...chine must be connected to a LAN and set up correctly under Initial Settings in the Facsimile Features menu The facsimile function of this machine cannot be used with IPv6 Before using this function configure the network in the System Settings menu Note IP Fax supported by this machine is ITU T Recommendation T 38 compliant ALT001S ...

Страница 498: ...es connected to an IP network and converts alias telephone numbers to IPv4 addresses and performs authentication functions In addition a gatekeeper governs band transmission rate assignment and access control SIP server A SIP server mediates connection requests between devices connected to an IP network and is composed mainly of servers that have the following three functions Proxyserver ReceivesS...

Страница 499: ...deleted the Power Failure Report is automatically printed out when the main power switch is turned on Use this report to check which documents were deleted Simply turning off the power by pressing the operation switch does not delete stored documents See Troubleshooting When Using the Facsimile Function Troubleshooting Reference Troubleshooting When Using the Facsimile Function Troubleshooting Fun...

Страница 500: ...ortant To use this function the optional printer scanner unit must be installed To use Internet Fax functions this machine must be connected to a LAN and set up correctly in System Settings The facsimile function of this machine cannot be used with IPv6 To send Internet Fax documents in the Facsimile Features menu under Ini tial Settings set Internet Fax Settings to On However documents can still ...

Страница 501: ...on Notice p 125 Setting an E mail Destination as a BCC p 128 Entering the Subject p 131 Entering the Text p 153 Received Images p 189 Checking the Transmission Result Transmission File Status Connecting the Machine General Settings Guide System Settings General Settings Guide Facsimile Features General Settings Guide Notes on Using Internet Fax The following are notes about using Internet Fax When...

Страница 502: ...elete stored documents See Troubleshooting When Using the Facsimile Function Troubleshooting You may not be able to send large files as e mail depending on e mail envi ronment conditions Whenavailablememoryislow youmaynotbeabletosendInternetFaxdocuments Because the machine sends documents as e mail messages with an attached TIFF F image viewer applications are required in order to view documents w...

Страница 503: ...d Subjects differ depending on Stamp Sender Name settings When Stamp Sender Name is set to on From Sender Name Fax Message NO xxxx When Stamp Sender Name is set to off If Own Fax Number and Own Name are programmed From Own Fax Number Own Name Fax Message NO xxxx If only Own Fax Number is programmed From Own Fax Number Fax Message NO xxxx If only Own Name is programmed From Own Name Fax Message NO ...

Страница 504: ... that the final recipient address sent is pro grammed in the Address Book If it is programmed as a full mode destination the sender automatically registers the receiver s reception capability The reg istered reception capability is updated each time the sender receives new re ception capability information The sender can send documents to the receiver based on this information If the receiver is p...

Страница 505: ...ument Server Reference Note that Special Original of the copy function cannot be used with the facsimile function Place the originals according to their paper size Important If you place A5 B6 JIS 51 2 81 2 10 14 or 71 4 101 2 size originals on the exposure glass they are not detected Place A5 B6 JIS 51 2 81 2 10 14 or 71 4 101 2 size originals into the ADF Do not lift the ADF while using it to sc...

Страница 506: ...s completely dried before plac ing your original If it is still wet the exposure glass will become marked and those marks will appear on the received image Generally place A4 81 2 11 originals in the landscape orientation L If you place an A4 81 2 11 original in the portrait orientation K the image is sent rotated by 90 degrees You can send the first page from the exposure glass then the remaining...

Страница 507: ...ion with Image Rotation p 51 Scan Size p 268 Registering a priority function using a program Facsimile Features General Settings Guide Placing Originals Copy Document Server Reference Setting the Original Orientation When you store documents in the Document Server set Original Orientation A Place the original and then select the scan settings you require B Press Original Feed Type C Specify the or...

Страница 508: ...riginal will be printed in order on separate sheets at the other end The orientation of alternate sheets may be reversed at the other end If you want to print the original with the same orientation at the other end specify the Original position and Page opening orientation Important When you use 2 Sided Original under Original Feed Type the originals cannot be sent by using just the exposure glass...

Страница 509: ...ngs you require B Press Original Feed Type C Specify the original orientation Check the orientation of the placed document and then press or Make sure that the specified original orientation matches the orientation of originals loaded in the ADF D Press 2 Sided Original ...

Страница 510: ... you want to send a cover sheet as the first page G Press OK 2 Sided Original appears above Original Feed Type H Specify a destination and then press the Start key Note You can set the original feed types that are selected right after the power is turned on or the Clear Modes key is pressed See Registering a priority function using a program Reference p 268 Registering a priority function using a ...

Страница 511: ...able original size Maximum number of sheets Paper thickness Exposure glass Up to A3 297 420 mm 11 17 279 432 mm 1 ADF one sided docu ment B6 JIS L to A3 L up to 1200 mm long 51 2 81 2 K to 11 17 L 100 sheets 80 0 g m2 20 lb 40 128 g m2 11 34 lb ADF two sided docu ment A5 L to A3 L up to 432 mm long 51 2 81 2 K to 11 17 L 100 sheets 80 0 g m2 20 lb 52 128 g m2 14 34 lb ...

Страница 512: ...1 17 on the exposure glass only an A3 11 17 area is scanned Exposure Glass ADF Maximum scan area The following shows the maximum scan area Memory Transmission 297 1200 mm 11 47 W L from the ADF Immediate Transmission 297 1200 mm 11 47 W L from the ADF 297 432 mm 11 17 W L from the exposure glass AAG019S ...

Страница 513: ...detects paper sizes in the following ways When you place an original in the ADF an original wider than about 263 mm 10 4 is scanned as A3 11 17 size An original narrower than about 230 mm 9 1 is sent as A4 or 81 2 14 size and an original narrower than about 263 mm 10 4 is scanned as B4 JIS Japanese Industrial Standard Originals up to 1200 mm 47 2 in length can be scanned Seethefollowingtableforsiz...

Страница 514: ...s or translucent paper dark originals with dense text or drawings originals that contain areas of solid print originals that have solid print around their edges originals with glossy surfaces bound originals of more than 10 mm 0 3 in thickness such as books The following paper sizes are automatically detected in facsimile mode Metric Version Auto detect Unable to auto detect Inch Version Auto dete...

Страница 515: ...1 original in the portrait orientation K the image is sent rotated by 90 degrees Providing the receiver has A4 81 2 11 landscape paper L the document is printed the same size as the original Note This function is unavailable with Immediate Transmission When Image Rotation is used all documents are sent by normal Memory Transmission This function is unavailable when using Mixed Original Sizes ...

Страница 516: ...strations or diagrams with complex shading patterns or grays select the appropriate scan type to optimize image clarity Text Select Text to send high contrast black and white image originals Use this setting when you only want to send clearer text even if the original contains text and photographs Text Line Art Select Text Line Art to send high contrast black and white graphic originals at improve...

Страница 517: ...Text is selected If you send a fax document with Text Line Art Text Photo or Photo and the background of the received image is dirty reduce the density setting and resend the fax You can set the scan type that is selected right after the machine is turned on or the Clear Modes key is pressed See Registering a priority function using a program Reference p 58 Density Contrast p 268 Registering a pri...

Страница 518: ... it takes to transmit Therefore images scanned at high resolution Super Fine have high quality but transmission takes longer Conversely low resolution Standard scanning results in lower quality but the original is sent more quick ly Select the setting that matches your needs based upon this trade off between speed and image clarity Standard 8 3 85 lines mm 200 100 dpi Select for originals containi...

Страница 519: ...Transmission 50 1 A Press Scan Settings B Press Resolution C Select the resolution you require and then press OK ...

Страница 520: ...is selected right after the machine is turned on or the Clear Modes key is pressed See Registering a priority function using a program When using Internet Fax transmission documents are sent at Detail res olution even if you have specified Super Fine To send a document at Super Fine configure the Full Mode when registering the destinations in the Address Book Reference p 35 T 37 Full Mode p 196 Pr...

Страница 521: ... scans all pages using that size If the machine cannot detect the original size a confirmation message appears Place the original again A Place the originals B Press Scan Settings C Press Scan Size D Make sure that Auto Detect is selected If it is not press Auto Detect ...

Страница 522: ...pecify a destination and press the Start key Regular The placed original is scanned according to specified size regardless of actual size The sizes that can be specified are A4KL B4 JISL A3L 81 2 11 KL 81 2 14 L and 11 17 L A Place the originals B Press Scan Settings C Press Scan Size ...

Страница 523: ...ed size appears above Scan Settings F Specify a destination and press the Start key Note To cancel the selected scan size select Auto Detect Area Program the sizes of the originals to be scanned in advance Only the area in the specified size is scanned regardless of the actual size of a placed original A Place the originals B Press Scan Settings ...

Страница 524: ...gs 55 1 C Press Scan Size D Press Area 1 or Area 2 E Press OK The specified size appears above Scan Settings F Specify a destination and press the Start key Note To cancel the selected scan size select Auto Detect ...

Страница 525: ...nal according to its size Important The sizes of the originals that can be placed in this mode are as follows Metric Version A3L B4 JISL A4KL B5 JISKL Inch Version 11 17 L 81 2 14 L 81 2 11 KL When placing originals in the ADF align their rear and left edges against the ADF and adjust the document guide according to the largest original Since small originals may not be correctly aligned with the o...

Страница 526: ...g OK in step D When using Mixed Original Sizes the machine sends the originals by Memory Transmission When using Mixed Original Sizes rotation transmission is disabled You can have the machine select Mixed Original Sizes right after the power is turned on or the Clear Modes key is pressed See Registering a priority function using a program Reference p 46 Transmission with Image Rotation p 268 Regi...

Страница 527: ...ipping or if the writing is faint adjust the density Auto Density The appropriate density setting for the original is automatically selected A Make sure that Auto Density is selected Manual Density Use manual density to set density manually You can select one of seven density levels A If Auto Density is selected press Auto Density to turn it off B Press W or V to adjust the density The cursor move...

Страница 528: ...e that Auto Density is selected B Press W or V to adjust the density The cursor moves Note Selecting Text Text Line Art or Text Photo for the scan type causes Auto Density to be selected You can set the density that is selected right after the machine is turned on or the Clear Modes key is pressed See Registering a priority function using a program Reference p 268 Registering a priority function u...

Страница 529: ...next page that you checked on the exposure glass C Select the density resolution and scan type You have about 60 seconds 10 seconds for Immediate Transmission to se lect density resolution and scan type The time remaining is shown on the display Adjust the settings for each page before you press the Start key When placing originals in the Auto Document Feeder ADF A Check which pages you want to sc...

Страница 530: ...talled unit Multi port When the extra G3 interface unit is installed communications can take place simultaneously through three lines at once The following list shows protocol combinations available for each line type IP Fax When sending an IP Fax select either SIP or H 323 as the protocol To display SIP and H 323 on the screen make the settings in Initial Set tings in the Facsimile Features menu ...

Страница 531: ...Select the line you want to use If you select G3 Auto the machine will use any available line This increas es efficiency When one optional extra G3 unit is installed When two optional extra G3 units are installed When H 323 SIP are set to On ...

Страница 532: ...tering a priority function using a program Facsimile Features General Settings Guide Simultaneous Broadcast Using Multiple Line Ports The Standard Broadcast function sends faxes one at a time to multiple destina tions in the order of specified destinations However the Simultaneous Broadcast function can simultaneously send faxes to multiple destinations using different lines This results in a shor...

Страница 533: ... Make sure that Fax is selected B Enter the fax number using the number keys If you make a mistake press the Clear Stop key and then enter again If the optional extra G3 interface unit is installed select the line you want to use before pressing the Start key To select a destination from the Address Book see Using the Address Book to Specify Destinations C Press the Start key The machine starts to...

Страница 534: ...Address Book to Specify Destinations p 83 Registering Entered Destinations to the Address Book p 276 Maximum Values Entering a pause Press Pause when dialing or storing a number to insert a pause of about two seconds Note A pause is shown as a on the display You can also program numbers including pauses in the destination list ...

Страница 535: ... function with On Hook Dial as an example A Press On Hook B Enter the fax number using the number keys C Press Tone D Enter the number you want to tone dial using the number keys E Press the Start key The machine starts to scan the original and stores it in memory When scan ning ends the Communicating indicator lights and transmission starts Note Certain services may be unavailable even when using...

Страница 536: ...ecify the protocol to be used in Select Line in advance A Make sure that Fax is selected B Press Manual Entry To select a destination from the Address Book see Using the Address Book to Specify Destinations C Enter the IP Fax destination and then press OK If you enter an incorrect character press Backspace or Delete All Then re enter the characters correctly To change the IP Fax destination after ...

Страница 537: ...or a list of gateways T 38 compliant gatekeepers or SIP servers that are certified as operable with this machine contact your local reseller or ser vice representative Methods of entering a destination vary depending on the network settings made by the administrator Ask the machine administrator for details For detailsaboutenteringtheIP Faxdestination see RegardingIP Faxdestinations To avoid accid...

Страница 538: ...er From IP Fax to IP Fax Specify the IPv4 address or host name of the receiving machine Example 192 168 1 10 IPv4 address Example IPFAX1 host name From IP Fax to G3 fax Specify the G3 fax telephone number of the receiving machine Example 0312345678 When using a gatekeeper server From IP Fax to IP Fax Specify the alias telephone number of the receiving machine Example 0311119999 alias telephone num...

Страница 539: ...s IPFAX1 and the port number is 2100 specify IPFAX1 2100 Ask the network administra tor for details An alias telephone number is a number that is registered in the gatekeeper and is available only in the network to which the gatekeeper is connected Pay attention to the number of telephone number digits set in the gateway IPv4 address conversion table to avoid transmission error Sending to an E mai...

Страница 540: ...ress Manual Entry To select a destination from the Address Book see Using the Address Book to Specify Destinations D Enter the e mail address destination and then press OK If you enter an incorrect character press Backspace or Delete All Then re enter the characters correctly To change the e mail address after pressing OK press Edit Dest re enter an e mail address and then press OK ...

Страница 541: ...sion see Canceling a Transmission To avoid accidentally pressing the wrong Destination key you can set the machine so that each time a destination is added using a Destination key Add must be pressed Make the setting in User Parameters switch 17 bit 2 in the Facsimile Features menu For the maximum number of digits for a destination see Maximum Values If Auto Specify Sender Name is set to On in Sys...

Страница 542: ... specify the host name of the other party as the domain part of the e mail address program the host name of the other party on the DNS server If the other party s IPv4 address is not registered on the DNS server specify the IPv4 address at the domain part of the e mail address To use this function the other party s fax machine must be compatible with Internet Fax connected to the same LAN as this ...

Страница 543: ...y s host name Specify a destination s e mail address by adding the other party s host name to the domain part of the e mail address Specify the address to the right of as follows host name dot and domain name xxxx host name of the other party domain name Example The other party s e mail address is abc defcompany com and the host name is HOST abc HOST defcompany com Specify the other party s IPv4 a...

Страница 544: ...Book is enabled To send Internet Fax documents from a computer use the LAN Fax Driver to specify whether or not to bypass the SMTP server When sending with the Use device address check box selected the SMTP server setting speci fied on this machine is enabled Reference p 237 Sending Fax Documents from Computers System Settings General Settings Guide Registering Addresses and Users for Facsimile Sc...

Страница 545: ...of destinations A Press Fax or Internet Fax to switch the transmission type to fax IP Fax or Internet Fax B Press the title word key where the desired destination is programmed For example if you want to specify NewYork Office programmed in LMN press LMN C Press the Destination key programmed with the desired destination If the desired Destination key is not shown press U and T to look through the...

Страница 546: ...neral Settings Guide Registering Addresses and Users for Facsimile Scanner Functions Gen eral Settings Guide Switching the titles in the Address Book There are three types of titles for destination lists Title 1 Title 2 and Title 3 The above display shows Title 1 A Press Change Title B Select the type of the title and then press OK ...

Страница 547: ...for Memory Transmission it cannot be used for Immediate Transmission The machine automatically changes to Memory Transmission when you use group destination The total number of destinations programmed in multiple groups should not exceed the maximum number of destinations you can specify for one file For details see Maximum Values A Press Fax or Internet Fax to switch the transmission type to fax ...

Страница 548: ...ed destination and then press the Clear Stop key You can also cancel a transmission by pressing the highlighted Destination key to dese lect it Reference p 276 Maximum Values System Settings General Settings Guide Facsimile Features General Settings Guide Registering Addresses and Users for Facsimile Scanner Functions Gen eral Settings Guide Selecting Destinations from Recent Destinations The mach...

Страница 549: ...s the Start key Note You can select Internet Fax and IP Fax destinations from Recent Destina tions as well When you press Program Dest you can register a selected recipient in the destination list For the maximum number of recent destinations the machine can store see Maximum Values Reference p 83 Registering Entered Destinations to the Address Book p 276 Maximum Values ...

Страница 550: ...r destinations using Address Book Management in Administrator Tools in the System Settings menu A Press the User Tools Counter key B Press System Settings C Press Administrator Tools D Press Address Book Management E Check that Program Change is selected F Press New Program For a description of the subsequent procedure see System Settings General Settings Guide BFT015S ...

Страница 551: ...ears Press Exit to bring up the facsimile s initial display You can register in the Address Book using Web Image Monitor or Smart DeviceMonitor for Admin For details about installation see Monitoring and Configuring the Printer Network Guide or for information about the Address Book see the relevant Help Reference System Settings General Settings Guide Registering Addresses and Users for Facsimile...

Страница 552: ...any necessary information For details about registering destinations see Registering Addresses and Users for Facsimile Scanner Functions General Settings Guide C Press OK Note Depending on security settings Prg Dest may not appear and you may be unable to register the destination When the facsimile initial display is shown after changing the contents of the Address Book the Destination list machin...

Страница 553: ...he search returns only destinations whose first characters match the entered characters A warning message appears if the search returns more than the maximum number of destinations you can search for at a time Press Exit and change the destination name to view fewer destinations For the maximum number of destinations you can search at a time see Max imum Values Although one user can program multip...

Страница 554: ... a destination registered in the Address Book by name A Press Search Dest B Select a search destination To search through the Address Book select Address Book To search through an LDAP server select the relevant LDAP server C Press Fax or Internet Fax to switch the transmission type to fax IP Fax or Internet Fax ...

Страница 555: ...you want to search for and then press OK If you enter a wrong destination name press Backspace and Delete All and then enter the destination name again F Confirm the characters you entered and then press Start Search When the search is finished a result appears ...

Страница 556: ...or T to scroll through the list Press Details to display the detailed information of the selected destination Reference Entering Text About This Machine Search by Fax Number IP Fax Destination Follow these steps to search for a destination registered in the Address Book by fax number or IP Fax destination A Press Search Dest ...

Страница 557: ...through an LDAP server select the relevant LDAP server C Press Fax Destination D Enter the number you want to search for and then press OK To search for an IP Fax destination enter the IP Fax destination that you want to find If you enter a wrong number press Backspace or Delete All and then enter the number again ...

Страница 558: ...ered fax numbers and then press Start Search When the search is finished a result appears F Select a destination If the desired destination does not appear use U or T to scroll through the list Press Details to display the detailed information of the selected destination ...

Страница 559: ...h for a destination registered in the destination list A Press Search Dest B Select a search destination To search through the Address Book select Address Book To search through an LDAP server select the relevant LDAP server C Press Internet Fax to switch the type of transmission to Internet Fax ...

Страница 560: ... Enter the e mail address you want to search for and then press OK If you enter a wrong e mail address press Backspace or Delete All and then enter the e mail address again F Confirm the entered characters and then press Start Search When the search is finished a result appears ...

Страница 561: ...etailed information of the selected destination Search Using Advanced Search Follow these steps to search for a destination registered in the Address Book by specifying search criteria A Press Search Dest B Select a search destination To search through the Address Book select Address Book To search through an LDAP server select the relevant LDAP server ...

Страница 562: ... Press Advanced Search E Press the key for each condition and then enter a partial string The following conditions can be specified for Address Book searches Name Fax Destination E mail Address and Folder Name The following conditions can be specified for LDAP server searches Name Fax Destination E mail Address Company Name and Department Name ...

Страница 563: ... Search for strings that include the specified character Example When searching for ABC enter A B or C Exclude Words Search for strings that do not include the specified character Example When searching for ABC enter D Fuzzy Search Perform a fuzzy search This item appears when selecting an LDAP server in step B The perfor mance of fuzzy search depends on the search method supported by the LDAP ser...

Страница 564: ... as the first or last name depending on the administrator s setting For example to search for the name John Smith ask the system administrator whether you should enter John or Smith Reference Entering Text About This Machine System Settings General Settings Guide Search by Registration Number Follow these steps to search for a destination by specifying a registration number stored in the destinati...

Страница 565: ...of a registration number If you make a mistake press Clear or the Clear Stop key and then try again D Press OK The corresponding destination appears Note If the Cannot find the specified Registration No message ap pears the specified registration number or selected type of transmission is wrong or does not exist Press Exit check the registration number again and then follow the procedure from step...

Страница 566: ...e unit Internet Fax and IP Fax A Place the original and then select the scan settings you require B Press On Hook You will hear a low tone from the internal speaker If you want to cancel this operation press On Hook again C Dial The machine immediately dials the destination If you make a mistake press On Hook or the Clear Modes key and then try again To select a destination from the Address Book s...

Страница 567: ...r Lower to adjust the volume of the on hook sound The volume can also be preprogrammed in the Facsimile Features menu If you have an external telephone on the fax machine you can speak with the other party when you hear a voice If you hear a voice before pressing the Start key pick up the external telephone and tell the receiver you want to send a fax document ask them to switch to facsimile mode ...

Страница 568: ...report A Place the original and then select the scan settings you require B Pick up the handset You will hear a dial tone C Dial The machine immediately dials the destination If you make a mistake replace the handset and then try again from step B To select a destination from the Address Book see Using the Address Book to Specify Destinations D When the line is connected and you hear a high pitche...

Страница 569: ...is off even if the main power switch is on you cannot operate this machine using only the handset of the external tele phone You must first press the operation switch to turn on the machine Reference p 76 Using the Address Book to Specify Destinations ...

Страница 570: ...Name as Sender in advance using Address Book Management in System Settings If user authentication is set the user logged in is set as sender The transmis sion result is sent to the logged in user s e mail address A Place the original and then select the scan settings you require B Press Sender Name C Select a sender To select a sender by specifying the registration number registered in the Ad dres...

Страница 571: ...ser name appears on the re ceiver s sheet lists and report F To confirm the transmission results by e mail notification press E mail TX Results to highlight it If the sender s e mail address is registered you can send the transmission re sult to the registered e mail address G Press OK The standby display appears To check the settings press Sender Name H Specify the destination and then press the ...

Страница 572: ...imile Fea tures menu You can use Communication Result Report etc to check usage status by specified users If user authentication is set you can check usage by logged in users If User Code is set to sender you can count the number of uses by each user To cancel the Sender Name cancel the transmission See Canceling a Transmission Reference p 112 Canceling a Transmission Facsimile Features General Se...

Страница 573: ... for a particular receiver since only a person who knows the SUB Code can print the document Documents can also be sent via facsimiles that have the Transfer Station function This function helps you save costs when you send the same document to more than one place in a distant area and saves time since many documents can be sent in a single operation Important Documents can be sent to facsimiles t...

Страница 574: ...n Setting D Press SUB Code Transmission E Press OK twice The standby display appears F Enter the fax number of a destination or an IP Fax destination G Press Adv Features H Make sure that SUB Code is selected I Press Transmission SUB Code ...

Страница 575: ...e sure the number of digits in the SUB Code matches the specification of the machine to which you are sending For the maximum number of dig its for the SUB Code of this machine see Maximum Values You can store SUB Codes as well as names and fax numbers in the destina tion list and Keystroke Programs When a SUB Code is stored in the destination list the SUB Code can be modified or deleted after sel...

Страница 576: ...ing Keystroke Programs p 276 Maximum Values Registering Addresses and Users for Facsimile Scanner Functions Gener al Settings Guide Setting SEP Codes for Reception Follow these steps to enter a SEP Code to request the destination to transmit a document You can receive a document stored in the destination s memory if the document has the same SEP Code as the SEP Code you entered This function enabl...

Страница 577: ...on Setting C Press SEP Code Reception D Press OK twice The standby display appears E Enter the fax number of a destination or an IP Fax destination F Press Adv Features G Make sure that SEP Code is selected H Press Reception SEP Code ...

Страница 578: ...ing For the maximum number of digits for the SEP Code of this machine see Maximum Values You can enter numbers p q and spaces You can store SEP Codes as well as names and fax numbers in the destina tion list and Keystroke Programs When a SEP Code is stored in the destination list the SEP Code can be modified or deleted after selecting a destination using the Destination keys The SEP Code is printe...

Страница 579: ...ams p 276 Maximum Values Registering Addresses and Users for Facsimile Scanner Functions Gener al Settings Guide SEP Code RX Reserve Report This report is printed after SEP Code Reception is set up You can use this report to check the reservations for SEP Code Reception Note You can turn this function on or off with the User Parameters switch 03 bit 3 in the Facsimile Features menu You can have a ...

Страница 580: ...on with the Journal You can turn this function on or off with the User Parameters switch 03 bit 4 in the Facsimile Features menu To view the report without text disruption select a font of even character width in your e mail application s settings You can display a destination with the User Parameters switch 04 bit 4 in the Facsimile Features menu You can display a sender name with the User Parame...

Страница 581: ... Is Scanned Use this procedure to cancel a transmission before pressing the Start key A Press the Clear Modes key Note When originals are placed into the ADF you can cancel transmission sim ply by removing them While the Original Is Being Scanned Use this procedure to cancel a transmission while the originals are being scanned after the Start key has been pressed A Press the Clear Stop key The mac...

Страница 582: ...on while the Communicating indicator is lit A Press the Clear Stop key You can also cancel a Memory Transmission by pressing Change TX Info B Select the file you want to cancel If the desired file is not shown press U or T to find it There are cases when a destination may not be selected as the destination ap pears as p depending on the security settings C Press Stop Transmission BFT019S ...

Страница 583: ...cel a document while it is being sent the transmission is halted as soon as you finish the cancellation procedure However some pages of the document may already have been sent and received at the other end If the transmission finishes while you are carrying out this procedure it will not be canceled If multiple destinations were specified only one destination number appears ...

Страница 584: ...earch for the file to be canceled among the files stored in memory and then de lete it You can cancel transmission of a file while the file is being sent stored in mem ory or fails to transmit All the scanned data is deleted from memory Important This function is unavailable with Immediate Transmission A Press Change TX Info B Press Check Stop Transmission File The list of stored files being trans...

Страница 585: ...ot shown press U or T to find it There are cases when a destination may not be selected as the destination ap pears as p depending on the security settings D Press Stop Transmission E Press OK To cancel another file repeat steps C and E To cancel stopping transmission press Cancel ...

Страница 586: ...ady been sent and is received at the other end If the transmission finishes while you are carrying out this procedure transmission cannot be canceled If multiple destinations were specified only the number of the destina tions that have not received the document you sent is shown If multiple destinations were specified only one destination number ap pears To display all destinations press Check Ch...

Страница 587: ...ange TX Info B Press Check Stop Transmission File C Select a file to check If multiple destinations were specified only the name of the destination you specify first and only the number of destinations that have not received the document you sent are shown ...

Страница 588: ...Confirming a Transmission 119 1 D Press Check Change Settings E Confirm a transmission and then press Exit F Press Exit twice The standby display appears ...

Страница 589: ...3 bit 2 in the Facsimile Features menu Even if the machine is set up not to print this report it is still printed if an orig inal could not be stored You can select whether to include part of the original image on the report with the User Parameters switch 04 bit 7 in the Facsimile Features menu You can select whether to display a destination with the User Parameters switch 04 bit 4 in the Facsimi...

Страница 590: ...to be by the machine at the time Important If the machine is switched off for about one hour all fax documents stored in memory are lost If documents are lost for this reason a Power Failure Report is automatically printed when the operation switch is turned on Use this re port to identify lost documents For details see Troubleshooting When Us ing the Facsimile Function Troubleshooting This functi...

Страница 591: ...isplay appears To check the settings press TX Mode F Specify a destination and then press the Start key Note You can specify a time within 24 hours of the current time If the current time shown is not correct change it You can program one of the Quick Operation keys with operations for this function Using the Quick Operation key allows you to omit step B You can cancel the transmission setup for S...

Страница 592: ...the Result column of the Journal allowing the originator to verify the transmission was received Important The Reception Notice feature is only available if the receiver supports MDN Message Disposition Notification A Place the original and then select the scan settings you require B Press TX Mode C Press Reception Notice to highlight it D Press OK The standby display appears To check the settings...

Страница 593: ...ion notice message indicating an error Error appears in the Result column and will not be overwritten even if you subsequently receive a reception notice message as OK following the error message Reception notice results are only shown in the Journal The Result column in all other files lists and transmission reports show Reception notice messages themselves are not recorded in the Journal You can...

Страница 594: ... you require B Press TX Mode C Press BCC Transmission to highlight it D Press OK The standby display appears To check the settings press TX Mode E Specify a destination and then press the Start key Note You can program one of the Quick Operation keys with operations for this function Using the Quick Operation key allows you to omit step B Reference Facsimile Features General Settings Guide ...

Страница 595: ... transmission results by sending an e mail noti fication to the specified destination Important Register the e mail address of the destination for e mail notification in the destination list in advance A Place the original and then select the scan settings you require B Press TX Mode C Press E mail TX Results ...

Страница 596: ...hlight off E mail TX Results gets highlighted and the destination of notification selected appears E Press OK The standby display appears To check the settings press TX Mode F Specify a destination and then press the Start key Note You can program one of the Quick Operation keys with operations for this function Using the Quick Operation key allows you to omit step B Reference Facsimile Features G...

Страница 597: ...atures 128 2 Entering the Subject Allows you to enter a subject for the e mail document you want to send A Place the original and then select the scan settings you require B Press TX Mode C Press Subject D Enter the subject ...

Страница 598: ...uently used subjects in advance in Pro gram Change Delete User Text in System Settings If you send e mail without setting a subject a subject is automatically in serted For details about how the subject is automatically inserted see E mail Subject and Received Images You cannot send a subject only as e mail without an original You can program one of the Quick Operation keys with operations for thi...

Страница 599: ...nsmission Features 130 2 Reference p 34 E mail Subject p 153 Received Images p 276 Maximum Values Entering Text About This Machine System Settings General Settings Guide Facsimile Features General Settings Guide ...

Страница 600: ...ment you want to send Important Program text strings in advance in Program Change Delete E mail Mes sage in System Settings A Place the original and then select the scan settings you require B Press TX Mode C Press Text D Select a text and then press OK E Press OK The standby display appears ...

Страница 601: ... key Note You cannot send text only without an original You can program one of the Quick Operation keys with operations for this function Using the Quick Operation key allows you to omit step B Reference System Settings General Settings Guide Facsimile Features General Settings Guide ...

Страница 602: ...nt Please phone and Copy to corres section You can also program other messages Important While this function is in use the third line of the Label Insertion is not printed When there is an image around the area where the standard message is to be stamped that image is deleted Program a standard message in Program Change Delete Standard Mes sage in the Facsimile Features menu See Facsimile Features...

Страница 603: ...ultiple standard messages Note You can program one of the Quick Operation keys with operations for this function Using the Quick Operation key allows you to omit step B and step C Reference p 136 Label Insertion Facsimile Features General Settings Guide Auto Reduce When this function is turned on if the receiver s paper is smaller than the size of the original you are sending the document is autom...

Страница 604: ...may be deleted when printed at the other end A Place the original and then select the scan settings you require B Press TX Mode C Select Option Setting D Make sure that Auto Reduce is highlighted To cancel an Auto Reduce press Auto Reduce to turn the highlight off E Press OK twice F Specify the destination and then press the Start key ...

Страница 605: ...area where the Label is to be printed that image is deleted The receiver s name is printed as follows Receiver s name printed at the top of the page and preceded by To Standard message the programmed message is printed within the next two lines Set this function as follows Set Label Insertion to On when programming fax destinations Set Label Insertion to on when sending fax documents On the Standa...

Страница 606: ... Note You can program one of the Quick Operation keys with operations for this function Using the Quick Operation key allows you to omit step B and step C To print a standard message that is not programmed as a default program it in advance in Program Change Delete Standard Message in the Facsimile Features menu Reference p 133 Standard Message Stamp Facsimile Features General Settings Guide ...

Страница 607: ...rehand in the Facsimile Fea tures menu This function is not available with Internet Fax A Place the original and then select the scan settings you require B Press TX Mode C Select Option Setting D Press Closed Network to highlight it To cancel a Closed Network transmission press Closed Network again E Press OK twice F Specify the destination and then press the Start key Note YoucanprogramoneoftheQ...

Страница 608: ... Transmission is set to on if the SUB Code is not appended to the spec ified destination transmission is in standard fax mode When you select a destination that has a registered SUB Code from the Ad dress Book if SUB Code Transmission is set to off the SUB Code is not ap pended and transmission is in standard fax mode A Place the original and then select the scan settings you require B Press TX Mo...

Страница 609: ...rform SEP Code Reception Important This function is not available with Internet Fax To perform SEP Code Reception a SEP Code must be set in Adv Features the Address Book or Keystroke Programs in advance Otherwise even if SEP Code Reception is set to on reception is not performed If the other party s fax machine has a polling transmission function the machine performs poll ing reception When you se...

Страница 610: ...and then press the Start key Note You can program one of the Quick Operation keys with operations for this function Using the Quick Operation key allows you to omit step B and step C Reference p 107 Setting SEP Codes for Reception p 266 Programs Facsimile Features General Settings Guide Registering Addresses and Users for Facsimile Scanner Functions Gen eral Settings Guide ...

Страница 611: ...ld use the first when sending internal faxes and the second for external faxes Important In the USA the Fax Header must contain the telephone number of the line your machine is connected to It will be printed on the header of every page you send Required in the USA A Place the original and then select the scan settings you require B Press TX Mode C Select Option Setting D Make sure that Fax Header...

Страница 612: ...ceiver the first header name is printed on the receiver s paper To print the second header name contact your service representative You can program one of the Quick Operation keys with operations for this function Using the Quick Operation key allows you to omit step B and step C In the USA law requires that your fax number be included in the Fax Header Register the fax number and switch on Fax He...

Страница 613: ...Other Transmission Features 144 2 ...

Страница 614: ...memory space is low If free memory reaches 0 during Immediate Reception any further recep tion becomes impossible and the current communication is terminated Note Reception is always by Immediate Reception unless 2 Sided Print is set to On or Reception File Print Quantity is set to 2 or higher in which cases the machine switches to Memory Reception If the Substitute Reception is used a fax documen...

Страница 615: ... documents or doc uments with high data content If this is the case we recommend that you set Reception File Print Quantity to 1 and disable 2 Sided Print Alterna tively install the optional expansion memory The machine may not be able to receive fax documents when free memory space is low If free memory reaches 0 during Memory Reception any further reception becomes impossible and the current com...

Страница 616: ...r all fax documents received or for only those documents that match a condition specified in the User Parameters in the Facsimile Features menu The Receive File indicator lights to let you know when fax documents have been received using Substitute Reception Important Reception may not take place if there is not enough free memory If free memory reaches 0 during Substitute Reception any further re...

Страница 617: ...ocument is automatically printed after the current job finishes The message Output Tray is full Re move paper appears The output tray is full Remove paper from the output tray h is lit The cover is open Close the cover shown in the display Problems Causes Solutions h is lit Paper is jammed Remove the jammed paper For details about removing the pa per see Clearing Misfeeds Trou bleshooting h is lit...

Страница 618: ...sender has not programmed their Own Name or Own Fax Number the machine may fail to receive an important fax document It is recommended that you ask important senders to program an Own Name or Own Fax Num ber in advance Free The machine switches to Substitute Reception regardless of whether or not the sender has programmed their Own Name or Own Fax Number Closed Network Code match The machine switc...

Страница 619: ...witch manually to facsimile mode A When the machine rings pick up the handset of the external telephone B If you hear beeps press the Start key or hold the Facsimile key down for a few seconds The Start key is only available in facsimile mode when an original is not placed C Replace the handset of the external telephone The machine will start receiving Note When the operation switch is off even if...

Страница 620: ...Facsimile Fea tures menu If you program a Quick Operation key with Switch Reception Mode you can switch the reception mode quickly A Press Switch RX Mode B Select the reception mode and then press OK The standby display appears To cancel the selection press Cancel Reference Facsimile Features General Settings Guide ...

Страница 621: ...tocol is set to POP3 or IMAP4 you can set the machine to retain incoming e mail or delete it from the server in System Settings With User Parameters switch 21 bit 1 in the Facsimile Features menu you can have the machine send the return receipt in response to the reception no tice request attached to the sent e mail Reference System Settings General Settings Guide Facsimile Features General Settin...

Страница 622: ...splay appears Reference Facsimile Features General Settings Guide Received Images Here is an example of an Internet Fax document sent from this machine and re ceived on a computer using the Outlook Express e mail application The received image varies according to the e mail application Important When Internet Fax e mail is sent to computer the following information is al ways inserted in the e mai...

Страница 623: ...ission If no subject is specified one is automatically assigned in the format shown in 1 above 7 The message is inserted in all e mail xxxx is the machine name 8 Attachment File Any document included by the sender is displayed as an attached document Note The display format of the sender name differs according to that of the Stamp Sender Name setting and other functions The display format of the s...

Страница 624: ...nd the document is routed to the destination whose SUB Code is specified Important You must set the Personal Box and register a delivery destination beforehand Personal Boxes can be programmed in Box Setting in the Facsimile Features menu This function is not available when you set received documents to be deliv ered to the network delivery server Delivery of received documents can be set in Syste...

Страница 625: ...rer Reference Facsimile Features General Settings Guide SUB Code Transfer Report You can check the results of transmission to Receiving Stations The machine prints this report when it has finished transmitting to Receiving Stations Note You can select whether the SUB Code Transfer Report be automatically print ed using the User Parameters switch 04 bit 1 in the Facsimile Features menu You can set ...

Страница 626: ...ination according to the sender specify the Forwarding destination for each sender under Facsimile Features Reception Settings Program Special Sender Documents from other senders are forwarded to the default Forward ing destination specified for this function You can select whether the machine prints out the documents it forwards with User Parameters switch 11 bit 6 in the Facsimile Features menu ...

Страница 627: ...bled on the DNS server e mail sent from the SMTP server will not be received and the machine reports an error if SMTP reception is not set under System Settings Also the SMTP server sends an error notification to the originator If an error occurs while receiving e mail reception is aborted the e mail is de leted and Error Report is printed Also the SMTP server will send an error notification to th...

Страница 628: ...as follows Fax Number fax destination fax number host name of this machine domain name Example to transfer to fax number 212 123 4567 fax 2121234567 abc company com Single destination programmed in the destination list fax qregistration number of 5 digits or less host name of this machine do main name Example to transfer to the destination number 00001 fax q00001 abc company com Group destination ...

Страница 629: ...perts Group compression you can send photographic originals faster than with other methods of compression It allows you to receive documents sent in the JBIG format through JBIG Transmission Important This function is not available with Internet Fax function Auto Fax Reception Power Up This machine can be set to shut down automatically if no one has used it for a while In these situations even tho...

Страница 630: ... of the beep or turn it off completely using Adjust Sound Volume in the Facsimile Features menu set the volume to the mini mum level Reference Facsimile Features General Settings Guide Checkered Mark When this function is turned on a Checkered Mark is printed on the first page of fax documents to help you separate them Note You can turn this function on or off using Checkered Mark in the Facsimile...

Страница 631: ...acsimile Features menu Reference Facsimile Features General Settings Guide Reception Time You can have the date time and file number printed at the bottom of the docu ment when it is received Note You can turn this function on or off using Print Reception Time in the Facsim ile Features menu When a received document is printed on two or more sheets the reception time is printed on the last page Th...

Страница 632: ...ssary You must also have paper set in the machine of the same size as that sent by the sending par ty In Two Sided Printing this machine will correctly receive in A3L B4 JIS Japanese Industrial Standard L A4KL B5 JISKL A5KL 11 17 L 81 2 14 L 81 2 11 KL 51 2 81 2 KL The following table shows the results that can be achieved when receiving with this machine This function works only when all pages ar...

Страница 633: ...ame size are printed on the same paper Some stored documents may be unavailable for this printing option Reference Facsimile Features General Settings Guide 180 degree rotation printing When printing on both sides of the paper this machine rotates images as shown in the diagram Multi Copy Reception If you switch this function on multiple copies of each incoming fax document is printed You can also...

Страница 634: ... Reception File Print Quantity in the Facsimile Features menu The machine will use Memory Reception for Multi copy Reception Reference Facsimile Features General Settings Guide Image Rotation If you have set paper in the standard tray K incoming fax documents are auto matically rotated to fit onto the paper Note If you specified a tray for Paper Tray in the Facsimile Features menu the paper loaded...

Страница 635: ...cument is reduced if it is less than 20 mm 0 79 When a document is split an asterisk p is inserted at the split position and about 10 mm 0 39 of the split area is duplicated on the top of the second sheet Note Your service representative can customize this function with the following settings Reduction Print split mark Overprinting Overprinting length Guideline for split You can adjust the overpri...

Страница 636: ... printing quality may not be as good as usual Reference p 166 Page Separation and Length Reduction Facsimile Features General Settings Guide TSI Print Transmitting Subscriber Identification Print Usually the sender s Fax Header is printed on received documents When you receive an Internet Fax document the e mail address of the sender is printed If the sender has not programmed their Fax Header you...

Страница 637: ... the size of the sent original Reference p 165 Image Rotation p 166 Page Separation and Length Reduction p 167 Page Reduction Facsimile Features General Settings Guide Setting priority trays With the same size of paper loaded into multiple trays you can make the ma chine use one tray for one function and another tray for another function For example you may load white A4 paper into tray 1 to use w...

Страница 638: ...nts or reports were being printed automatically the printer automatically continues printing from where it left off If any documents or reports were being printed manually the printer does not resume printing Perform the operation from the beginning again Reference Facsimile Features General Settings Guide Having incoming documents printed on paper from the bypass tray You can print documents sent...

Страница 639: ...tings Guide Where Incoming Documents Are Delivered Output Tray You can specify the output tray or output position to facilitate separation of re ceived documents Specifying tray for lines Use this function to specify the output tray for each line port You can specify the document feeding tray for each port telephone Internet Fax IP Fax For example you can specify documents received through the G3 ...

Страница 640: ...uired When the optional finisher unit is selected for fax output you can use the Tray Shift function whenever a fax or report is printed This is useful for separating faxes stacked in the finisher output tray For exam ple if the previous incoming fax was output to the left the next incoming fax will be output to the right and vice versa Note You can turn this function on or off with the User Param...

Страница 641: ...Reception 172 3 ...

Страница 642: ...ansmission change the settings of a transmission print a stored file print a list of stored files and resend a file which the machine failed to transmit Note If the No transmission files found message appears on the screen af ter you press Check Stop Transmission File no files are being stored or sent by Memory Transmission You cannot check or edit a file being sent Also a SUB Code Transmission fi...

Страница 643: ...Broadcast You can delete selected broadcasting destinations Important If you delete a destination that is the only destination for a transmission the transmission is canceled A Press Change TX Info B Press Check Stop Transmission File C Select the file from which you want to delete a destination ...

Страница 644: ...ear Stop key to delete the destination and then press OK Pressing the Clear Stop key deletes by single digits the fax number or IP Fax address The Internet Fax address can be entirely deleted at once by pressing the Clear Stop key G Press Exit To delete another destination repeat from step C H Press Exit twice The standby display appears BFT019S ...

Страница 645: ...ming Communication Information 176 4 Adding a Destination You can add a destination for broadcasting A Press Change TX Info B Press Check Stop Transmission File C Select the file to which you want to add a destination ...

Страница 646: ...sion type between fax IP Fax and Internet Fax by pressing Fax or Internet Fax To add an e mail address switch the type of transmission to Internet Fax by pressing Internet Fax Then press Manual Entry and enter the e mail address You can also program a SUB Code or SEP Code by pressing Adv Features G Press Exit Repeat from step C if you want to add another destination H Press Exit twice The standby ...

Страница 647: ...the transmission time specified with Send Later You can also delete the transmission time If the transmission time is deleted the file is transmitted immediately A Press Change TX Info B Press Check Stop Transmission File C Select the file for which you want to change or cancel the transmission time ...

Страница 648: ...enter the transmission time using the number keys and then press OK If you press Transmit Now the file is transmitted immediately However if there is a file on standby that file is sent first G Press Exit Repeat from step C if you want to change another transmission time H Press Exit twice The standby display appears ...

Страница 649: ...rmation 180 4 Changing the SMTP Server Setting You can change the settings for whether or not to bypass the SMTP server A Press Change TX Info B Press Check Stop Transmission File C Select a file whose SMTP server setting you want to change ...

Страница 650: ...Changing the Settings of Files in Memory 181 4 D Press Check Change Settings E Press Change F Press SMTP G Select Yes or No and then press OK ...

Страница 651: ...Changing Confirming Communication Information 182 4 H Press OK I Press Exit Repeat from step C to change the SMTP server settings of other recipients J Press Exit twice The standby display appears ...

Страница 652: ...le that is stored in memory and not yet sent use this procedure to print it out A Press Change TX Info B Press Check Stop Transmission File C Select the file you want to print If multiple destinations were specified only the number of the destinations that have not received the document you sent is shown ...

Страница 653: ...Cancel The display returns to that of step C E Press the Start key To cancel printing after pressing the Start key press Stop Printing The dis play returns to that of step C Repeat from step C if you want to print another file F Press Exit twice The standby display appears Note You can also print files that have not been successfully transmitted ...

Страница 654: ...find out which files are stored in memory and what their file numbers are Knowing the file number can be useful for example when erasing files A Press Change TX Info B Press Check Stop Transmission File C Press Print List To cancel printing before pressing the Start key press Cancel The screen returns to that displayed before pressing Print List ...

Страница 655: ...rinting The dis play returns to that of step C E Press Exit twice The standby display appears Note The contents of a file stored in memory can also be printed You can set whether or not to display a sender name with the User Param eters switch 04 bit 5 in the Facsimile Features menu Reference Facsimile Features General Settings Guide ...

Страница 656: ... could not be transmitted to On in User Parameters switch 24 bit 0 in the Facsimile Features menu A Press Change TX Info B Press Check Stop Transmission File C Select the file you want to resend TX failed is displayed for files that could not be sent If multiple destinations were specified only the name of the destination you specify first and only the number of destinations that have not received...

Страница 657: ... resend another file To cancel transmissions press Cancel The display returns to that of step D F Press Exit twice The standby display appears Transmission starts Note Files that could not be transmitted are kept for either 24 or 72 hours de pending on the setting you make in User Parameters switch 24 bit 1 in the Facsimile Features menu Reference Facsimile Features General Settings Guide ...

Страница 658: ...ansmission File Status C Check the transmission results Transmission results are displayed from the latest result down in groups of nine When a fax is sent Destination shows the Own Fax Number or Fax Header information of the receiver When an Internet Fax is sent the e mail address and name programmed in the destination list appears For a transmission from a computer LAN Fax is shown Depending on ...

Страница 659: ...f a document cannot be sent a Communication Failure Report is automati cally printed Or you can use the Communication Result Report to check each transmission result regardless of status This report is printed each time a Memory Transmission is completed if turned on with User Parameters switch 03 bit 0 in the Facsimile Features menu You can also print the report by programming the TX Status Repor...

Страница 660: ...ender the transmission results are sent to senders e mail addresses that have been registered Select the sender from the Internet Fax destinations in the destination list If you send fax documents from a computer use LAN Fax Driver to specify whether or not the LAN Fax Result Report is sent to the computer Reference p 101 Sender Settings p 107 Setting SEP Codes for Reception p 192 Immediate TX Res...

Страница 661: ...rt of the original image on the report with the User Parameters switch 04 bit 7 in the Facsimile Features menu To view the report without text disruption select a font of even character width in your e mail application s settings You can set whether or not to display a destination with the User Parameters switch 04 bit 4 in the Facsimile Features menu The Pg s column gives the total number of page...

Страница 662: ...ransmissions so you can send them again Note You can select whether the Communication Failure Report is automatically printed using the User Parameters switch 04 bit 1 in the Facsimile Features menu This report is only printed if the Communication Result Report is turned off andadocumentcouldnotbesuccessfullytransmittedwithMemoryTransmission You can select whether to include part of the original i...

Страница 663: ...teps to display the reception result A Press Change TX Info B Press Reception File Status C Check the reception results Reception results are displayed from the latest result in groups of nine When a fax or IP Fax is received Sender shows the Own Fax Number or Fax Header information When an Internet Fax is received the sender s e mail address appears D Press Exit twice The standby display appears ...

Страница 664: ...b Image Monitor s Help If a document is received while you are using this function the result will not appear To view the latest result exit Reception File Status and then try again You can program one of the Quick Operation keys with operations for this function Using the key allows you to omit step A Reference p 276 Maximum Values Facsimile Features General Settings Guide Confirming by Report Pr...

Страница 665: ...u You can display a sender name with the User Parameters switch 04 bit 5 in the Facsimile Features menu Depending on security settings the Journal is not automatically printed If the optional extra G3 interface unit is installed you can set whether the Journal is printed by line type with the User Parameters switch 19 bit 1 in the Facsimile Features menu You can program one of the Quick Operation ...

Страница 666: ...f communications in the order made A Press Change TX Info B Press Print Journal C Select All D Press the Start key To cancel a file printing press Stop Printing The display returns to that of step C E Press Exit twice The standby display appears ...

Страница 667: ...mber A Press Change TX Info B Press Print Journal C Select Print per File No D Enter a 4 digit file number If you make a mistake press Clear or the Clear Stop key and then try again E Press the Start key To cancel a file printing press Stop Printing The display returns to that of step C F Press Exit twice The standby display appears ...

Страница 668: ... Change TX Info B Press Print Journal C Select Print per User D Select a user Press Cancel if the user is not registered The display returns to that of step C E Press OK after checking the user name shown on the display Press Cancel if a wrong user name is selected The display returns to that of step C ...

Страница 669: ...hanging Confirming Communication Information 200 4 F Press the Start key To cancel a file printing press Stop Printing The display returns to that of step C G Press Exit twice The standby display appears ...

Страница 670: ...ate Shows the transmission or reception date 4 Time Shows the transmission or reception start time 5 Other end For fax destinations Shows the name for display pro grammed by the other end Shows the programmed fax number if the name for display was not pro grammed If neither name nor fax number was programmedbytheotherend anentered fax number or a name programmed in a destination list is shown for ...

Страница 671: ... Q indicates outgoing e mail for which a Reception Notice is set in TX Mode whereas an A indicates reception notice e mail For IP Fax transmissions and recep tions After T for outgoing faxes or R for incoming faxes and the com munication mode appear in alphabet ical letters or symbols For forwarding to the folder destina tions After folder mark and T for outgoing faxes the communication mode appea...

Страница 672: ...be transmitted in e mail format the Journal is printed out The name of an attached CSV file is JOURNALnyear month date hours minutes For example the file name transmitted in 14 40 on 20th December 2006 is JOURNAL200612201440 csv The subject of a Journal sent by e mail begins with Journal Reference Facsimile Features General Settings Guide Journal by e mail If the setting is made so that the Journa...

Страница 673: ...et ting in the Facsimile Features menu before using this function Note If you have selected to store received documents and specified an e mail ad dress for notification of receipt fax reception notification can be sent to that e mail address For the maximum number of received documents you can store on the ma chine s hard disk see Maximum Values You can view and print received and stored document...

Страница 674: ... press Print on 2 Sides beforepressingthe Start key D Press the Start key To stop printing after pressing the Start key press Stop Printing The dis play returns to that of step C E Press Exit twice The standby display appears Note This function allows you to print only received and stored documents You cannot print and delete received documents using the Document Server function You can program on...

Страница 675: ...red Reception File C Select a file to be deleted and then press Delete D Press Yes To cancel a deletion press No The display returns to that of step C E Press Exit twice The standby display appears Note You cannot delete a document while another person is previewing or printing it using a Web Image Monitor or DeskTopBinder You can specify and delete multiple documents For the maximum number of doc...

Страница 676: ...nction the following preparations are required in the Fac simile Features menu Program your Memory Lock ID Set Memory Lock Reception to On Important If the main power switch is turned off for about an hour all documents pro tected by Memory Lock Reception are deleted When this happens the Power Failure Report is printed so you can confirm which documents have been de leted For details see Troubles...

Страница 677: ...ck Reception is unavailable and received documents be come stored documents Even when Memory Lock Reception is available if free memory is insuffi cient reception is not possible You can also apply a Memory Lock Reception to documents that come only from certain senders Documents received by SEP Code Reception are automatically printed even if this function is switched on You can program one of th...

Страница 678: ...he document using SUB Code Transmission with that SUB Code When your ma chine has received a confidential document the Confidential File i indicator lights Important If the main power switch is turned off for about an hour all documents received into Personal Boxes are deleted When this happens the Power Failure Report is printed so you can confirm which documents have been deleted For details see...

Страница 679: ...Personal Box Documents Follow these steps to print a document received into a Personal Box A Make sure that the Confidential File indicator is lit B Press Change TX Info C Press Print Personal Box File D Select the box with the document you want to print BFT017S ...

Страница 680: ...To print a document in another Personal Box repeat from step D G Press Exit twice The standby display appears Note If you print a Personal Box document it is deleted The passwords for Personal Boxes can be programmed under Box Set ting in the Facsimile Features menu Reference Facsimile Features General Settings Guide Confidential File Report You can check whether a document was received to a Perso...

Страница 681: ...mportant If the main power switch is turned off for about an hour all documents stored in Information Boxes are deleted When this happens the Power Failure Report is printed so you can confirm which documents have been deleted For details see Troubleshooting When Using the Facsimile Function Troubleshooting For other parties to be able to retrieve a document programmed in an Information Box you ne...

Страница 682: ...rearepre programmedfiles afilemarkappearstotheleftoftheboxname A message is displayed if you select a box with a file stored in it Press Yes when changing the file The stored original file is overwritten D If a password has been set for the box enter the password and then press OK If you make a mistake press Clear or the Clear Stop key before pressing OK and then try again To cancel entering a pas...

Страница 683: ... machine starts to scan the original To stop scanning press Stop The display returns to that of step C To store a document in another Information Box repeat from step C G Press Exit twice The standby display appears Note One Information Box stores one file The stored file is not deleted automatically If you want to delete a stored file see Deleting Information Box Documents Reference p 216 Deletin...

Страница 684: ... Box File C Press Print D Select the box that contains the stored file you want to print You cannot select a box that has no stored file E If a password has been set for the box enter the password and then press OK If you make a mistake press Clear or the Clear Stop key before pressing OK and then try again To cancel entering a password press Cancel The display returns to that of step D ...

Страница 685: ... stop printing after pressing the Start key press Stop Printing The dis play returns to that of step D Repeat from step D to print another stored file in the box G Press Exit twice The standby display appears Deleting Information Box Documents Follow these steps to delete a file stored in an Information Box A Press Change TX Info B Press Store Delete Print Information Box File C Press Delete D Sel...

Страница 686: ...lear or the Clear Stop key before pressing OK and then try again To cancel entering a password press Cancel The display returns to that of step D F Press Yes To stop deleting press No The display returns to that of step D Repeat from step D to delete another stored file in another box G Press Exit twice The standby display appears ...

Страница 687: ...Changing Confirming Communication Information 218 4 ...

Страница 688: ...the Document Server enables the following Once stored a document can be sent out as many times as you want just by selecting it Storing a document does not use facsimile memory You can send and print multiple stored documents as a single document and also send them with scanned originals at the same time Follow the instructions under Select Stored File when sending or printing stored documents Imp...

Страница 689: ...ee Document Server Copy Document Server Reference For the maximum values of the following items see Maximum Values Number of documents you can store in the Document Server using the fac simile function Number of pages per document you can store in the Document Server Number of pages you can store in the Document Server in total copy function facsimile function printer function and scanner function...

Страница 690: ...d correctly in the preview B Press Store File C Select Send Store or Store Only Select Send Store to send documents after they are stored Select Store Only to store documents D Set the user name file name and password as necessary If you are not setting a user name file name or password proceed to step E You cannot change multiple documents at once E Press OK The file name appears to the left of S...

Страница 691: ...ettings Guide Programming a user name A Press User Name B Press the user name to be programmed Press the title key to switch between titles To set a non programmed user name press Manual Entry and then enter the name User names entered by pressing Manual Entry are not programmed into the user code C Press OK Note Depending on the security settings Access Privileges might be displayed instead of Us...

Страница 692: ... Stored File 223 5 Reference Entering Text About This Machine Setting a file name A Press File Name B Enter the file name C Press OK Reference Entering Text About This Machine Setting a password A Press Password ...

Страница 693: ... documents stored in the Document Server can be sent again and again until they are deleted Once sent documents are stored in the Document Server Therefore you can send them in just one operation without having to set your originals again Important Store the documents to be sent in advance You can program a password for this function You can change the user names file names and passwords of stored...

Страница 694: ...he documents in alphabetical order Press User Name to place the documents in order by programmed user name Press Date to place the documents in order of programmed date To view details about stored documents press Details Press the Thumbnails key to switch the screen to thumbnail display C If you select a document with a password enter the password and then press OK If the document does not have a...

Страница 695: ...red documents place the original and then select any scan settings you require The added originals are not stored Note You can send only documents saved with the facsimile function in the Doc ument Server You cannot send documents stored in the Document Server using the copy printer or scanner functions The specified documents are sent with the scan settings made when they were stored To see detai...

Страница 696: ... B Select the file Specifying documents by User Name A Select User Name B Select the user name of the programmed document and then press OK To search by directly entering a user name press Manual Entry and then enter the user name Forward matching is used when searching for a user name C Select the file to be sent ...

Страница 697: ...ter the name of the document to be sent and then press OK Forward matching is used when searching for a file name C Select the file to be sent Displaying a preview A Select the document you want to send Press the Thumbnail key to switch the screen to thumbnail display B Press Preview ...

Страница 698: ...r than A3 they are not displayed on the preview window If the image file is corrupt store it again If you stored originals that had multiple mixed size pages without using the Mixed Original Sizes function the displayed size might differ from the actual size for pages after the first page Printing Stored Documents Use this function to print documents stored in the Document Server Important When Pr...

Страница 699: ...1st Page When Print File is pressed the machine prints all the pages When Print 1st Page is pressed the machine prints only the first page To print both sides press Print 2 Sides When multiple files are specified they are printed per file To cancel printing press Stop Printing E Press the Start key When only the first page is printed the file name is printed at the top of the paper To cancel print...

Страница 700: ...n specify and print multiple documents at one time For the maximum number of stored documents you can print at a time us ing Print 1st Page see Maximum Values For the maximum number of stored pages you can print at a time see Maximum Values Reference p 276 Maximum Values Changing Stored Document Information You can change the file name user name and password of stored documents To change a stored ...

Страница 701: ...a password is set enter the password and then press OK When a selected file does not have a password proceed to step D D Change the desired information of the stored document Press the keys for the items you want to change E Press Exit The standby display appears ...

Страница 702: ...h between titles To set a non programmed user name press Manual Entry and then enter the name User names entered by pressing Manual Entry are not programmed into the user code Note Depending on the security settings Change Access Priv might be dis played instead of Change User Name For details about setting Change Ac cess Priv ask the administrator Reference Entering Text About This Machine ...

Страница 703: ...t 234 5 Changing the file name A Press Change File Name B Press Backspace or Delete All and then re enter the file name C Press OK Reference Entering Text About This Machine Changing the password A Press Change Password ...

Страница 704: ... File 235 5 B Enter a new password using the number keys and then press OK C Enter the password again and then press OK Deleting a Stored Document Use this function to delete stored documents A Press Select Stored File ...

Страница 705: ... the document you want to delete You can also delete multiple documents at once D Enter a password using the number keys and then press OK E Press Delete File F Press Yes If you do not want to delete the document press No G Press Exit The standby display appears ...

Страница 706: ...ables pa perless faxing from your computer to the other destinations In addition to sending faxes the LAN Fax Driver allows this machine to be used for printing out documents prepared on a computer for proof checking To use the LAN Fax Driver connect this machine to a LAN and make the nec essary network settings and then install the LAN Fax Driver and the related utilities on your computer Importa...

Страница 707: ...nnected in parallel See Preparing the Machine Printer Reference When using Ethernet or IEEE 802 11b wireless LAN See Connecting the Machine General Settings Guide Reference Connecting the Machine General Settings Guide System Settings General Settings Guide Preparing the Machine Printer Reference Using the Software This section provides information about LAN Fax Driver Address Book and LAN Fax Cov...

Страница 708: ...ivers and utilities launch automatically as Auto Run programs when you insert the CD ROM LAN Fax Driver Address Book and LAN Fax Cover Sheet Editor can be in stalled by Auto Run Important If the plug and play function starts click Cancel in the Found New Hardware dialog box and then insert the CD ROM Auto Run might not work automatically with certain OS settings If this is the case double click Se...

Страница 709: ...talling the above applications install SmartDeviceMonitor for Client A Quit all applications currently running B Insert the CD ROM included with this machine into the CD ROM drive of your computer The installer launches automatically and the language selection window appears Depending on your operating system settings the installer may not launch automatically If it does not double click Setup exe...

Страница 710: ...r resolution A On the Start menu select Control Panel Then select Printers and Other Hard ware and then Printers and Faxes In Windows 2000 point to Settings on the Start menu and then click Printers In Windows XP Professional or Windows Server 2003 2003 R2 select Printers and Faxes on the Start menu In Windows Vista select Control Panel on the Start menu Then select Hard ware and Sound and then Pr...

Страница 711: ...ings do not match the installed optional units click Load from Device E When this machine is connected locally to your computer select the check boxes for the installed optional units F Click Apply Option configuration settings are complete G Click OK Accessories tab The Accessories tab contains the following items besides option configura tion items Prohibit manual destination entry Check this op...

Страница 712: ...fer depending on the application you are using In all cases select LAN Fax M8 for the printer D Specify the destination You can specify the destination using the following methods Specifying a destination using a destination list Specifying a destination using Address Book Specifying a destination by directly entering a fax number Internet Fax destination or IP Fax destination For details about sp...

Страница 713: ...Fax A Click the Address Book or Specify Destination tab The Address Book or Specify Destination tab appears B Select the Device Address or Use device address check box Device addresses that were registered by selecting the Use device address check box in the Address Book appear in the destination list of the Address Book tab C The address is displayed in the Device Address field on the Address Boo...

Страница 714: ...nation list contents change as follows depending on the option selected Contact Individual name company name department name fax number Group Group name If you selected Group proceed to step E D If you selected Contact in step C select the type of fax from the Type dropdown menu To send by standard fax or IP Fax select Fax To send by Internet Fax select E mail E Click the destination in the destin...

Страница 715: ...nsmission Specify settings according to the type of fax transmission selected in step B as follows If you selected Fax select a line or a protocol in the Line list If you selected E mail select the Do not use SMTP server check box if you want to bypass the SMTP server E Click Set as Destination The entered destination is added and appears in the List of Destination box If you add a destination by ...

Страница 716: ...nt at a specific time A Click Send Options The Send Options tab appears B Select the Sending at specific time check box and then specify a transmission time To print a sender stamp A Click Send Options The Send Options tab appears B Select the Print Fax Header check box To attach a cover sheet A Click Send Options The Send Options tab appears B Select the Attach a Cover Sheet check box A cover she...

Страница 717: ...w window click Cancel Saving as files You can save the fax document in TIFF format TIFF F A Click Send Options The Send Options tab appears B Select the Save as file check box C Click Save to D Select a folder on the folder tree E Select a method of file naming To enter a file name manually select the Specify file name when saving check box To have the file assigned a name and saved automatically ...

Страница 718: ...n about files sent using LAN Fax Driver For the maximum number of transmission results you can check see Maximum Values Also you can save the contents of the Journal in a personal computer as a CSV file using Load Fax Journal in SmartDeviceMonitor for Admin Note When data is transmitted from the LAN Fax Driver via the SmartDevice Monitor for Client port the Data transmission complete message ap pe...

Страница 719: ...dio button and then enter the registration number of the Destination key in the Device Address box The Device Address box is unavailable when the Specify destinations is select ed and you cannot enter anything in the text box D Click Send or Send Print Note You can confirm transmission results using the E mail TX Results function and the Communication Result Report You can set whether to use both ...

Страница 720: ...on Facsimile Features General Settings Guide Printing and Saving You can print documents created using Windows applications Open the application document you want to print or create a new document and then perform the following procedure For details about printing the fax image see the LAN Fax Driver s Help A On the File menu click Print B Select LAN Fax M8 in the list and then click Print The LAN...

Страница 721: ...og box appears If LAN Fax Driver has already started up click Edit Address Book B Click New Browse and then select the CSV file containing the address list to be edited C Enter the destination and name You can enter a contact name company name department name fax number e mail address and IP Fax address The name and destination Fax Number E mail address or IP Fax address cannot be omitted D Click ...

Страница 722: ...k box Editing programmed destinations A On the Start menu point to All Programs LAN Fax Utilities and then click Address Book The Address Book dialog box appears If LAN Fax Driver has already started up click Edit Address Book B Click New Browse and then select the CSV file containing the address list to be edited C Select the destination you want to edit so it is highlighted in the list D Edit th...

Страница 723: ...en you have not made any changes after starting Address Book Using the Machine s Address Book Data in the Destination List of the LAN Fax Address Management Tool in SmartDeviceMonitor for Admin allows you to save the Address Book s information registered on this machine as a CSV file that you can save on a computer Saved CSV files can be used as the LAN Fax Driver des tination table Note When dest...

Страница 724: ... Department name as destination information Person name as destination information Company name as sender information Department name as sender information Person name as sender information Telephone number as sender information Fax number as sender information Date Message A On the Start menu point to All Programs LAN Fax Utilities and then click LAN Fax Cover Sheet Editor The LAN Fax Cover Sheet...

Страница 725: ...ect an other file If you want to change only destination information omit this step and proceed to step E E Select the type of information from To You can select Use Address Book To Whom It May Concern Edit Names or None Selecting Edit Names allows you to enter company department and contact names F To print the date select the With a Date check box G Enter the sender information You can enter com...

Страница 726: ...etwork Guide LAN Fax Operation Messages This section explains typical operation error messages displayed on the comput er when using the LAN Fax Driver and solutions to those messages Message Causes and Solutions The number of entries in Destinations exceed the limits Up to 500 entries can be entered The number of destinations specified exceeds the maximum possible The maximum number of desti nati...

Страница 727: ...network environment as this machine Otherwise the Web browser may not open and an error may occur When entering an IPv4 address do not begin segments with zeros For exam ple If the address is 192 168 001 010 you must enter it as 192 168 1 10 to connect to the machine You need to select Store as the Reception File Setting in the Facsimile Fea tures menu You can also check and manage the documents u...

Страница 728: ... fax documents you can select the thumbnail dis play icon display or detail display Click or F View the content of the fax document To enlarge the preview image click Enlarge Image Enlargement cannot be performed without Acrobat Reader installed For more information see Help on the Web Image Monitor G To download the received fax document click PDF or Multi page TIFF and then click Download When a...

Страница 729: ...th sides of the paper For more informa tion see Help on the Web Image Monitor G Click OK The display returns to that of step E Deleting fax information using a Web browser A Start a Web browser B Enter the machine s IPv4 address in the Address field C Click Fax Received File in the left pane The list of received fax documents appears D Select the check box of the fax document to be deleted To view...

Страница 730: ...ollow these steps to use Web Image Monitor to edit information about the des tination machine registered in the Address Book A Start the Web browser B Enter the IPv4 address of the machine you want to monitor after http in the address field The top screen is displayed C Click Login and then enter the Administrator s name and password D Click Address Book in the left pane The Address Book is displa...

Страница 731: ...e Address Book is displayed E Click Add User The Add User page appears F Enter the registration number name and e mail address then set the nec essary properties You can set the Internet Fax data format after entering the e mail address G Click Full Mode under Internet Fax Data Format and set the properties ac cording to the receiver s properties If you change the mode to Simple Mode you cannot se...

Страница 732: ... folder on the computer Incoming documents with no SUB Code Own Name or Own Fax Number are saved in the delivery server inbox You can also set it so that the received documents are stored in the specified delivery server inbox according to the line used for reception You can check or download received documents stored in the delivery server inbox using DeskTopBinder Note Documents received in Pers...

Страница 733: ...Fax via Computer 264 6 ...

Страница 734: ...and RX Print Standby File s Others shows the total number of documents registered in Information Boxes and received in Person al Boxes See When the Machine Dose Not Operate As Wanted Troubleshooting Note If you set the Reception File Setting in the Facsimile Features menu to Store you can check the number of received documents using RX Print Standby File s Reference p 7 Reading the Display Panel a...

Страница 735: ...Original Settings Select Line SUB SID SEP PWD Code entry Send Later Reception Notice BCC Trans mission E mail TX Results Text Standard Message Auto Reduce Label In sertion Closed Network SUB Code Transmission SEP Code Reception Fax Header Print TX Status Report Store File Program name A Make the settings you want to register in the program The procedure for programming differs depending on the ite...

Страница 736: ...layed To change the program name press Backspace or Delete All and then try again You should register the program name To cancel a program press Cancel The display returns to that of step E Note Use the same procedure to register and change programs In step E select the program number you want to change For the maximum number of Keystroke Programs you can register see Maximum Values For the maximu...

Страница 737: ...elect these functions right after the power is turned on or the Clear Modes key is pressed To set the priority functions register the desired settings to a program Then re call the registered program and then press Program as Defaults on the Program screen The recalled settings are registered as priority functions Important Destinations and SUB SID SEP PWD Code entries cannot be registered as prio...

Страница 738: ...simile mode and the standby display is shown If the standby display is not shown press the Facsimile key B Press the Program key C Press Change Name D Select the program number of the name you want to change E Enter a new program name and then press OK The standby display appears Press Cancel to cancel the change BFT020S ...

Страница 739: ... in facsimile mode and the standby display is shown If the standby display is not shown press the Facsimile key B Press the Program key C Press Delete D Select the program number you want to delete E Press Yes The standby display appears Press No not to delete the program The display returns to that of step D BFT020S ...

Страница 740: ...s the registered program number The standby display appears The programmed fax number appears and the registered settings are recalled E Press the Start key The machine starts to scan the original Then transmission starts with the recalled transmission settings Note Using the program causes the previous settings to be cleared If you have no programmed destinations or scan settings as programs se l...

Страница 741: ...uments at high resolution Super Fine This also allows you to receive fax documents at high resolution Fine or Super Fine If you require this option consult your service representative Reference p 276 Maximum Values Extra G3 Interface Unit This option provides one extra G3 line connection A maximum of two G3 interface units can be installed ...

Страница 742: ...ng a laser Transmission speed G3 33 600 31 200 28 800 26 400 24 000 21 600 19 200 16 800 14 400 12 000 9 600 7 200 4 800 2 400bps auto shift down system Immediate Transmission approx 360 W Memory Transmission approx 320 W Memory Reception approx 320 W Reception approx 800 W Network LAN Local Area Network Ethernet 10base T 100base TX IEEE802 11b wireless LAN Scan line density 8 3 85 lines mm 200 10...

Страница 743: ...line density 200 100 dpi Standard character 200 200 dpi Detail char acter 200 400 dpi Fine character optional 1 400 400 dpi Super Fine character optional 1 Original size Scanning width A3 1 B4 JIS 1 A4 Communication Protocols Transmission SMTP TCP IP Reception POP3 SMTP IMAP4 TCP IP E mail format Single Multi part MIME Conversion Attached file forms TIFF F MH MR 1 MMR 1 compression Authentication ...

Страница 744: ...ications for coding original size and resolution For de tails about the specifications available in full mode see Internet Fax Transmission and Reception in Specifications Reference p 273 Specifications Communication protocols Transmission SMTP Reception POP3 SMTP IMAP4 E mail format Format MIME Base64 Content Type Image tiff Multipart mixed text plain Image tiff attached file forms Data format Pr...

Страница 745: ...f destinations you can search at a time using Search Dest 100 100 Number of recent destinations the machine can store 10 10 Number of digits for a destination 128 128 Number of digits for a SEP SUB PWD SID Code 20 20 Number of characters you can enter in the e mail subject line 128 128 Number of communication results you can check on this machine 200 200 Number of communication results printed in ...

Страница 746: ... can specify at a time in Select Stored File 30 30 Number of stored pages you can send in one op eration in Select Stored File 1 000 1 000 Number of stored documents you can print at a time using Print 1st Page 30 30 Number of stored documents you can print at a time using Print File 30 30 Number of documents you can store in the Doc ument Server using the facsimile function 2 000 2 000 Number of ...

Страница 747: ...re the transmission is started 115 Canceling a transmission of an Internet Fax 112 Canceling a transmission while the original is being scanned 112 Canceling a transmission while the original is being transmitted 113 Caution 4 Center Mark 10 162 Change File Name 234 Change Name 269 Change Password 234 Change Stop Transmission File 118 Change Title 77 Change TX Info 173 183 185 Change User Name 233...

Страница 748: ...received and stored documents 204 206 Delivering files received by fax 263 Density contrast 58 Destination key 76 78 Detail 49 Displaying a preview 228 Displaying confirmation of transmission 26 Document Server 249 Dual Access 22 E Edit Cover Sheet 256 Edit Dest 67 70 Editing Address Book 252 Editing fax cover sheets 255 Editing programmed destinations 253 E mail Address 90 E mail subject 34 E mai...

Страница 749: ...sult Report 251 LDAP server 84 Louder 97 Lower 97 M Making settings for option configuration 242 Manage Delete File 231 235 Managing facsimile functions using SmartDeviceMonitor for Admin 257 Manual Density 58 Manual Dial 99 Manual e mail reception 153 Manual E mail RX 153 Manual Entry 67 70 222 227 Manual Reception 150 Manuals for this machine i Max E mail Size 10 Maximum values 276 MDN 123 Memor...

Страница 750: ... 268 Program Change Delete Gateway 10 Program Change Delete Scan Size 10 Program Change Delete Standard Message 10 Program Closed Network Code 10 Program Dest 79 Program Fax Information 10 Program key 266 Program Memory Lock ID 10 Programming a user name 222 Programming destination information from Web browser 261 Programming destinations in the Address Book 81 Programming new destinations 252 Pro...

Страница 751: ...Reserve Report 110 SEP Code RX Result Report 111 Setting an e mail destination as a BCC 125 Setting LAN Fax Driver properties 241 Setting print properties 241 Setting priority trays 168 Setting the Original Orientation 38 SID Code 107 Simplified display 9 Simplified Display key 9 Simultaneous Broadcast 22 Simultaneous Broadcast using multiple line ports 63 SIP 29 SIP server 29 SIP Settings 10 SMTP...

Страница 752: ...s 15 Transmission SUB Code 104 Transmission with Image Rotation 46 Transmit Failed File 187 Transmit Stored File only 224 Transmitting Journal by e mail 203 Tray Shift 171 TSI Print Transmitting Subscriber Identification Print 167 TSI Transmitting Subscriber Identification 167 Two Sided Printing 163 TX File List 185 TX Mode 121 123 125 126 128 131 Types of reception 145 U User Name 222 User Text 1...

Страница 753: ...284 EN USA B819 7603 ...

Страница 754: ...0 Professional Microsoft Windows 2000 Server Microsoft Windows 2000 Advanced Server The product names of Windows XP are as follows Microsoft Windows XP Professional Microsoft Windows XP Home Edition Microsoft Windows XP Media Center Edition Microsoft Windows XP Tablet PC Edition The product names of Windows Vista are as follows Microsoft Windows Vista Ultimate Microsoft Windows Vista Business Micr...

Страница 755: ...FAX Option Type 7500 Operating Instructions Facsimile Reference EN USA B819 7603 ...

Страница 756: ...d keep it handy for future reference For safe and correct use be sure to read the Safety Information in About This Machine before using the machine Preparing the Machine Setting Up the Printer Driver Other Print Operations Saving and Printing Using the Document Server The Functions and Settings of the Machine Appendix 1 2 3 4 5 6 ...

Страница 757: ...ibited by local law bank notes revenue stamps bonds stock certificates bank drafts checks passports driver s licenses The preceding list is meant as a guide only and is not inclusive We assume no responsibility for its completeness or accuracy If you have any questions concerning the legality of copying or printing cer tain items consult with your legal advisor Notes Some illustrations in this man...

Страница 758: ...and explains how to replace paper toner and other consumables Copy Document Server Reference Explains Copier and Document Server functions and operations Also refer to this manual for explanations on how to place originals Facsimile Reference Explains Facsimile functions and operations Printer Reference Explains Printer functions and operations Scanner Reference Explains Scanner functions and oper...

Страница 759: ...see Setting Up the Machine Security Reference Be sure to read this manual when setting the enhanced security functions or user and administrator authentication PostScript 3 Supplement Explains how to set up and use PostScript 3 UNIX Supplement For UNIX Supplement please visit our Web site or consult an authorized dealer Other manuals Manuals for DeskTopBinder Lite DeskTopBinder Lite Setup Guide De...

Страница 760: ...nnection 22 Installing the Printer Driver 23 Quick Install 23 Installing the Printer Driver for the Selected Port 25 Using as a Windows Network Printer 35 Using as a NetWare Print Server Remote Printer 37 Form Feed 39 Banner Page 39 Printing after Resetting the Printer 39 Installing the Printer Driver Using USB 40 Windows 2000 USB 40 Windows XP Windows Server 2003 2003 R2 USB 41 Windows Vista USB ...

Страница 761: ...nauthorized Copy Control 69 Using Data security for copying 69 Using Mask type 71 Important Notice 72 Using the Print Job Function 73 Selecting the Initial Print Job List 76 Printing from the Print Job Screen 77 Sample Print 77 Locked Print 81 Hold Print 85 Stored Print 88 Printing from the Jobs Per User ID Screen 92 Printing the Selected Print Job 92 Printing All Print Jobs 94 Form Feed 96 Printi...

Страница 762: ...t Server Accessing the Document Server 121 5 The Functions and Settings of the Machine Mainframe 123 Functions 123 Interface 123 List of the Setting Items 124 Web Image Monitor 124 telnet 129 Settings that can be used with PostScript 3 130 6 Appendix Notes to Users of the PostScript 3 Driver 131 Specifications 136 Options 138 INDEX 140 ...

Страница 763: ...vi ...

Страница 764: ...ead these notes They can be found in the Safety Information section of About This Machine Indicates points to pay attention to when using the machine and explanations of likely causes of paper misfeeds damage to originals or loss of data Be sure to read these explanations Indicates supplementary explanations of the machine s functions and instruc tions on resolving user errors This symbol is locat...

Страница 765: ...example cannot be used 1 Operational status or messages Displays current machine status such as Ready Offline and Printing In formation about the print job user ID and document name appears in this sec tion 2 fOnline Offline When you press these keys the machine switches between online and offline When the machine is online it can re ceive data from the computer When the machine is offline it cann...

Страница 766: ...ry default This initial setting can be changed See User Tools System Set tings General Settings Guide Simplified Display This section explains how to switch to the simplified display When you press the Simplified Display key the screen changes from the initial display to the simplified display Letters and keys are displayed at a larger size making operations easier Example of a simplified display ...

Страница 767: ...simile function and scanner function are not displayed in the job list Job List Screen This section explains displays and icons that appear in the Job List screen The Job List screen varies depending on whether Job Order is selected with Print Priority for the System Settings For details about the setting procedure see Print Priority General Settings Guide When Job Order is not selected The job li...

Страница 768: ... jobs Job printed using copy function Job printed using printer function Job printed using Document Server function Job printed using DeskTopBinder Job printed using Web Image Monitor Checking Jobs in the Print Queue You can check the contents of jobs in the print queue A Press Job List B Select the job you want to check C Press Details and then check the contents D Press Exit ...

Страница 769: ...rved A Press Job List B Select the job whose order you want to change C Press Change Order D Change the order using Top Previous or Next E Press OK Holding Print Jobs The machine holds jobs that are queued and currently printing A Press Job List B Select the job s to hold C Press Suspend Printing ...

Страница 770: ...elete C Press Delete Reservation D Press Yes Note To delete multiple print jobs select them in step B Checking Job History You can view the history contents of printed jobs A Press Job List B Press Job History A list of completed print jobs appears C Press Details to check the contents of the displayed jobs D Press Exit ...

Страница 771: ...ou can print the current configuration and installed PostScript font list This menu can be selected only when the optional Post Script 3 unit is installed PDF Configuration Font Page You can print the current configuration and installed PDF font list This menu can be selected only when the optional Post Script 3 unit is installed Hex Dump You can print in the Hex Dump mode Menu Description Menu Pr...

Страница 772: ...of print sets This setting is disabled if the number of pages to print has been spec ified with the printer driver or another command Blank Page Print You can select whether or not to print blank pages Toner Saving Make setting to select either to apply or not to apply Toner Saving Spool Image You can select to print spool images The print job transmitted from the computer is tempo rarily stored o...

Страница 773: ...her port usually arrives in the middle of a print job you should increase this timeout period Menu Description Orientation You can set the page orientation Form Lines You can set the number of lines per page Font Source You can set the storage location of the default font Font Number You can set the ID of the default font you want to use Point Size You can set the point size you want to use for th...

Страница 774: ...pier features and system settings see Copy Reference and General Settings Guide Menu Description Data Format You can select a data format Resolution You can set the print resolution in dots per inch Menu Description Change PDF Password You can set the password for the PDF file executing PDF Direct Print PDF Group Password You can set the group password already specified with DeskTopBinder Lite Res...

Страница 775: ...0 mm 5 5 23 7 in horizontal If 3 000Sheet 100Sheet Staple Finisher is installed paper of the following di mensions can be loaded onto the bypass tray 100 305 mm 3 9 12 in ver tical and 139 7 458 mm 5 5 18 1 in horizontal The following functions are disabled when printing from the bypass tray Duplex Booklet printing Auto Tray Select Auto Tray Switching Rotating Collate Staple when the optional unit...

Страница 776: ...1 Extender 2 Paper Guide C Set the paper size using the printer driver or the control panel The following procedures are not required if you select Driver Command from Bypass Tray Setting Priority in System of Printer Features In that case set the paper size using the printer driver Note When loading OHP transparencies or thick paper set paper size and paper type The number of sheets that can be l...

Страница 777: ...ystem Settings General Settings Guide the settings made using the control panel have priority over the printer driver settings If the printer driver is not used select Machine Settings from Bypass Tray Set ting Priority in System of Printer Features see System Settings General Set tings Guide Set paper size using the control panel A Press the User Tools Counter key on the control panel B Press Sys...

Страница 778: ... is not used select Machine Settings from Bypass Tray Set ting Priority in System of Printer Features see System Settings General Set tings Guide Set paper size using the control panel A Press the User Tools Counter key on the control panel B Press System Settings C Press the Tray Paper Settings tab D Press Printer Bypass Paper Size E Press Custom Size If a custom size is already set press Change ...

Страница 779: ...riority in System of Printer Features see System Settings General Settings Guide the settings made using the control panel have priority over the printer driver settings If the printer driver is not used select Machine Settings from Bypass Tray Set ting Priority in System of Printer Features see System Settings General Set tings Guide Set the paper size using the control panel A Press the User Too...

Страница 780: ... Tools Counter key The initial screen appears Note The settings made will remain valid until they are reset again After print ing on OHP transparencies or thick paper make sure to clear settings for the next user For printer driver settings see the printer driver Help ...

Страница 781: ...18 ...

Страница 782: ...nstallation procedure that is appropriate to the connection method Network Connection This machine can be used as a Windows printing port or network printer Using this machine as the Windows printing port Network connections can be established through Ethernet and IEEE 802 11b Available ports are determined based on the combination of Windows operating system version and connection method used BFE...

Страница 783: ... TCP IP port For the LPR port see p 33 Using the LPR port Connection Method Available Ports Ethernet IEEE 802 11b SmartDeviceMonitor for Client port Standard TCP IP port LPR port Connection Method Available Ports Ethernet IEEE 802 11b SmartDeviceMonitor for Client port Standard TCP IP port LPR port Connection Method Available Ports Ethernet IEEE 802 11b SmartDeviceMonitor for Client port Standard ...

Страница 784: ...emote printer Note In an IPv6 environment Netware servers cannot be used Reference See the explanation about how to install the printer driver for each type of network printer For the Windows network printer see p 35 Using as a Windows Network Printer For the NetWare print server and remote printer see p 37 Using as a Net Ware Print Server Remote Printer BFE002S ...

Страница 785: ...Parallel and Bluetooth connections Windows Vista USB Parallel and Bluetooth connections Windows Server 2003 2003 R2 USB Parallel and Bluetooth connections Reference See the explanation about how to install the printer driver for each method of connection For the USB connection see p 40 Installing the Printer Driver Using USB For the parallel connection see p 43 Printing with Parallel Connection Fo...

Страница 786: ...st have an account that has Manage Printers permission Log on as an Administrator If you connect using USB refer to p 40 Installing the Printer Driver Using USB and install the printer driver A Quit all applications currently running B Insert the CD ROM into the CD ROM drive The installer starts Auto Run may not work with certain operating system settings If this hap pens launch Setup exe on the C...

Страница 787: ...installa tion is complete Auto Run may not work with certain operating system settings If this hap pens launch Setup exe on the CD ROM root directory Select a machine to whose IP address is displayed in Connect To to install SmartDeviceMonitor for Client when using TCP IP Reference Quick Install is not available unless bidirectional communication between the machine and computer is enabled via par...

Страница 788: ...elect an interface language and then click Next The default interface language is English F The message to quit all other applications appears Quit all applications and then click Next G The software license agreement appears in the License Agreement dialog box After reading through its contents click Yes H Click Full install or Custom Install Full install installs all required applications DeskTo...

Страница 789: ...dows XP Windows Server 2003 2003 R2 A Open the Printers and Faxes window from the Start menu The Printers and Faxes window appears B Click the icon of the printer you want to use On the File menu click Prop erties The printer properties appear C Click the Ports tab and then click Configure Port The Port Configuration dialog box appears Windows Vista A Open the Control Panel window from the Start m...

Страница 790: ...Client Help Installing the PCL or RPCS printer driver TCP IP Important To install this printer driver under Windows 2000 XP Professional Vista and Windows Server 2003 2003 R2 you must have an account that has Man age Printers permission Log on as an Administrators or Power Users group member A Quit all applications currently running B Insert the CD ROM into the CD ROM drive The installer starts C ...

Страница 791: ...racter or symbol can be entered P Select the Default Printer check box to configure the printer as default Q Click Continue Installation starts R After the installation is completed select one of the options to restart the computer either now or later and then click Finish Restart the computer to complete installation Note Setting a user code allows a SmartDeviceMonitor for Admin user to dis play ...

Страница 792: ...r driver you want to use in the Select Program dialog box You can select several printer drivers G Select the machine model you want to use The printer name can be changed in the Change settings for Printer Name box H Double click the printer name to display the printer settings The details shown in Comment Driver and Port vary depending on the operating system printer model and port I Click Port ...

Страница 793: ...ion starts T After the installation is completed select one of the options to restart the computer either now or later and then click Finish Restart the computer to complete installation Note To stop installation of the selected software click Cancel before installa tion is complete Auto Run may not work with certain operating system settings In that case launch Setup exe on the CD ROM root direct...

Страница 794: ...nguage and then click OK The default interface language is English D Click PCL RPCS Printer Drivers E The software license agreement appears in the License Agreement dialog box After reading the agreement click I accept the agreement and then click Next F Select a printer driver you want to use in the Select Program dialog box You can select several printer drivers G Click Next H Select the machin...

Страница 795: ...er as necessary R Click Continue The printer driver installation starts S After the installation is completed select one of the options to restart the computer either now or later and then click Finish Restart the computer to complete installation Note To stop installation of the selected software click Cancel before installa tion is complete Auto Run may not work with certain operating system set...

Страница 796: ...greement appears in the License Agreement dialog box After reading the agreement click I accept the agreement and then click Next F Select a printer driver you want to use in the Select Program dialog box You can select several printer drivers G Select the machine model you want to use The printer name can be changed in the Change settings for Printer Name box H Click Next I Double click the print...

Страница 797: ...er to complete installation Note To stop installation of the selected software click Cancel before installa tion is complete Auto Run may not work with certain operating system settings In that case launch Setup exe on the CD ROM root directory A message appears if there is a newer version of the printer driver already installed If there is you cannot install the printer driver using Auto Run If y...

Страница 798: ...t has Man age Printers permission Log on as an Administrators or Power Users group member If you print with a print server connected to the printer using the SmartDe viceMonitor port Recovery Printing and Parallel Printing cannot be used from the client If you print with a Windows XP Vista or Windows Server 2003 2003 R2 print server notification functions of SmartDeviceMonitor may not be used with...

Страница 799: ...code can be set after the printer driver in stallation For information about user code see the printer driver Help P Select the Default Printer check box to configure the printer as default Q Click Continue The printer driver installation starts R After the installation is completed select one of the options to restart the computer either now or later and then click Finish Restart the computer to ...

Страница 800: ...ing on to the NetWare file server The following values are used in the example Operating system Windows 98 NetWare version 4 1 File server name CAREE Queue name R QUEUE A Insert the CD ROM into the CD ROM drive The installer starts Auto Run may not work with certain operating system settings In that case launch Setup exe on the CD ROM root directory B Select an interface language and then click OK...

Страница 801: ...computer either now or later and then click Finish Restart the computer to complete installation Q After restarting the computer launch the Printers window and then open the printer properties Under Windows XP or Windows Server 2003 2003 R2 open the printer properties from the Printers and Faxes window R On the Printer Settings tab clear the Form Feed and Enable Banner check boxes Under Windows 20...

Страница 802: ... not use NetWare to configure a banner page Follow the procedure below to disable banner pages according to the operating system used Under Windows 2000 XP Vista or Windows Server 2003 2003 R2 clear the Enable banner check box on the NetWare Settings tab in the printer prop erties dialog box Printing after Resetting the Printer Printer to print server connection requires 30 40 seconds to resume af...

Страница 803: ...nstructions of the printer to install it from the supplied CD ROM A Connect the machine to the computer using the USB cable Connect the USB cable firmly B In the Found New Hardware Wizard display click Search for a suitable driver for my device recommended and then click Next C Select the Specify location check box and then click Next D Insert the CD ROM into the CD ROM drive When Auto Run starts ...

Страница 804: ...ter driver is not installed follow the plug and play instructions of the printer to install it from the supplied CD ROM A Connect the machine to the computer using the USB cable Connect the USB cable firmly B In the Found New Hardware Wizard display click Install the software auto matically Recommended and then click Next C Insert the CD ROM into the CD ROM drive If Auto Run starts click Cancel an...

Страница 805: ...er s plug and play instructions to install it from the provided CD ROM A Connect the machine to the computer using a USB cable Connect the USB cable firmly The Found New Hardware dialog box appears B Click Locate and install driver software Recommended If the User Account Control dialog box appears click Continue C Click Don t search online A message prompting you to insert the provided CD ROM app...

Страница 806: ... the CD ROM drive The installer starts C Select an interface language and then click OK The default interface language is English D Click PCL RPCS Printer Drivers E The software license agreement appears in the License Agreement dialog box After reading the agreement click I accept the agreement and then click Next F Select the printer driver you want to use in the Select Program dialog box You ca...

Страница 807: ...llation Note To stop installation of the selected software click Cancel before installa tion is complete Auto Run may not work with certain operating system settings In that case launch Setup exe on the CD ROM root directory A message appears if there is a newer version of the printer driver already installed If there is you cannot install the printer driver using Auto Run If you still want to ins...

Страница 808: ...ection is se lected When selecting the connection between the other devices cancel the first established connection SPP connection does not support bidirectional communications HCRP connection supports bidirectional communications BIP For BIP connection a module including PostScript 3 must be installed in the machine Only one Bluetooth adaptor or Bluetooth equipped computer can be con nected via B...

Страница 809: ...rs The Printers window appears G Click the icon of the printer you want to use H On the File menu click Properties I Click the Ports tab J Under Port select the COMx check box X indicates the COM port num ber used by Bluetooth K Click OK Close the Printers window Note To always use the same printer select the Always use for this connection check box System requirements vary depending on the Blueto...

Страница 810: ...x Reference For details about the security mode see 3Com Bluetooth Connection Man ager Help For details about the password entry which is required to trans mit print jobs see p 47 Printing in the Security Mode Printing in the Security Mode This describes how to print in the security mode A Send the print job to the printer in use Depending on the computer configuration the Connect dialog box may a...

Страница 811: ...port bidirectional communication the following conditions must be met When connected with parallel cables The computer must support bidirectional communication The machine must support bidirectional communication The interface cable must support bidirectional communication The machine must be connected to the computer using the standard paral lel cables and parallel connectors Under Windows 2000 X...

Страница 812: ...oup member A On the Start menu point to Settings and then click Printers The Printers window appears When using Windows XP or Windows Server 2003 2003 R2 point to Set tings on the Start menu and then click Printers and Faxes The Printers and Faxes window appears B Click the icon of the printer you want to use C On the File menu click Properties D Click the Change Accessories tab If options in the ...

Страница 813: ...ll ing applications by Auto Run requires administrator privilege To install a printer driver by Auto Run log on using an account that has administrator privilege A Quit all applications currently running B Insert the CD ROM into the CD ROM drive The installer starts C Click Font Manager D Follow the instructions on the screen ...

Страница 814: ...RC PPD4 For PageMaker 6 5 default installation The directory is C PM65 RSRC USENGLISH PPD4 The USENGLISH may vary depending on your language selection For PageMaker 7 0 default installation The directory is C PM7 RSRC USENGLISH PPD4 The USENGLISH may vary depending on your language selection Note If the driver is not set correctly after copying the ppd file printing may not be performed properly W...

Страница 815: ...Preparing the Machine 52 1 ...

Страница 816: ...oups have Manage Printers permission by default You cannot change the printer default settings for each user Settings made in the printer properties dialog box are applied to all users A On the Start menu point to Settings and then click Printers The Printers window appears B Click the icon of the printer you want to use C On the File menu click Properties The printer properties dialog box appears...

Страница 817: ...ngs for a specific application To make printer settings for a specific application open the Printing Preferences dialog box from that application The following explains how to make settings for the WordPad application provided with Windows 2000 A On the File menu click Print The Print dialog box appears B Select the printer you want to use in the Select Printer list C Make the necessary settings a...

Страница 818: ...rinter you want to use C On the File menu click Properties The printer properties dialog box appears D Make the necessary settings and then click OK Note Settings you make here are used as the default settings for all applications For details see the printer driver Help Making printer default settings printing preferences Important You cannot change the printer default settings for each user Setti...

Страница 819: ...t the printer you want to use in the Select Printer list and then click Preferences C Make the necessary settings and then click OK to start printing Note The procedure to open the Printing Preferences dialog box may vary de pending on the application For details see the manuals provided with the application you use Any settings you make in the following procedure are valid for the current applica...

Страница 820: ...use and then click Properties The Printer Properties dialog box appears D Make the necessary settings and then click OK Note The settings you make here are used as the default settings for all applications For details see the printer driver Help Making printer default settings printing preferences Important You cannot change the printer default settings for each user Settings made in the Printing ...

Страница 821: ...rint dialog box appears B In the Select Printer list select the printer you want to use C Click Preferences The Printing Preferences dialog box appears D Make the necessary settings and then click OK Note Procedures for opening the PrintingPreferences dialog box vary depending on the application For details see the manuals provided with the application Any settings you make using this procedure ap...

Страница 822: ...ncluding option configuration settings log on using an account that has Manage Printers permission Members of the Administrators and Power Users groups have Manage Printers permission by default You cannot change the printer default settings for each user Settings made in the printer properties dialog box are applied to all users A On the Start menu point to Settings and then click Printers The Pr...

Страница 823: ...ngs for a specific application To make printer settings for a specific application open the Printing Preferences dialog box from that application The following explains how to make settings for the WordPad application provided with Windows 2000 A On the File menu click Print The Print dialog box appears B Select the printer you want to use in the Select Printer list C Make the necessary settings a...

Страница 824: ...gs for each user Settings made in the printer properties dialog box are applied to all users A On the Start menu click Printers and Faxes The Printers and Faxes window appears B Click the icon of the printer you want to use C On the File menu click Properties The printer properties dialog box appears When you open the printer properties dialog box initially after installing the RPCS printer driver...

Страница 825: ... for a specific application To make printer settings for a specific application open the Printing Preferences dialog box from that application The following explains how to make settings for the WordPad application provided with Windows XP A On the File menu click Print The Print dialog box appears B Select the printer you want to use in the Select Printer list C Make the necessary settings and th...

Страница 826: ...nter Properties dialog box appears When you open the Printer Properties dialog box for the first time after install ing the RPCS printer driver a confirmation message appears After you click OK the Printer Properties dialog box appears D Make the necessary settings and then click OK Note The settings you make here are used as the default settings for all applications For details see the printer dr...

Страница 827: ... for a specific application A On the File menu click Print The Print dialog box appears B In the Select Printer list select the printer you want to use C Click Preferences The Printing Preferences dialog box appears D Make the necessary settings and then click OK Note Procedures for opening the PrintingPreferences dialog box vary depending on the application For details see the manuals provided wi...

Страница 828: ...hen printing on custom size paper Printing Method The following procedures explain the two methods of direct PDF printing us ing DeskTopBinder Lite or by entering commands Using DeskTopBinder Lite Installing DeskTopBinder Lite Follow the procedure below to install DeskTopBinder Lite A Quit all applications currently running B Insert the CD ROM into the CD ROM drive The installer starts Auto Run ma...

Страница 829: ...scanners for doc uments without having to open DeskTopBinder Lite You can also use these functions simply by dragging a target file to the button corresponding to the re quired function and dropping it there A On the Start menu click Programs DeskTopBinder and Function Palette An icon for the Function palette is added to the task bar displayed at the bot tom right of the screen B Right click the i...

Страница 830: ...nt to the PDF Direct Printing icon on the palette using a drag and drop operation F Output File List PDF Direct Print is displayed Select the PDF file you want to output to make it reverse video and then click OK G The PDF Direct Print Properties screen opens Enter the password for the PDF file you want to print in the PDF Password field at the bottom right of the screen and then click OK The pass...

Страница 831: ...rinting mode if this check box is selected 9 Orientation Specifies the original s orientation 10 Number of copies Specifies the number of copies to print 11 Collate Sorts printed sheets 12 Range Specifies the print area on each page 13 Resolution Specifies a print resolution 14 PDF password If the PDF file is password protected en ter the password in this field Otherwise the file cannot be printed...

Страница 832: ...nter driver open the Printing Preference window B Click Add Change Custom Settings C Select the Unauthorized copy check box D Click Control Settings The Unauthorized Copy Control window appears Note For details see the printer driver Help Using Data security for copying You can embed a pattern by setting it in the printer driver Setting Data security for copying in the printer driver Select the Da...

Страница 833: ...ne does not require the optional Copy Data Security unit to be installed The Copy Data Security unit is required when copying or storing a document protected by gray overprint Only the RPCS printer driver is supported You cannot partially embed a pattern and text in a document Use 182 257 mm 71 4 101 2 in or larger paper Use ordinary or recycled paper of at least 70 whiteness Duplex printing may i...

Страница 834: ...n copiers multifunction machines 3 The pattern and text you have set appear clearly Note Only the RPCS printer driver is supported You cannot partially embed patterns and text strings in a document To make the embedded pattern clear set the character size at least 50 pt pref erably 70 to 80 pt and character angle to between 30 and 40 degrees Due to the effects of the settings the results of copyin...

Страница 835: ...otection features The appearance of the print pat terns and the performance of Unauthorized Copy Control may vary depend ing on the quality of paper used and the machine model and settings The supplier takes no responsibility for any damages sustained in connection with use of or inability to make use of Unauthorized Copy Control print patterns ...

Страница 836: ...are deleted after printing is completed If you select Stored Print the files remain in the machine even after printing is finished If you press Print Jobs on the Printer screen the Complete List or the List Per User ID screen appears depending on which list type you select from Initial Print Job List Complete List If you select Complete List from Initial Print Job List the following screen appears...

Страница 837: ...es the password of a file if a password is set To change the password press Change enter the current password and then enter the new password on the confirmation screen To delete the password press Change leave the entering confirming a new password box blank and then press the OK key You can also set passwords to the Stored Print files that do not currently have passwords L Clear All Clears all s...

Страница 838: ... Multiple files can be selected on the Print Jobs screen To clear selection press the selected print jobs again The display is not updated if a new file is stored while the list of stored files is displayed To update the display press Exit to return to the Printer screen and then press Print Jobs again If a large number of print jobs are stored in the machine processing may slow temporarily depend...

Страница 839: ...t A Press the User Tools Counter key B Press Printer Features The Printer Features menu appears C On the System tab press Initial Print Job List D Select either Complete List or List Per User ID After configuring the settings the selected type of print job list is displayed Displaying a Print Job List A Press Print Jobs Either the Complete List or List Per User ID screen appears ...

Страница 840: ...perly check the error log on the display panel Even after you turn off the machine stored documents in the machine re main However the Auto Delete Temporary Print Jobs or Auto Delete Stored Print Jobs settings are applied first If the application has a collate option make sure it is not selected before send ing a print job By default Sample Print jobs are automatically collated by the printer driv...

Страница 841: ...X v10 2 or higher to use this function A Configure Sample Print in the printer driver s properties For details about configuring the printer drivers see the relevant Help files B Start printing from the application s Print dialog box Make sure to set more than two copies The Sample Print job is sent to the machine and the first set is printed C On the machine s control panel press the Printer key ...

Страница 842: ... not specify the number of sets on the confirmation screen one set less than the number specified on the com puter is printed for every selected document If the number of sets speci fied on the computer is 1 one set each is printed for every document When the number of set quantity is changed the changed quantity is ap plied to all selected files When printing is completed the stored file will be ...

Страница 843: ...een B Press Print Jobs A list of the print files stored in the machine appears C Press Sample Print Job List A list of Sample Print files stored in the machine appears Depending on the security settings certain print jobs may not be displayed D Select the file you want to delete and then press Delete The delete confirmation screen will appear E Press Yes to delete the file The selected file is del...

Страница 844: ...t or stored files in the machine contain over 10 000 pages in total Note If a Locked Print file has not been stored properly check the error log on the display panel Even after you turn off the machine stored documents remain However the Auto Delete Temporary Print Jobs or Auto Delete Stored Print Jobs settings are applied first If the application has a collate option make sure it is not selected ...

Страница 845: ...ing Mac OS X you need Mac OS X v10 2 or higher to use this function A Configure the Locked Print in the printer driver s properties For details about configuring the printer drivers see the corresponding Help files B Start printing from the application s Print dialog box The Locked Print job is sent to the machine C On the machine s control panel press the Printer key to display the Printer screen...

Страница 846: ...assword again If multiple print files are selected the machine prints files that correspond to the entered password The number of files to be printed is displayed on the confirmation screen If you forgot your password ask your network administrator for help H Press Yes The locked file is printed Press No to cancel printing Note When printing is completed the stored file will be deleted To stop pri...

Страница 847: ...displayed E Enter the password using the number keys and then press OK The delete confirmation screen appears A confirmation screen will appear if the password is not entered correctly Press Exit to enter the password again If you forgot your password ask your network administrator for help F Press Yes The selected file is deleted If you do not want to delete the file press No Note If multiple pri...

Страница 848: ...efore send ing a print job By default Hold Print jobs are automatically collated by the printer driver If a collate option is selected from the application s Print dialog box more prints than intended may be produced For details about the Auto Delete Temporary Print Jobs and Auto Delete Stored Print Jobs see System Settings General Settings Guide Reference For details about the error log on the di...

Страница 849: ... to the machine and stored D On the machine s control panel press the Printer key to display the print er screen E Press Print Jobs F Press Hold Print Job List A list of a print files stored in the machine appears Depending on the security settings certain print jobs may not be displayed G Select the file you want to print and press Print The confirmation screen appears ...

Страница 850: ...lete a Hold Print file from Web Image Monitor For de tails see Web Image Monitor Help Deleting Hold Print files A Press the Printer key to display the Printer screen B Press Print Jobs A list of print files stored in the machine appears C Press Hold Print Job List A list of a Hold Print files stored in the machine appears Depending on the security settings certain print jobs may not be displayed D...

Страница 851: ...f the application has a collate option make sure it is not selected before send ing a print job By default Stored Print jobs are automatically collated by the printer driver If a collate option is selected from the application s Print dialog box more prints than intended may be produced For details about the Auto Delete Temporary Print Jobs and Auto Delete Stored Print Jobs see System Settings Gen...

Страница 852: ...ails about configuring the printer drivers see the relevant Help files B Click Details and then enter a User ID in the User ID box You can also set a password The same password must be entered when print ing or deleting C Start printing from the application s Print dialog box The Stored Print job is sent to the machine and stored D On the machine s control panel press the Printer key to display th...

Страница 853: ...the machine prints files that correspond to the entered password and files that do not require a password The number of files to be printed is displayed on the confirmation screen If you forgot your password ask your network administrator for help H Enter the number of sets using the number keys You can enter up to 999 sets Press the Clear Stop key to correct any entry mistakes I Press Yes The Sto...

Страница 854: ... de tails see Web Image Monitor Help Deleting Stored Print files A Press the Printer key to display the Printer screen B Press Print Jobs A list of print files stored in the machine appears C Press Stored Print Job List A list of Stored Print files stored in the machine appears Depending on the security settings certain print jobs may not be displayed D Select the file you want to delete and press...

Страница 855: ...e Selected Print Job A Press the Printer key The Printer screen appears B On the Printer screen press Print Jobs A list of user IDs whose files are stored in the machine appears C Press the user ID whose file you want to print You cannot select multiple user IDs at the same time Press UPrevious or TNext to scroll through the list Press Clear to cancel a selection ...

Страница 856: ... The print job list of the selected user ID appears E Select the desired print jobs To cancel a selection press the highlighted print job again To clear all selec tions press Clear All F Press Print The confirmation screen appears G Press Yes The selected files are printed ...

Страница 857: ...whose files are stored in the machine appears C Press the user ID whose file you want to print You cannot select multiple user IDs at the same time Press UPrevious or TNext to scroll through the list Press Clear to cancel a selection D Press Print All Jobs If the selected user ID has multiple types of print jobs the selection screen of the print job type appears ...

Страница 858: ...ion screen one set less than the number specified on the computer is printed for every selected document If the number of sets spec ified on the computer is 1 one set each is printed for every document If you select Stored Print the number you set on the confirmation screen is applied to all files of the selected print job type If you do not set a quantity the minimum number is applied to all file...

Страница 859: ...ray that does not support duplex printing If Auto Continue is selected form fed paper is printed after a set interval See System General Settings Guide Printing from a Selected Tray If the machine does not have a tray for the selected paper size or paper type or if the selected paper loaded in the machine has run out a caution message ap pears If this message appears do the following procedure A P...

Страница 860: ... shared by multiple computers be careful not to acciden tally cancel someone else s print job Under Windows if the machine is connected to the computer using a par allel cable sent print jobs may be canceled if Reset All Jobs is pressed while Waiting is on the display panel After the interval set in I O Tim eout in Printer Features has passed the next print job can be sent A print job sent from a ...

Страница 861: ...anel A Press the Printer key The Printer screen appears B Press Job Reset C Press Reset the Job or Reset All Jobs Reset the Job cancels the print job currently being processed Reset All Jobs cancels all jobs in the print queue Resume Printing resumes printing print jobs A confirmation message appears D Press Yes to cancel the print job Press No to return to the previous display ...

Страница 862: ...uter using a parallel cable sent print jobs may be canceled if Reset All Jobs is pressed while Waiting is on the display panel After the interval set in I O Timeout in Printer Fea tures has passed the next print job can be sent A print job sent from a dif ferent client computer will not be canceled in this case Under Windows XP Vista or Windows Server 2003 2003 R2 click Can cel on the Document men...

Страница 863: ...e Print Locked Print Hold Print Stored Print If the main power switch is turned off the error log is deleted A Press the Printer key The Printer screen appears B Press Error Log An error log list appears Depending on the security settings certain errors may not be displayed C Press the desired job list You can select job list from Complete List Locked Print Job List Sample Print Job List Hold Prin...

Страница 864: ...Using Web Image Monitor See Network Guide or Help for more information Using telnet Type in spoolsw spool on to set Spool Printing See Network Guide for more information about telnet Viewing a list of spool jobs on the display panel If Spool Printing is set a list of spooled jobs can be viewed on the display panel screen Press the Printer key and then press Spooling Job List A list of spooled jobs...

Страница 865: ... tray Important This function is available with the PCL 6 5e printer driver only If Document Server is selected under Job Type User Defined Page cannot be used If User Defined Pages is selected under Paper Selection on Paper tab Lay out cannot be selected Note For printing methods see the printer driver Help AEV044S ...

Страница 866: ...y or Copy Tray is installed Note Depending on the application print settings may not be enabled and printed output may not be as expected When setting Staple or Collate in the printer driver make sure that the Collate check box is cleared in the application s Print dialog box If Collate is enabled in the application printing will not be as intended When printing restarts after removing jammed pape...

Страница 867: ...g on paper size type quantity and feed orientation The following table shows staple positions Note Stapling might not be in the specified position if combine layout and duplex printing are both selected After setting the staple position use the printer driver s preview icon to check the position before printing For paper sizes and maximum numbers of sheets available for stapling see Specifications...

Страница 868: ...Collate is selected with the optional 3 000Sheet 50Sheet Sta ple Finisher 3 000Sheet 100Sheet Staple Finisher and Booklet Finisher in stalled the paper will be output to the finisher shift tray irrespective of the setting When printing on letterhead stapling may not be at the specified position If you cannot make staple settings even with 3 000Sheet 50Sheet Staple Fin isher 3 000Sheet 100Sheet Sta...

Страница 869: ...h position The specified punch position varies depending on paper feed and print data ori entation The following table shows punch positions Note Punch positions will vary slightly from page to page as holes are punched into each sheet individually For information about paper sizes that can be punched see Specifications General Settings Guide For printing methods see the printer driver Help ANV101...

Страница 870: ...en the staple position and the punch po sition when using with staple function Note When the punching is cancelled BE Punch has been cancelled appears Punching might not be in the specified position when printing on letterhead paper If you cannot make punch settings even with the optional finisher installed options may not be set correctly in the printer driver Correct option settings in the print...

Страница 871: ... the printer driver settings make sure that a collate option is not selected in the application s print settings If a collate option is selected printing will not be as intended Note Set Collate and Rotating collate when using the RPCS printer driver Follow the procedure below when using the printer driver other than the RPCS Set Collate and Rotating Collate in the printer driver If you cannot mak...

Страница 872: ...en combined with staple function When combined with punch function When combined with z fold function If jobs containing pages of various sizes are set When output tray is specified When combined with covers function When combined with slip sheet function When combined with chaptering function When combined with tab sheet function If custom size paper is set Note When Rotating Collate has been sel...

Страница 873: ...be set The cover sheets should be the same size and orientation as the body of the paper Cover sheet Prints the first page of the document on the sheet for the cover page Print on one side Printsononesideofthecoversheetonly even whenduplexprintingisselected Print on both sides Prints on both sides of the cover sheet when duplex printing is selected Front cover printed on both sides Front cover pri...

Страница 874: ...des Back cover Prints the last page of the document as the back cover pages Print on one side Prints on one side of the cover sheets only even when duplex printing is selected Back cover page face inside Back cover page face outside AEV018S AEV033S AMT202S AMT207S ...

Страница 875: ...uplex printing is selected Back cover page face inside and the number of pages is odd Back cover page face outside and the number of pages is odd Back cover page face inside and the number of pages is even Back cover page face outside and the number of pages is even AMT203S AMT204S AMT205S AMT206S ...

Страница 876: ...et as the paper feed tray for the body paper the paper will be delivered from a tray containing paper in the K orientation There fore if the cover paper is set to the L orientation the orientation of cover and body will be different For printing methods see the printer driver Help AEV040S AEV041S ...

Страница 877: ...hether or not to print on the slip sheets No slip sheets The specified page is always printed on the same side as the first page Note This function is only valid with duplex printing Up to 100 pages can be specified as the front pages of chapters using the print er driver This function can be used together with combine layout printing For printing methods see the printer driver Help AJO025S ...

Страница 878: ...e slip sheet should be the same size and orientation as the body of the paper If Auto Tray Select has been set as the paper feed tray for the body paper the paper will be delivered from a tray containing paper in the K orientation Therefore when the cover paper has been set to the L orientation the orien tation of the output cover paper and body paper will be different The same paper feed tray can...

Страница 879: ...Other Print Operations 116 3 Slip Sheet Inserting a slip sheet between each page Print Blank Inserting a slip sheet between OHP transparencies Print Blank AEV019S AEU023S AEV020S AEU024S ...

Страница 880: ... orientation as the main paper If Auto Tray Select has been set as the paper feed tray for the body paper the paper will be delivered from a tray containing paper in K orientation Therefore when the cover paper has been set to L orientation the orienta tion of the output cover paper and body paper will be different The same paper feed tray cannot be set for the main paper and slip sheets ...

Страница 881: ...be printed on Note Make sure to check the position of the tab beforehand so that images to be printed do not come out slanted If there are any letters in a position where the tab is not present toner may dirty the back of the paper If there are any inconsistencies between the position of the tab the staple and the punch hole the tab position will be prioritized For information about tab sheets siz...

Страница 882: ...ect the folding positions for the front page using the printer driver The relationship between the size of the front page and that of subsequent pages determines whether the subsequent pages can be Z folded 1 Select the folding position according to the print direction 2 If the size of the paper is the same as that of the front page the paper can be Z folded only if the front page can be Z folded ...

Страница 883: ...When the paper is fed from the optional interposer tray The rotating collate and auto tray switching cannot be used when Z folding When using Booklet Finisher Note You can Z fold with A3 A4 B4 11 17 8 1 2 11 and 8 1 2 14 paper Z folded paper can be stapled When stapling Z folded paper fewer sheets than normal can be stapled to gether This is because a single Z folded sheet is equivalent to 10 non ...

Страница 884: ...nd File Name to distinguish the job from others Up to 3 000 files can be stored in the Document Server No new files can be stored after 3 000 is reached Even if less than 3 000 files are stored new files cannot be stored when a file to be stored contains more than 2 000 pages the total number of pages contained in files stored exceeds 10 000 the hard disk is full The Document Server also stores fi...

Страница 885: ...Saving and Printing Using the Document Server 122 4 ...

Страница 886: ...e The machine must be equipped with the Printer Scanner Unit in order to use the printer or scanner function Interface The following interfaces are available with the machine Ethernet 100BASE TX 10BASE T USB 2 0 IEEE 1284 Parallel Optional IEEE 802 11b Wireless LAN Optional Bluetooth Optional Gigabit Ethernet 1000BASE T Optional Note To use the IEEE 1284 IEEE 802 11b wireless LAN Bluetooth or Ethe...

Страница 887: ...ministrator Home Status Configuration Counter Inquiry Menu User mode Administrator mode Toner Read Read Input Tray Read Read Output Tray Read Read Menu User mode Administrator mode Function Read Read System Read Read Version Read Read Printer Language Read Read Menu User mode Administrator mode Copier Read Read Printer Read Read Fax Read Read Send TX Total Read Read Fax Transmission Read Read Scan...

Страница 888: ...Administrator mode Read Modify None User mode Administrator mode Read Modify Read Modify Menu User mode Administrator mode Current Waiting Jobs Read Read Job History Read Read Menu User mode Administrator mode Job History Read Read Error Log Read Read Menu User mode Administrator mode Transmission Read Read Reception Read Read LAN Fax Read Read Menu User mode Administrator mode Print Job History R...

Страница 889: ... Modify Auto E mail Notification None Read Modify On demand E mail Notifi cation None Read Modify File Transfer None Read Modify User Authentication Man agement None Read Modify Administrator Authentica tion Management None Read Modify Program Change Adminis trator None Read Modify LDAP Server None Read Modify Menu User mode Administrator mode Basic Settings Read Read Modify Tray Parameters PCL No...

Страница 890: ...ngs Read Read Modify Menu User mode Administrator mode IPv4 Read Read Modify IPv6 Read Read Modify NetWare Read Read Modify AppleTalk Read Read Modify SMB Read Read Modify SNMP None Read Modify SNMPv3 None Read Modify SSDP None Read Modify Bonjour Read Read Modify System Log Read Read Menu User mode Administrator mode Network Security None Read Modify Access Control None Read Modify IPP Authentica...

Страница 891: ... RC Gate Firmware None Read Modify RC Gate Proxy Server None Read Modify Menu User mode Administrator mode Webpage Read Modify Read Modify Menu User mode Administrator mode Startup Setting None Read Modify Extended Feature Info None Read Install None Read Modify Uninstall None Read Modify Change Allocation None Read Administrator Tools None Read Modify Copy Extended Features None Read Modify Copy ...

Страница 892: ...ith the machine access appletalk authfree autonet bonjour rendezvous btconfig device name dhcp diprint dns domainname help hostname ifconfig info ipp ipv6 lpr netware passwd prnlog route set show slp smb snmp sntp spoolsw sprint ssdp ssh status syslog upnp web wiconfig wins ...

Страница 893: ...than 300 ppi Input Tray AutoSelect Tray Bypass Tray Tray 1 LCT Tray 2 Tray 3 Large Capacity Tray Output Tray Printer Default Copy Tray Finisher SR970 4000 Upper Tray Finisher SR970 4000 Shift Tray Finisher SR4000 Booklet Tray Finisher SR841 Upper Tray Finisher SR841 Shift Tray Booklet Processor Tray Mailbox Tray 1 9 Resolution 600 dpi 1200 dpi Size See General Setting Guide Staple Off Top Left Top...

Страница 894: ...is performed with the size of document to be printed unchanged Nearest Size and Scale If the paper size is smaller than the selected paper size the driver reduces the print size If the paper size is larger than the size of document to be printed print is not to fit the paper size Nearest Size and Crop When the paper size is smaller than the size of document to be printed print is adjusted to meet ...

Страница 895: ...ust be installed on the machine The following table shows the tabs or menus where you can select this function Off Disables Duplex Printing Long Edge Prints output so that you can open it to the long edge when bound along the long edge Short Edge Prints output so that you can open it to the short edge when bound along the short edge Windows 2000 XP Vista Windows Server 2003 2003 R2 Orientation Ove...

Страница 896: ...estination tray supported by this machine see Gen eral Setting Guide Staple Use this function to staple sheets of printed paper together The following table shows where you can select this function Note The stapling location might differ depending on the orientation of the ma chine set in the printer and the orientation of the data to be printed Windows 2000 XP Vista Windows Server 2003 2003 R2 Se...

Страница 897: ...e Windows 2000 XP Vista Windows Server 2003 2003 R2 Punch on Print Job on the Finishing tab in the Print ing Preference dialog box Windows 2000 XP Vista Windows Server 2003 2003 R2 Z fold on Print Job on the Finishing tab in the Print ing Preference dialog box Windows 2000 XP Vista Windows Server 2003 2003 R2 Watermark on the Advanced tab in the Printing Pref erences dialog box Windows 2000 XP Vis...

Страница 898: ... Disables image smoothing On Performs image smoothing unconditionally Auto Performs image smoothing automatically for images that have a resolution less than 25 of supported printer resolution Less than 90 ppi Less than 300 ppi Performs image smoothing only when the image has an image resolution pixels per inch less than the respective value you have selected in the list Note When Auto is selected...

Страница 899: ... Guide Interface Standard Ethernet interface 100BASE TX 10BASE T USB 2 0 interface Option IEEE 1284 parallel interface Use a standard 36 pin printer cable not longer than 3 meters 10 feet IEEE 802 11b wireless LAN interface Bluetooth interface USB Host interface Ethernet interface 1000BASE T Network protocol IPv4 IPv6 IPX SPX AppleTalk Printer language Standard PCL 6 5e RPCS Option PostScript 3 PD...

Страница 900: ...dard with Mac OS 10 3 3 USB2 0 is sup ported Network cable 100BASE TX 10BASE T shielded twisted pair STP Catego ry Type5 cable USB Interface Standard Supported Operating System Windows 2000 XP Vista Windows Server 2003 2003 R2 MacOS 10 3 3 or later Transmission spec USB 2 0 Standard Connectable Device Devices corresponding to USB 2 0 Standard Component Specifications ...

Страница 901: ...rface Unit Type H Transmission spec Based on IEEE 802 11b wireless LAN Protocol TCP IP IPX SPX AppleTalk Note SmartDeviceMonitor and Web Image Monitor are supported Data transfer speed Auto select from below speed 1 Mbps 2 Mbps 5 5 Mbps 11 Mbps Frequency range Inch version 2412 2462 MHz 1 11 channels Metric version 2412 2472 MHz 1 13 channels Transmittable distance 1 Mbps 400 m 2 Mbps 270 m 5 5 Mb...

Страница 902: ...dio signal condition and Bluetooth adaptor Maximum Range 10 m USB Host Type A Interface Connector USB 1 1 host interface A type Data Transmission Speed 12 Mbps Full speed Distance Between Devices 2 5 m Gigabit Ethernet Type 7300 Interface Connector Ethernet 10BASE T 100BASE TX 1000BASE T USB 2 0 It requires a USB computer port and cable that support USB 2 0 Data Transmission Speed Ethernet 1000 Mb...

Страница 903: ...rver 121 E Error log 100 F Finisher 103 Font Manager 50 Fonts 136 Form feed 39 96 Functions 123 G Gigabit ethernet 139 H Hard disk 136 Holding print jobs 6 Hold print 85 Hold print deleting 87 Hold print printing 85 How to read this manual 1 I IEEE 1284 interface board 138 IEEE 802 11b interface unit 138 Initial display 2 Inserting chapter slip sheets 115 Installing the printer driver 23 Interface...

Страница 904: ...roperties 59 RPCS printer driver TCP IP 27 S Sample print 77 Sample print deleting 80 Sample print printing 78 Selecting the initial print job list 76 Setting custom size paper Bypass tray 15 Setting the paper size Bypass tray 14 Shift collate 109 Simplified display 3 Slip sheet 116 SmartDeviceMonitor for Client port 25 Specifications 136 Spool printing 101 Standard TCP IP port 31 Staple 104 Store...

Страница 905: ...142 EN USA D406 7503 ...

Страница 906: ...rademarks of Novell Inc Other product names used herein are for identification purposes only and might be trademarks of their respective companies We disclaim any and all rights to those marks The proper names of the Windows operating systems are as follows The product name of Windows 2000 are as follows Microsoft Windows 2000 Professional Microsoft Windows 2000 Server Microsoft Windows 2000 Advan...

Страница 907: ...Printer Scanner Unit Type 8000 Operating Instructions Printer Reference EN USA D406 7503 ...

Отзывы: