8
Effects
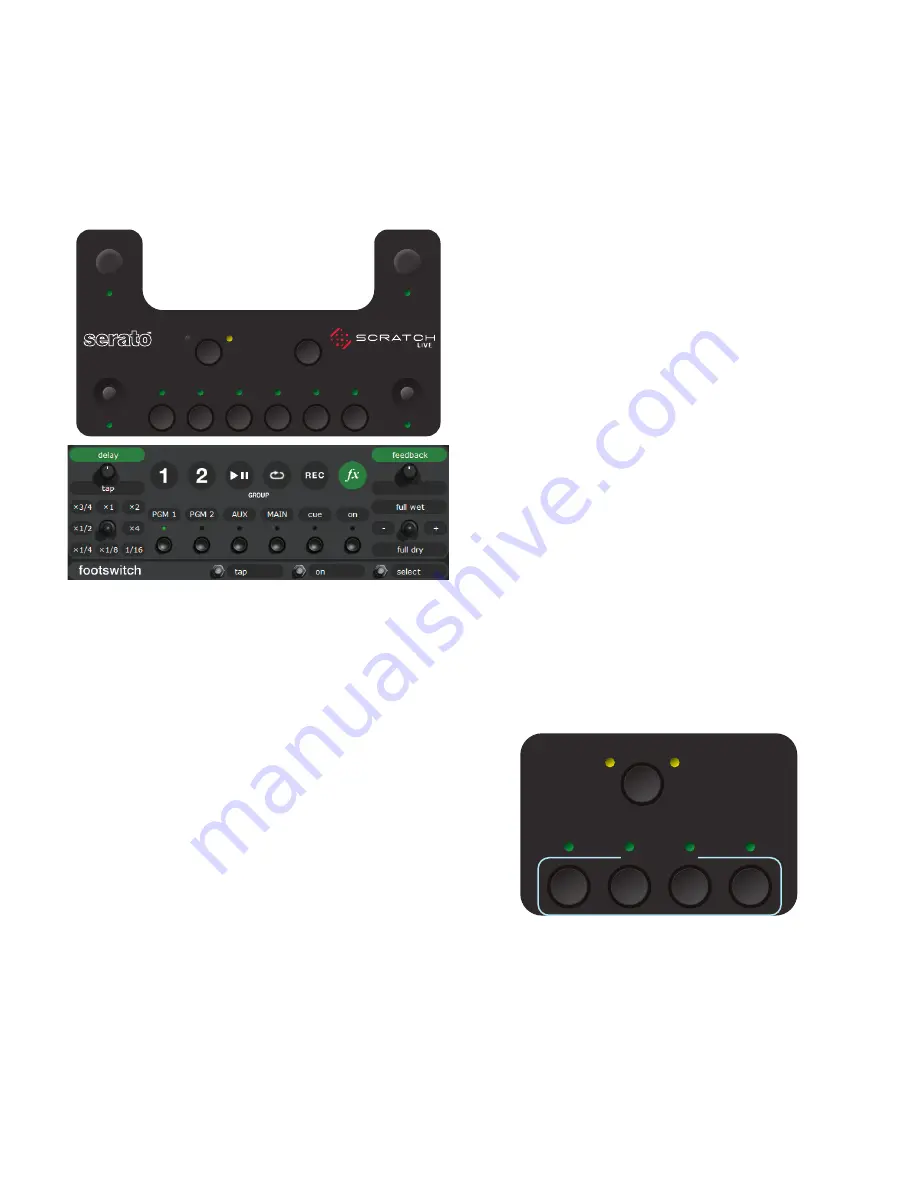
Hardware and software control panels
These “soft” controls have multiple functions for controlling
Serato Scratch
LIVE
software. These also control the Internal
Digital Effects when the mixer is operated stand-alone without
a computer. The Effects function the same way if connected to
the Scratch
LIVE
software or when using the TTM 57SL stand-
alone. Scratch
LIVE
software controls are described on page 36.
Internal Digital Effects
There are two Effects Processors available in the TTM 57SL.
Digital Effects hang out in the mixer instead of the software so
they are available for signal processing even when Scratch
LIVE
is
not running. Each processor can load one of ten effects:
• Echo
[post fader]
• Hold Echo
[post fader]
• HP Echo
[post fader]
• HP Hold Echo
[post fader]
• LP Filter (Low Pass)
[pre fader]
• BP Filter (Band Pass)
[pre fader]
• HP Filter (High Pass)
[pre fader]
• Phaser
[pre fader]
• Flanger
[pre fader]
• Desecrator
[pre fader]
When Scratch
LIVE
software is running, the deployed effect
for each Effect Processor is on the computer screen, along with
all control assignments and settings. The Effects are still available
when the mixer is operating stand-alone, however, there is no
display on the mixer for indicating the deployed Effect, control
assignment or settings.
Scratch
LIVE
software effect controls mirror the TTM 57SL front panel.
When one status changes, so does the other.
GROUP
DECK
P1
P2
J1
B1
B2
1
2
B3
B4
B5
B6
J2
DECK
B1
B2
1
2
B3
B4
PROCESSOR 1
PROCESSOR 2
PGM 1
PGM 2
AUX
MAIN
INSERT POINT
For this reason, you may want to begin by using the Effects
with Scratch
LIVE
software to learn control assignments. Typically,
Effects are controlled by ear. If you know which Effect is installed
in the Effects Processors and what controls are assigned to what
functions, the Effects are very usable without the software. The
function of the controls has been standardized to help keep
stand-alone operation simple. The TTM 57SL ships with Echo
in Processor 1, and LP Filter in Processor 2 before Scratch
LIVE
reassigns them.
Note: these defaults can be changed and saved to the
mixer with the Hardware Setup screen shown on page 32.
Group 6
If you are connected to the Scratch
LIVE
software, switch to
Group 6 to begin using Effects. Press GROUP then B6 (See page
36 for more information on Groups).
Inserting an Effect
There are four possible insert points for a deployed Effect:
PGM 1
,
PGM 2
,
AUX BUS
or
Main Mix
. When an Effects
Processor is inserted in PGM 1 or PGM 2, pre- or post-fader
operation is determined by the Effect. All the Echo Effects
are post-fader, and all other Effects are pre-fader. Both Effects
Processors can use the same insert point, but the order depends
on the effect. For instance, the Filter effect will be processed first
(because it is pre-fader), and the Echo effect will be processed
second (because it is post-fader). If both are pre-fader Effects,
Processor 1 will be first.
Note: Any Echo Effect can only be loaded into one of the
processors.
The controls required to select an Effects Processor and deter
-
mine it’s insert point are shown below. The
DECK
button selects
the Effects Processor
to be controlled. Pressing the button toggles
between Effects Processor 1 and Effects Processor 2.
B1
inserts the selected Effects Processor in PGM 1.
B2
inserts the selected Effects Processor in PGM 2.
B3
inserts the selected Effects Processor in AUX Bus.
B4
inserts the selected Effects Processor in Main Mix.
To share an effect with both PGM 1 and PGM 2, insert the
effect in the Aux Bus and use the FlexFX switches. Remember
that an effect in the Aux Bus affects the FlexFX, Mic and Aux
Inputs.


