1. Instrument description: name and catalog and serial
numbers. Refer to front and rear panels.
2. Part number of board. Refer to the parts lists in this manual. (The
number etched in the foil is generally NOT the part number.)
3. Your purchase order number. This number facilitates billing if the unit is
out of warranty and serves to identify the shipment. The repair facility will
arrange for the prompt delivery of a replacement.
To prevent damage to the board, return the defective board in the packing
supplied with the replacement (or equivalent protection). Please identify the
return with the Return Material number on the tag supplied with the
replacement and ship to the address indicated on the tag.
New Boards.
For equally prompt replacement of any etched-circuit board,
and for maximum life expectancy, order a new one. Use the same procedure
as described above, but request a new board. Please return the defective one
to GenRad.
5.4 PERFORMANCE VERIFICATION.
This procedure is recommended for verification that the instrument is
performing normally.
No other check isgenerally necessary
because this
procedure checks operation of nearly all the circuitry. There are no
calibrations or adjustments that could require resetting; and the internal stan-
dards are very stable. (However, for a rigorous performance and accuracy
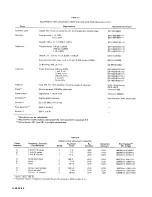
check, refer to para 5.5.) The necessary resistors, capacitors, and inductors
are inexpensive and readily obtained. The most accurate ones available
should be used; tolerances listed are the "best" commonly catalogued. Refer
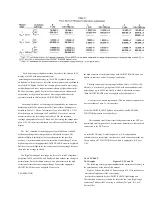
to Table 5-1.
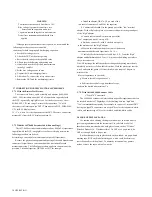
CAUTION
Be sure the Iine voltage switch, rear panel, is correctly set for your
power Iine voltage.
Verify performance as follows:
a. Set the line voltage switch, connect the power cord,
and depress the POWE R button.
b. Press the PARALLEL/SERIES button, if necessary,
so that the SERIES light stays lit.
c. Press FUNCTION button R.
d. Press the FREQUENCY button, if necessary, so that
the 120 Hz (100 Hz) light stays lit.
e. Press the RANGE 1 button.
f. Install the test fixture adaptors, as described in para 3.2.
Insert the
49.9-0
resistor as the device to be tested or "unknown"
component (DUT).
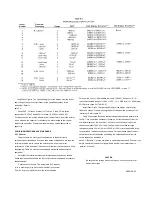
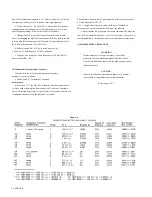
g. Verify that the displays are within the extremes shown in "check number
1" in Table 5-2, if the resistor value is within the tolerance listed above.
h. Similarly make the other checks indicated in this table. In check number
12, verify that the 5th digit is reasonably stable, as follows. (Notice that the 4th
digit is the least significant one in the readout, for 0.2% accuracy.)
i. In check number 12, the flickering of the 5th digit should stay typically
with in a range of +/-3 counts. For example, if the display is 1.101 X,uF, the "X"
might fIicker between 2 and 8 (or a smaller range). If, for example, "X" is
flickering between 7 and 13, it will of course cause a flickering of the preceding
digit (1.1017 to 1.1023). In such a case, the correct readout is the larger 4-digit
number (1.102) and the 5th digit is acceptably stable.
Tolerances.
Acceptable performance of the instrument is bracketed by the
set of display "extremes" in Table 5-2. These are defined as the nominal (ideal)
measurements plusor-minus the sum of the instrument accuracy tolerance and
twice the DUT accuracy tolerance. If the accuracy of your DUT is different from
the recommendation, revise the acceptable "extremes" accordingly. Notice that
this performance verification is NOT intended to prove the accuracy of the
instrument.
5-2
SERVICE
Содержание 1657 RLC Digibridge
Страница 6: ...Table of Contents...
Страница 8: ...1 2 INTRODUCTION...
Страница 9: ...INTRODUCTION 1 3...
Страница 10: ...1 4 INTRODUCTION...
Страница 15: ...OPERATION 3 1...
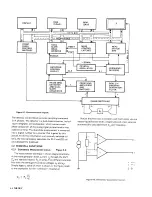
Страница 24: ...4 2 THEORY...
Страница 30: ...5 4 SERVICE...
Страница 42: ...5 16 SERVICE...
Страница 46: ......
Страница 49: ......
Страница 50: ......
Страница 51: ......
Страница 52: ......
Страница 53: ......
Страница 54: ......
Страница 55: ......
Страница 56: ......
Страница 57: ......

