background image

OPTALIGN smart RS5 BT handbook

48


‘Train orientation’ is used to flip machines (see ‘Flipping machines’ section 5.8) 
or to select either a vertical or horizontal machine train orientation. For instance, 
you may wish to select ‘Vertical train’ for vertical flange-mounted machines.


‘Change sensor type’ is used to allow measurement using RS5 sensor or 
ROTALIGN sensor or OPTALIGN sensor. 

5 .7 .1 Machine properties

The editing of specific machine parameters is possible only if the respec-
tive options have been purchased and licenced. Please consult your local 
PRÜFTECHNIK representative for details. 
In this handbook the ‘optional’ icon is used to highlight features not available in 
the standard version.

With the machine highlighted, pressing 

e

 reveals the machine parameters that can 

be edited.

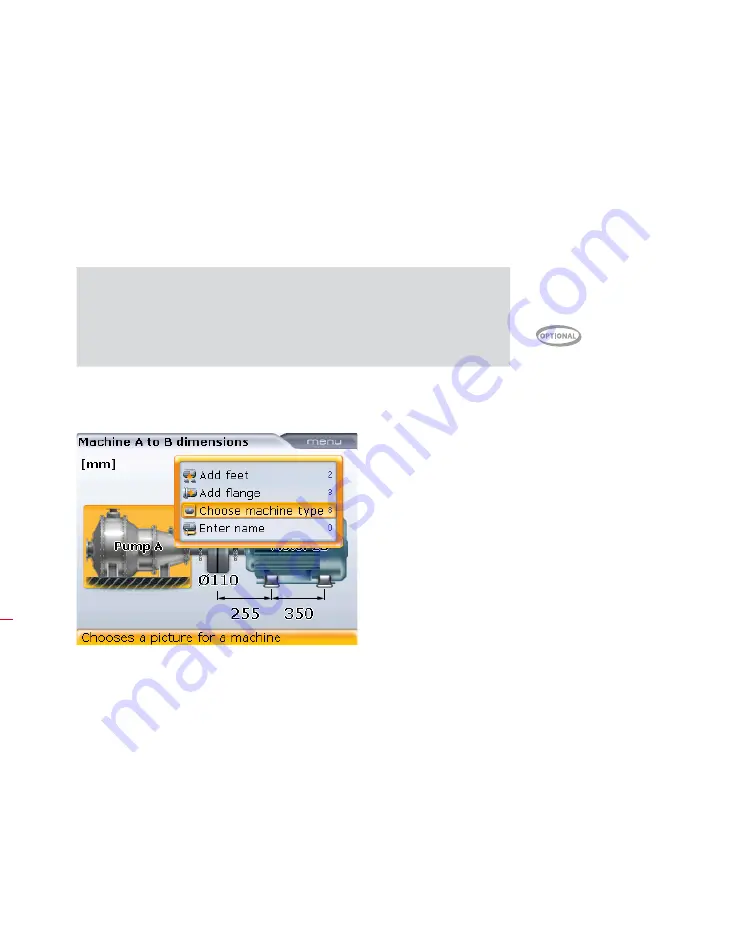
5.7.1.1 Editing machine type

To choose type of machine to be displayed, use 

f

/

g

 highlight the context 

menu item ‘Choose machine type’ then press 

e

 to confirm selection. The ‘Machine 

selection’ pane opens.

H

Note

Parameters that can be 

edited for 

stationary 

machines

 include:


fixation 


flange position 


type of machine 


machine name 

Содержание OPTALIGN smart RS5 BT

Страница 1: ...5737 Ismaning Germany Email info pruftechnik com www pruftechnik com Edition March 2016 Part number DOC 12 206 en Firmware version 3 xx OPTALIGN smart RS5 is a registered trademark of PRÜFTECHNIK Dieter Busch AG PRÜFTECHNIK products are the subject of patents granted and pending throughout the world Contents subject to change without further notice particularly in the interest of further technical...

Страница 2: ...monitor live horizontal and vertical machine corrections concurrently and with the sensor at any shaft rotational position During shaft rotation in Continuous Sweep more and finer readings are taken faster This ensures highly repeatable results even under mechani cal constraints such as backlash OPTALIGN smart RS5 BT possesses powerful features that include among others user definable stationary f...

Страница 3: ... 27 Chapter 4 Getting started 29 4 1 Set up 29 4 2 Set RS5 BT sensor as default 30 4 3 Enter dimensions 31 4 4 Wireless measurement 32 4 5 Results 35 4 6 Context menu items 37 Chapter 5 Horizontal machine alignment 39 5 1 Preparing for the alignment procedure 39 5 2 Check for soft foot 40 5 3 Mount the brackets 40 5 4 Mount laser and RS5 BT sensor 42 5 5 Switch the computer on and start applicatio...

Страница 4: ...Machine train alignment 123 7 2 Cardan drive machines 133 7 3 Vertical and horizontal flanged machines 142 7 4 Measure 148 7 5 Results 149 7 6 Machine alignment 152 Chapter 8 Configuration and data management 155 8 1 Shortcut numbers 155 8 2 Configuration 155 Chapter 9 Appendix 175 9 1 Updating system to a newer firmware version 175 9 2 Sensor firmware update 180 9 3 Suggested shaft alignment tole...

Страница 5: ... PRÜFTECHNIK sales representative All optional items and features are highlighted in this handbook using the OPTIONAL icon 1 1 OPTALIGN smart RS5 BT package with rechargeable battery computer ALI 12 015 RS5R ALI 12 805 OPTALIGN smart RS5 case ALI 12 200 OPTALIGN smart computer including OPTALIGN smart rechargeable battery ALI 12 601 ALI 12 201 Computer stand Note OPTALIGN smartRS ALI 12 805 ALI 12...

Страница 6: ...6 ALI 12 651 I OPTALIGN smart charger universal ALI 3 901 RS5 BT sensor ALI 3 910 RS5 laser ALI 3 953 RS5 BT sensor charger universal ALI 3 952 Micro USB cable for charging sensor ALI 3 901 ALI 3 952 ALI 3 910 ALI 12 651 I ALI 3 953 ...

Страница 7: ...peripherals ALI 17 451 USB memory stick with ARC 4 0 software and product literature ALI 2 118 Small chain type bracket Note that the OPTALIGN smart RS5 package contains 2 no ALI 2 118 ALI 2 911 Lens cleaning cloth ALI 3 589 Tape measure mm inch ALI 2 118 ALI 17 451 ALI 12 503 ALI 12 502 2 ALI 2 911 ALI 3 589 ...

Страница 8: ...ALIGN smart RS5 BT pocket guide DOC 12 206 en OPTALIGN smart RS5 BT operating handbook this handbook DOC 12 601 OPTALIGN smart RS5 BT safety and general information DOC 12 905 en OPTALIGN smart RS5 product catalogue ALI 9 516 DG RS5 BT sensor inspection certificate not shown DOC 12 106 en DOC 12 601 DOC 12 905 en ...

Страница 9: ... the standard items are the same as those in the package ALI 12 015 RS5R but without the OPTALIGN smart rechargeable battery ALI 12 601 and the OPTALIGN smart charger ALI 12 651 I ALI 12 600 OPTALIGN smart RS battery housing ALI 12 600 Bab y LR 14 C AM2 No 4014 1 5 V Bab y LR 14 C AM2 No 4014 1 5 V Nicht ins Feuer werfen Nicht wiedera ufladba r May explode in fire Not recharg eable Ne pas jeter au...

Страница 10: ...OPTALIGN smart RS5 BT handbook 10 Page intentionally left blank ...

Страница 11: ...al information and tips regarding operation of OPTALIGN smart RS5 BT This symbol denotes information which must be followed in order to avoid damage to equipment This symbol denotes information which must be followed in order to avoid personal injury This laser safety warning symbol denotes laser radiation Numbers in red circles indicate the corresponding operating step described in these instruct...

Страница 12: ...TION Use of controls or adjustments or performance of procedures other than those specified herein may result in hazardous radiation exposure 2 2 Operating information 2 2 1 Temperature range OPTALIGN smart RS5 BT and its related system components must be used at tempera tures between 10 C and 50 C 14 F to 122 F Outside of this range the specified accuracy may not be maintained Store the system an...

Страница 13: ...th a PC printer 2 2 6 Notes regarding data storage With any data processing software data may be lost or altered under certain circumstances PRÜFTECHNIK strongly recommends that you keep a backup or printed records of all important data PRÜFTECHNIK assumes no responsibility for data lost or altered as a result of improper use repairs defects battery replacement failures or any other cause PRÜFTECH...

Страница 14: ...n label are affixed to the back of the RS5 laser ALI 3 910 Type S No HWS Date of manufacture PRÜFTECHNIK AG 85737 Ismaning www pruftechnik com Made in Germany Check calibration ALI 3 901 3910 0108 0 80 März 2016 17 The RS5 BT sensor iden tification label and the sensor inspection label are affixed to the back of the sensor ALI 3 901 DO NOT STARE INTO BEAM AVOID EXPOSURE LASER RADIATION LASER LIGHT...

Страница 15: ...5 The OPTALIGN smart computer identification label is located at the bottom of the computer This label is located at the back of the OPTALIGN smart computer battery housing Type S No Component labelling ...

Страница 16: ...OPTALIGN smart RS5 BT handbook 16 This page intentionally left blank ...

Страница 17: ...ntered inadvertently q The Menu key offers a choice of procedures for setting up the computer and proceeding with different alignment situations h i f g The navigation keys are used to navigate through the program steps e The On Off Enter key is used to perform four functions switching OPTALIGN smart computer on off and accessing any selected item or confirming an action To switch on off press and...

Страница 18: ...ll out the rechargeable battery or the battery compartment depending on power supply source The reverse procedure is used to reinstall the rechargeable battery or the battery compartment Due to their similarity the battery housing ALI 12 600 is removed and replaced in the same manner as the rechargeable battery ALI 12 601 00012 ALI 12 601 1 00 Lift housing or rechargea ble battery after undoing th...

Страница 19: ...tatus LED indicates the charging status of the battery A flashing red LED indicates that the battery is either defective or fully discharged The LED flashes green at initialization and during the charging process A constantly lit green LED denotes that the battery is fully charged 3 2 3 Mounting and dismounting the universal adapter charger plug ALI 12 651 I The universal OPTALIGN smart adapter ch...

Страница 20: ...ls so that the beam strikes the sensor lens straight on The RS5 laser is water and dust resistant The internal optics and electronics are internally sealed preventing possible contamination The battery compartment is not watertight If water enters this compartment open it and dry it out The two AA size batteries should then be replaced 3 3 2 Laser batteries The RS5 laser is powered using two high ...

Страница 21: ...partment cover 1 4 turn screw Locking knob Beam active indicator LED Vertical beam position adjustment thumbwheel RS5 laser dust cap in open position On Off push button switch Rubber housing Horizontal beam position thumbwheel Laser emission aperture Under no circumstances may the two smaller housing hex head screws be removed as that would void all warranty coverage Used batteries should be dispo...

Страница 22: ... sensor the left LED shows both the laser beam adjustment and charging statuses The LED lights red orange or green depending on current function The LED on the right shows the Bluetooth communication status and lights blue when scanning and when commu nication is established The sensor is powered using its internal 3 7 V 5 Wh Lithium ion rechargeable battery Rubber housing On Off push button switc...

Страница 23: ...st charge 0 90 Blinks slowly green when charge is 90 Lights steady green when charge is 100 3 3 5 Charging the sensor The sensor may be charged using mains supply or a PC Charging the sensor using mains supply is faster than when charging through a PC Connect the micro USB cable ALI 3 952 to the sensor then plug the other end of the micro USB cable to the RS5 BT sensor charger ALI 3 953 Plug the a...

Страница 24: ...r the sensor as follows 1 Connect the micro USB cable ALI 3 952 to the sensor 2 Connect the short USB cable ALI 12 503 to OPTALIGN smart computer then connect both USB cables ALI 12 503 and ALI 3 952 together 3 Press the sensor on off push button The left LED charging status blinks red and communication is re established between the sensor and OPTALIGN smart computer ALI 12 503 OPTALIGN smart comp...

Страница 25: ...r aperture functions in a similar manner In the following example images of the RS5 BT sensor are used Step 1 Lift the dust cap slightly in the direction shown by the bold red arrow Step 2 Rotate the dust cap in either direction as shown by the bold red arrow Step 3 Lock the dust cap in its open position highlighted in red below ...

Страница 26: ... in which the plug is to be inserted with the latch release pushed downward The plug is locked into position when the latch release springs back into position To dismount a plug push the latch release downwards 1 The plug pops out 3 3 9 Service and care The accuracy of the system components should be checked every two years as indicated by the date wheel label shown at right located on the back of...

Страница 27: ...S5 BT package with rechargeable battery computer ALI 12 015 RS5R items are shown in section 1 1 When transporting any magnetic brackets and components from PRÜFTECHNIK Condition Monitoring especially by air transport please ensure that the magnet ic field strength of such brackets and components are kept well below the stipu lated limits by using the provided cover plate The relevant safety data s...

Страница 28: ...OPTALIGN smart RS5 BT handbook 28 Page intentionally left blank ...

Страница 29: ...on the right machine usually movable The laser is mounted on the left machine usually stationary 3 Switch OPTALIGN smart computer on by pressing e The system beeps followed by the flashing of an alignment condition LED Shortly afterwards the machine dimensions screen appears Refer to section 5 4 for details on mounting components OPTALIGN smartRS5 RS5 laser mounted on left machine usually stationa...

Страница 30: ...ight Configuration 2 Confirm selection by pressing e and then use the navigation keys and highlight the Default settings icon 3 Confirm selection by pressing e The Default settings screen opens Use f g and highlight the item Default sensor and then press e to confirm selection A selection box with three different sensor options appears ...

Страница 31: ... pressing e The rectangular highlight box moves to the next dimension The navigation keys can also be used to cycle through all dimensions Dimensions to be entered include 1 Sensor to coupling center 2 Coupling diameter default is 100 mm 10 for US units 3 RPM default is 1500 1800 for US units 4 Coupling center to front foot machine designated movable 5 Front foot to back foot machine designated mo...

Страница 32: ...rtically by moving them along the support posts and horizontally by loosening the compact chain type bracket Avoid looking directly at the laser beam When the laser beam is centered on the sensor dust cap tighten brackets and components Now press m to access the Measurement screen When in Measurement screen press q then use f g to highlight the context menu item Sensor selection Refer to section 5...

Страница 33: ...sing e The selection window below appears With the item Press Enter to scan for sensors highlighted press e to scan for sensors within the neighbourhood Make sure the sensor is switched on Once detected the sensor is selected automatically H Note ...

Страница 34: ...N smart computer alignment condition LED lights up and the green LED on the sensor blinks slowly If using Continuous Sweep mode and Auto Sweep is on set under the Configura tion screen item Shaft settings measurement is automatically initiated when the shafts are rotated If Auto Sweep is set off press e to initiate Continuous Sweep mode Rotate the shafts through a complete turn or as far as possib...

Страница 35: ... at the top or side away from viewer Offset is positive when at the coupling point the shaft of the right machine is higher or further away from viewer Individual vertical and horizontal foot and coupling results are accessed by pressing either k or f or g The all in one results screen activated under Shaft settings shows both vertical and horizontal coupling and foot results ...

Страница 36: ...iewer The alignment condition is indicated by the tolerance symbol and the corresponding lit OPTALIGN smart computer alignment condition LED Vertical position results the OK smiley indicates alignment within tolerance but can be improved by aligning the machine to obtain a happy smiley Horizontal position results a sad smiley indicates alignment out of tolerance A happy smiley with blue LED lit va...

Страница 37: ...y be made of the data entry keys which provide navigation shortcuts All context menu items are labelled with digits for quick access The required menu item is accessed directly by pressing the corresponding data entry key H Note If using the shortcut keys pressing 7 2 prompts the change train orientation hint Context menu items are available for every screen In this example the context menu items ...

Страница 38: ...OPTALIGN smart RS5 BT handbook 38 This page intentionally left blank ...

Страница 39: ...commended for horizontal movement 5 1 3 Rigid couplings Rigid couplings must be loosened before measurement so that they do not distort the alignment condition 5 1 4 Shaft play and coupling backlash Axial shaft play of up to 3 mm 1 8 has no adverse effect on alignment results but not necessarily for machine operation Because of the measuring principle the system can distinguish between coupling ba...

Страница 40: ...lid coupling hub on the left side The bracket assembly holding the RS5 BT sensor is mounted on the shaft on the right side of the couplings or the solid coupling hub on the right side Mount the brackets on either side of the coupling on either the shafts or on the solid coupling hubs and both at the same rotational position Please note the following in order to obtain the highest possible measurem...

Страница 41: ...h of the bracket frame insert the chain from the inside of the bracket as shown in the diagram if the shaft is larger than the bracket width insert the chain into the frame from the outside 4 Catch the chain loosely on the anchor peg 5 Turn the bracket thumbscrew to tighten the assembly onto the shaft 6 Clip the loose end of the chain back onto itself The bracket should now be tight upon the shaft...

Страница 42: ...nsor slide onto the support posts 2 Clamp the sensor onto the support posts by tightening the yellow knobs 3 Mount the RS5 laser on the support posts of the bracket fixed on the shaft of the left machine usually reference machine as viewed from normal working position Ensure that the yellow locking knobs are loosened enough to let you slide the housing onto the support posts Ensure that the laser ...

Страница 43: ...d also visually appear to be rotationally aligned to each other Make the final adjustments loosening the brackets slightly if necessary then rotating them and retightening In some cases if the coupling is large enough a coupling bolt can be removed and the laser beam shot through the bolt hole in order to avoid protruding radially beyond the coupling s outer diameter O D ...

Страница 44: ...ine information and dimensions are entered using the grey data entry keys The required dimensions are entered directly using the data entry keys With the required dimension highlighted enter dimension by pressing the appropriate data entry keys The editing box appears as soon as the first key is pressed Confirm the entered value by pressing e The highlight advances automatically to the next requir...

Страница 45: ...he navigation keys to highlight the value then use the data entry keys to edit the value directly Confirm the value by pressing e The highlighting box advances to the next required dimension automatically The default coupling diameter also referred to as the reference diameter may be set under the Default settings screen 5 6 3 RPM revolutions per minute The default value is 1500 1800 if set to US ...

Страница 46: ...ted on the coupling such that the sensor distance marking is infront of the coupling as shown in the diagrams 1a and 1b below 5 6 7 Spacer shaft If the spool piece of a spacer coupling is removed and offset support posts used to clear any radial obstructions the situation illustrated in diagram 2 below could occur A B C Spacer removed In the case shown B A and C A This spacer shaft situation is ef...

Страница 47: ...st saved before system was switched off New file used to create a new measurement file Soft foot measurement prompts the measurement of soft foot Pipe strain wizard opens the wizard Add last machine is used to add a machine to the current train The added element appears on the right side of the train Note that if the machine train has three machines the context menu item Delete machine will be inc...

Страница 48: ...sible only if the respec tive options have been purchased and licenced Please consult your local PRÜFTECHNIK representative for details In this handbook the optional icon is used to highlight features not available in the standard version With the machine highlighted pressing e reveals the machine parameters that can be edited 5 7 1 1 Editing machine type To choose type of machine to be displayed ...

Страница 49: ...vailable pump motor gearbox and a generic standard machine If you need to change the orientation of the machine graphic use i h Parameters that can be edited for moveable machines include fixation flange position thermal growth values type of machine machine name Soft foot measurement can also be carried out from this screen ...

Страница 50: ...tem Thermal Growth using either f or g Press e The Thermal growth screen appears When entering names that contain both upper and lower case characters as well as numerals use o to cycle through the three options Press and hold down o while observing the status indicator at the top left corner of the editing box This displays the type of character to be entered Empty spaces are entered by pressing ...

Страница 51: ...diting box appears when any data entry key is pressed Use the data entry keys to enter the thermal growth value in the vertical orientation cycling through the feet pairs using the navigation keys To enter values in the horizontal orientation press q while in the Thermal growth screen The context menu as shown below appears ...

Страница 52: ...ed from the Thermal growth screen by highlighting the tick then confirming selection by pressing e Alternatively press q while in the Thermal growth screen The context menu appears Carefully observe sign convention and when entering thermal growth values Thermal growth values are NOT a target instead they represent the amount and direction of the anticipated movement that the machine will undergo ...

Страница 53: ...es e g fluid pressures airflow The most notable of these changes is the change in the temperature of the machine bearings and supports This is called the machine s thermal growth The system is used to calculate thermal growth compensation if no other values are available Thermal growth is calculated from the following factors material charac teristics expected temperature difference and height of ...

Страница 54: ...scribed previously 2 Press q while on the screen The context menu appears Use f g to highlight the context menu item Thermal growth calculator 3 Confirm selection by pressing e The thermal growth calculator pane appears 4 Use the navigation keys to highlight the Material information box then press e A drop down menu appears 5 Use f g to highlight required type of material ...

Страница 55: ...aft centerline using the data entry keys Pressing q with the thermal growth calculator pane open reveals the available context menu items In the example opposite the motor material is cast iron the ambient temperature is 25 C the machine running temperature is 120 C and the distance from the bottom of the machine feet to the shaft centerline is 70 cm This gives a growth of 0 71 mm The thermal grow...

Страница 56: ... highlighted pressing e reveals the coupling parameters that can be edited The menu may also be used to reset the coupling settings to default i e rpm is 1500 coupling diameter is 100 mm and the tolerance table is based on 50 Hz Coupling parameters that can be edited include coupling targets user defined tolerance values type of coupling types available are short flex cardan and spacer shaft senso...

Страница 57: ...ghlight type of coupling required from the menu Press e to confirm selection Carefully observe sign convention and when entering target values Target values are NOT the anticipated thermal growth values instead they represent the amount and direction of the desired misalignment to be set at the coupling to compensate for the anticipated movement the machine will undergo when put in operation The e...

Страница 58: ...ay be edited Use f g and highlight the item Spacer format If the coupling type was Short flex then the item Short flex format would appear in the list Press e to confirm selection The available spacer shaft coupling results formats are displayed Type of coupling selected in this example is cardan In this example the selected coupling type is Spacer shaft and therefore the availability of spacer sh...

Страница 59: ...rt flex coupling and cardan shafts may also be set under the configuration item Shaft settings Offset B Offset A Gap B Gap A Total Gap Offset at Left Coupling Total Gap Offset at Right Coupling Alpha Beta Total Angle Offset at Left Coupling Total Angle Offset at Right Coupling ...

Страница 60: ...e Dimensions screen and highlight the coupling and then press e The coupling parameters are displayed Use either f or g to highlight the context menu item Tolerances then press e The combined User defined tolerances Tolerance table screen appears The Shaft settings screen is accessed via the menu item Configuration To set Symmetrical or Non symmetrical user defined tolerances highlight the item Us...

Страница 61: ... was symmetrical then values would be displayed for both horizontal and vertical planes In this example the active tolerances are the symmetrical user defined values which have already been defined The user button in the lower frame is yellow The system tolerance table is deactivated as can be seen from the grayed out smileys in the upper frame The user button In this example the active tolerances...

Страница 62: ...upper frame revert to yellow Press ß to exit the combined User defined tolerances Tolerance table screen Note that the screen header toggles between Tolerance table and User defined tolerances The context menu item Disable tolerances may be used to deactivate both system and user defined tolerance values Tolerances may also be directly enabled and disenabled from the Tolerance table or User define...

Страница 63: ...the manufacturer of the machine or coupling prescribe no other tighter values The tolerance table values are rpm dependent Changing the rpm results in the cor responding gap offset tolerance values Use the navigation key to highlight the rpm box With the box highlighted use the data entry keys and enter the required rpm then confirm entry pressing e If tolerances are already disenabled a no symbol...

Страница 64: ...d to set user defined gap and offset tolerance values When these defined values are active the system tolerance table is disenabled The menu item Disable tolerance Enable tolerance is the used to enable and disenable both system and user defined tolerances The tolerance table can be printed directly to the configured printer or saved to a memory stick aka jumpdrive as a PDF if the printer configur...

Страница 65: ...se f g and highlight Targets as dial gauge and the press e to confirm selection This prompts the Dial gauge set up screen Note that a hint to set up the dial gauge configuration will appear followed by the Dial gauge set up screen Use the navigation keys to exit the header and cycle through the required dimensions Enter the required dimensions The Coupling targets screen is accessed as described i...

Страница 66: ...s dial gauge values display then enter the dial indicator values in the respective value boxes using the data entry keys and confirming each entry by pressing e Press ß to display the target values including any bracket sag amounts entered in terms of gap and offset ...

Страница 67: ...rom the screen by highlight ing the tick and then confirm selection by pressing e The screen context menu is accessed by pressing q The context menu and submenu items available include Enabling and disenabling coupling targets and entering coupling target values as dial indicator readings In this example the machine set has been mounted next to a wall and the machine on the right is stationary As ...

Страница 68: ...ighlight Train orientation Flip machines 2 Press e to confirm selection A Flip machines hint screen appears The hint reminds the user that the laser must always be mounted on the left machine as viewed by the user and sensor to coupling center distance must be checked again 3 Press e or ß to confirm flipping machines Note that once a measurement has been taken the Dimensions screen context menu it...

Страница 69: ...sor dust cap If the beam be so far off target that it misses the sensor completely hold a sheet of paper in front of the sensor to locate the beam and readjust it onto the sensor as follows 3 Reposition the components until the laser beam strikes the sensor cap vertically loosen the locking knobs and adjust the height horizontally loosen the bracket and turn the laser and or sensor brackets into l...

Страница 70: ...thumbwheels be brought to the approximate center of their travel range This will ensure that the beam is emitted from the laser as straight as possible and not at an angle Also make sure both brackets are rotationally aligned to each other These precautions will greatly facilitate the beam adjustment process 1 RS5 laser ON OFF push button switch Laser beam adjustment ...

Страница 71: ... BT sensor on by pressing its On Off push button switch 2 Press m to access the OPTALIGN smart computer measurement screen 3 While in the Measurement screen press q then use f g to highlight the context menu item Sensor selection 4 Press e to confirm selection The selection window appears ...

Страница 72: ... highlighted press e to scan for sensors within the neighbourhood Make sure the sensor is switched on Once detected the sensor is selected automatically 6 If the laser beam has been correctly adjusted as shown above right you may proceed with measurement as described in section 5 10 ...

Страница 73: ...ange for measurement is available when the beam is well centered Once centered the sensor and laser must not be touched as any movement during measurement will be interpreted as misalignment These components may however be moved when extending the measurement range see section 6 2 1 Extending the measurement range The Bluetooth status LED blinks blue when in operation Green Orange Red Blue Laser o...

Страница 74: ...eep mode Other measurement modes are available The table below gives a guide as to which measurement mode is ideal for which measurement In this section we describe the Continuous Sweep mode Details on the other modes can be found in section 6 1 Measurement modes Measurement mode Application Continuous Sweep Standard machines Multipoint measurement Uncoupled shafts nonrotatable shafts sleeve beari...

Страница 75: ... press e to finish measurement and collect data a screen similar to the following appears Alternatively view alignment results directly by pressing k once measurement is completed Remember not to touch mounted components It is advised to turn shafts in the same direction as the machine normally rotates in case the shafts shift from their normal seating in the bearings You may begin measurement by ...

Страница 76: ...display Gap is positive when open at top or side away from viewer and offset is positive when at the coupling point the shaft of the right machine is higher or further away from viewer Both vertical and horizontal results show the foot position relative to the centerline of machine designated stationary Positive values indicate that feet of machine desig nated movable are upwards or away from view...

Страница 77: ...t tolerance The red or yellow LED lights up when alignment is out of tolerance In this case the machines must be aligned If the coupling results show that misalignment exceeds the tolerance then the machine must be realigned by shimming vertically and repositioning the machine horizontally The different views may be accessed by pressing k f g In this example the left machine has no fixation theref...

Страница 78: ... Press q when in feet results Use f g to highlight the context menu item Multiple feet calculator Confirm selection by pressing e The multiple feet calculator pane opens With the multiple feet calculator pane open enter the dimension between the first and middle pair of feet The foot correction value at the middle feet appears in the box just below the entered dimension ...

Страница 79: ...e from the context menu that appears Press e to confirm selection The results table is displayed Use f g to scroll though the coupling results entries The individual results can not be averaged Only the result listed as current Cur can be displayed on the Results screen Should a measurement result listed as current Cur be deleted then the next recent measurement will be listed as current and these...

Страница 80: ...tively use the context menu item Measurement details With the desired results set highlighted press q then use f g to highlight the context menu item Measurement details With Measurement details highlighted press e to confirm selection The measurement details shown here have ensued from a Continuous Sweep results set Note that the standard deviation is also displayed ...

Страница 81: ...rances have been enabled see section 5 7 4 Coupling properties The computer LED system provides additional information on the tolerance status Tolerance Smiley Lit LED Within tolerance Happy face Blue Within tolerance OK Green Out of tolerance Sad face Amber Worse tolerance Sad face Red The smiley TAKES INTO ACCOUNT any targets and thermal growth values which you may have entered see page 50 to pa...

Страница 82: ...ion The Tolerance table screen appears If user defined tolerances are desired use f g to toggle between the recom mended tolerance table values and the user defined tolerance values You may also use the Tolerance screen context menu item User tolerance to switch to User defined tolerance values screen Usage of Tolerance table User defined tolerance values screen is explicitly described in sections...

Страница 83: ...aft alignment 83 With user defined tolerances now activated press k to view alignment results The human bust icon next to the smiley indicates that the tolerances being currently applied are user defined tolerances ...

Страница 84: ...he machines can be accessed from both sides Rotate view functionality is available within the Results and Move screens After obtaining measurement results press q then use f g and highlight Rotate view With Rotate view highlighted press e to confirm selection After confirming selection a video hint runs on the display When the video run stops the orientation on the display changes to match the opp...

Страница 85: ...view functionality is temporary and is available only in the Results and Move screens As soon as one reverts to either the Dimensions or Measurement or Soft foot screens the original machine orientation is reassumed 5 13 Align machine Machines can be aligned using the given foot results by proceeding as described below Remember if alignment is in tolerance indicated by a happy smiley symbol and th...

Страница 86: ...r them should lowering the machine be necessary Good quality shims such as PERMABLOC MYLAR or LAMIBLOC are available from PRÜFTECHNIK Condition Monitoring Visit www pruftechnik com for details 2 Loosen foot bolts while trying to avoid moving the machine horizontally If any foot comes off the ground when loosened suspect soft foot 3 Use the vertical foot position values to shim BOTH front and back ...

Страница 87: ...ve display From the results screen press q The context menu appears Use f g to highlight Move then press e to confirm selection If Live Move is initiated from the all in one results screen or the horizontal results screen the prompted Move direction will be Horizontal Vertical Move direction may be prompted by initiating Live Move in the vertical results screen If the laser beam is centered Live M...

Страница 88: ...nd the with foot bolts of the machine to be moved loosened proceed to make the necessary shimming corrections Keep an eye on the smiley on the screen and the computer alignment condition LEDs 2 Use the vertical foot correction values to shim BOTH front and back feet pairs as required Positive feet values indicate that the feet are high and therefore shims should be removed while negative feet valu...

Страница 89: ...Note the following sign convention Positive feet values indicate that the machine feet should be moved towards viewer while negative feet values suggest the moving the machine feet away from viewer 4 Move the machine feet in the direction of the yellow arrows keeping an eye on the smiley on the screen The arrows change with the movements automatically Watch the screen carefully to ensure that mach...

Страница 90: ...aulic devices are recommended for moving machines 5 If the smiley returns a happy face or an OK symbol the current horizontal alignment condition is within tolerance 6 Tighten anchor bolts and to proceed to verify alignment condition after Move 7 Press q then use f g to highlight Stop 8 Confirm selection by pressing e If desired you may toggle between the Horizontal and Vertical Live Move directio...

Страница 91: ...aking another set of measurements and viewing results If they are in tolerance then the machines are aligned 5 13 6 Saving data and printing See section 5 14 5 13 7 Finish alignment Switch off the computer the sensor and the laser then remove the components from the shafts and store them in the case Replace guards before you switch the machine back on s WARNING ...

Страница 92: ... window comes up indicating the angle to which the shaft has rotated The shafts must be rotated back into the narrow green sector Live Move resumes automatically when the shafts are rotated back into this sector 2 Extending measurement range If the hint on the screen below appears during Live Move then the laser beam has drifted out of detection range due to great misalignment or long beam travel ...

Страница 93: ...this before aligning See section 5 16 for details 4 If poor repeatability is experienced Possible causes include Incorrect or loose bracket mounting Significant shaft play or coupling backlash Soft foot can cause positioning errors that make repeat measurement necessary Loose anchor bolts Yellow knobs on sensor or laser loose Temperature changing machines recently shut down Uneven shaft rotation S...

Страница 94: ...To save a file The current measurement file can be saved at any time To save the file press q twice Highlight Save file using f g Press e to confirm selection The editing box appears Use the data entry keys to enter the file name and confirm entry by pressing either ß or e H Note When entering names that contain both upper and lower case characters as well as numerals use o to cycle through the th...

Страница 95: ...omputer to a printer To print the current measurement report press q twice then use f g to highlight Print Press e to confirm selection The Print report screen appears The system provides the option of printing reports in four different formats Use f g to highlight the desired format and then press e to print the selected report Note As may be seen from the screen header the selected printer type ...

Страница 96: ...r configuration screen opens and the printing settings are made The settings may also be verified if unable to print meas urement report Alternatively the Printer configuration screen may be accessed at any time as described in section 8 2 6 Printer configuration 5 14 4 Available printing options The Printer configuration screen shows the options that can be selected Use either f g to highlight th...

Страница 97: ...election or use ß to exit the selection box Use f g to scroll through the available paper sizes Highlight the required paper size and press e to confirm selection or use ß to exit the selection box Use f g to change the page orientation between Portrait for a vertical layout and Landscape for a horizontal layout Confirm selection by pressing e or use ß to exit the selection box Saving and printing...

Страница 98: ...OPTALIGN smart RS5 BT handbook 98 Use f g to select the colour in which the report will be printed Selecting Colour results in full colour reports while GrayScale results in black and white reports ...

Страница 99: ...ing lock out machines and observe all safety precautions then mount the components as described on section 5 4 Mount laser and RS5 BT sensor 2 Switch both the OPTALIGN smart computer and the RS5 BT sensor on then press m to establish wireless communication between the computer and the sensor for details refer to section 5 9 1 If the laser beam has been centered on the detector turn the shafts in t...

Страница 100: ...ng e The alignment results displayed depend on whether the shaft setting All in one results has been activated The screen opposite shows both the coupling and feet results Use k f g to cycle through the different results views If however the option All in one results has not been activated in the Shaft settings configuration menu only the sensor to coupling center dimension needs to be entered to ...

Страница 101: ...ked before aligning the shafts This can be done quickly and conveniently with the aid of the instrument s soft foot function With the sensor and laser mounted on the shaft at any angular position the system is able to sense any machine movement when the machine bolts are loosened individually By entering the machine dimensions the system is able to calculate from shaft movement by how much each fo...

Страница 102: ...oose and treat the machine as a four footed machine Soft foot is measured only on machine designated as movable 1 Set up the system in the normal way as described in sections 5 3 5 4 then switch the laser on Adjust the beam onto center of the sensor dust cap 2 Switch the RS5 BT sensor on then open its aperture by lifting and rotating the sensor dust cap to its open position 3 Switch the OPTALIGN s...

Страница 103: ... step 8f If however the laser beam is not centered the following Soft foot screen appears 8a Use the on screen instructions to adjust the laser beam or refer to section 5 9 Laser beam adjustment 8b The laser beam can also be centered using the XY view Access the XY view screen by pressing q while in the soft foot screen The context menu appears ...

Страница 104: ... Use the top thumbwheel to move the beam up down The side thumbwheel is used to move the beam sideways The context menu item Adjust laser may also be used to prompt the on screen instructions With the context menu displayed use either f g to highlight the context menu item Adjust laser then press e to confirm selection Full description of XY View may be found in section 6 2 5 ...

Страница 105: ...t 9 Use the navigation keys to select the foot to be measured Press e to confirm foot selection Loosen the corresponding anchor bolt 10 The calculated distance that the foot has moved is shown on the screen Press e to store the value and retain it in the display Retighten the bolt The next foot is highlighted automatically or any desired foot can be selected using the navigation keys 11 Repeat thi...

Страница 106: ...in the printed report The Soft foot screen context menu items may be used to carry out the displayed functions The set soft foot tolerance is 0 06 mm 0 002 The happy Smiley indicates that the measured soft foot is within tolerance and shimming corrections are not necessary The context menu items Clear all SF measurements and Pipe strain wizard toggle depending on whether soft foot values are avail...

Страница 107: ...se a feeler gauge to establish the variation of the gap and use these measurements to sketch the shape and dimensions for a stair stepped shim wedge If the soft foot is purely angular then the stepped shim will vary in thickness from about zero to twice the value displayed by the computer Parallel soft foot The machine is rocking on two diagonal feet which are longer than the other two In this exa...

Страница 108: ...certain its existence and eliminate it This check complements but does not replace the soft foot function 5 18 1 How the function works After mounting the laser and sensor with integrated Bluetooth as usual refer to sections 5 3 5 4 turn the system computer on Enter all necessary machine dimensions as usual Press q while in the dimensions screen The context menu with the function Pipe strain wizar...

Страница 109: ... With the Next button highlighted press e to proceed with measurement The measurement screen appears Rotate the shafts over a wide enough measurement range When a wide enough measurement range is attained the Stop button appears H Note If the laser beam is not centered press q then use g f to highlight the context menu item Adjust laser confirming selection by pressing e After adjusting the laser ...

Страница 110: ... button highlighted press e to finish the first measurement The instruction to loosen pipe flange bolts then appears After loosening the pipe flange bolts press e with the Next button highlighted This prompts the start of the second measurement step ...

Страница 111: ... also be saved as an individual pipe strain measurement report PDF file or printed directly from the system computer To save or print report refer to section 5 14 Saving data and printing The measurement procedure and wizard instructions are dependent on the measurement mode used In all instances a wide enough measurement range has to be attained Toggle between Finish and Print using the navigatio...

Страница 112: ...OPTALIGN smart RS5 BT handbook 112 This page intentionally left blank ...

Страница 113: ... or Sweep The choice depends on the measurement mode required Press e to confirm selection The default measurement mode is effective only when a new file is opened Auto resumed files are opened with the last used measurement mode Note The default measurement mode may be set via the Configura tion menu item Default settings Changing the measurement mode from the Measurement screen does not change t...

Страница 114: ...ge mounted machines uncoupled shafts and nonrotatable shafts After centering the laser beam as described in section 5 9 Laser beam adjustment turn the shafts to any of the eight 45 positions i e 12 00 1 30 3 00 4 30 6 00 7 30 9 00 or 10 30 o clock positions viewed from coupling towards laser emitter Position shaft as accurately as possible using either an external inclinometer spirit level or prot...

Страница 115: ...ment point by pressing e If shaft rotation restrictions hinder the taking of measurement at particular shaft positions bypass these using the navigation keys Measurements must be taken in at least three positions over 90 but it is recommended to take more measurements over a wider angle Eight is the maximum number of points that may be taken over 360 After finishing measurement press k to display ...

Страница 116: ...ul linearized measurement range Laser off is displayed if the beam is blocked or falls entirely outside the detector area This situation occurs when machines are severely misaligned or when the beam travel is long Measurement is not taken when this message appears 1 When measuring and Laser end message appears rotate the shafts backwards until the laser beam re enters the measurement range The mes...

Страница 117: ...adjustment thumbwheels 4 On centering the laser dot the blue system computer LED lights up Press e The adjusted beam position is automatically recorded and taken as the end point of the readjustment CAUTION Do not allow shafts to turn during this process Extend measurement range ...

Страница 118: ...ng e To start a new measurement press q and use g f to highlight the context menu item Start Note The Infinirange beam readjustment procedure steps 1 5 may be repeated as often as necessary to obtain sufficient measurement points or rotational arc to complete a set of readings successfully This allows even very gross misalign ment or very long spans across spacer shafts to be handled with ease Not...

Страница 119: ...ume last file action is possible only from the dimensions screen This auto resume function ensures that the measurement file last selected when the instrument switches itself off due to the power management function power scheme see section 8 2 1 Device settings remains the active file when the instrument is switched on again 6 2 4 Averaging In certain industrial conditions it may be necessary to ...

Страница 120: ...of 0 5 seconds to a maximum averaging of 10 0 seconds Averaging is possible only in Multipoint and Static measurement modes The averaging setting that is selected will also be active in soft foot and Move Should high averaging be selected patience must be exercised during Move to allow the system enough time to catch up as the machine is moved In this case each reading that must be calculated to u...

Страница 121: ...entioned above To access the XY View screen press q while in the measurement screen Use g f to highlight the context menu item XY View Confirm selection by pressing e The laser beam position on the two detector planes is displayed Additional XY View capabilities include the setting of the XY coordinates as a reference value To access this option press q while in the XY View screen above Displayed ...

Страница 122: ...beam dot is adjusted while in the Relative mode screen it traces a path showing the laser dot movement The adjusted beam position is set to 0 0 on both detectors to serve as a reference Press e to toggle between the reference and the absolute values This can also be done via the XY View screen context menu item Absolute coordinates The new absolute positions are 0 3 2 5 and 0 5 6 4 ...

Страница 123: ...e feet 3 Align two machines remount laser and sensor if necessary 4 Recheck alignment results 5 Align the two machines at the next coupling and repeat alignment check 7 1 2 Machine train set up Machine train set up resembles the set up described in section 5 7 and will therefore be outlined here only briefly 1 While in dimensions screen use the navigation keys to highlight either machine then pres...

Страница 124: ...rain elements appearing on the screen are shown highlighted on the train icon at the top right of the display Pressing h or i long enough moves the view of the train to the right or left respectively Use h i to highlight machine to be edited Pressing e reveals the corresponding submenu ...

Страница 125: ...easurement shafts must be rotated by at least 70 a minimum of 3 measurement points to be taken 6 If using Continuous Sweep measurement mode press e to stop measurement If the measurement mode used is not Continuous Sweep measurement is stopped by pressing q then using f g to highlight the context menu item Stop and confirming selection by pressing e In this example coupling 1 is measured using the...

Страница 126: ...e measuring is the one actually highlighted in the machine train 9 Repeat the measurement procedure as described previously at the second coupling position 7 1 4 Evaluating results Press k to view the alignment results at the individual couplings Cycle through all available results screens using f g k In this example coupling 2 is measured using the Continuous Sweep measurement mode In this case m...

Страница 127: ...coupling position between machines A and B Horizontal feet and coupling values at the coupling position between machines A and B Entire machine train overview with vertical feet and coupling values between machines A and B Machine train alignment ...

Страница 128: ...lts overview screen jumping from one coupling to the next is possible only when the cursor is on either foot postion of the middle machine Entire machine train overview with horizontal feet and coupling values between machines A and B H Note Vertical and horizontal feet and coupling values at the coupling position between machines B and C Vertical feet and coupling values at the coupling position ...

Страница 129: ...ling position between machines B and C Entire machine train overview with vertical feet and coupling values between machines B and C Entire machine train overview with horizontal feet and coupling values between machines B and C Machine train alignment ...

Страница 130: ... misalignment may be carried out using the Live Move function While in results screen highlight the machines to be moved then press q The context menu appears Use f g to highlight Move Confirm selection by pressing e If the laser beam is centered and either machine is designated stationary Live Move starts automatically If however the pair of machines selected are both designated movable then a hi...

Страница 131: ...mechanical or hydraulic devices are recommended for moving machines Move the machines until the alignment condition is within the specified tolerance which is indicated by the smiley and the system computer alignment condition LEDs Tighten the anchor bolts and then press q to conclude the Move procedure The Live Move context menu appears Use f g to highlight Stop a CAUTION If the laser beam has no...

Страница 132: ...s can only be determined by rotating the shafts during measurement it is not possible to exit Live Move without carrying out another measurement Remeasure to confirm the alignment condition If the smiley returns a happy face the alignment condition is within tolerance and you may press e to save measurement results Use f g to highlight action to be taken Press e to confirm selection H Note ...

Страница 133: ... electron ically controlled synchronous and asynchronous AC drive motors Precise alignment reduces the rotational irregularities of the cardan shaft to a minimum so that the uneven bearing loading during cardan shaft rotation is also minimized the service life of the components is extended and the chance of unexpected machine failure is reduced The measurement procedure described here allows preci...

Страница 134: ...tly the location where the faceplate and coupling are being joined The center part of the coupling face must not be used as a reference surface 7 2 2 Mounting the laser holder assembly on to the rail 1 Loosen the handwheel slightly then slide the laser holder assembly down the center groove of the rail with the T nut acting as a guide 1 The coupling shown opposite has a raised face flange The prov...

Страница 135: ...it is roughly colinear to the rotational axis of the laser holder assembly this will make it possible to make fine adjustments to the laser holder assembly s position afterwards without having to realign the laser beam itself The distance sleeves black influence the offset by positioning the laser beam on the same axis as the rotational axis of the laser holder assembly The two yellow beam positio...

Страница 136: ...mbwheels to move the laser beam back by half the distance it has moved when rotating the laser holder assembly 180 from its start position Do this both vertically and horizontally When correctly adjusted you should be able to rotate the laser holder assembly a full 360 without the laser dot moving from the target center As soon as a single dot position has been achieved do not touch the laser posi...

Страница 137: ... center of the target placed on the rotational axis of machine to be aligned 3 Once the laser beam has been centered on the target tighten the faceplate on the coupling face using the provided hexagon socket head screws 7 2 5 Positioning RS5 laser and mounting RS5 BT sensor for measurement In this step the RS5 laser is remounted on the underside of the laser holder while the RS5 BT sensor is mount...

Страница 138: ...upporting the sensor see 3 below Do not touch the RS5 laser or its laser position thumbwheels 7 2 6 Set up and measurement 1 Switch the OPTALIGN smart computer on and then proceed to set up the machines refer to Machine set up section 5 7 Select Change to cardan in coupling properties refer to Coupling properties section 5 7 4 2 Enter all required machine dimensions H Note Note The cardan shaft co...

Страница 139: ...aser dot should be in the square target If not center laser beam refer to Laser beam adjustment in section 5 9 7 With laser beam centered press e to take the first measurement point 8 Rotate the sensor to the next measurement point 9 Rotate the laser holder and the RS5 laser and observe the detector view in the measurement screen see next screenshot at the moment when the laser dot is positioned o...

Страница 140: ...en enough measurement points over at least 70 rotation have been taken press q then use f g to highlight the context menu item Stop Confirm selection by pressing e to stop measurement 7 2 5 Evaluation and alignment Since offset does not affect the performance of cardan shafts only angularity is displayed for correction 1 Press k to view alignment results Alternatively stop measurement by pressing ...

Страница 141: ... to section 8 2 7 If a specific amount of offset between the machine shafts was desired and the laser holder assembly was set up to this precise offset as described in step 2 section 7 2 2 previously then after the angular alignment of the movable machine is completed remount and readjust the laser as described in steps 1 5 section 7 2 3 and proceed to adjust the movable machine in a parallel mann...

Страница 142: ...nclinometer cannot determine the rotation angle of vertical shafts therefore on vertically oriented machines measurements must be taken using Static measurement mode The eight 45 measurement positions used with this procedure must be marked accordingly on the machine 7 3 2 Marking measurement positions 1 Mark a reference position on the bearing housing close to the shaft and in line with one of th...

Страница 143: ...y are aligned exactly with the 0 or reference mark 2 Switch OPTALIGN smart computer on by pressing e 3 From the dimension screen that appears press q With the context menu displayed use the navigation keys to highlight Train orientation Vertical train 4 Confirm selected train orientation by pressing e A hint appears requiring the acknowledgement of the change Use f g and highlight Yes and then pre...

Страница 144: ...flange patterns are available Circular flange Square flange circular bolt pattern Square flange 4 Highlight the menu item Flange shape using g f This displays the flange pattern submenu items With the submenu items displayed press h to access the flange pattern pane The parameters that can be edited are number of bolts outer flange and bolt circle diameters These parameters are highlighted using t...

Страница 145: ...ions i Press q while in the Edit flange screen ii When the context menu appears press 4 While in the pattern pane use f g to highlight required flange pattern confirming selection by pressing e The option of selecting predefined bolt positions is currently possible with circular bolt patterns only Vertical flanged machines ...

Страница 146: ... pressing e 7 3 5 Enter dimensions Press ß or d to return to the dimensions screen 1 Enter the coupling center to sensor distance 2 Enter the coupling diameter The default is 100 mm or 10 depending on unit and language settings 3 Enter the coupling center to flange distance ...

Страница 147: ...he flange configuration can also be edited from the above screen by highlight ing the flanged machine then pressing e Measurements can now be taken H Note To edit the flange configura tion use g to highlight Edit flange then confirm selection by pressing e Vertical flanged machines ...

Страница 148: ...d cursor line to correspond with the position of the laser and sensor on the shafts 4 Press e to take the first measurement point After taking measurement point the clock hour hand moves automatically to the next clock position If the first measured position is 12 00 o clock then the hour hand moves to the 1 30 o clock position 5 Rotate the shafts to the second measurement position this could be e...

Страница 149: ...sults Sign convention for vertical machines POSITIVE GAP opens towards 0 00 or 3 00 POSITIVE OFFSET if the top coupling half is offset towards 0 00 or 3 00 Cycle through the coupling results and the flange correction positions using either w f or g H Note The all in one results screen shows the coupling gap and offset values in the 0 6 and 3 9 directions for short flex coupling and the flange corr...

Страница 150: ... highlighted calculated shim correction value appears numbered and highlighted with a yellow dot Use i h to cycle through the shim values In this example the sad face smiley indicates that the flange needs to be adjusted in the 0 6 direction The shimming correction value 0 91 mm and the corresponding bolt position 1 are highlighted automatically as shown ...

Страница 151: ...zed optimized Therefore half of the corrections will be negative and half of them positive This option results in zero axial movement of the shaft To cycle through the three available shimming modes press q while in the Flange corrections screen then highlight the context menu item Change correction format and confirm selection by pressing e The shimming mode changes from to then to Flange correct...

Страница 152: ...tions Insert or remove shims with the correct thickness under the selected bolt Use good quality shims such as PERMABLOC LAMIBLOC or MYLAR 3 Retighten the bolts and then remeasure to verify shimming results and determine the exact alignment condition 7 6 2 Correcting offset The correction of offset misalignment is carried out using the Live Move function 1 Access Live Move by pressing q while in R...

Страница 153: ...red Live Move starts automatically If beam is not centered a hint to center the laser beam appears on the display 7 Loosen the flange bolts Move the machine laterally in the direction of the bold yellow arrow as indicated in the Live Move display 8 Corrections should be brought as close as possible to zero The smiley changes from a sad face to OK to a happy face At the same time the OPTALIGN smart...

Страница 154: ...are not to let the shims slip out of place during lateral positioning When machine is correctly positioned tighten the bolts back down Remeasure to check if the new alignment condition is within tolerance The orientation of the Live Move may be changed via the context menu of the Move screen H Note ...

Страница 155: ...sed directly by pressing the corresponding numerical data entry key 8 2 Configuration The menu item Configuration is used to configure the OPTALIGN smart computer settings the regional settings default settings shaft application settings printing settings and licencing of available applications With the computer switched on access Configuration by pressing q twice The expanded menu as shown below ...

Страница 156: ...Alternatively press 1 to directly access the Device settings screen The available settings include brightness keyboard beep power scheme battery level resume policy and Bluetooth Use f g to select item to be set The display brightness is adjusted using h i Each item in the configura tion screen can be opened by pressing the correspond ing data entry key e g pressing 6 opens the Shaft settings scre...

Страница 157: ...etting that manages the power usage within the OPTALIGN smart computer The four available options are Standard the display dims after 10 minutes and shuts down after 1 hour Full power no dimming and no shutdown Use standby no dimming and shutdown is after 1 hour and Long life the display dims after 3 minutes and shutdown takes place after 10 minutes The required setting is selected using f g and s...

Страница 158: ...m computer is turned on The system may be set to open the last used measurement file Always resume last file or open a new measurement file Resume manually The option may also be used to open measurement files based on date last used With Resume policy highlighted press e to display the available resume options Use f g to highlight preferred resume option Confirm selection by pressing e ...

Страница 159: ...ngs This option is used to set the units of measurement the preferred country language current date and time The screen is opened by highlighting the Regional settings icon using the navigation keys then confirm selection by pressing e Alternatively press 2 while in Configuration screen to directly access the available settings Highlighting Units using f g then confirming selection by pressing e r...

Страница 160: ...rming selection by pressing e displays the different time zones The required zone is selected using f g and confirmed by pressing e Current date and time are set by highlighting the respective option using f g then confirming selection by pressing e Use h i to highlight either date month or year When a time zone is initially highlighted a hint appears displaying major world cities within the selec...

Страница 161: ...ta entry keys then confirm entry using either ß or e Alternatively both date and time can be set using f g The format in which the date or time is displayed is set via the item Date time format Use f g to highlight the menu item Date time format ...

Страница 162: ... menu box with the items Date format and Time format Use f g to select either item confirming selection by pressing e The time format is used to set either the 12h or 24h notation The selected notation is confirmed by pressing e The date format is used to set dd mm yyyy or mm dd yyyy format ...

Страница 163: ...ata entry keys to enter the required default rpm Confirm entry by pressing either e or ß Every new alignment file created will then automatically be preconfigured with this RPM value already entered Reference diameter used to set the required reference diameter Use f g and highlight Ref diameter then use the data entry keys to enter the required reference diameter Confirm entry by pressing either ...

Страница 164: ...e are On Sensor coupling distance auto calculation and Off Default mode used to set the default measurement mode Three measurement modes are available Sweep Multipoint and Static modes Use f g and highlight Default sensor and then press e The default sensor options appear Use f g and highlight required default sensor and the confim selection by pressing e ...

Страница 165: ...1 decimal place Foot results mils 1 decimal place rounded off to 1 2 mil 0 5 mil 1 mil 1 5 mils 1 decimal place xxx x 8 2 4 Licence manager This option is used to licence all possible system applications The Licence manager screen is opened by highlighting the Licence manager icon using the navigation keys then confirming selection by pressing e Use the data entry keys to enter the application lic...

Страница 166: ... PDF report Soft foot measurement Ability to define static feet Results table to verify measurement repeatability Checking pipe strain Multiple feet machine correction six feet machines Averaging Vertical machine alignment Dial gauge input Targets Supporting OPTALIGN ROTALIGN RS5 and RS5 BT sensors To find out which features are available on your particular instrument press q while in the Licence ...

Страница 167: ... ordering details All missing optional features may be acquired in one go by ordering part number ALI 12 710 All Additional Features To register any feature press q while in the Licence manager screen then use either f or g to highlight Register feature Press e to confirm selection Use f g to scroll through the features list H Note ...

Страница 168: ... Printer configuration This option is used to set up printers and the printing configuration in OPTALIGN smart computer The Printer configuration screen is opened by highlighting the Printer configuration icon using the navigation keys then confirming selection by pressing e Use the navigation keys to highlight the Feature key and Licence code boxes Enter the received key and code values using the...

Страница 169: ...for a horizontal layout Colour mode Used to set the colour mode in which the measurement report is to be printed This can either be in full colour or in grayscale The default printer type is PDF file This option is used to save measurement reports as a PDF file directly to an approved USB memory stick If a different printer type has been selected one may revert back to the default printer PDF file...

Страница 170: ... are displayed Two options are available Angle format unit used to specify whether angularity should be displayed in degrees or milliradians All in one results used to activate or deactivate the option to display both feet and coupling results within a single screen User tolerance type used to allow user tolerances be defined in either symmetrical or non symmetrical form Tolerance table the availa...

Страница 171: ...rint and About Open file This option is used to load any stored file and may be accessed from the Machine dimensions screen above Use the navigation keys and highlight the context menu item Open file then confirming selection by pressing e The Open file screen opens displaying a list consisting all stored files Use f g and highlight file to be opened and then press e to open the file Use h i to cy...

Страница 172: ...er ß or e to confirm file name If the file name already exists the editing box appears with the existing file name highlighted This may be overwritten or replaced with a new file name New file This option is used to create a new measurement file Print This option is used to save the measurement report as PDF directly to a memory stick or print the report or the soft foot measurement report using a...

Страница 173: ...ort this option generates reports only in text format Pipe strain measurement report this option is used to generate the pipe strain check report Change printer to configured printer this item is used to toggle between the default setting PDF file and the configured printer To configure a new printer press q while on this screen then use f g to highlight the context menu item Printer configuration...

Страница 174: ...OPTALIGN smart RS5 BT handbook 174 This page intentionally left blank ...

Страница 175: ...the update Old PRÜFTECHNIK memory sticks must be disposed of in accordance to the direc tive on Waste Electrical and Electronic Equipment WEEE 9 1 1 Downloading the firmware from the PRÜFTECHNIK website The file available for download is an exe file Download the file to the desired directory on a PC Double click the file to extract it to the approved memory stick The following screen with instruct...

Страница 176: ...h the update ensure that the indicated nominal capacity of the battery is greater than 50 If this is not the case recharge the battery to full capacity first if using the rechargeable battery package or replace all six AA batteries at the same time 2 Attach the short USB cable ALI 12 503 to the OPTALIGN smart computer socket 3 Insert the approved PRÜFTECHNIK USB memory stick ALI 17 451 into the sh...

Страница 177: ... and the need to reboot the OPTALIGN smart computer appears 5 When the hint above appears press and hold down e until the device reboots The display goes dark 6 The update process will start automatically after a little while as long as 10 seconds The system beeps and an LED flashes as the process begins ...

Страница 178: ...pdate process which takes up to 10 minutes 7 When the process is completed the following hint appears on the display 8 Detach the USB cable from the OPTALIGN smart computer then press and hold down e until the device resets OPTALIGN smart computer is now ready for use with the uploaded firmware version H Note ...

Страница 179: ...dimensions screen appears press q then use the navigation and highlight More About 2 Press e to confirm selection The application information screen appears The application details include the uploaded firmware version the application build currently loaded features among others ...

Страница 180: ... select Yes then press e The sensor firmware update wizard appears Before commencing with the sensor firmware update ensure that the sensor is fully charged If sure that sensor is fully charged use i h and highlight Next then press e to proceed with update using the sensor firmware update wizard Refer to section 9 2 2 Proceeding with the sensor firmware update The up date process takes about 5 min...

Страница 181: ...rge capacity is displayed by the battery icon and the percentage Charge the sensor if not fully charged 9 2 2 Proceeding with the sensor firmware update To proceed with the update after exiting the wizard press q while in the Measurement screen then use g f and highlight the menu item XY View Press e to confirm selection The XY View screen opens Press q while in the XY View screen then use g f and...

Страница 182: ... Confirm selection by pressing e The sensor firmware update wizard opens It is strongly recommended that the sensor firmware update be carried out Use i h and highlight Next then press e to proceed with the sensor firmware update H Note ...

Страница 183: ...r may be checked at any time To do this proceed as follows 1 Switch the sensor on 2 Press m to access the measurement screen While in the measurement screen press q to display the context menu 3 With the context menu displayed use f g and highlight XY View 4 Press e to confirm selection The XY View screen appears 5 With the XY View screen displayed press q to display the context menu Use f g to hi...

Страница 184: ...OPTALIGN smart RS5 BT handbook 184 6 Press e to confirm selection The current sensor information including the sensor firmware version is displayed ...

Страница 185: ...Acceptable Excellent 600 9 0 5 0 750 0 19 0 09 900 6 0 3 0 1200 4 0 2 5 1500 0 09 0 06 1800 3 0 2 0 3000 0 06 0 03 3600 1 5 1 0 6000 0 03 0 02 7200 1 0 0 5 ANGULARITY coupling gap difference per 100 mm or 10 diameter 600 15 0 10 0 750 0 13 0 09 900 10 0 7 0 1200 8 0 5 0 1500 0 07 0 05 1800 5 0 3 0 3000 0 04 0 03 3600 3 0 2 0 6000 0 03 0 02 7200 2 0 1 0 continued ...

Страница 186: ...ouplings RPM metric mm inch mils Acceptable Excellent Acceptable Excellent OFFSET per 100 mm spacer length or per inch of spacer length 600 3 0 1 8 750 0 25 0 15 900 2 0 1 2 1200 1 5 0 9 1500 0 12 0 07 1800 1 0 0 6 3000 0 07 0 04 3600 0 5 0 3 6000 0 03 0 02 7200 0 3 0 2 ...

Страница 187: ...e batteries 6 x 1 5 V IEC LR6 AA Lithium Ion rechargeable battery 7 4 V 2 5 Ah 18 5 Wh optional Operating time 18 hours typical use based upon an operating cycle of 25 measurement 25 computation and 50 sleep mode External interface USB host USB slave RS232 serial for sensor Integrated wireless communication class 1 transmitting power 100 mW AC adapter charger socket Environmental protection IP 65 ...

Страница 188: ...orage 20 C to 60 C 4 F to 140 F Charging 0 C to 40 C 32 F to 104 F Dimensions Approx 105 x 74 x 58 mm 4 9 64 x 2 29 32 x 2 1 4 Weight Approx 235 g 8 1 3 oz CE conformity Refer to the CE compliance certificate in www pruftechnik com RS5 laser Type Semiconductor laser diode Beam divergence 0 3 mrad Beam power 1 mW Wavelength 630 680 nm red visible Safety class Class 2 according to IEC 60825 1 2007 T...

Страница 189: ...features optional ALI 12 710 167 All in one results 126 149 170 Angle format unit degrees 170 Angle format units milliradians 170 Auto Sweep 74 170 Averaging 119 B Battery disposal 21 Battery housing ALI 12 600 18 Battery icon sensor 73 Beam adjustment crosshair 73 Bluetooth on off 159 Bracket anchor peg 41 mounting 41 C Cardan drive machines 123 Cardan drives set up 138 Cardan shaft bracket lite ...

Страница 190: ...eature key 168 File resume policy 158 Finishing alignment 91 Flange configuration 143 Flanged machines 123 Flip function 67 Flip machines 47 I Infinirange 116 118 In house standards 63 77 Inspection label 14 system 13 IP65 computer 13 IP classification 11 J Job preparation 39 86 L Labelling 14 Laser adjustment 131 Laser batteries 20 Laser beam adjustment 69 103 Laser centered 73 Laser classificati...

Страница 191: ...Operating handbook OPTALIGN smart RS5 BT DOC 12 206 en 8 OPTIONAL icon 2 P Package standard OPTALIGN smart RS5 ALI 12 015 RS5R 5 PDF file 169 Pipe strain 108 measurement report 111 Pipe strain wizard 108 Pocket guide OPTALIGN smart RS5 BT DOC 12 106 en 8 Power scheme option 157 Predefined bolt patterns 145 Printer configuration 96 168 Printing measurement reports 95 Printing options 96 172 Product...

Страница 192: ...and correcting 102 parallel 101 correction 107 Spacer spool piece 46 Spacer format 170 Spacer shaft ALI 12 718 optional feature 138 Standard deviation 80 Standard machine generic 49 System language 160 System units 159 T Tape measure ALI 3 589 7 Technical data OPTALIGN smart RS5 187 Temperature effects fluctuations 12 operating range 12 Thermal growth 50 Thermal growth calculator 53 54 Tolerance 7...

Страница 193: ...Index 193 W WEEE electronic waste 175 Wireless communication establishing 71 Workflow assistant 164 X XY view 73 88 103 XY View 121 absolute values 121 relative coordinates 122 relative mode 122 ...

Страница 194: ...OPTALIGN smart RS5 BT handbook 194 This page intentionally left blank ...

Отзывы:

Похожие инструкции для OPTALIGN smart RS5 BT