CLUTCH
6.21
EARLY 2004 -- EBS DRIVE
BUSHING SERVICE
EBS CLUTCH BUSHING REMOVAL AND
INSTALLATION
(Use Tool Kit PN 2201379)
The contents of this kit include:
Item
Qty
Part Description
Part No
A/B
1
EBS Puller Tool
5132027
C
1
EBS Puller Nut
5132501
D
1
EBS Main Adapter
5132029
E
1
EBS Bushing
5132028
Removal Tool
1
Instructions
9915111
Also required: Clutch Bushing Replacement
Tool Kit (PN 2871226) (ATV Clutch Kit) or (PN
2871025) (For all clutches) Piston Pin Puller
(PN 2870386)
REMOVAL AND INSTALLATION
INSTRUCTIONS
NOTE:
Bushings are installed at the factory using
Loctite
t
609. In order to remove bushings it will be
necessary to apply heat evenly to the area around
each bushing. Clean all residual Loctite from bushing
bore prior to installing new bushing.
EBS Drive Clutch Moveable Sheave
Bushing Removal
1. Remove clutch as outlined previously in this
chapter.
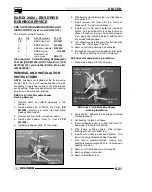
2. Install handle end of Piston Pin Puller (
PN
2870386
) securely into bench vise and lightly
grease puller threads.
3. Remove nut from puller rod and set aside.
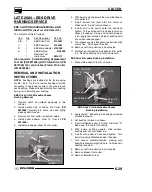
4. Install puller adapter (Item 10 from kit
PN
2871226
).
5. Install main adapter (Item D) onto puller.
Puller Adapter (10)
Main Adapter
(D)
Puller Tool (A/B)
Side “A” toward
sheave
Piston Pin
Puller
Nut (C)
6. With towers pointing toward the vise, slide sheave
onto puller rod.
7. Install removal tool (Item A/B) into center of
sheave with “A side” toward sheave.
8. Install nut (C) onto end of puller rod and hand
tighten. Turn puller barrel to increase tension on
sheave if needed. Using a hand held propane
torch, apply heat around outside of bushing until
tiny smoke tailings appear.
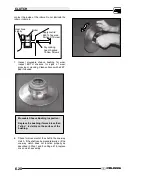
9. Turn sheave counterclockwise on puller rod until it
comes free. Lift sheave off puller.
10. Remove nut from puller rod and set aside.
11. Pull bushing removal tool and adapter from puller
rod. Remove bushing from tool and discard.
EBS Drive Moveable Bushing Installation
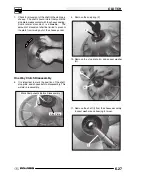
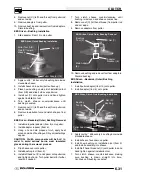
1. Place main adapter (Item 8) on puller.
Main Adapter
(8)
Piston Pin
Puller
Nut (C)
Bushing
EBS Drive Clutch Moveable Sheave
Bushing Installation
Puller Tool (A/B)
Side “A” toward
sheave
2. Apply Loctite
t
609 evenly to bushing bore inside
moveable sheave.
3. Set bushing in place on sheave.
4. Insert installation puller tool (Item A/B) with “A”
side down, into center of bushing.
5. With towers pointing upward, slide sheave,
bushing and tool onto puller rod.
6. Install nut on puller rod and hand tighten. Turn
barrel to apply additional tension if needed.
7. Turn sheave counterclockwise, making sure
bushing is drawn straight into bore. Continue until
bushing is seated.
8. Remove nut from puller rod and set aside.
9. Remove sheave from puller.
10. Remove installation tool.
Содержание 600 Dragon SP
Страница 1: ...2004 SPORTSMAN 600 700 SERVICE MANUAL PN 9918803 ...
Страница 138: ...BODY STEERING SUSPENSION 5 16 NOTES ...
Страница 210: ...FINAL DRIVE 7 38 NOTES ...
Страница 293: ...ELECTRICAL 10 43 WIRING DIAGRAM HAND AND THUMB WARMERS WINCH HUNTER EDITION ...
Страница 294: ...ELECTRICAL 10 44 NOTES ...
Страница 295: ...ELECTRICAL WIRING DIAGRAM EARLY 2004 SPORTSMAN 600 700 BUILT BEFORE FEB 20 2003 Built Before February 20 2003 ...
Страница 297: ...ELECTRICAL WIRING DIAGRAM LATE 2004 SPORTSMAN 600 700 BUILT AFTER FEB 20 2003 Built After February 20 2003 ...
Страница 298: ...ELECTRICAL WIRING DIAGRAM LATE 2004 SPORTSMAN 600 700 BUILT AFTER FEB 20 2003 Built After February 20 2003 NOTES ...
Страница 299: ...ELECTRICAL WIRING DIAGRAM LATE 2004 SPORTSMAN 600 700 MODELS WITH FUEL GAUGE Models Equipped with Fuel Gauge ...
Страница 300: ...ELECTRICAL WIRING DIAGRAM LATE 2004 SPORTSMAN 600 700 MODELS WITH FUEL GAUGE NOTES ...
Страница 301: ...ELECTRICAL WIRING DIAGRAM 2004 SPORTSMAN 600 700 HUNTER EDT HAND WARM WINCH ...
Страница 307: ...Winch Switch Installation 10 34 Winch Wiring 10 35 Wiring Diagram Hand Thumb Warmer Winch 10 43 ...
Страница 308: ...PN 9918803 Printed in USA ...


