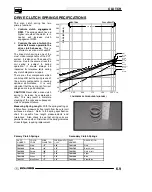


CLUTCH
6.23
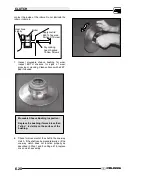
8. Remove nut (C) (left hand thread) from puller rod
and set aside.
9. Remove adapters from puller.
10. Remove bushing and remove tool from adapters.
Discard bushing.
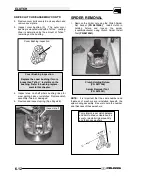
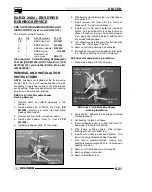
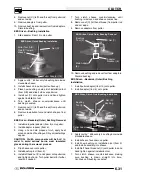
EBS Driven - Bushing Installation
1. Slide adapter (Item 10) onto puller.
Nut (C)
Bushing
EBS Driven Clutch Bushing Installation
Puller Adapter (10)
Puller Tool (A/B)
Side “B” toward
sheave
2. Apply Loctite
t
609 evenly to bushing bore inside
moveable sheave.
3. Install sheave onto puller (belt surface up).
4. Place new bushing on side B of installation tool
(Item A/B) and slide both over puller rod.
5. Install nut (C) onto puller rod and hand tighten
against installation tool.
6. Turn clutch sheave counterclockwise until
bushing is seated.
7. Remove nut (C) (left hand thread) from puller rod
and set aside.
8. Remove installation tool and clutch sheave from
puller.
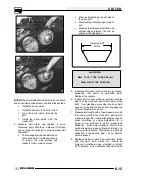
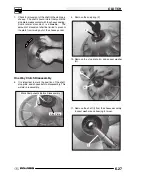
EBS Driven - Backside (Outer) Bushing Removal
1. Install main puller adapter (Item 8) onto puller.
2. Install adapter reducer (Item 9).
3. Using a hand held propane torch, apply heat
around outside of bushing until tiny smoke tailings
appear.
CAUTION: Clutch components will be hot! In
order to avoid serious burns, wear insulated
gloves during the removal process.
4. Flip sheave over onto puller.
5. Install bushing tool (Item 2).
6. Install left hand nut (C) and spacer onto puller rod
and tighten by hand. Turn puller barrel for further
tension if needed.
7. Turn clutch sheave counterclockwise until
bushing is removed and sheave comes free.
8. Remove nut (C) (left hand thread) from puller rod
and set aside.
9. Remove adapters from puller.
Main Adapter
(8)
Nut (C)
Adapter
Reducer (9)
Bushing
Tool (2)
Bushing
Tool (2)
EBS Driven Clutch Outer Bushing Removal
10. Remove bushing and removal tool from adapters.
Discard bushing.
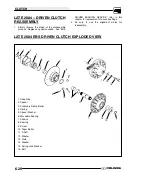
EBS Driven - Backside (Outer) Bushing
Installation
1. Install puller adapter (Item 10) onto puller.
2. Install adapter (Item 9) onto puller.
Nut (C)
Bushing
Tool (2)
Bushing
EBS Driven Clutch OuterBushing Installation
Adapter
(9)
Puller Adapter
(10)
3. Apply Loctite
t
609 evenly to bushing bore inside
moveable sheave.
4. Install sheave face down on puller.
5. Install new bushing on installation tool (Item 2)
and install assembly into sheave.
6. Install left hand thread nut (C) onto puller rod and
hand tighten against installation tool.
7. Turn clutch sheave counterclockwise, making
sure bushing is drawn straight into bore.
Continue until bushing is seated.
Содержание 600 Dragon SP
Страница 1: ...2004 SPORTSMAN 600 700 SERVICE MANUAL PN 9918803 ...
Страница 138: ...BODY STEERING SUSPENSION 5 16 NOTES ...
Страница 210: ...FINAL DRIVE 7 38 NOTES ...
Страница 293: ...ELECTRICAL 10 43 WIRING DIAGRAM HAND AND THUMB WARMERS WINCH HUNTER EDITION ...
Страница 294: ...ELECTRICAL 10 44 NOTES ...
Страница 295: ...ELECTRICAL WIRING DIAGRAM EARLY 2004 SPORTSMAN 600 700 BUILT BEFORE FEB 20 2003 Built Before February 20 2003 ...
Страница 297: ...ELECTRICAL WIRING DIAGRAM LATE 2004 SPORTSMAN 600 700 BUILT AFTER FEB 20 2003 Built After February 20 2003 ...
Страница 298: ...ELECTRICAL WIRING DIAGRAM LATE 2004 SPORTSMAN 600 700 BUILT AFTER FEB 20 2003 Built After February 20 2003 NOTES ...
Страница 299: ...ELECTRICAL WIRING DIAGRAM LATE 2004 SPORTSMAN 600 700 MODELS WITH FUEL GAUGE Models Equipped with Fuel Gauge ...
Страница 300: ...ELECTRICAL WIRING DIAGRAM LATE 2004 SPORTSMAN 600 700 MODELS WITH FUEL GAUGE NOTES ...
Страница 301: ...ELECTRICAL WIRING DIAGRAM 2004 SPORTSMAN 600 700 HUNTER EDT HAND WARM WINCH ...
Страница 307: ...Winch Switch Installation 10 34 Winch Wiring 10 35 Wiring Diagram Hand Thumb Warmer Winch 10 43 ...
Страница 308: ...PN 9918803 Printed in USA ...


