background image


106                                     

DIGITAL VIDEO RECORDER


Appendix: How to connect modem 


Please follow the next procedure after installed client software.


We provide client 

software in a CD.   
 
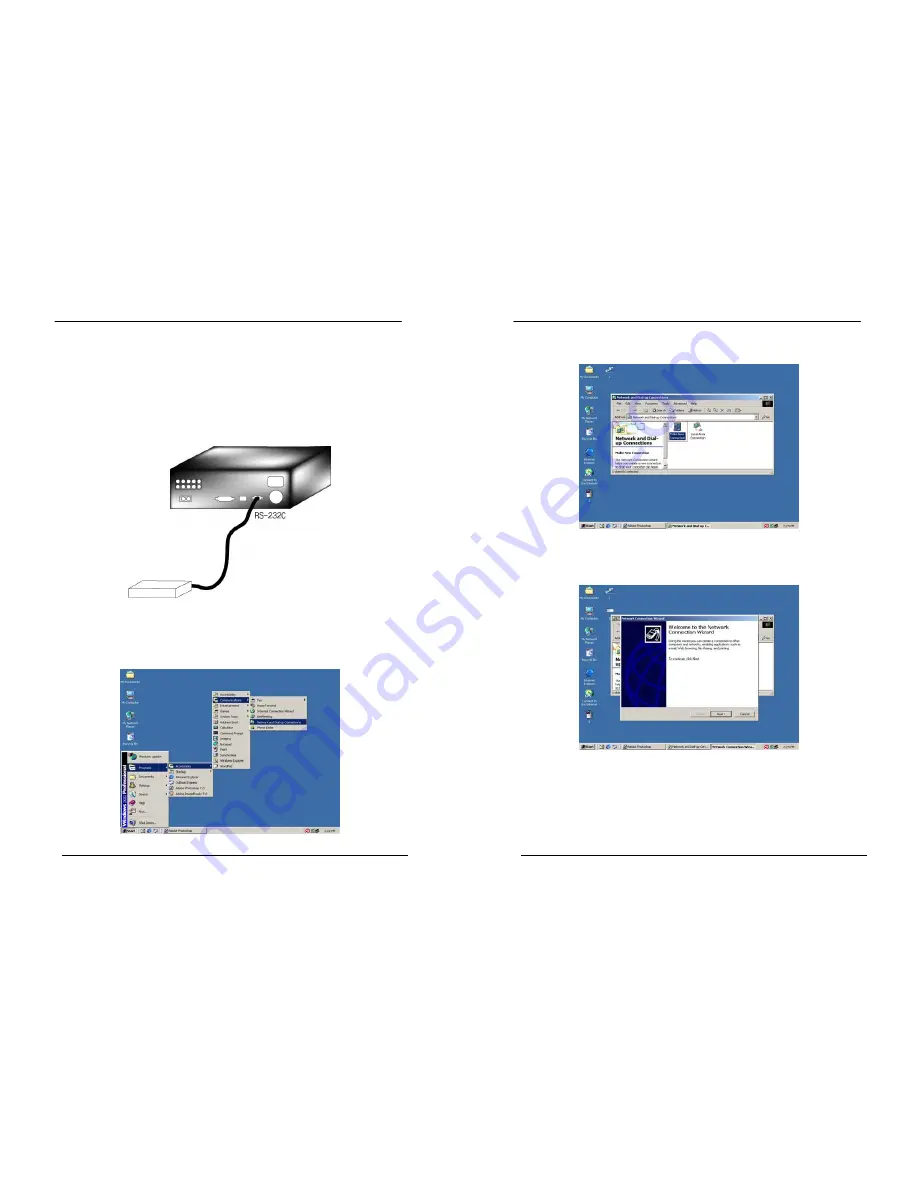
1. Connect modem to the back of DVR RS-232C.(MODEM) 


2. Follow the below steps:   

Start 

 Programs 

 Accessories 

 Communications 

 Network and Dial-up 

Connections 


107                                     

DIGITAL VIDEO RECORDER


3. Double click “Make New Connection”. 


4. Click “Next” at the window of network connection wizard. 


Содержание DVR-SRX-m5016

Страница 1: ...K OF ELECTRIC SHOCK DO NOT REMOVE COVER OR BACK NO USER SERVICEABLE PARTS INSIDE REFER SERVICING TO QUALIFIED SERVICE PERSONNEL The lightning flash with arrowhead symbol within an equilateral triangle is intended to alert the user to the presence of un insulated dangerous voltage within the product s enclosure that may be of sufficient magnitude to constitute a risk of electric shock to persons Th...

Страница 2: ...y Overview 19 Multiscreen Display and Sequencing 20 Zooming 22 Operation Main Menu Overview 23 Display Option 24 Camera Setup 26 Motion Recording 28 Normal Recording 30 Alarm Recording 32 Schedule Recording 36 Network Setup 39 System Setup 42 Pan Tilt Zoom Control 47 3 DIGITAL VIDEO RECORDER Search Playback 51 Time Search 51 Log List Search 52 External Search 53 Back up 54 Built in CD RW 54 Extern...

Страница 3: ...he power cord from the power outlet Continued use of the equipment may result in fire or electrical shock Please consult your DVR distributor 5 DIGITAL VIDEO RECORDER z Do not use substances containing alcohol benzene thinners or other flammable substances to clean or maintain the equipment The use of these substances may lead to fire Use a dry cloth on a regular periodic basis and wipe away the d...

Страница 4: ...in an airtight resalable plastic bag and letting it adjust to temperature changes slowly before removing it from the bag z If Condensation forms inside the Digital Video Recorder Stop using the equipment immediately if you detect condensation Continued use may damage the equipment Remove the power cord from the power outlet and wait until the moisture evaporates completely before resuming use CAUT...

Страница 5: ...he image Pressing cursors can move this zoom area Screen Control Buttons y P T Z FOCUS Press this button to control a PAN TILT ZOOM camera via RS 485 connection y SCHEDULE Press this button to make scheduled recording standby The SCHEDULE LED green lights goes off when the schedule is on off y TIME SEARCH Press this button to display the Time Search menu y LOG Press this button to display log list...

Страница 6: ...or 11 Spot out connector 12 Composite Monitor Output BNC standard composite video output connector 13 S VHS Output An S VHS connector for separate luminance and chrominance Y C signals 14 RJ 45 Ethernet Port For connecting to remote PC via Ethernet network 15 USB 2 0 connector For connecting USB compatible devices 16 AUDIO Input 1 8 9 16 Output 2 connectors RCA 11 DIGITAL VIDEO RECORDER Remote Con...

Страница 7: ...N OUT ALARM DVR DVR RS 232C 1 DOME 2 DATA2 DATA1 J BOX FRONT DATA1 DATA2 DC 12V Rx Rx Tx Tx 4 ALARM INPUT 1 AUX OUTPUT HEATER AC 24V AC 24V POW ER C O M M T X T X V ID E O Tx DOME1 Tx DOME1 DOME CONTROLLER TXB TX TXA TX RS 485 HALF DUPLEX MODE J BOX REAR REAR AWG 24 BNC BNC MAIN MONITOR SPOT MONITOR KEYBOARD CONTROLLER BNC AC 24V POWER POWER AC 24V Single DVR Configuration ...

Страница 8: ...RXA RXA RXB TXA AC AC TXB DATA1 DATA2 DC 12V 1 DOME 2 DATA2 RS 232C DATA1 J BOX FRONT DVR ALARM DVR OUT IN SLAVE RS 485 T x T x R x R x R x R x T x T x TO THE SLAVE CONTROLLER TO THE NEXT SLAVE CONTROLLER J BOX REAR REAR SLAVE KEYBOARD CONTROLLER SPOT MONITOR 2ND MAIN MONITOR 1ST MAIN MONITOR POWER AC 24V AC 24V POWER POWER AC 24V MASTER KEYBOARD CONTROLLER BNC AWG 24 1 AUX OUTPUT 4 ALARMINPUT VID...

Страница 9: ...AT 5 UTP Cable for LAN Crossover cable for direct connect to PC Disclaimer The connection and remote viewing of the DVR may not be successful on all PC s due to the variety of PC s internet connection settings Please contact the technical support for further assistance 17 DIGITAL VIDEO RECORDER QUICK START PAGE The Factory Default password for the unit is 000000 The Default password to run the CMS...

Страница 10: ...gered by an alarm sensor To disappear press CANCEL button 2 Indicate Motion detected To disappear press CANCEL button 3 Indicate Video Loss during Recording To disappear press CANCEL button 2 1 Indicate Built in CD R W is connected It s changed to blue color while it s doing backup 2 Indicate an USB Device is connected on Front panel It s changed to blue color while it s doing backup 3 Indicate an...

Страница 11: ...ITAL VIDEO RECORDER 3 Quick button for multi screen Display 1 Press F1 button on the remote controller Number For example press F1 button then number 8 The eight channel view mode will be displayed Note 6 4 8 10 13 split mode must be checked on Spit mode to use this function 2 Repositioning It is possible to reposition the camera from the bigger window with the one from a smaller one It is used on...

Страница 12: ... to auto switch cameras Sequence interval can be set from the Sequential Setup y When an alarm has been triggered that specific channel will go into Full Screen x 2 x 8 23 DIGITAL VIDEO RECORDER OPERATION Main Menu Overview When the DVR is powered on Live Viewing screen will appear after initialization about 30sec Press MENU button to access the main menu An Admin Password Box will appear Enter th...

Страница 13: ...DARK GRAY Æ BLACK Æ BLUE Æ WHITE DISPLAY DEVICE ySelect On Screen Display coordinates on Monitor CCTV Monitor Video out through Composite and VGA VGA 1 Monitor Video out through VGA only Specific resolution for this DVR VGA 2 Monitor Video out through VGA only 800 600 resolutions SPLIT MODE y Select Split mode while for manual switching 5 Save changes and exit the menu press ENTER button Exit the ...

Страница 14: ...TRAST 50 y The contrast of each camera can be adjusted by pressing buttons COLOR 50 y The color of each camera can be adjusted by pressing buttons CAMERA TITLE Camera y A combination of 12 digits and alphabets can be entered to label each camera Press appropriate Numeric button to type camera title It s up to 12 characters See Next chart P T Z MODEL None y Select P TZ camera model to control P T Z...

Страница 15: ... y Select All y Clear All y Motion detected zones will be changed to GREEN Color y It is also possible to select smaller motion grids for more precise motion detection by using CMS Motion Detected zones 29 DIGITAL VIDEO RECORDER 5 Save changes and exit the menu press ENTER button Then go RECORD Menu 6 Select ON or OFF to Enable or Disable motion detection on a per camera as shown below 7 Press the...

Страница 16: ...ect audio recording ON or OFF MOTION ySelect Motion Recording ON or OFF Camera does not record under normal conditions It is discussed on Motion Recording Section Note Press MENU button on each Item at first line to apply all setting for the rest channel 5 Save changes and exit the menu press ENTER button 6 Press REC button Then the red REC LED lights on the front panel and recording starts 7 To R...

Страница 17: ...TMENT RECORD TIME y Determines the duration of recording after the alarm signal has been activated 10SEC 240SEC RECORD CAMERA y ALL Start to record All Alarm ON channel if there is any Alarm signal is triggered y 1 1 Start to record the channel which Alarm is triggered MOTION TO ALARM y Select ON to use Motion detection like Alarm triggered From the LOG it will be listed as Motion The unit will no...

Страница 18: ...mal Resulting Actions ON OFF ON ON Press the REC button then Normal recording starts with High picture quality at 3F S without Audio When Alarm is triggered on this channel it changed to record with Super picture quality at 15F S with Audio It will be back to Normal Recording after Alarm recording duration time is end Example 3 RECORD Alarm Normal Motion USE Normal Resulting Actions ON ON ON ON Pr...

Страница 19: ... not be before the starting time or the same as the starting time It must be any time over the starting time 3 MODE Up to 4 different recording modes can be pre determined for schedule recording MODE1 MODE4 6 Define modes below Refer to Basic Recording for set up Note y The recording time is set by 24H 00 00 23 59 You need to set 2 days if the setting is over one day D W BEGIN END MODE Monday 18 0...

Страница 20: ...roviders offer both solutions this manual will distinguish the two solutions according to the commonly available service type to configure the DVR for the networking purposes 1 GENERAL 1 Use Direction buttons to select NETWORK menu Then press ENTER button to display Network 2 Use Down button to specify the detail 3 Use button to change the value 4 Save changes and exit the menu press ENTER button ...

Страница 21: ... mail server ITEM ADJUSTMENT OFF y Select the e mail notification on or off The default is off Default y Select mail server Default it is supporting by manufacture You do not need to setup SMTP server USE SMTP y Select mail server SMTP then Setup below SMTP menu Server y Select Highlight SMTP Server and then press numeric buttons to define an e mail server PORT y Define the port that the SMTP serv...

Страница 22: ...y By default the DVR emits a beep every time a button is pressed Set the key tone to off to turn button beep off Default by ON KEYPAD MODEL y Select Joystick Controller and Baud Rate RECORD SIZE y CIF DVR records each camera individually and then multiplexes them Each channel records at Field resolution 360 240 360 288 y Field DVR records each camera individually and then multiplexes them Each cha...

Страница 23: ...USB Front USB Rear 3 Use down button T to move then press ENTER button to start formatting 4 Formatting will begin and the progress will be displayed at the bottom of the window Please not that it takes 10 30 seconds for format a HDD 5 When formatting is finished it will display COMPLETE and also SUCCESS at the bottom of the window INTERNAL HDD Select the record policy of the internal hard disk dr...

Страница 24: ...rimary HDD status A Master B Slave note It will be displayed when the HDD support S M A R T function Please change this HDD to NEW HDD in the case of WARNING ERROR means the HDD damaged physically IDE BUS 1 y Shows the Secondary HDD status C Master D Slave note Internal CD burner is set on Master by default TEMPERATURE y Shows the temperature status of CPU and System Good Bad Warning VOLTAGE y Sho...

Страница 25: ...n remote controller PTZ custom function 3 P T Z on remote controller Please refer to below camera list for specific functions Please refer to the PTZ manufacture s instruction manual for proper jumper settings to match the protocols to the DVR 49 DIGITAL VIDEO RECORDER PTZ Camera Model PAN TILT ZOOM Camera List Model Name 3X Speed Preset Goto Tour A Pan A Tilt Pat Me Esc Enter C1 C2 Cus3 1 NUVICO ...

Страница 26: ...DER SEARCH PLAYBACK Time Search 1 To start playback press Time Search button Time search Calendar Menu pops up as shown below 2 Use Left Right button to change select Month on 3 Use Up Down buttons to select DAY on Calendar Selected data will be shown as a graphical representation of the recorded video stored on the DVR 4 Select Hour and Minutes or the camera you wish to playback Then press ENTER ...

Страница 27: ...Down buttons TS to desired Time to playback Use Left Right buttons WX to move NEXT page 3 Press ENTER button to start playback Note Log list is saved on HDD Note To save log output please connect USB memory stick into USB port on Front or Rear Then press Menu button on each category to backup Log data 53 DIGITAL VIDEO RECORDER EXTERNAL SEARCH This button allows searching for data from the external...

Страница 28: ...ORMAL ALARM and MOTION data 6 Enter the numbers as required in 24 hour format then move to 7 Press ENTER button to start BACKUP CD indicator will be changed to BLUE Color that the backup is in session RACK CD ROM 55 DIGITAL VIDEO RECORDER z The progress of the backup will be displayed at the bottom of the window in percentages of the entire backup process Please note that the internal CD RW icon s...

Страница 29: ...fferent backup methods MANUAL AND AUTOMATIC The manual backup procedure is the same as using the internal CD RW for backup This section will cover the automatic procedure only Auto back up is enable while DVR is on recording 1 Please connect to external HDD to USB port on Front or Rear 2 The USB indicator will be appeared after connection which takes about 5sec USB Port on Rear USB Port on Front 3...

Страница 30: ...r use on or off The default is off File y It transmit the file to FTP server whenever file is made USE Event y It transmit the file to FTP server for 2 seconds after Event occurs Server y Select Highlight FTP Server and then press numeric buttons to define an FTP server Port y Define the port that the FTP server will communicate through User ID y Enter the user ID of FTP Server It is recognized as...

Страница 31: ...on Front 3 Press ENTER button to start save a snap image current monitoring or playback image 4 USB indicator will be changed to BLUE Color whenever the backup is in session The USB Playback software will not simply auto run please click McdPlayer exe to start mini player 61 DIGITAL VIDEO RECORDER Back up range setup It is possible to set up backup range automatically on Time Search Menu by Month ...

Страница 32: ...62 DIGITAL VIDEO RECORDER 63 DIGITAL VIDEO RECORDER CLIENT PROGRAM Central Management Software ...

Страница 33: ...been tested under a single task environment therefore if multiple tasks are run simultaneously unexpected error may occur Moreover the program may malfunction if inappropriate codecs have been installed on the PC CMS may not run if DirectX 6 0 or earlier version is installed Please download the latest Direct X from Microsoft 65 DIGITAL VIDEO RECORDER 2 HOW TO INSTALL 1 Insert Client Install CD to ...

Страница 34: ...l Screen Display g 10 Way Screen Display b Quad Screen Display h 16 Way Screen Display c 6 Way Screen Display i 25 Way Screen Display d 7 Way Screen Display j 36 Way Screen Display e 8 Way Screen Display k 49 Way Screen Display f 9 Way Screen Display l 64 Way Screen Display Multiscreen selection Current CMS Mode Time and Date Live PB mode Switch Quick Button Playback Button Pan Tilt Control Power ...

Страница 35: ...ek Hour Minutes Seconds 69 DIGITAL VIDEO RECORDER CMS Setup General 1 C F Control Hardware Acceleration Click the Advanced button on Display Properties on your PC ⓐ ⓑ Select Troubleshoot and slow down Hardware Acceleration ⓐ ⓑ a OSD SETUP Select On Screen Display information such as the Time DVR name Camera Number Camera Name Frame Rates for each camera b OVERLAY Default It is recommended to use O...

Страница 36: ...VIDEO RECORDER SOUND Audio alert setting for the CMS You can toggle to enable the sound or to disable the sound from the software Connect CMS will emit a sound when a DVR connects Disconect CMS will emit a sound when a DVR disconnects Alarm CMS will emit a sound when an alarm is triggered from the DVR Motion CMS will emit a sound when the DVR detects a motion Video Loss CMS will emit a sound when ...

Страница 37: ...cus Far Focus Near Focus Auto Switch to Compact Interface Switch to Full Interface Zoom IN Zoom Out 73 DIGITAL VIDEO RECORDER c Iris Indicator Resulting Actions Iris Open Iris Close Iris Auto d Tour Indicator Resulting Actions Set Tour by clicking Total address is depends on connected Pan Tilt Camera Go To Calls up preset Start Automatic Tour e Special Function Key It has various function depends ...

Страница 38: ... 75 DIGITAL VIDEO RECORDER Health Report Health Report menu is provided so that users may quickly overview all the condition of connected DVR You can check maximum 300 DVR statuses such as Failure Event Recording Mode and etc Health Report can be accessed at any time by double clicking HEALTH The detail log lists can be showed by double clicking Name on Health Report or ICON on DVR Window Block Co...

Страница 39: ...Configure current Video Loss channel g HDD SIZE Available HDD Total HDD h BACKUP SIZE Available USB HDD Total USB HDD i REC REMAIN Estimated Remaining Recording Time j HDD It shows defect of Hard Disk k SYSTEM FAN It shows defect of FAN 77 DIGITAL VIDEO RECORDER CMS LOG LIST This menu provides CMS log while CMS is operating For more specific information for each DVR please refer to DVR Log list DV...

Страница 40: ...indow 2 IP Enter the IP address ex 192 168 0 52 or DNS name ex demo dvrhost com 3 Port 7000 Default 4 Password Select from the following options User Password Live Monitoring and remote Playback Search Admin Password All functions 5 Add to List Click Add to List to complete add the DVR onto CMS list 6 Save changes and exit the menu Select OK 7 Exit the menu without making change Click Cancel z APP...

Страница 41: ...d DVR means the disconnection of DVR caused by network error or invalid password CMS try to connect the DVR at every 30 sec in the case of network connecting error When you click this icon it shows this message Network connection error or Invalid Password Please change the password on Set List Manager in the case of invalid password Orange colored DVR means there is an event or system problem When...

Страница 42: ...ield rate of the DVR Camera Title DVR status Time Frame Rate 83 DIGITAL VIDEO RECORDER 3 Multiscreen Display Click the individual Multiscreen buttons to display corresponding multiscreen 4 Change the camera position Click on each camera to directly switch the desired camera 5 Full Screen Display There are 2 way of Full Screen display 1 Select any camera for Full Screen display by double clicking t...

Страница 43: ...ick Play button See Playback section Note If there are no minutes data for the selected time it means there is no recorded video for the selected camera 85 DIGITAL VIDEO RECORDER 4 Selected camera begins playback during live viewing 5 To stop playback Right clicking 6 Then Context Menu will appear Select Live Live viewing Playback Motion Recording Playback ...

Страница 44: ... SCREEN Full Screen Display LIVE 87 DIGITAL VIDEO RECORDER 2 There are four types of Context Menu on playback during Live viewing Click Right Mouse Button to display Context Menu 1 SEARCH Remote Search for Playback See Next page Playback 2 LIVE To stop playback and come back to live viewing 3 FULL SCREEN Full Screen Display 3 There are seven types of Context Menu on each DVR 1 LIVE Live display fo...

Страница 45: ...elow 3 When button pressed Remote Search Menu will appear 4 Select button or button for playback 89 DIGITAL VIDEO RECORDER 1 Remote Playback Remote Playback is provided so that users directly playback the stored video on the internal HDD through CMS Select button and desired DVR Remote Search shows a graphical representation of the recorded video stored on the DVR The Data are color coded by categ...

Страница 46: ...e and End time of selected File b CURRENT Indicate the time of current downloaded file c Download Cancel Select 91 DIGITAL VIDEO RECORDER d Download Complete Current time will be changed to message Download Complete after the download has been completed as shown below Click 3 LOCAL Local Menu is mainly used to review the data downloaded from a DVR through CMS Select button Local Search shows a gra...

Страница 47: ...s up as shown below 1 Display 1 Display Setup a Status bar Show or Hide b Camera Select OSD information for camera c Select Border Color or Background Color 93 DIGITAL VIDEO RECORDER 2 Sequential Mode 2 Camera Setup ⓐ Select Camera 1 16 ⓑ Select Covert On OFF ⓒ Adjust Brightness Contrast and Color 0 99 ⓓ Enter the camera title up to 12 characters ⓔ Select P T Z Camera a Sequential Interval 1 30 se...

Страница 48: ...by right click on the mouse It is also possible to select smaller motion grids for more precise motion detection ⓐ ⓑ ⓒ ⓓ ⓔ 95 DIGITAL VIDEO RECORDER 5 Alarm Record 1 Alarm Record Set up 2 Alarm Record Set up ⓐ Record Time Adjust Post Event Duration ⓑ Record Camera All or 1 1 ⓒ Alarm Buzzer Alarm Buzzer On Off ⓓ Alarm Out Configure which relay will be triggered when an alarm is activated per camera...

Страница 49: ...p for selected Day as shown below Save setup and exit the menu select OK or otherwise exit the menu without making changes select Cancel Enter the beginning and end time and then select Record Mode to record Schedule Menu shows a graphical representation of the defined record Mode Mode 1 4 However the Schedules are only displayed if a corresponding schedule has been configured in the schedule menu...

Страница 50: ...up SMTP server if you want to use your own mail server ⓐ ⓑ 99 DIGITAL VIDEO RECORDER 8 System Setup 1 General 2 Time a System ID Configure Set ID b Auto Key Lock ON OFF c Key Tone Key tone ON OFF d Select overwrite HDD e Camera Record Fps Select Max Recording Frame rate a Time Sync Select Master or slave clock b Configure Time server c Enter the date and time ⓐ ⓑ ⓒ ⓓ ⓔ ⓐ ⓑ ⓒ ...

Страница 51: ...ord Changed the user Password up to 5 users 4 Control d Stop Recording e Schedule On Off f Alarm Activated through Network ⓐ ⓑ ⓒ 101 DIGITAL VIDEO RECORDER 5 FTP Server Set up Set up the FTP Server for Auto Back up Refer to FTP Back up ...

Страница 52: ...occurring from a virtual DVR with registered cameras The cameras with events are moved to channel 1 automatically then arranged in the order of priority Auto Insert Arrange Check this option to have the CMS to add prioritize and arrange cameras with any of the events occurring from any cameras Alarm Motion Video Loss Check those options to have the cameras with alarm motion triggers or Video Loss ...

Страница 53: ...draged to channel Number 5 CH 5 C CH 12 105 DIGITAL VIDEO RECORDER 2 Any selected camera on DVR Click any DVR on DVR Window while Virtual DVR is activating After camera Icons diplyed any camera on DVR to directly drag the desired channel In the following exampels Camera No 1 on 3rd DVR is draged to Channel No 14 5 Delete Camera There are two ways of deleteing the camera from CMS 1 Select any camer...

Страница 54: ...nt software We provide client software in a CD 1 Connect modem to the back of DVR RS 232C MODEM 2 Follow the below steps Start Programs Accessories Communications Network and Dial up Connections 107 DIGITAL VIDEO RECORDER 3 Double click Make New Connection 4 Click Next at the window of network connection wizard ...

Страница 55: ...l up to private network and click Next 6 Enter the telephone number which is connected to the DVR 109 DIGITAL VIDEO RECORDER 7 Check For all user and click Next 8 Type DVR at the parameter check Add a shortcut to my desktop and click Finish ...

Страница 56: ...peed of analog modem is 33 6kbps between DVR and the Computer At the ISP Internet Service Provider and digital modem It s max speed is 56kbps For more information on connection speed please contact your modem manufacturer directly 111 DIGITAL VIDEO RECORDER 11 Open CMS and click Set list manager 12 Type on DVR title to display on monitoring window enter 192 168 1 1 in IP and set port default 80 an...

Страница 57: ...he PC The function is exactly same as CMS except that WEB CMS does not support Download It is to view live images and playback only 1 CONNECTING TO THE UNIT VIA INTERNET EXPLORER Enter the IP address of the unit in the address pane of the Internet Explorer For example type in http 192 168 0 250 7000 Above illustrates example of a unit when it is utilizing port 7000 The default port for the unit is...

Страница 58: ...ou can either sign in with admin or user Next enter the password for the unit 115 DIGITAL VIDEO RECORDER Click on Web CMS Use overlay to connect to the DVR Please refer to page 85 for more information on CMS overlay A small icon will appear on the upper left corner of the internet explorer indicating the user for the presence of Active X Click on Install ActiveX Control Click on Install Wait until...

Страница 59: ...on Web viewer to connect to the DVR only purpose for view 117 DIGITAL VIDEO RECORDER APPENDIX 4 AVI Converting Required Software for PC 1 Avi Player 2 Divx 4 0 Video Codec It is used for only MPEG4 DVR CMS file and back up file How to change CMS file to AVI file 1 Click the ConvAVi exe to start convert 2 Browse the target file through on next Input file ...

Страница 60: ...s 720 288 200fps 360 288 400fps Audio Record 8CH 8 IN 1CH Out 16CH 16 IN 1CH 16CH 16 IN 1CH Features Display Brightness Contrast Color Adjustments Per Channel Camera Title 12 Characters per Channel Recording Mode Manual Schedule Alarm Motion Recording Method 5 Levels of Compression Rate Record Frame Rate Adjustment Recording Adjustments Pre Alarm 5 sec Post Alarm 10 sec 240 sec Motion Detection Pe...

Страница 61: ...120 DIGITAL VIDEO RECORDER General Power AC 100 240V Universal 50 60 Hz Power Consumption 82Watt Operation Temperature 0 40 Dimension Weight 430 W x 450 D x 100 H 8 7 Kg Revised at Mar2007 ...

Отзывы: