background image

64

ENGLISH

Windows XP

1

Insert the DVD-RAM disc you want to format.

2

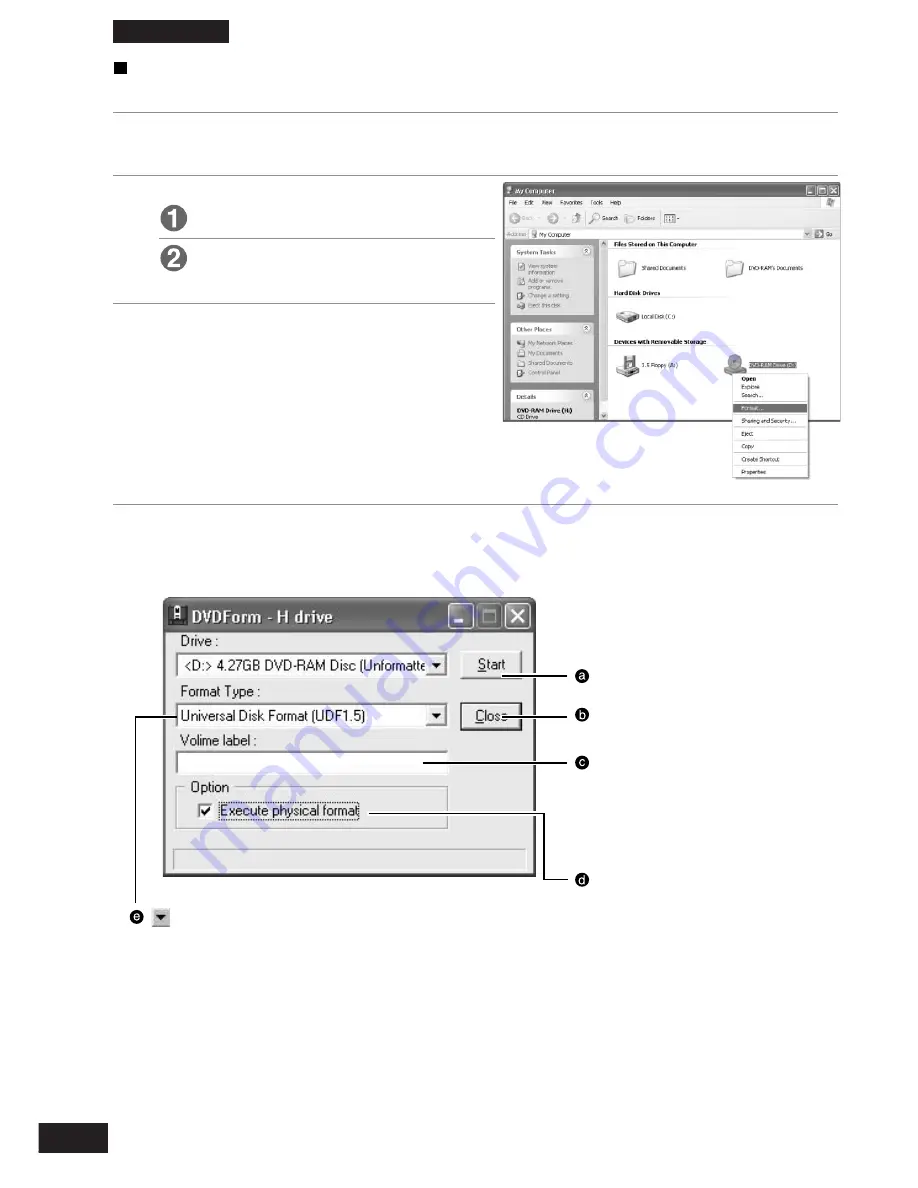
Open [My Computer].

Right click on the icon for the DVD-
RAM disc.

3

Click [Format].

4

The following window is shown.

Follow the instructions below.

 Click to start formatting.

 Click to close DVDForm.

 Enter a volume name.

You must input a volume name
when you select UDF format.
When you do not input one, the
volume name is set as “UDF” and
the date automatically.

 Select this when you want to

perform physical formatting.

(There is no need to do this every
time.)
This mode forces a check of all
sectors for defects and allocates
detected defective sectors to the
spare area.
(Normally it takes about between
40 and 90 minutes for 4.7 GB/9.4
GB DVD-RAM discs, and 2.6 GB/
5.2 GB DVD-RAM discs and
takes about 20 minutes for 8 cm
DVD-RAM discs.)

 Select the format type.

(See the tables on pages 68 and 69.)

Содержание LF-M621U

Страница 1: ...n Sie diese Bedienungsanleitung vollständig durch bevor Sie das Gerät anschließen in Betrieb nehmen oder einstellen und bewahren Sie diese Anleitung sorgfältig auf Avant de raccorder faire fonctionner ou régler l appareil lire attentivement tout ce mode d emploi Conserver ce manuel Compatible operating system Kompatible Betriebssysteme Système d exploitation compatible Windows XP Home Edition Prof...

Страница 2: ...lation 48 Checks after installation 54 Using DVD RAM discs 60 Formatting 60 Recommended formats 66 Format types 68 Accessing DVD RAM discs recorded on a DVD Recorder 69 Using DVD RAM utility 74 When you cannot copy or reformat 80 Using other discs 80 Using B s Recorder GOLD5 BASIC 83 Using B s CLiP5 98 Using DVD Movie AlbumSE 3 106 Using MyDVD 4 114 Using WinDVD 4 122 Using FileSafe 128 Support ut...

Страница 3: ...fonctionnement clignote 137 Guide de dépannage 140 Manipulation des disques 143 Caractéristiques techniques 158 Inhaltsverzeichnis WICHTIGE SICHERHEITSERKLÄRUNG 5 SICHERHEITSAUFKLEBER 7 WICHTIGE SICHERHEITSHINWEISE 10 ENTSORGEN VON DISCS 12 VORSICHTSMASSNAHMEN 12 Inbetriebnahme Inhalt des Verpackungskartons 14 Merkmale 16 Geeignete Discs 20 Lage und Funktion der Teile 28 Einstellungen und Anschlüs...

Страница 4: ... respective owners Matsushita Electric Industrial Co Ltd herewith declares that it will not be liable in any way for any loss of data or any other damage whether direct or indirect caused by the operation or malfunctioning of this product Backup important data to protect it from possible loss IMPORTANT SAFETY NOTICE ENGLISH Do not insert any foreign objects into the drive unit since this may resul...

Страница 5: ...rnimmt keinerlei Haftung für Datenverluste oder sonstige direkte oder indirekte Schäden die auf den Betrieb oder eine Funktionsstörung dieses Gerätes zurückzuführen sind Bitte erstellen Sie grundsätzlich Sicherungskopien aller wichtigen Daten um gegen Verluste geschützt zu sein WICHTIGE SICHERHEITSERKLÄRUNG Keine Fremdkörper in das Laufwerk einlegen da sonst die Gefahr besteht dass das Laufwerk se...

Страница 6: ...priétaires respectifs Matsushita Electric Industrial Co Ltd déclare ici que la société ne sera en aucun cas responsable de la perte de données ou de tout autre dommage direct ou indirect provoqué par l utilisation ou le fonctionnement défectueux de cet appareil Sauvegarder les données importantes afin de les protéger d une perte possible AVERTISSEMENT IMPORTANT CONCERNANT LA SÉCURITÉ Ne pas introd...

Страница 7: ...TRÅLING NÅR DEKSEL ÅPNES STIRR IKKE INN I STRÅLEN ELLER SE DIREKTE MED OPTISKE INSTRUMENTER VARNING LASERSTRÅLNING NÄR DENNA DEL ÄR ÖPPNAD STIRRA EJ IN I STRÅLEN OCH BETRAKTA EJ STRÅLEN MED OPTISKA INSTRUMENT VARO AVATTAESSA OLET ALTTIINA LASERSÄTEILYLLE ÄLÄ TUIJOTA SÄTEESEEN ÄLÄKÄ KATSO SITÄ OPTISEN LAITTEEN LÄPI CAUTION Laser radiation when open DO NOT STARE INTO BEAM CAUTION INVISIBLE LASER RAD...

Страница 8: ...n order to avoid exposure to beam or do not stare into beam or view directly with optical instruments When the power switch of the computer is on do not place your eyes close to the front panel opening door and other openings to look into the inside of the drive Caution Use of controls or adjustments or performance of procedures other than those specified herein may result in hazardous radiation e...

Страница 9: ...e Semiconductor laser AlGaAs Wave Length 775 815 nm Typical 790 nm Divergence θ 17 2 5 Output Power Read 0 28 mW Write 44 mW Laser Daten For German Typ AlGaAs Halbleiter Laser Wellenlänge 775 815 nm Typisch 790 nm Divergenz θ 17 2 5 Ausgangsleistung Lesen 0 28 mW Schreiben 44 mW Laser specifikationer For Swedish Typ Laserhalvedare AlGaAs Våglängd 775 815 nm Typiskt 790 nm Divergens θ 17 2 5 Uteffe...

Страница 10: ...Laufwerk vor direkter Sonneneinstrahlung schützen und nicht an sehr heißen Orten aufstellen Das Laufwerk nicht an einem sehr staubigen Platz oder bei hoher Luftfeuchtigkeit betreiben Keine gesprungenen oder verzogenen Discs abspielen Die Disc Lade darf nicht gewaltsam geöffnet werden Stecken Sie keine Finger in Geräteöffnungen Blicken Sie nicht ins Geräteinnere Während die Disc rotiert darf der Co...

Страница 11: ...this drive If the computer is to be moved remove the cartridge or disc close the tray and then turn the power off To ship the drive e g if you are moving remove it from the computer and put it in the packing material you received when you purchased it Do not drop the drive or bump it into objects when moving or transporting it Maintenance Maintaining this drive s panel surfaces Turn off the comput...

Страница 12: ...idge oder Disc aus dem Laufwerk entfernen die Disc Lade schließen und dann die Stromzufuhr ausschalten Zum Transport des Laufwerks z B bei einem Umzug dieses aus dem Computer ausbauen und wieder in seinem Original Verpackungskarton unterbringen Beim Tragen darauf achten dass das Laufwerk nicht fallengelassen wird oder gegen andere Gegenstände stößt Instandhaltung und Pflege Reinigen der Außenfläch...

Страница 13: ...çu au moment de l achat Ne pas laisser tomber le lecteur ni le heurter lors de son déplacement ou transport Entretien Entretien de la surface des panneaux de ce lecteur Mettre l ordinateur hors tension Enlever doucement la poussière à l aide d un chiffon doux sec et non pelucheux Pour enlever des taches tremper le chiffon dans du détergent neutre dilué bien l essorer puis essuyer Observer toutes l...

Страница 14: ...berprüfen Sie das mitgelieferte Zubehör anhand der folgenden Liste auf Vollständigkeit Contrôler et identifier les accessoires fournis Note Please read this manual completely and obtain whatever additional components are re quired Use numbers in parentheses when asking for replacement parts These numbers are for one part Hinweis Bitte lesen Sie diese Bedienungsanleitung vor der Inbetriebnahme voll...

Страница 15: ...data CD DVD and audio CD as well as back up CDs and DVDs This software also allows you to write to DVD RAM B s CLiP5 CD RW and DVD RW packet writing software See page 98 This software allows you to write data to CD RW DVD RW discs in files DVD MovieAlbumSE 3 DVD Video Recording software See page 106 This software provides an environment for recording playing and editing video recordings that compl...

Страница 16: ...len können Außerdem kann dieses Programm zum Schreiben auf DVD RAM Discs eingesetzt werden B s CLiP5 Paket Schreibprogramm für CD RW und DVD RW Discs Siehe Seite 99 Dieses Programm ermöglicht das Schreiben von Daten auf CD RW DVD RW Discs in Form von Dateien DVD MovieAlbumSE 3 DVD Video Aufzeichnungsprogramm Siehe Seite 107 Dieses Programm bietet eine geeignete Umgebung für die Aufzeichnung Bearbe...

Страница 17: ... de données et CD audio et de faire des copies de sauvegarde des CD et DVD Ce logiciel vous permet également d écrire sur les DVD RAM B s CLiP5 logiciel d écriture par paquets CD RW et DVD RW Voir page 99 Ce logiciel vous permet d écrire des données dans des fichiers de disques CD RW DVD RW DVD MovieAlbumSE 3 logiciel d enregistrement vidéo DVD Voir page 107 Ce logiciel fournit un environnement pe...

Страница 18: ...or Authoring Ver 1 0 4 7 GB Ver 1 0 4 7 GB Ver 1 1 Reading Speed 3x 2x 1x 2x Max 12x Max 6x Max 6x Max 6x Max 6x Max 6x Max 6x Max 6x DVD ROM DVD Video DVD RW DVD R ENGLISH Writing to DVD RAM discs with B s Recorder GOLD5 BASIC Apart from current hard disk like operations such as drag and drop in Explorer or saving directly from an application with B s Recorder GOLD5 BASIC you can also write to DV...

Страница 19: ... and other moving pictures in MPEG1 CD R RW Disc Writing Format Disc At Once This format records all the data onto a single disc in one go It is not possible to write additional data to the disc afterwards Track At Once This format records data track by track As long as there is space remaining on the disc additional recordings may be carried out up to a maximum of 99 times Session At Once This fo...

Страница 20: ...solchen Programm können Sie Dateien auf gleiche Weise auf eine Disc aufzeichnen wie auf ein Festplattenlaufwerk DEUTSCH Disc Schreiben auf DVD RAM Discs unter Einsatz von B s Recorder GOLD5 BASIC Neben aktuellen Festplatten ähnlichen Operationen wie Drag und Drop im Explorer oder dem direkten Abspeichern aus einer Anwendung können Sie mit Hilfe von B s Recorder GOLD5 BASIC genau wie auf CD R RW Di...

Страница 21: ...für CD R RW Discs Disc At Once Bei diesem Format werden alle Daten in einem einzigen Schreibvorgang auf die Disc geschrieben Danach können keine weiteren Daten auf die betreffende Disc aufgezeichnet werden Track At Once Bei diesem Format werden Daten für jeweils einen Titel aufgezeichnet Solange freier Speicherplatz auf einer Disc verbleibt können weitere Aufzeichnungen mit einer maximalen Anzahl ...

Страница 22: ...pour l écriture Ver 2 0 3 95 Go pour l écriture Ver 1 0 4 7 Go Ver 1 0 4 7 Go Ver 1 1 Écriture sur les disques DVD RAM avec B s Recorder GOLD5 BASIC En plus des opérations similaires à celles que l on effectue sur un disque dur telles que le glisser déposer dans Explorer et la sauvegarde directe à partir d une application B s Recorder GOLD5 BASIC permet également d écrire sur les DVD RAM sauf les ...

Страница 23: ...s en MPEG1 Format d écriture des disques CD R RW Disc At Once Dans ce format toutes les données sélectionnées sont enregistrées en une opération unique sur un seul disque Il n est pas possible d écrire des données additionnelles sur le disque par la suite Track At Once Dans ce format les données sont enregistrées plage par plage Tant qu il reste de l espace sur le disque il est possible d effectue...

Страница 24: ...computer 3 The DVD R for General or DVD RW you create with this drive and MyDVD 4 follow the DVD Forum s video recording standards and can be played on DVD players that can play DVD R DVD RW and on compatible DVD ROM and DVD RAM drives However play is not guaranteed on any of these You will need software to enable play of DVD Video on DVD RAM and DVD ROM drives 4 Video CD format CD R and CD RW dis...

Страница 25: ... DVD RAM Laufwerken geeignet Bitte beachten Sie jedoch dass eine fehlerfreie Wiedergabe mit derartigen Geräten nicht gewährleistet ist Zum Abspielen von DVD Video Discs mit einem DVD RAM oder DVD ROM Laufwerk ist Spezial Software erforderlich 4 CD R und CD RW Discs im Video CD Format die unter gemeinsamen Einsatz dieses Laufwerks mit MyDVD 4 erstellt wurden können mit Geräten abgespielt werden die...

Страница 26: ...ilisation combinée de cet appareil et de MyDVD 4 peuvent être lus sur un appareil compatible avec la lecture des CD R CD RW et Vidéo CD Version 2 0 La lecture n est toutefois pas garantie sur tous les appareils 5 Les disques DVD RAM créés au moyen de ce lecteur et de B s Recorder GOLD5 BASIC deviennent ensuite des supports à lecture seulement voir page 22 Lecture écriture Création Création Lecture...

Страница 27: ...lose the tray 1 Turn on the computer 2 Press the open close button The tray may close automatically when you turn the computer on Open close button For opening and closing the tray Shutter Rear panel AUDIO output connector For connecting the internal audio cable in cluded Jumper connector For setting the drive s Master and Slave See page 30 IDE connector For connecting the internal IDE cable not i...

Страница 28: ...i A u f z e i c h n u n g Wiedergabe oder Öffnen Schließen der Disc Lade Blinkt grün Fehlerzustand Siehe Seite 136 Notausgabeloch Falls sich die Disc Lade durch Drücken der Auf Zu Taste bzw über Programmbefehl nicht ausfahren lässt kann sie anhand des folgenden Verfahrens manuell ausgefahren werden Das obige Verfahren darf nur ausgeführt werden wenn sich die Disc Lade nicht auf normale Weise ausfa...

Страница 29: ... sous tension 2 Appuyer sur la touche d ouverture fermeture Il se peut que le plateau se ferme auto matiquement lorsque l ordinateur est mis sous tension Touche d ouverture fermeture Pour ouvrir et fermer le plateau Volet FRANÇAIS Panneau arrière Connecteur de sortie audio Pour le raccordement du câble audio interne fourni Connecteur de cavalier Pour régler le serveur en mode maître ou asservi Voi...

Страница 30: ... drive Be sure to read the operating instructions and operating precautions for the computer into which the drive will be installed Turn off the computer and unplug the power cord from the power socket Never connect the drive while the power is on Do not place the drive where it will be susceptible to vibration or impact or where the surface is tilted Be sure to observe all operating environment r...

Страница 31: ...ten Positionen in den Schalter ein Anderenfalls besteht die Gefahr einer Funktionsstörung des Laufwerks Beispiel einer unzulässigen Einstellung Réglages et raccordements Ceci est un équipement à interface IDE conforme aux caractéristiques ATAPI Exemples de connexions Les cartes mères d ordinateur ont deux connecteurs d interface IDE l un primaire l autre secondaire Vous pouvez connecter jusqu à qu...

Страница 32: ...he drive into a computer or other device secure the drive firmly in place with four mounting screws included in four places on the right and left panels or in four places on the bottom panel ENGLISH Note Only use the screws included in this drive Using screws with a different length or diameter may damage the drive Mounting screws included This drive Computer Mounting screws included ...

Страница 33: ...m Lieferumfang dieses Laufwerks Bei Verwendung von anderen Schrauben mit unterschiedlicher Länge oder einem anderen Durchmesser kann das Laufwerk beschädigt werden Raccordement de ce lecteur à un ordinateur Il y a huit emplacements pour les vis de fixa tion sur les panneaux latéraux du lecteur et quatre autres sur le panneau inférieur Pour fixer le lecteur à un ordinateur ou à un autre périphériqu...

Страница 34: ...matches the audio output connector or use the cable supplied with the sound board not included Insert into computer expansion slot Rear panel of this drive Audio output connector Speakers with built in amplifier not included IDE connector Power supply connector Power supply cable from computer Sound board not included Internal IDE cable not included When using DMA66 for transter mode you will need...

Страница 35: ... secondaire sur la carte mère de l ordinateur Enceintes stéréo avec amplificateur incorporé non fournies Anschließen der Kabel und Soundkarten Achten Sie darauf die Stecker aller Kabel bis zum Anschlag in die Buchsen zu schieben Rückwand dieses Laufwerks Audioausgang IDE Anschluss Netzeingang Internes Audiokabel mitgeliefert bzw das Kabel dessen Stecker in den Audioausgang passt oder das mit der S...

Страница 36: ...sc holder A Disc holder B Label DVD RAM DVD R DVD RW CD R CD RW CD ROM or DVD ROM disc Disc guide Indent for 8 cm discs Set 8 cm discs in the indent Set 12 cm discs so the rear edge is under the stopper and the sides are between the disc guides Discs cannot be read and may be damaged if you insert them incorrectly Remove 8 cm DVD RAM from their cartridges before use Refer to the disc s instruction...

Страница 37: ...le bord avant du disque sous le butoir 3 Insérer le disque de telle sorte qu il se loge à l intérieur des supports de disque Einlegen von DVD RAM DVD R Discs und anderen Discs Bei waagerechter Installation dieses Laufwerks DVD RAM Discs DVD RAM Disc Etikett Disc Lade 1 Legen Sie die DVD RAM Disc so in die Disc Lade ein dass das Etikett auf der Blende nach oben weist 2 Schieben Sie die DVD RAM Disc...

Страница 38: ...CD ROM or DVD ROM disc You cannot use 8 cm discs even with an adapter 1 Raise disc holders A and B so they are higher than the tray 2 Insert the disc diagonally between the stopper and the tray and push it about 1 cm towards the stopper 3 Now pull the disc back so it fits between the tray and disc holders A and B Note Do not turn off the computer or remove DVD RAM discs while the Operation Indicat...

Страница 39: ...un disque dans le plateau Bei senkrechter Installation dieses Laufwerks DVD RAM Discs Disc Lade Etikett DVD RAM Disc 1 Legen Sie die DVD RAM Disc so in die Disc Lade ein dass das Etikett auf der Blende nach oben weist 2 Schieben Sie die DVD RAM Disc um ca 2 cm in Richtung des Laufwerks 3 Drücken Sie sacht auf das Etikett auf der Blende bis die DVD RAM Disc fest auf der Disc Lade aufliegt Andere 12...

Страница 40: ...and players play the images you recorded on a DVD recorder and erase unnecessary parts create play lists with simple mouse and keyboard commands and add or edit titles plus other editing functions It is also possible to transfer extracted data and title information to MyDVD 4 and make a DVD video 4 MyDVD 4 DVD Authoring software See page 114 This software can process the following material to crea...

Страница 41: ...elen lassen die mit einem DVD Recorder aufgezeichneten Bilder wiedergeben und unerwünschte Teile löschen Abspiellisten anhand einfacher Befehle über Maus und Tastatur zusammenstellen Namen hinzufügen und bearbeiten sowie auf eine Reihe weiterer Bearbeitungsfunktionen zugreifen Außerdem können extrahierte Daten und Nameninformationen an MyDVD 4 übertragen und DVD Video Discs erstellt werden 4 MyDVD...

Страница 42: ...nétoscope DVD et effacer les parties inutiles créer des listes de lecture à l aide d une simple souris ou de commandes clavier puis ajouter ou modifier des titres ainsi que d autres fonctions de montage Il est également possible de transférer sur MyDVD 4 les données et informations de titre extraites puis de créer un DVD Vidéo 4 MyDVD 4 logiciel auteur DVD Voir page 115 Ce logiciel comprend des me...

Страница 43: ...e except that you may make one 1 copy of the Programs for backup purposes only in support of your use of the Programs on the single Product which was accompanied by the Programs You shall not modify or attempt to modify the Programs E You may transfer the Programs and license them to another party only in connection with your transfer of the single Product which was accompanied by the Programs to ...

Страница 44: ...produziert werden außer dass der Käufer eine 1 Kopie der Programme ausschließlich für Sicherungszwecke und nur zur Unterstützung der Verwendung der Programme mit genau dem Produkt erstellen darf zu dessen Lieferumfang die Programme gehören Der Käufer darf die Programme weder modifizieren noch solche Modifkationen versuchen E Der Käufer darf die Programme und eine diesbezügliche Benutzerlizenz nur ...

Страница 45: ...e uniquement pour soutenir votre utilisation des Logiciels sur le Produit unique qui est accompagné par les Logiciels Vous ne pouvez ni modifier ni tenter de modifier les Logiciels E Vous ne pouvez céder les Logiciels et en octroyer la licence à une autre partie qu en rapport avec votre cession du Produit unique qui est accompagné par les Logiciels à cette autre partie Au moment de cette cession v...

Страница 46: ...does not start automatically start it manually by following the pro cedure below This assumes that the drive letter assigned to this drive for CD ROM media is E From the Start menu select Run In the Open box enter e setup exe Click OK The installation program starts 2 After the following window is shown click on the button of the software you want to install ...

Страница 47: ...Sie dann auf OK Das Installationsprogramm startet 2 Wenn das folgende Fenster erscheint klicken Sie auf die Schaltfläche der Software die installiert werden soll Affichage du menu du logiciel 1 Insérer le CD ROM fourni dans ce lecteur Le programme d installation démarre automatiquement Si le programme d installation ne démarre pas automatiquement le démarrer manuellement en procédant comme indiqué...

Страница 48: ... when install ing When installing the other software after installing the driver select No I will restart my com puter later in step 2 Restart your computer after you have completed installation of the rest of the software 2 After installation Select Yes I want to restart my com puter now Click Finish The computer now reboots You can read from and write to a DVD RAM disc after rebooting To verify ...

Страница 49: ...rts können Daten von einer DVD RAM Disc gelesen und auf diese geschrieben werden Gehen Sie wie im Abschnitt Überprüfungen nach der Installation beschrieben vor um sicherzustellen dass die Treiber einwandfrei installiert wurden siehe Seite 55 und 57 Installation du logiciel de pilote DVD RAM Remarques Si un logiciel d écriture par paquets et un système de fichier UDF autres que B s CLiP5 fourni ave...

Страница 50: ...ish 3 The computer detects the DVD RAM device Click Yes when the computer has fin ished setting up the DVD RAM device The computer restarts 4 After the DVD RAM device is installed click Yes if the following message appears The computer restarts You can read from and write to a DVD RAM disc after rebooting To verify that the drivers were installed correctly refer to Checks after installation on pag...

Страница 51: ... und auf diese geschrieben werden U m n a c h z u p r ü f e n d a s s d i e Treiberprogramme einwandfrei installiert wurden gehen Sie wie im Abschnitt Überprüfungen nach der Installation auf Seite 55 und 57 beschrieben vor Windows 2000 1 Cliquer sur Pilote du DVD RAM sur l écran de l étape 2 page 46 Cliquer sur Suivant lorsque l écran à la page 50 s affiche Suivre les instructions à l écran pour p...

Страница 52: ...unction in this way will result in the deactivation of the standard write function for CD R CD RW in Windows XP for that drive When writing to Windows XP standard CD R CD RW discs turn on the CD Write Possible Using This Drive setting in Drive Property Deactivating the RAM auxiliary tool 1 Select Start Programs Startup RAMASST right click Deletion 2 Reboot the computer Activating the RAM auxiliary...

Страница 53: ...ieren oder Aktivieren des RAM Hilfswerkzeugs müssen Sie sich unter einem Benutzernamen anmelden der zum Netzkonto des Systemadministrators gehört Windows XP 1 Cliquer sur Pilote du DVD RAM sur l écran de l étape 2 page 46 Cliquer sur Suivant lorsque l écran à la page 52 s affiche Suivre les instructions à l écran pour procéder à l installation 2 Après l installation Sélectionner Oui je veux redéma...

Страница 54: ... CD ROM DVD ROM CD R CD RW DVD R DVD RW discs If the correct icons do not appear select Refresh from the View pull down menu When reading or writing in DVD RAM format use drive E When reading or writing in any other disc format use drive D Depending on the system configuration it may be possible to change the drive name alphabet Windows XP When this drive has been correctly connected the icon for ...

Страница 55: ...déroulant Affichage Icône du lecteur DVD MULTI Überprüfungen nach der Installation Führen Sie das unten beschriebene Verfahren aus um nachzuprüfen dass dieses Laufwerk einwandfrei registriert ist und erkannt wird Überprüfung in Arbeitsplatz Windows 98 Me 2000 Wenn dieses Laufwerk korrekt angeschlossen und die Treiberprogramme einwandfrei installiert wurden werden 2 Symbole für DVD RAM Disc und CD ...

Страница 56: ...nd appear If they fail to appear refer to Troubleshooting on page 138 Windows 2000 From the Start menu select Settings then Control Panel Select System then click on the Hardware tab to bring up the win dow below which shows all devices connected Double click Disk drives DVD CD ROM drive and DVD RAM de vice and verify that items and appear If they fail to appear refer to Troubleshooting on page 13...

Страница 57: ...device um nachzuprüfen dass die abgebildeten Einträge und erscheinen Falls diese drei Einträge nicht erscheinen schlagen Sie bitte im Abschnitt Fehlersuche auf Seite 139 nach Contrôle avec Gestionnaire de périphériques Ce lecteur apparaît sous la dénomination DVD RAM SW 9572 Windows 98 Windows Me D a n s l e m e n u D é m a r r e r sélectionner Paramètres puis Panneau de configuration Sélectionner...

Страница 58: ...rol Panel then Performance Main tenance Select System then Hardware then click on the Device Manager tab to bring up the window below which shows all devices connected Double click DVD CD ROM drives and verify whether item appears This drive is recognized ...

Страница 59: ...e r ä t e aufgelistet sind Doppelklicken Sie auf DVD CD ROM drives und vergewissern Sie sich dass Eintrag erscheint Dieses Laufwerk wird erkannt Windows XP D a n s l e m e n u D é m a r r e r sélectionner Panneau de con figuration puis Performance Maintenance Selectionner Système et Matériel puis cliquer sur l onglet Gestionnaire de périphériques pour faire apparaître la fenêtre à la page 58 q u i...

Страница 60: ...atted using either UDF Universal Disk Format or FAT32 format Use the format appropriate to your needs Format 2 8 GB 8 cm 5 2 GB 9 4 GB double sided DVD RAM discs one side at a time UDF Universal Disk Format UDF is newly specified for DVD family products This new format is optimized for big capacity files such as Video and Audio capture and playback to keep constant high transfer rates FAT32 Format...

Страница 61: ...mms müssen Sie sich mit einem Benutzernamen anmelden der zur Administrator Gruppe des Computers gehört Vor Beginn des Formatiervorgangs müssen alle Anwendungen beendet werden die momentan auf einer DVD RAM Disc verwendet werden Utilisation d un disque DVD RAM En principe vous devez formater un disque DVD RAM avant de pouvoir y écrire des fichiers Une fois que le DVD RAM a été logiquement formaté i...

Страница 62: ...r defects and allocates detected defective sectors to the spare area Normally it takes about between 40 and 90 minutes for 4 7 GB 9 4 GB DVD RAM discs and 2 6 GB 5 2 GB DVD RAM discs and takes about 20 minutes for 8 cm DVD RAM discs Select the format type See the tables on pages 68 and 69 Starting the formatting software DVDForm Windows 98 Me 2000 1 Insert the DVD RAM disc you want to format 2 Ope...

Страница 63: ...chen 40 und 90 Minuten bei einer DVD RAM Disc mit einer Speicherkapazität von 4 7 GB 9 4 GB oder 2 6 GB 5 2 GB und ca 20 Minuten bei einer 8 cm DVD RAM Disc Wählen Sie den Formattyp aus Siehe die Tabellen auf Seite 70 und 71 Démarrage du logiciel de formatage DVDForm Windows 98 Me 2000 1 Insérer le disque DVD RAM que l on désire formater 2 Ouvrir le Poste de travail Cliquer avec le bouton droit su...

Страница 64: ... UDF format When you do not input one the volume name is set as UDF and the date automatically Select this when you want to perform physical formatting There is no need to do this every time This mode forces a check of all sectors for defects and allocates detected defective sectors to the spare area Normally it takes about between 40 and 90 minutes for 4 7 GB 9 4 GB DVD RAM discs and 2 6 GB 5 2 G...

Страница 65: ...und 90 Minuten bei einer DVD RAM Disc mit einer Speicherkapazität von 4 7 GB 9 4 GB oder 2 6 GB 5 2 GB und ca 20 Minuten bei einer 8 cm DVD RAM Disc Wählen Sie den Formattyp aus Siehe die Tabellen auf Seite 70 und 71 Windows XP 1 Insérer le disque DVD RAM que l on désire formater 2 Ouvrir le Poste de travail Cliquer avec le bouton droit de le souris sur l icône DVD RAM 3 Cliquer sur Formater 4 La ...

Страница 66: ...if the disc is to be played in a DVD Recorder that uses the DVD Forum s video recording standard or with the recording software designed for personal computers that is based on the above standard or if an 8 cm DVD RAM is to be used in a DVD video camera 1 Select Universal Disk Format UDF 2 0 2 Enter a volume name 3 Click Start Notes In the case of Windows XP the DVD RAM icon may change to a CD ROM...

Страница 67: ...erscheint wenn Sie bei deaktivierter Prüfung eine DVD RAM Disc formatieren die mit Hilfe von B s Recorder GOLD BASIC beschrieben wurde Klicken Sie auf OK um die physikalische Formatierung der Disc zu starten Formats recommandés Sélectionner Universal Disk Format UDF 1 5 si on utilise le disque DVD RAM pour y inscrire des données PC Ce format permet le transfert des données entre des systèmes d exp...

Страница 68: ...iscs Universal Disk Format UDF 1 5 FAT32 This is the standard format type for DVD RAM Data can be trans ferred between different operating systems for example Windows and Mac OS 1 This is the additional format type in Windows 95 OSR2 2 Windows 98 Windows Me Windows 2000 Windows XP FAT32 formatted discs cannot be used with Windows 95 other than OSR2 2 Windows NT Universal Disk Format UDF 1 5 Univer...

Страница 69: ...ormatting software that starts if you click on Yes when the following window appears in Windows 98 or Windows Me Formatting a DVD RAM disc with the standard format program included in Windows 98 Me results in a FAT16 format that exceeds the 2 0 GB limit which can interfere with subse quent use Accessing DVD RAM discs recorded on a DVD Video Recorder When you record onto a DVD RAM disc with a DVD v...

Страница 70: ...isk Format UDF 1 5 FAT32 Dabei handelt es sich um den Standard Formattyp für DVD RAM Discs Daten können zwischen unterschiedlichen Betriebssystemen übertragen werden z B Windows und Mac OS 1 Dabei handelt es sich um einen zusätzlichen Formattyp der bei Win dows 95 OSR2 2 Windows 98 Windows Me Windows 2000 Windows XP vorgesehen ist Discs die im Format FAT32 formatiert wurden können nicht unter Win ...

Страница 71: ...t werden ist u U kein Abspielen der auf der Disc aufgezeichneten Videodaten mit einem DVD Videorecorder oder mit dem Video Anwendungs programm eines Computers möglich Verwenden Sie ausschließlich das Programm DVD MovieAlbumSE 3 um mit einem Computer auf diese Dateien zuzugreifen siehe Seite 107 Um Daten eines DVD Videorecorders oder des Programms DVD MovieAlbum SE 3 zu kopieren verwenden Sie das K...

Страница 72: ...Universal Disk Format UDF 1 5 FAT32 Il s agit du format standard pour les DVD RAM Les données peuvent être transférées entre des systèmes d exploitation différents comme Windows et Mac OS 1 par exemple Il s agit d un format additionnel sur Windows 95 OSR2 2 Windows 98 Windows Me Windows 2000 Windows XP Les disques formatés FAT32 ne peuvent pas être utilisés sur Windows 95 autre que OSR2 2 Windows ...

Страница 73: ...peut qu il soit alors impossible de faire la lecture des images sur un magnétoscope DVD ou avec le logiciel vidéo pour ordinateurs Pour accéder à ces fichiers depuis un ordinateur utiliser le logiciel DVD MovieAlbumSE 3 voir page 107 Pour copier les données d un magnétoscope DVD ou du logiciel DVD MovieAlbumSE 3 utiliser l utilitaire de copie fourni avec ce dernier DISQUE Type de format UDF1 5 4 2...

Страница 74: ... of DVD RAM discs Starting the DVD RAM utility software Windows 98 Me 2000 1 Insert the DVD RAM disc you want to use 2 Open My Computer Right click on the icon for the DVD RAM disc 3 Click Properties Windows XP 1 Insert the DVD RAM disc you want to use 2 Open My Computer Right click on the icon for the DVD RAM disc 3 Click Properties Continued step 4 next page Continued step 4 next page ...

Страница 75: ... Klicken Sie mit der rechten Maustaste auf das Symbol für die DVD RAM Disc 3 Klicken Sie auf Eigenschaften Utilisation de l utilitaire DVD RAM Ce produit contient un logiciel utilitaire DVD RAM Ce logiciel permet les fonctions suivantes 1 Vérification de poussière sur les disques DVD RAM 2 Activation désactivation de l interdiction d écriture sur les disques DVD RAM Démarrage du logiciel utilitair...

Страница 76: ...Now on the window shown above The following window is shown Displays the write protect condition of the DVD RAM disc currently loaded To set the selected mode Saves the setting to the DVD RAM disc Write protects the disc The disc can only be used for reading Write enables the disc The disc can be used for reading and writing See below To return to the property window ...

Страница 77: ... Disc kann zum Lesen und Schreiben von Daten verwendet werden Die Disc ist schreibgeschützt Die Disc kann nur zum Lesen von Daten verwendet werden 4 Cliquer sur DVD Tools La fenêtre de l étape 4 à la page 76 apparaît Voir page 79 Voir ci dessous Activation désactivation de l interdiction d écriture Insérer un disque DVD RAM de 4 7 Go ou un disque DVD RAM de 8 cm puis cliquer sur Définir maintenant...

Страница 78: ...e used as a guide and should not be considered a guarantee of the disc s ability to read or write If level 2 or 3 is displayed even after cleaning the DVD RAM disc and drive there may be scratching or persistent dust Use the disc for read only A An example of the results if dust was not detected B An example of the results if dust was de tected Displays checking progress and results The higher the...

Страница 79: ...ngezeigt wird ist die Disc u U zerkratzt oder zu stark verstaubt Verwenden Sie die Disc nur zum Lesen von Daten Vérification de poussière Insérer un disque DVD RAM à vérifier dans le lecteur puis cliquer sur Vérification de poussière sur la fenêtre de l étape 4 à la page 76 La fenêtre à la page 78 apparaît Pour définir le niveau de vérification Spécifier un nombre de pistes par zone à vérifier sur...

Страница 80: ...ing the disc to its cartridge Either use the disc for reading only or clean the disc See page 11 back up the data and physical for mat it See pages 62 and 64 Using other discs Select the software to suit the disc and purpose Refer also to page 24 CD R DVD R discs Use B s Recorder GOLD5 BASIC see page 83 and MyDVD 4 see page 114 to make data CDs DVDs and music CDs or to write DVD Video data CD RW D...

Страница 81: ...unter Verwenden Sie die Disc entweder nur zum Lesen oder reinigen Sie die Disc siehe Seite 12 erstellen Sie eine Sicherungskopie der Daten und führen Sie eine physikalische Formatierung aus siehe Seite 63 und 65 DEUTSCH Verwendung von anderen Discs Wählen Sie die für den Anwendungszweck der jeweils verwendeten Disc geeignete Software aus Siehe auch Seite 25 CD R DVD R Discs Verwenden Sie B s Recor...

Страница 82: ...que inséré sera protégé en écriture Lorsque ce problème survient le témoin vert de fonctionnement situé à l avant du lecteur clignote trois fois par seconde Utilisation d autres disques Sélectionner le logiciel qui correspond au disque et à l opération désirée Se référer également à la page 26 Disques CD R DVD R Utiliser B s Recorder GOLD5 BASIC voir page 85 et MyDVD 4 voir page 115 pour créer des...

Страница 83: ... 1 Support for the music data base Gracenote When backing up music CDs or carrying out ripping you can connect to music databases on the Internet and automatically download album names track titles artist names A direct cutting function compatible with analog sound Includes the Direct Cut Function which allows analog sound such as LP records or microphone input to be recorded directly to CD R or h...

Страница 84: ...enbank Gracenote Beim Sichern von Musik CDs oder beim Rippen von CD Titeln können Sie eine Verbindung zu Musikdatenbanken im Internet herstellen um Informationen über Album Titel und Interpretennamen automatisch herunterzuladen Mit analogen Tonquellen kompatible Direktschnitt Funktion Die Direct Cut Funktion gestattet eine direkte Aufzeichnung von analogen Tonquellen z B Schallplatten und Mikrofon...

Страница 85: ...s faites des copies de sauvegarde de CD de musique ou effectuez de l extraction audionumérique vous pouvez vous connecter à des bases de données sur Internet et télécharger automatiquement les noms d album les titres de plage et les noms d artiste Fonction d enregistrement analogique direct Inclut la Fonction d enregistrement analogique direct qui permet d enregistrer directement sur un CD R ou su...

Страница 86: ...ing to register online or if online registration is completed click Next IBM PC AT compatible computer Windows 98 Me 2000 XP Pentium II 300 MHz or higher 64 MB or more Recommended size 128 MB or more A minimum of approx 30 MB of available space is necessary to install this soft ware on hard disk To use this software to make a CD a minimum of approx 800 MB of available space on the hard disk is nec...

Страница 87: ...r das Internet auszuführen klicken Sie auf Registrieren Wenn keine Online Registrierung ausgeführt werden soll oder die Registrierung abgeschlossen ist klicken Sie auf Weiter Impératifs d exploitation pour B s Recorder GOLD5 BASIC Votre ordinateur doit remplir les conditions suivantes pour pouvoir utiliser ce logiciel Ordinateur Ordinateur compatible IBM PC AT Système d exploitation Windows 98 Me ...

Страница 88: ...f CD R RW drives supported by the version of B s Recorder GOLD5 BASIC you are using by selecting Help Supported Drives from the menu bar The drives supported depend on the version installed To view the online manual From the Start menu select Programs B H A B s Recorder GOLD5 User s Manual User support If you have any questions about B s Recoder GOLD5 BASIC contact the following support center Int...

Страница 89: ... s Recorder G O L D 5 B A S I C a n d i e f o l g e n d e Kundendienststelle Unterstützung per Internet http www bhacorp com support index html Homepage http www bhacorp com 4 Après l installation Sélectionner Oui je veux redémarrer mon ordinateur maintenant Cliquer sur Terminer L ordinateur redémarre Vous pouvez utiliser B s Recorder GOLD5 BASIC après le redémarrage Démarrage de B s Recorder GOLD...

Страница 90: ...e information regarding detailed settings for CD DVD copying and CD TEXT refer to HELP or the online manual 3 Select the source drive the drive sending the data and place the origi nal disc into it 4 Place a disc in the receiving drive and click Start 2 If the copyright prompt is displayed click Yes The CD DVD COPY screen is displayed Note When you wish to make a dedicated copy of the original use...

Страница 91: ...hen und Verification Verifizieren überprüfen ob die Daten einwandfrei abgespeichert wurden oder nicht 6 Nach beendetem Schreibvorgang klicken Sie auf OK Guide sommaire Copie des CD DVD 1 Sélectionner Copier dans l assistant 2 Si le message sur les droits d auteur apparaît cliquer sur Oui L écran COPIE DE CD DVD apparaît 3 Sélectionner le lecteur source le lecteur qui envoie les données et y placer...

Страница 92: ...it field in the bottom section of the window 3 Set the volume label and click Record on the tool bar 4 Set the Recording Speed Recording Method and whether you will record using On the Fly or not and click Start 5 Click OK when writing is completed Note After copying data CD DVDs you can confirm if data was correctly written or not using verification functions such as Comparison and Verification ...

Страница 93: ...son Vergleichen und Verification Verifizieren überprüfen ob die Daten einwandfrei abgespeichert wurden oder nicht 5 Nach beendetem Schreibvorgang klicken Sie auf OK Création de CD DVD de données 1 Sélectionner Données dans l assistant 2 Depuis le navigateur de fichiers qui se trouve dans la section supérieure de la fenêtre ou depuis Explorer glisser déposer les fichiers à enregistrer dans le champ...

Страница 94: ...ction screen will be displayed 4 Place the disc in the drive 5 By turning the check boxes ON OFF select the tracks for ripping 8 When ripping is finished click OK 9 If the Ripping Production Screen is displayed click Close Note Audio files can be saved in various formats such as WAV TwinVQ by clicking the Options icon You can also search CDDB specify CD TEXT infor mation for the files or create a ...

Страница 95: ...klicken Sie auf OK 9 Wenn das Fenster Ripping Produc tion angezeigt wird klicken Sie auf Schließen um es zu schließen Extraction audionumérique 1 Sélectionner Extraire dans l assistant 2 Si le message sur les droits d auteur apparaît cliquer sur Oui 3 Sélectionner le lecteur source S il y a plus d un lecteur connecté l écran de sélection du lecteur apparaît 4 Insérer le disque dans le lecteur 5 Sé...

Страница 96: ...record from the file browser in the upper sec tion of the window or the Explorer and drop them in the Track Edit field in the bottom section of the window 4 Set the Recording Speed Recording Method and whether you will record using On the Fly or not and click Start 5 Click OK when finished 3 Click Record on the tool bar ...

Страница 97: ...hnung anhand des On the Fly Verfahrens erfolgen soll oder nicht und klicken Sie dann auf Starten 5 Nach beendetem Schreibvorgang klicken Sie auf OK Création de CD audio 1 Sélectionner CD Audio dans l assistant 2 Depuis le navigateur de fichiers qui se trouve dans la section supérieure de la fenêtre ou depuis Explorer glisser déposer les fichiers à enregistrer WAV AIFF MP3 TwinVQ CDA dans le champ ...

Страница 98: ...he special characteristics of CD RW and DVD RW discs so that the avail able space on the disc increases if you delete files Comes with Verifier function Comes with the Verifier function which inspects a disc that has been written to verify that data has been correctly recorded By using this function it is possible to obtain data storage with a very high level of reliability Completely compatible w...

Страница 99: ...reier Speicherplatz auf Festplatte Mindestens 5 MB Grafikkarte Mindestens 800 600 Bildpunkte High Color 16 Bit oder mehr Utilisation de B s CLiP5 B s CLiP5 B s CLiP5 utilise le mode d écriture par paquets pour écrire les données dans des fichiers sur les disques CD RW et DVD RW Il est possible d utiliser les CD RW et DVD RW de la même façon que les disquettes et DVD RAM pour y transférer enregistr...

Страница 100: ...M case Click Next Follow the on screen instructions to proceed 3 To register online via the Internet click Register If you are not going to register online or if online registration is completed click Next 4 After installation Select Yes I want to restart my com puter now Click Finish The computer now reboots You can use B s CLiP5 after rebooting Starting B s CLiP5 B s CLiP5 will automatically sta...

Страница 101: ...rwenden Starten von B s CLiP5 B s CLiP5 wird beim Start von Windows automatisch gestartet und das B sCLiP Symbol erscheint in der Taskleiste Installation de B s CLiP5 1 Cliquer sur B s CLiP5 dans l écran de l étape 2 page 46 Cliquer sur Suivant lorsque l écran à la page 100 apparaît Suivre les instructions à l écran pour procéder à l installation 2 Saisir le nom de l utilisateur le nom de la firme...

Страница 102: ...VD RW formatted using B s CLiP5 with a pre mastering software program it is necessary to first erase the disc Ejecting the disc Some mounted discs formatted discs that have been placed in the drive may not be ejected when you press the eject button on the drive Use B s CLiP5 to eject disc whenever possible Limits When using Windows 98 Me files over 2 GB may not be able to be copied When using Wind...

Страница 103: ...ur un disque dur ou un disque amovible Prêter attention aux points suivants lors de la création de CD de musique ou de CD de données puisqu il y a des différences au niveau du logiciel de prémasterisation Formatage Pour que l écriture sur un disque soit possible avec B s CLiP5 le disque doit d abord être formaté de la même façon qu un disque dur ou qu un disque amovible Lecture depuis le disque Le...

Страница 104: ... B s CLiP icon on the task bar and selecting For mat If when you do this the Formatter is acti vated click on Next 2 Select the drive you wish to format and click Next 3 To check the properties of the disc click on Properties If everything is OK click on Next 4 Enter the volume label and click on Finish Formatting begins When formatting is completed the disc is mounted 5 Click on OK Note A disc th...

Страница 105: ...lette Formatierung 5 Klicken Sie auf OK Auswerfen der Disc Klicken Sie mit der rechten Maustaste auf das Symbol von B s CLiP5 in der Taskablage und wählen Sie Auswerfen in dem Menü aus das daraufhin erscheint Guide sommaire Formatage des disques CD RW DVD RW Deux options sont disponibles Formatage intégral Le disque entier est formaté physiquement Cela prend plus de temps mais ce type de formatage...

Страница 106: ...isc with recordings on it the first frame of each program is automatically displayed as a thumbnail image Just double click on the thumbnail to start playing the program You can also change the displayed thumbnail to show a particular frame in the program Find a scene using play lists and indexes You can easily find a particular scene from amongst those recorded Finding a part you want to watch is...

Страница 107: ...im Standard Video Aufzeichnungsformat verwendet werden kann Benutzen Sie dazu ausschließlich das zu diesem Programm gehörende Kopier Tool Utilisation de DVD MovieAlbumSE 3 DVD MovieAlbumSE 3 L utilisation combinée de DVD MovieAlbumSE 3 et de ce lecteur permet d effectuer sur un ordinateur la lecture l enregistrement et le montage des enregistrements vidéo compatibles avec les normes d enregistreme...

Страница 108: ...tion function is limited to Windows 98SE and later versions cannot be used with Windows 98 2 Install Internet Explorer 5 0 or later versions Discs you can use with DVD MovieAlbumSE 3 UDF 2 0 format 4 7 GB and 9 4 GB double sided and 8 cm DVD RAM You cannot use 2 6 GB or 5 2 GB double sided DVD RAM DVD MovieAlbumSE 3 installation Windows 98 Me 2000 1 Click on DVD MovieAlbumSE 3 on the screen in Ste...

Страница 109: ...en Sie auf Next Folgen Sie den Anweisungen die auf dem Bildschirm erscheinen 4 Wenn das in der Abbildung auf Seite 108 gezeigte Fenster erscheint klicken Sie auf Yes Anderenfalls fahren Sie mit Schritt 5 fort Impératifs d exploitation pour DVD MovieAlbumSE 3 Votre ordinateur doit remplir les conditions suivantes pour pouvoir utiliser ce logiciel Ordinateur Ordinateur compatible IBM PC AT Système d...

Страница 110: ...t the TV System NTSC or PAL to suit your equipment 3 Enter the user name company name and serial num ber the hyphenated number attached to the CD ROM case Click Next Follow the on screen instructions to proceed 4 After installation Select Yes I want to restart my computer now Click Finish The computer now reboots You can use DVD MovieAlbumSE 3 after rebooting Notes In Windows 2000 XP login under a...

Страница 111: ...r In stallation mit einem Benutzernamen anmelden der zur Administrator Gruppe gehört Nach einer Änderung von TV System NTSC oder PAL muss eine Neuinstallation ausgeführt werden 5 Après l installation Sélectionner Yes I want to restart my computer now Cliquer sur Finish L ordinateur redémarre V o u s p o u v e z u t i l i s e r D V D MovieAlbumSE 3 après le redémarrage Windows XP 1 Cliquer sur DVD ...

Страница 112: ...u exe This assumes that the drive letter assigned to this drive for CD ROM media is E From the Start menu select Programs Panasonic DVD MovieAlbumSE Online manual A note on discs you create The discs you create with this drive and DVD MovieAlbumSE 3 follow the DVD Forum s video recording standards and can be played on DVD players that can play DVD RAM and that follow the video recording standard a...

Страница 113: ...M Laufwerk ist Spezial Software erforderlich Service Wenden Sie sich bei Fragen über DVD MovieAlbumSE 3 an die in der Panasonic HOTLINE aufgeführte Verkaufsstelle Démarrage de DVD MovieAlbumSE 3 Dans le menu Démarrer sélectionner Programmes Panasonic DVD MovieAlbumSE DVD MovieAlbumSE Vous pouvez également démarrer ce logiciel en double cliquant sur l icône de bureau si celle ci a été créée Utilisa...

Страница 114: ...VDs DVD contents are simple to make with drag and drop operations When you import MPEG 2 files from DVD MovieAlbumSE 3 the play list and program titles are also imported These titles can then be output as a text file for use when you make DVD menu screens Check operation of DVD menus in the editing window Before writing to a DVD R you can check menu operation and playability Note You can use video...

Страница 115: ...äten abgespielt werden die mit Video CD Ver 2 0 kompatibel sind Eine einwandfreie Wiedergabe ist jedoch nicht mit allen derartigen Geräten gewährleistet Utilisation de MyDVD 4 MyDVD 4 MyDVD 4 utilise les formats de données suivants pour créer et enregistrer des données DVD Vidéo comprenant des menus fichiers MPEG sortis depuis une carte de codage MPEG2 dont le bon fonctionnement a été testé fichie...

Страница 116: ...mory size Hard disk space Display Sound card Operating requirements for MyDVD 4 Your computer must meet the following requirements to use this software 1 The CAPTURE function for DV Camera is limited to Windows 98SE and later versions cannot be used with Windows 98 2 Install Internet Explorer 5 0 or later versions MyDVD 4 installation Windows 98 Me 2000 1 Click on MyDVD 4 on the screen in Step 2 p...

Страница 117: ...Sie auf Weiter Folgen Sie den Anweisungen die auf dem Bildschirm erscheinen 3 Wenn das in der Abbildung auf Seite 116 gezeigte Fenster erscheint klicken Sie auf OK Anderenfalls fahren Sie mit Schritt 4 fort Impératifs d exploitation pour MyDVD 4 Votre ordinateur doit remplir les conditions suivantes pour pouvoir utiliser ce logiciel Ordinateur Ordinateur compatible IBM PC AT Système d exploitation...

Страница 118: ...t when the screen on the right is displayed Follow the on screen instructions to proceed 2 Enter the user name company name and serial number the number attached to the CD ROM case Be sure to enter the serial number in uppercase Click Next Follow the on screen instructions to proceed 3 After installation Select Yes I want to restart my com puter now Click Finish The computer now reboots You can us...

Страница 119: ...ation Wählen Sie Ja Computer jetzt neu starten aus Klicken Sie auf Fertigstellen Danach wird ein System Neustart ausgeführt Nach dem System Neustart können Sie MyDVD 4 verwenden 4 Après l installation Sélectionner Oui je veux redémarrer mon ordinateur maintenant Cliquer sur Terminer L ordinateur redémarre Vous pouvez utiliser MyDVD 4 après le redémarrage Windows XP 1 Cliquer sur MyDVD 4 dans l écr...

Страница 120: ...y double clicking on the desktop icon if one was created Using MyDVD 4 For more detailed operating instructions and trouble shooting refer to the HELP file User support If you have any questions about MyDVD 4 contact directly the following support center Internet support http www mydvd com Home Page http www sonic com ...

Страница 121: ...ützungs Zentrum Technische Unterstützung per Internet http www mydvd com Homepage http www sonic com Démarrage de MyDVD 4 Dans le menu Démarrer sélectionner Programmes Sonic MyDVD Lancer MyDVD Vous pouvez également démarrer MyDVD 4 en double cliquant sur l icône du bureau si celle ci a été créée Utilisation de MyDVD 4 Pour des instructions d utilisation plus détaillées et pour les conseils de dépa...

Страница 122: ...rlacing on some software This means that you don t get the comb effect you sometimes see in scenes with rapid movement Software scaling WinDVD 4 s scaling feature means you get high quality images whether you expand or shrink the window Sound Adjustment Function Use the DSP function to adjust the sound to the environment and your preference IBM PC AT compatible computer Windows 98 Me 2000 XP Requi...

Страница 123: ...ls die von PCI Soundkarte Die Soundkarte muss Stereo Wiedergabe mit 48 kHz unterstützen Empfehlung PCI Hinweis Die Qualität der DVD Wiedergabe mit diesem Programm hängt von der Gesamtleistung des verwendeten Computersystems ab Utilisation de WinDVD 4 WinDVD 4 WinDVD 4 est un logiciel de lecture DVD qui non seulement décode les images de haute qualité de la vidéo DVD lit l audio de haute qualité ma...

Страница 124: ...If the screen on the right appears select Yes I want to restart my computer now and click Finish The computer now reboots You can use WinDVD 4 after rebooting If the screen on the right does not appear you can use WinDVD 4 without rebooting Windows XP 1 Click on WinDVD 4 on the screen in Step 2 page 46 Click Next when the screen on the right is displayed Follow the on screen instructions to procee...

Страница 125: ...packung der CD ROM angegebene Nummer ein Klicken Sie auf Weiter Folgen Sie den Anweisungen die auf dem Bildschirm erscheinen WinDVD 4 kann ohne Ausführung eines System Neustarts verwendet werden Die Aufforderung zur Ausführung eines Sys tem Neustarts erscheint nicht Installation de WinDVD 4 Windows 98 Me 2000 1 Cliquer sur WinDVD 4 sur l écran de l étape 2 page 46 Cliquer sur Oui lorsque l écran à...

Страница 126: ... on the screen on the right to display the menu and select Setup Preference and the drive you want to use When WinDVD does not start and begin play automatically From the Start menu select Programs InterVideo WinDVD 4 InterVideo WinDVD 4 User support If you have any questions about WinDVD 4 contact the following support center E mail Support support intervideo com Home Page http www intervideo com...

Страница 127: ...Unterstützungszentrum Technische Unterstützung per E Mail support intervideo com Homepage http www intervideo com Remarque Sous Windows 2000 XP ouvrir la session avec un nom d utilisateur affecté au groupe de l administrateur lors de l installation Démarrage de WinDVD 4 Si vous insérez un DVD ou CD alors que la fonction de reconnaissance automatique est activée WinDVD 4 démarre et la lecture comme...

Страница 128: ...f the selected source folders onto the drive Deletes all data in the copy destination and copies the data from the original 3 Synchronized Copy Files which are not the same on the original and the drive are copied to corresponding folders and the folder contents are updated to match each other This enables you to keep up to date files on different computers 4 Restore Copy files on the drive back o...

Страница 129: ...000 XP Espace de disque dur 1 Mo minimum Verwendung von FileSafe FileSafe Dieses Programm kann automatisch Daten in vorgegebenen Ordnern sichern oder nur den Inhalt aktualisierter Ordner sichern so dass ein wirksamer Schutz wichtiger Dateien gewährleistet ist Dieses Programm kann nicht zum Sichern des Betriebs systems verwendet werden Kopieren im gleichen Dateiformat wie die Originaldatei Bei Ausf...

Страница 130: ...afe manages discs based on their volume names so you must enter volume names on the hard disk and DVD RAM discs you are using See page 62 or 64 Using FileSafe Refer to the online manual for operating and troubleshooting instructions To view the online manual You need Acrobat Reader Version 4 0 or higher If you have not installed it yet activate the file below from the CD ROM supplied to install E ...

Страница 131: ...en wählen Sie im Start Menü Programme Panasonic DVD RAM FileSafe User Manual aus Service Wenden Sie sich bei Fragen über FileSafe an die in der Panasonic HOTLINE aufgeführte Verkaufsstelle Installation de FileSafe 1 Cliquer sur FileSafe sur l écran de l étape 2 page 46 Cliquer sur Next lorsque l écran à la page 130 s affiche Suivre les instructions à l écran pour procéder à l installation 2 Après ...

Страница 132: ...n the MS DOS file name display on and off This utility has been provided for use when you need assistance You should not have to use it under normal circumstances This utility is installed along with DVDForm This is installed in the following locations unless you have specified another location Program Files Panasonic DVD RAM Win 9x DVD RAM driver ...

Страница 133: ...erfolgt wird das in den folgenden Ordnern installiert Programmdateien Panasonic DVD RAM Win 9x DVD RAM driver Utilitaires de soutien Les deux utilitaires suivants sont inclus dans le CD ROM UDFTool Utilitaire de système de fichiers pour Windows 98 Me Utiliser cet utilitaire pour activer et désactiver l affichage des noms de fichier MS DOS Cet utilitaire est fourni pour être utilisé lorsque l on a ...

Страница 134: ... window and then select Control panel 2 Double click Add Remove programs and select the software you want to remove 3 Click Add Remove or Change Remove Follow the on screen instructions to proceed Reboot the computer when you are finished Windows XP 1 From the start menu Select Control panel You may also open the My Computer window and then select Control panel 2 Double click Add Remove programs a...

Страница 135: ...araissent à l écran Quand la désinstallation est terminée redémarrer l ordinateur Deinstallieren der Software Gehen Sie wie nachstehend beschrieben vor um Treiberprogramm und Anwendungsprogramme nach der Installation in Ihrem Computer wieder zu deinstallieren Hinweis Bei Windows 2000 XP müssen Sie sich zum Entfernen des DVD RAM Treiberprogramms unter einem Benutzernamen anmelden der zur Administra...

Страница 136: ...eige Die Betriebsanzeige blinkt wenn eine Funktionsstörung vorliegt Blinkmodus Dreifaches Blinken Doppeltes Blinken Einzelnes Blinken Mögliche Ursache Die Abtasterlinse oder die eingelegte Disc ist staubig In diesem Zustand ist die eingelegte Disc schreibgeschützt Die Innentemperatur des Laufwerks ist zu hoch Abhilfemaßnahme Verwenden Sie eine solche Disc nur zum Lesebetrieb oder reinigen Sie Abta...

Страница 137: ...écriture Mode de clignotement simple La température interne du lecteur est trop élevée Utiliser le disque uniquement en lecture seule Ou bien nettoyer la lentille et le disque avec le kit de nettoyage spécialement recommandé pour le lecteur voir page 13 et effectuer un formatage physique formatage de bas niveau du disque voir page 63 ou 65 après avoir sauvegardé les données Nettoyer la lentille et...

Страница 138: ...n the device driver software is not installed Did you initialize format the DVD RAM disc Did you access the drive letter assigned to the drive Did you insert a single sided DVD RAM disc with the label side facing up Is the DVD RAM disc dirty Has condensation formed in the drive Wait an hour or so after turning on the computer for the drive to dry and then try operating See pages 76 and 141 Did you...

Страница 139: ...rde die korrekte Laufwerksbezeichnung des Laufwerks vorgegeben Es können nur Discs der von diesem Laufwerk unterstützten Formate verwendet werden Wurde die Disc korrekt eingelegt so dass die Betriebsanzeige grün leuchtet Wurde die Disc mit nach oben weisender Etikettseite eingelegt Wird das korrekte Programm zum Abspielen von Discs verwendet Ist die Disc verschmutzt zerkratzt gesprungen verzogen i...

Страница 140: ...ant l étiquette tournée vers le haut Le DVD RAM est il sale S est il formé de la condensation dans le lecteur L ordinateur étant sous tension attendre environ une heure que le lecteur ait séché et recommencer A t on spécifié la lettre de lecteur assignée au lecteur Seuls les disques pris en charge par ce lecteur peuvent être utilisés Le disque est il inséré correctement dans le plateau de telle so...

Страница 141: ...f DVD RAM discs TYPE1 The disc inside cannot be removed TYPE2 Single sided discs The disc inside can be removed for future use in DVD ROM drives which have DVD RAM read compatibility TYPE4 Double sided discs The disc inside can be removed Non cartridge type Use TYPE2 TYPE4 or non cartridge discs in the soon to be released DVD ROM drives and DVD players that will be able to play DVD RAM discs Handl...

Страница 142: ...in DVD ROM Laufwerken die zum Lesen von DVD RAM Discs imstande sind aus ihrer Cartridge entfernt werden TYP 4 Dies ist eine doppelseitige Disc die aus ihrer Cartridge entfernt werden kann Typ ohne Cartridge Sie können Discs der Typen 2 und 4 sowie Discs ohne Cartridge in den neuen DVD ROM Laufwerken und DVD Playern verwenden die zum Abspielen von DVD RAM Discs imstande sind und deren Markteinführu...

Страница 143: ...ue à l intérieur ne peut être sorti TYPE2 Disques à simple face Le disque à l intérieur peut être sorti pour une future utilisation dans les lecteurs DVD ROM qui possèdent une compatibilité en lecture avec le DVD RAM TYPE4 Disques à double face Le disque à l intérieur peut être sorti Type sans cartouche Utiliser les disques de TYPE2 TYPE4 ou les disques sans cartouche avec les lecteurs DVD ROM et ...

Страница 144: ...pen the cover by force Do not insert discs other than DVD RAM into empty cartridges Take care that the disc s recording surface is not contaminated with fingerprints dirt dust scratches or liquids Do not write on the recording surface Write on the label side of the disc only with a soft oil based felt pen Do not use ballpoint pens or other hard writing implements Do not attach other labels or prot...

Страница 145: ...uf keinen Fall Benzol Farbverdünner Antistatik Sprays oder andere organische Lösungsmittel zum Reinigen von Discs Bringen Sie eine Disc nach dem Gebrauch stets wieder in ihrer Cartridge unter Lassen Sie Discs nicht fallen und verbiegen Sie sie nicht Pour retirer les disques des cartouches de TYPE2 Pousser la tige de blocage de la cartou che avec un stylo ou un objet similaire pour la dégager et la...

Страница 146: ...witch after closing the cover Handling precautions Do not try to open the cover by force Do not insert discs other than DVD RAM into empty cartridges Take care that the disc s recording surface is not contaminated with fingerprints dirt dust scratches or liquids Do not write on the recording surface Do not attach other labels or protective covers Do not use coatings Clean the disc with the special...

Страница 147: ...Sie auf keinen Fall Benzol Farbverdünner Antistatik Sprays oder andere organische Lösungsmittel zum Reinigen von Discs Bringen Sie eine Disc nach dem Gebrauch stets wieder in ihrer Cartridge unter Lassen Sie Discs nicht fallen und verbiegen Sie sie nicht Pour retirer les disques des cartouches de TYPE4 Pousser les deux tiges de blocage de la cartouche avec un stylo ou un objet similaire pour la dé...

Страница 148: ...the case center and lift out Fingerprints dirt dust and scratches on the recording surface of discs can affect the reading and writing of data Write on the label side of the disc only with a soft oil based felt pen Do not use ballpoint pens or other hard writing implements Do not attach additional labels or stickers If a disc becomes dusty obtain the DVD RAM PD disc cleaner to clean it part number...

Страница 149: ...s einer Cartridge des Typs 2 entfernt wurden ist nicht möglich Bevor Daten auf eine derartige Disc geschrieben werden können muss die wieder in ihrer Cartridge untergebracht werden Setzen Sie eine Disc ohne Cartridge auf gleiche Weise wie eine CD oder DVD ROM Disc in das Laufwerk ein Manipulation des disques DVD RAM sans cartou che DVD R à utilisation générale DVD RW 4 7 Go Ver 1 1 CD R et CD RW N...

Страница 150: ...ur Handling notes Do not dirty or damage them Do not drop or bend them Do not write on or adhere labels to them How to remove a disc from its case Refer to page 148 How to place a disc in its case Refer to page 148 How to hold a disc Refer to page 148 What to do when a disc is dirty Wipe the disc using a soft lint free cloth which has been dipped in water and then wipe with a dry lint free cloth T...

Страница 151: ...wurde und reiben Sie anschließend mit einem trockenen flusenfreien Tuch nach Führen Sie das Tuch stets von der Mitte der Disc in einer geraden Bewegung zum Rand hin Manipulation des DVD ROM CD ROM et autres CD DVD Ne pas placer les disques dans les endroits suivants Endroits chauds humides ou exposés aux rayons directs du soleil Endroits où des différences importantes de température peuvent se pro...

Страница 152: ...1 3 x 196 mm excluding front panel and protrusions 2 42 lbs Approx 1 1 kg DVD RAM 2 5 9 4 GB 5 2 GB 2 8 GB 4 double sided 4 7 GB 2 6 GB 1 4 GB 4 single sided 80 mm 120 mm DVD R for General Ver 2 0 2 5 4 7 GB 120 mm DVD RW Ver 1 1 2 4 7 GB DVD RW Ver 1 0 2 4 7 GB DVD ROM DVD Video DVD R 1 80 mm 120 mm CD R CD RW 80 mm 120 mm CD DA 3 CD ROM Mode1 CD ROM XA Mode2 CD Extra CD TEXT Photo CD Supports mu...

Страница 153: ...m W L D 0 2 lb 75 during operation for storage during operation for storage 4 3 4 120 mm 1 16 1 2 mm diameter thickness 0 05 lb 17 for U S A and Canada for Europe Model number Cartridge type Disc type Disc diameter thickness Memory size unformatted Bytes sector Sector track Track pitch Track format Ambient temperature Humidity range Dimensions W L D Mass LM HB94V 2x LM HB94LU 3x LM HB94F 2x LM HB9...

Страница 154: ...orage for U S A and Canada for Europe Specifications and external design are subject to change without notice because of product improvements Mass and dimensions are approximate DVD R for General Ver 2 0 discs not included Model number Disc type Disc diameter thickness Memory size Standard linear velocity Ambient temperature Humidity range Mass LM RF47 1x LM RF120LU 4x LM RF47 1x LM RF120LE 4x Wri...

Страница 155: ...Außenabmessungen handelt es sich um Näherungswerte Spannung Spannungsverbrauch Stromversorgung 5 V Gleichspannung 5 1 0 A max 10 W 12 V Gleichspannung 10 0 7 A max Leistungsaufnahme ATA ATAPI 5 oder ATAPI 6 PIO Modus 4 max 16 6 MB s Theoretischer Wert Ultra DMA Modus 4 7 max 66 6 MB s Theoretischer Wert 120 ms 120 ms 120 ms 110 ms 110 ms 110 ms 110 ms 1x 2 6 GB 2x 4 7 GB 3x 3x Korrespondenzmedia 4...

Страница 156: ... bis 90 rel Feuchte 124 6 138 0 8 0 mm B L T 75 beim Betrieb bei Lagerung beim Betrieb bei Lagerung 120 mm 1 2 mm Durchmesser Dicke 17 für USA und Kanada für Europa Modell nummer Cartridge Typ Disc Typ Durchmesser Dicke der Disc Speicherkapazität unformatiert Bytes pro Sektor Sektoren pro Spur Spursteigung Spurformat Umgebungs temperaturbereich Luftfeuchtigkeits bereich Abmessungen B L T Masse LM ...

Страница 157: ...d äußerer Aufmachung im Sinne der ständigen Produktverbesserung bleiben vorbehalten Bei den Angaben zu Masse und Außenabmessungen handelt es sich um Näherungswerte DVD R Discs für General Ver 2 0 nicht mitgeliefert Modell nummer Disc Typ Durchmesser Dicke der Disc Speicherkapazität Standard Lineargeschwindigkeit Umgebungs temperaturbereich Luftfeuchtigkeits bereich Masse LM RF47 1x LM RF120LU 4x L...

Страница 158: ...ondensation 146 x 41 3 x 196 mm sans le panneau avant et les saillies Approx 1 1 kg DVD RAM 2 5 9 4 Go 5 2 Go 2 8 Go 4 double face 4 7 Go 2 6 Go 1 4 Go 4 simple face 80 mm 120 mm DVD R à util générale Ver 2 0 2 5 4 7 Go 120 mm DVD RW Ver 1 1 2 4 7 Go DVD RW Ver 1 0 2 4 7 Go DVD ROM DVD Vidéo DVD R 1 80 mm 120 mm CD R CD RW 80 mm 120 mm CD DA 3 CD ROM Mode1 CD ROM XA Mode2 CD Extra CD TEXT Photo CD...

Страница 159: ...ant le fonctionnement pour le stockage pendant le fonctionnement pour le stockage 120 mm 1 2 mm diamètre épaisseur 17 pour les E U et le Canada pour l Europe Numéro de modèle Type de cartouche Type de disque Diamètre épaisseur du disque Taille de mémoire non formaté Octets secteur Secteur piste Pas de piste Format de piste Température ambiante Plage d humidité Dimensions L L P Masse LM HB94V 2x LM...

Страница 160: ...se et les dimensions indiqués sont approximatifxs Numéro de modèle Type de cartouche Type de disque Diamètre épaisseur du disque Taille de mémoire non formaté Octets secteur Secteur piste Pas de piste Format de piste Température ambiante Plage d humidité Dimensions L L P Masse LM DB26 LM DA52 LM DB26 LM DA52 TYPE2 TYPE1 Réinscriptible changement de phase 120 mm 1 2 mm 2 6 Go simple face 5 2 Go dou...

Отзывы: