40
1. BEFORE USING EQUIPMENT
4. Setting Copy Paper (Cont.)
1
Drawer for special uses
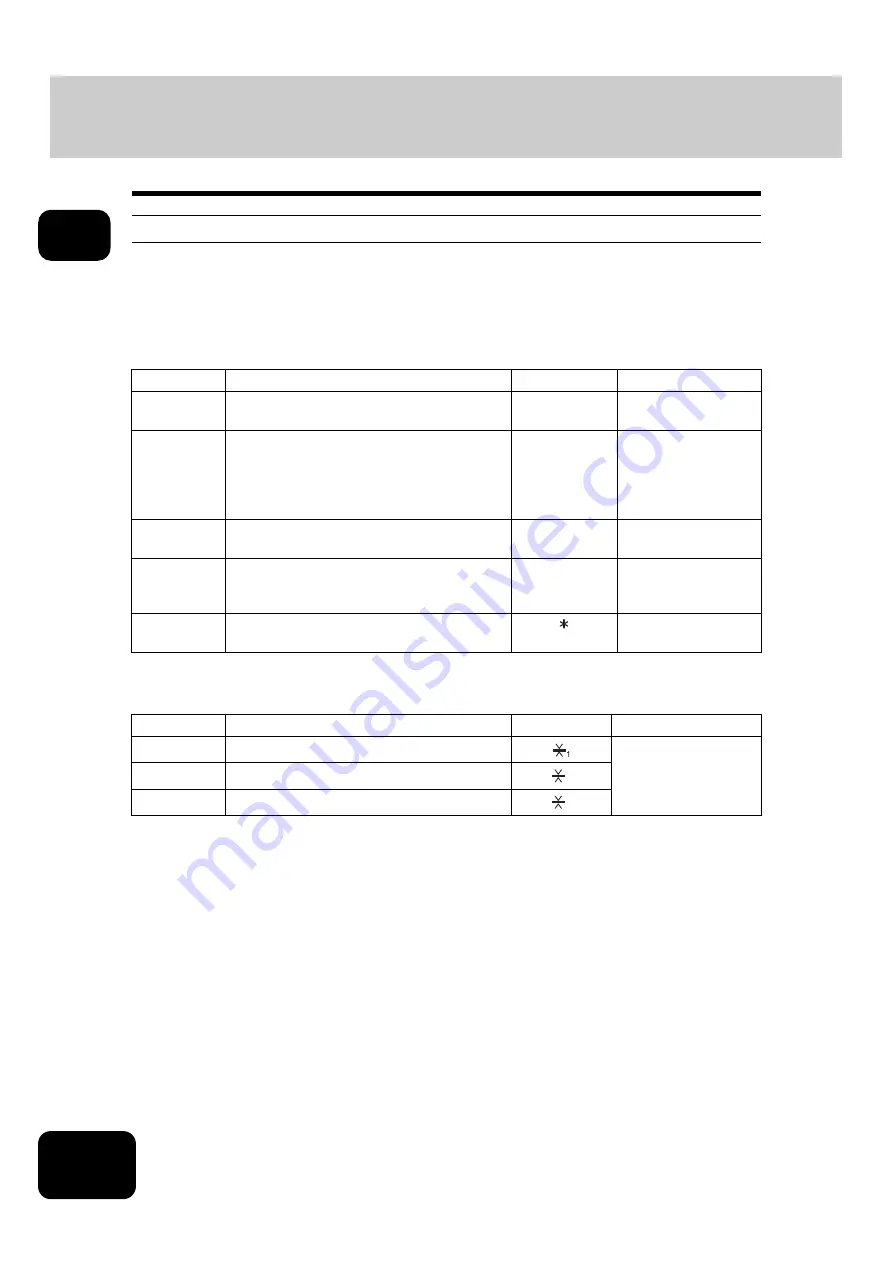
When you set paper for special uses other than normal copying (e.g. sheets for cover copying) in the
drawer, you need to set this drawer for the special use in advance. If the drawer has been set for a special
use, its indication will change on the touch panel. A drawer with this setting will not be used for normal
copying.
The following paper types are selectable according to each purpose.
Select the suitable paper type from the following according to its paper weight.
Paper type
Purpose
Indication
Reference
Cover sheet
Sheet used in the cover copying mode
“COVER”
Insertion
sheet
Sheet used in the sheet insertion mode
(Up to 2 drawers can be set for this mode.
First, set Insert source 1, then press the
drawer for the paper type of Insert source 2,
and then press the [INSERT] button.)
“INSERT 1”
(or “INSERT 2”)
Tab paper
Paper used for the tab paper mode
“TAB PAPER”
FAX paper
Paper to print data from the FAX Unit, Printer
Kit, Printer/Scanner Kit when any of them is
installed.
F
(See the manual of
each option.)
Special paper Special types of paper
(e.g. Paper with a watermark)
-
Paper type
Paper wight
Indication
Reference
Thick 1
- 28 lb. Bond
Thick 2
- 90 lb. Index
Thick 3
- 110 lb. Index
2
3
Содержание DP-7240
Страница 6: ...4 CONTENTS Cont ...
Страница 73: ...71 3 2 Press the APS button 4 Press the START button ...
Страница 109: ...107 4 4 IMAGE ADJUSTMENT 1 Background Adjustment 108 2 Sharpness 109 ...
Страница 112: ...4 110 4 IMAGE ADJUSTMENT ...
Страница 119: ...117 5 4 Press the ENTER button Set Book type original 2 sided copy P 100 in duplex copying as well ...
Страница 151: ...149 5 5 Press the ENTER button Select other copy modes as required 6 Press the START button ...
Страница 153: ...151 5 5 Press the ENTER button Select other copy modes as required 6 Press the START button ...
Страница 178: ...176 6 e FILING 3 Changing Data of User Boxes Cont 6 7 Press the ENTER button The box settings are updated ...
Страница 192: ...6 190 6 e FILING ...
Страница 222: ...7 220 7 TEMPLATE ...
Страница 260: ...8 258 8 JOB STATUS ...
Страница 291: ...289 10 3 Press the GENERAL button 4 Press the TONER NEAR EMPTY DETECTION button 5 Press the YES button ...
Страница 315: ...313 11 11 MAINTENANCE 1 Daily Inspection 314 2 Simple Troubleshooting 315 ...
Страница 320: ...11 318 11 MAINTENANCE ...
Страница 335: ......


