136
5. USING THE EDITING FUNCTIONS
5
9. COVER SHEET
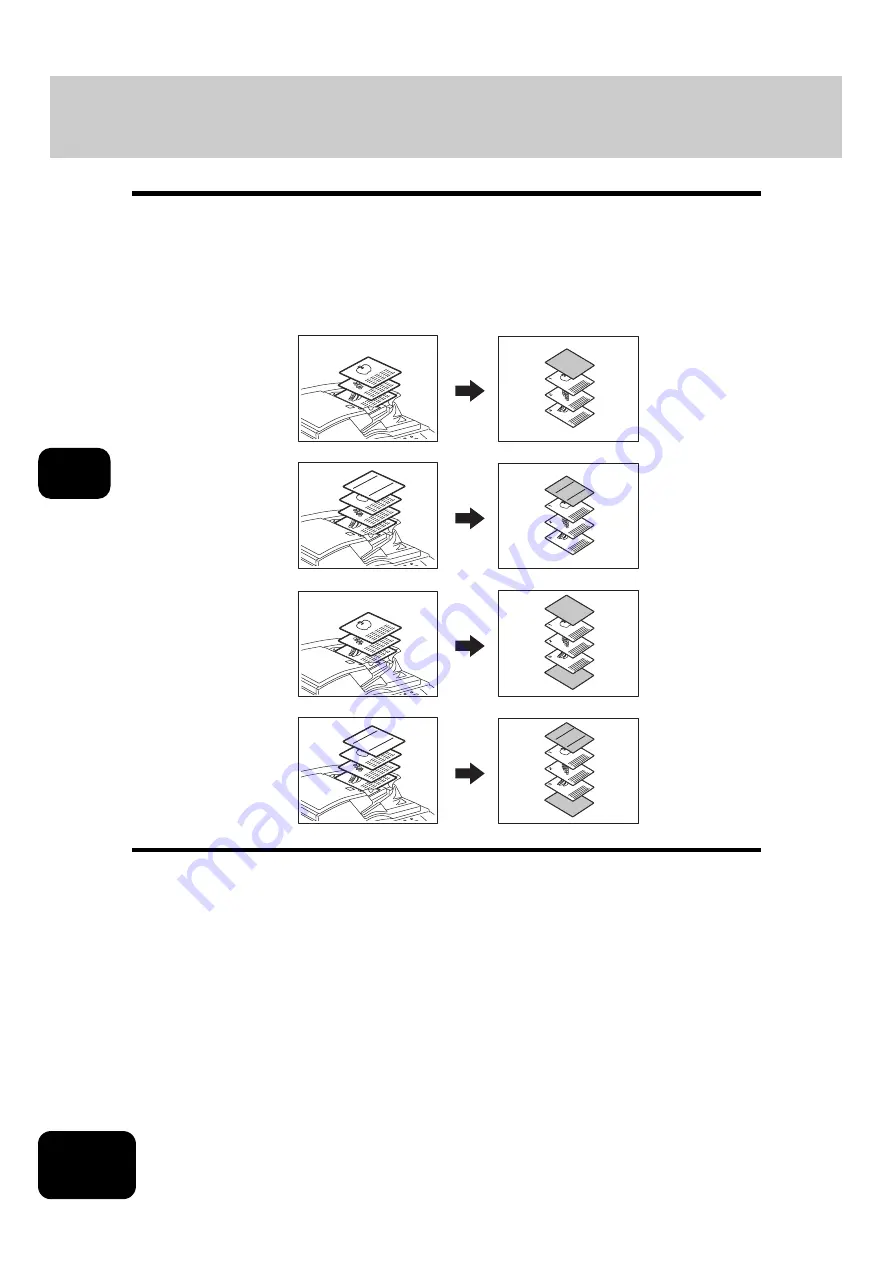
This function allows you to insert special sheets of paper (such as color paper) into a set of copies as
cover sheets. A copied front cover sheet can be inserted. The back cover sheet is inserted blank. There
are 4 types of sheet insertion modes:
1. Adding a blank front cover sheet ([TOP BLANK])
2. Adding a copied front cover sheet ([TOP COPIED])
3. Adding a blank front and blank back cover sheets ([BOTH BLANK])
4. Adding a copied front and blank back cover sheets ([TOP COPIED BACK BLANK])
1
Place the cover sheet.
• Place the cover sheet in the drawer selected for cover sheets, on the bypass tray or the Inserter Unit. (How-
ever, the Inserter Unit cannot be used with [TOP COPIED] or [TOP COPIED BACK BLANK].)
• When it is placed in the drawer for the cover sheets, you must set the paper type (cover sheet), size and thick-
P.40 “Drawer for special uses”)
• When it is placed on the bypass tray, you must set the paper size and thickness. (
• When using the Inserter Unit with [TOP BLANK] or [BOTH BLANK],
• Make sure the cover sheet and the sheets other than the cover sheet are placed in the same direction and of
the same size.
2
Place paper (other than cover paper) in the drawer(s).
• Make sure the cover sheet and the copy paper have the same orientation and size.
REPORT
2005
REPORT
2005
3
2
1
3
2
1
REPORT
2005
3
2
1
3
2
1
REPORT
2005
1
2
3
4
Содержание DP-7240
Страница 6: ...4 CONTENTS Cont ...
Страница 73: ...71 3 2 Press the APS button 4 Press the START button ...
Страница 109: ...107 4 4 IMAGE ADJUSTMENT 1 Background Adjustment 108 2 Sharpness 109 ...
Страница 112: ...4 110 4 IMAGE ADJUSTMENT ...
Страница 119: ...117 5 4 Press the ENTER button Set Book type original 2 sided copy P 100 in duplex copying as well ...
Страница 151: ...149 5 5 Press the ENTER button Select other copy modes as required 6 Press the START button ...
Страница 153: ...151 5 5 Press the ENTER button Select other copy modes as required 6 Press the START button ...
Страница 178: ...176 6 e FILING 3 Changing Data of User Boxes Cont 6 7 Press the ENTER button The box settings are updated ...
Страница 192: ...6 190 6 e FILING ...
Страница 222: ...7 220 7 TEMPLATE ...
Страница 260: ...8 258 8 JOB STATUS ...
Страница 291: ...289 10 3 Press the GENERAL button 4 Press the TONER NEAR EMPTY DETECTION button 5 Press the YES button ...
Страница 315: ...313 11 11 MAINTENANCE 1 Daily Inspection 314 2 Simple Troubleshooting 315 ...
Страница 320: ...11 318 11 MAINTENANCE ...
Страница 335: ......


