background image

262

9. BLINKING GRAPHIC SYMBOLS

9

3. Toner-Related Symbols

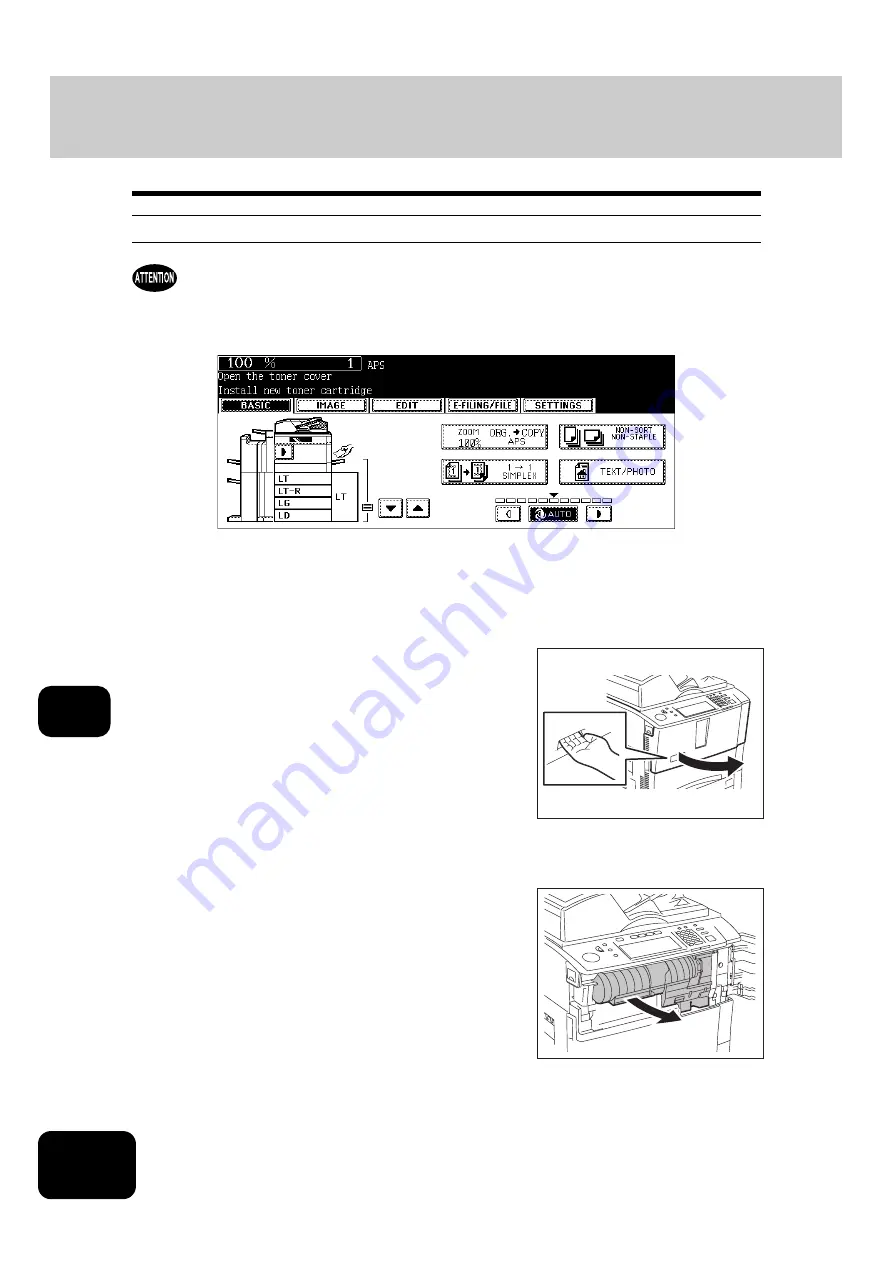
Toner cover symbol

Never attempt to incinerate toner cartridges. This could cause an explosion. Do not dispose of used toner 
cartridges. Contact your service representative. 

When the toner cartridge runs out of toner, the toner cover symbol blinks, and the above message 
appears. 
Approx. 2000 sheets of copy are available after the toner cover symbol starts blinking. Also the toner car-
tridge can be replaced during the copy process while the toner cover symbol is blinking. 
Replace the toner cartridge according to the following procedure. 

1

Insert your fingers in the access on the 
front and open the toner cover.

2

Pull the toner cartridge holder toward 
you.

Содержание DP-7240

Страница 1: ...g Systems Operating Instructions For Basic Functions Model No DP 8540 7240 Before operating this equipment please read these instructions completely and keep these operating instructions for future reference English ...

Страница 2: ...ode Default Time The default time for the Off Mode is 90 minutes DP 8540 7240 Copier Printer Fax model Multifunction model Automatic Energy Save The copier consumes less than 327 W DP 7240 377 W DP 8540 during Energy Save Automatic Energy Save Default Time The default time for the Automatic Energy Save is 15 minutes Sleep Mode The copier consumes less than 95 W DP 8540 7240 in the Sleep Mode Sleep...

Страница 3: ... General Copying Procedures 46 2 Setting Originals 49 Original sizes and types Maximum number of sheets 49 Placing originals on the glass 52 Using the Reversing Automatic Document Feeder 54 3 Auto Job Start Job Preset 57 4 Interrupt Copying 59 5 Stopping Copy Operation 60 6 Bypass Copying 61 Bypass copying 61 Bypass copying on standard size paper 62 Bypass copying on non standard size paper 66 Reg...

Страница 4: ...5 18 INSERTER 165 6 e FILING 169 1 e Filing 170 2 Creating User Boxes 172 3 Changing Data of User Boxes 174 4 Deleting User Boxes 177 5 Storing Documents in e Filing 179 6 Printing Stored Documents 183 7 Deleting Folders or Documents 188 7 TEMPLATE 191 1 Template 192 2 Registering User Groups and Templates 193 3 Changing Data of User Groups and Templates 204 4 Recalling Templates 211 5 Deleting Us...

Страница 5: ... READY CHECK STAPLER 296 6 Examine stapler in the saddle stitch unit 297 7 READY CHECK SADDLE STITCH STAPLER 300 8 READY HOLE PUNCH DUST BIN IS FULL 301 9 POWER FAILURE 302 10 Time for periodic maintenance 303 11 Check paper size setting on control panel for drawer N 304 12 Reboot the machine 312 11 MAINTENANCE 313 1 Daily Inspection 314 2 Simple Troubleshooting 315 12 SPECIFICATIONS OPTIONS 319 1...

Страница 6: ...4 CONTENTS Cont ...

Страница 7: ...Operation of this equipment in a residential area is likely to cause harmful interference in which case the user will be required to correct the interference at his own expense WARNING Changes or modification made to this equipment not expressly approved by Panasonic or parties autho rized by Panasonic could void the user s authority to operate the equipment This Class A digital apparatus complies...

Страница 8: ...6 4 Wax Silica TONER GENUINE TONER CAUTION Avoid prolonged or repeated breathing of dust particles Avoid eye contact In event of eye contact flush with water Call a physician immediately ATTENTION Eviter de respirer des particules de poussiére sur des périodes prolongées ou répétées Eviter tout contact avec les yeux En cas de contact rincer à l eau Appeler immédiatement un médecin DP 8540 7240 15 ...

Страница 9: ... made just for that machine By using Genuine Panasonic supplies with Panasonic copiers you are guaranteed optimum performance Toner Optimum image Quality Panasonic toner is manufactured using ultra fine quality materials under precisely controlled conditions to ensure that your Panasonic copiers will continually generate sharp high quality images Cost Advantage Genuine Panasonic toner provides val...

Страница 10: ...a cord with an unspecified current rating the machine or plug may emit smoke or become hot to the touch Do not attempt to repair pull bend chafe or otherwise damage the power cord Do not place a heavy object on the cord A damaged cord can cause fire or electric shocks Never touch a power cord with wet hands Danger of electric shock exists If the power cord is damaged or insulated wires are exposed...

Страница 11: ...AUTION Installation and Relocation Cautions Do not place the machine near heaters or volatile flammable or combustible materials such as curtains that may catch fire Do not place the machine in a hot humid dusty or poorly ventilated environment Prolonged exposure to these adverse conditions can cause fire or electric shocks Place the machine on a level and sturdy surface that can withstand a weigh...

Страница 12: ...the fresh air If skin contact occurs wash thoroughly with soap and water If eye contact occurs flush thoroughly with water In all cases seek medical treatment if adverse symptoms occur When the toner cartridge is at the end of its life do not dispose of it into a fire It can cause an explosion and you can get burnt Keep the toner cartridge out of children s reach Store in a cool and dry place low ...

Страница 13: ...afety precautions should always be followed to reduce the risk of fire electric shock and injury to persons including the following DO NOT USE THIS PRODUCT NEAR WATER FOR EXAMPLE NEAR A BATH TUB WASH BOWL KITCHEN SINK OR LAUNDRY TUB IN A WET BASEMENT OR NEAR A SWIMMING POOL AVOID USING A TELEPHONE OTHER THAN A CORDLESS TYPE DURING AN ELECTRICAL STORM THERE MAY BE A REMOTE RISK OF ELECTRIC SHOCK FR...

Страница 14: ...ncy electromagnetic field sand may cause harmful Interference to sensitive medical implant devices If you have a cardiac pacemaker or implantable defibrillator please consult your doctor for additional suggestion or advice Do not use the machine near medical instruments Otherwise it may cause erroneous operation and false indications of the medical device Do not use the machine near automatic cont...

Страница 15: ...facilitate changing of parts maintenance and clearing paper jam If there is insufficient space some operations such as bypass feeding will become difficult and the digital imaging system could even break down 2788 mm 109 76 1455 mm 57 28 1548 mm 60 94 100 mm 3 9 1024 mm 40 3 ...

Страница 16: ...USE OF CONTROLS ADJUSTMENTS OR PERFORMANCE PROCEDURES OTHER THAN THOSE SPECIFIED HEREIN MAY RESULT IN HAZARDOUS RADIATION EXPOSURE Caution Label Explanatory label Certification label Identification label Warning label Warning for high temperature areas Warning for grounding wire ...

Страница 17: ...mercury It also contains lead in some components Disposal of these materials may be regulated in your community due to environmental considerations For disposal or recycling information please contact your local authorities or the Electronics Industries Alli ance http www eiae org ...

Страница 18: ... omissions events or accidents beyond the reasonable control of Panasonic including without limitation acts of God war riot civil commotion malicious or deliberate damage fire flood or storm natural calamity earthquakes abnormal voltage or other disasters additions modifications disassembly transportation or repairs by any person other than service technicians authorized by Panasonic or use of pap...

Страница 19: ...ower On Shutdown 27 Turning power ON 27 Shutdown 28 3 Energy Saving Mode 31 4 Setting Copy Paper 32 Original and Copy orientation width and length definition 32 Copy paper types and sizes 33 Panasonic recommended paper Handling and storing paper 34 Setting copy paper size change Setting the drawer for special uses 35 Changing the setting of paper size 38 ...

Страница 20: ... Power switch 4 Drawers 15 Toner cartridge 5 Reversing Automatic Document Feeder RADF 16 Exit cover 6 Operator s Manual pocket Back side 17 Original glass 7 Bypass cover 18 Touch panel 8 Bypass tray 19 Control panel 9 Paper feed cover 20 Toner cartridge holder 10 Paper size indicator 21 Transfer Transport unit 11 Original cover 2 11 13 12 14 15 16 17 20 19 18 21 5 3 4 6 8 7 9 10 1 ...

Страница 21: ...are installable to this finisher 3 Hole Punch Unit DA SP81 This unit enables you to punch holes on printouts 4 Inserter Unit DA ST850 This unit enables you to insert a sheet of paper which does not need to be copied An already copied sheet as well as a blank sheet can be inserted This inserter is also usable for single finishing opera tion without copying such as stapling or hole punching 5 Extern...

Страница 22: ...h Component Cont 1 Other available options are as follows Contact your authorized Panasonic dealer for details FAX Board DA FG850 Printer Kit DA PR850 Printer Scanner Kit DA PS850 Data Overwrite Kit DA DW850 Scrambler Board DA SC850 PCI Slot DA SL850 ...

Страница 23: ...ata reception and FAX communication 5 FAX button Use this button to use the FAX Internet FAX function 6 e FILING button Use this button to access saved image data 7 SCAN button Use this button to use the scanning function 8 COPY button Use this button to use the copier function 9 INTERRUPT button Use this button to interrupt the copy job in process and perform another one The interrupted job is re...

Страница 24: ...on Use this button to start copying scanning and FAX operations 16 CLEAR button Use this button to correct numbers keyed in such as the copy quantity 17 ERROR lamp This lamp lights when an error occurs and the equipment needs some actions to be taken 18 PRINT DATA lamp This lamp lights when print data are being received 19 MONITOR PAUSE button Use this button only when a FAX Unit optional is insta...

Страница 25: ...ndex buttons Press these buttons to switch menus The type and number of the index buttons vary depending on the function of the copier scanner and e Filing Function setting area This area includes buttons for selecting and setting each function 1 Message 8 Finisher button 2 Reproduction ratio 9 Enlargement Reduction Zoom button 3 Total copy quantity 10 Original mode button 4 Currently selected dra...

Страница 26: ...of Each Component Cont 1 Setting functions confirmation SETTINGS button Press this button to confirm currently set functions An example is shown below Buttons appearing on the various menus are as follows some buttons may not appear on the menu ...

Страница 27: ...all the function settings to default without the need to press the FUNC TION CLEAR button When the department management function is being used the display returns to the department code input menu When this function is not being used the display returns to the basic menu of the copier function The period for the automatic function clear is set at 45 seconds by default at the time of installation ...

Страница 28: ... the digital keys on the control panel for number entry The following buttons are used for letter entry Space Press this to enter a space CANCEL Press this to cancel the entry of letters ENTER Press this to fix all entered letters Back Space Press this to delete the letter before the cursor Press them to move the cursor Shift Press this to enter capital letters Caps Lock Press this to switch capit...

Страница 29: ...tment code See the Operating Instructions For User Functions for setting and registration of the department code When the power is turned ON the following menu appears This menu also appears when the ACCESS button is pressed or the automatic function clear has worked Key in a department code 5 digits previously registered and press the ENTER button The menu will switch and the equipment will be re...

Страница 30: ... PRINT DATA MEMORY RX and FAX communication lamps should be blinking If the equipment is shut down while any of the above lamps is blinking jobs in progress such as FAX recep tion will be aborted No PC should access the equipment via the network 2 Press the USER button on the touch panel to enter the user setting menu and then press the SHUTDOWN button 3 Processing job will be deleted Are you sure...

Страница 31: ...utomatically returns to the OFF position Shutting down with the ENERGY SAVER button The equipment can also be shut down by following the procedure below 2 Press the SHUTDOWN button on the touch panel To cancel the shutdown operation press the CANCEL button 1 Press the ENERGY SAVER button on the control panel ...

Страница 32: ... 1 BEFORE USING EQUIPMENT 2 Turning Power On Shutdown Cont 1 3 Shutdown in progress appears on the menu After a while the equipment is shut down The power switch automatically returns to the OFF position ...

Страница 33: ...ions For User Functions for change of this setting The equipment can also be made to enter the energy saving mode manually by means of the following procedure 2 Press the SLEEP button on the touch panel The equipment enters into the energy saving mode During this mode the display on the touch panel disap pears and the ENERGY SAVER button lights in green To canceling the energy saving mode Press th...

Страница 34: ...elow corresponds to the length and B to the width In the figure below the operator is standing in front of the equipment When B is shorter than A it is called placing the original in a portrait direction When B is longer than A it is called placing the original in a landscape direction In this manual when an original or copy paper which can be set in both a portrait and landscape direc tions is pl...

Страница 35: ... lb Index 150 sheets Tab paper Standard size LT A4 The tab paper can be set in any one drawer and the bypass tray except Large Capacity Feeder The rec ommendation is to set in the 2nd drawer 1 External Large Capacity Feeder optional Plain paper 16 20 lb Bond Standard size LT A4 4500 sheets 17 lb Bond 4000 sheets 20 lb Bond Thick 1 28 lb Bond 3500 sheets Thick 2 90 lb Index 2000 sheets Thick 3 110 ...

Страница 36: ...rforming double copying on the same side of the paper since this may cause a malfunction Do not use paper with creases wrinkles or curls paper prone to curling smooth or rough paper this may cause paper misfeeds Paper should be wrapped in its wrapping and stored in a damp free place To prevent paper from being folded or bent store it evenly on a flat surface Paper type Panasonic recommendations Ma...

Страница 37: ... the power ON 2 Pull out the drawer carefully until it comes to a stop A Slide rails Be careful not to touch the slide rails of the drawer 3 Push the lower part of the end guide in the direction of the arrow to remove it then reinstall it at the desired paper size indicated on the bottom inner surface on the drawer 4 Push the arrow part right side of the side guide to unlock it A ...

Страница 38: ...ide may be described on the paper wrapping For the maximum number of sheets that can be set P 33 Copy paper types and sizes Fan the paper well before placing it in the drawer Be sure that the paper height does not exceed the line indicated inside of the guide Do not use creased folded wrinkled or damp sheets of paper Make sure that a gap of 0 02 0 04 or less in total is left between the paper and ...

Страница 39: ...YES button When the paper is the same size as the one in the drawer press the NO button When setting the same size of paper step 11 is not necessary If no action is taken this message will recede in approximately 60 sec 11Press the paper size button corresponding to the paper that has been set and then press the ENTER button 8 When the paper size is different from the one in the drawer change the ...

Страница 40: ...ause a paper jam In this case replace the paper corresponding to the setting of the paper size P 35 Placing paper in the drawer or change the setting of the paper size according to the following pro cedure 2 Press the USER button on the touch panel to enter the user setting menu then press the GENERAL button 3 Press the DRAWER button on the touch panel 1 Press the USER FUNCTIONS button on the cont...

Страница 41: ...39 1 4 Press the drawer on the touch panel corresponding to the one in which the paper size has been set and then press the button indicat ing the new one ...

Страница 42: ...ation Reference Cover sheet Sheet used in the cover copying mode COVER P 136 9 COVER SHEET Insertion sheet Sheet used in the sheet insertion mode Up to 2 drawers can be set for this mode First set Insert source 1 then press the drawer for the paper type of Insert source 2 and then press the INSERT button INSERT 1 or INSERT 2 P 139 10 SHEET INSERTION Tab paper Paper used for the tab paper mode TAB ...

Страница 43: ...Set the paper size as required P 38 Changing the setting of paper size To set tab paper P 155 17 TAB PAPER 3 Press the USER button on the touch panel to enter the user setting menu then press the GENERAL button 4 Press the DRAWER button on the touch panel 2 Press the USER FUNCTIONS button on the control panel ...

Страница 44: ...ting Copy Paper Cont 1 5 Press the MEDIA TYPE button 6 Press the desired drawer then select the paper type and thickness button on the touch panel e g when paper with a paper weight of Thick 1 is set as a cover sheet in the 1st drawer ...

Страница 45: ...as a cover sheet in the 1st drawer The paper type setting is cleared and the indication of drawer returns to the original state When both INSERT SOURCE 1 and INSERT SOURCE 2 have been set and only the setting of INSERT SOURCE 1 is cleared the drawer for INSERT SOURCE 2 changes to the one for INSERT SOURCE 1 Setting paper in the External Large Capacity Feeder optional 1 Pull out the External Large ...

Страница 46: ...hen closing the drawer 2 Place the paper on the elevator tray Set the paper with its copy side up For the maximum number of sheets that can be set P 33 Copy paper types and sizes Fan and jog the paper well before placing it on the elevator tray Set the paper aligned with the rear guide If there is a gap between the set paper and the rear guide the copied image may tilt Be sure that the paper heigh...

Страница 47: ...Placing originals on the glass 52 Using the Reversing Automatic Document Feeder 54 3 Auto Job Start Job Preset 57 4 Interrupt Copying 59 5 Stopping Copy Operation 60 6 Bypass Copying 61 Bypass copying 61 Bypass copying on standard size paper 62 Bypass copying on non standard size paper 66 Registering non standard size in the memory 68 ...

Страница 48: ...us items of the initial settings at the time of installation of this equipment Copying procedure 1 Place paper in the drawer s For the types and sizes of paper selectable P 33 Copy paper types and sizes When the desired size or type of paper is not in any of the drawers or the External Large Capacity Feeder see the following pages P 35 Setting copy paper size change Setting the drawer for special ...

Страница 49: ... starts The next original will also be scanned in the same manner when you press the YES button on the touch panel and then press the START button on the control panel Repeat the above procedure until the scanning of the last page of the original finishes 2 Place the original s See the following pages to set the originals P 49 Original sizes and types P 52 Placing originals on the glass P 54 Using...

Страница 50: ...e FINISHED button on the touch panel Copying starts The paper exits with its copied side down When the drawer runs out of paper during copying the corresponding drawer on the touch panel and the JOB STATUS button on the control panel blink Add paper to this drawer or select another one with the same paper size ...

Страница 51: ...lity 3 Be sure to place ST size originals in the landscape direction Setting position Type of original Maximum size Acceptable sizes for automatic size detection Original glass 1 Sheets 3 dimensional object Books Length 11 69 Width 17 01 Standard size LD LG LT LT R ST R Reversing Auto matic Document Feeder 2 3 Plain paper Recycled paper 1 sided originals 13 3 33 8 lb 2 sided originals 13 3 27 7 lb...

Страница 52: ... to 0 62 in height can be accommodated Scanned originals automatically exit at A or B depending upon the size of originals A LT ST R B LD LG LT R COMP When you copy a large number of landscape originals using the Reversing Automatic Document Feeder use the original stopper to prevent them from being scattered B A ...

Страница 53: ...b When the number of scanned sheets has exceeded the above limit a message The number of originals exceeds the limits Will you copy stored originals appears If you want to print out the data of originals stored scanned up till then press the YES button on the touch panel If you want to delete the stored data press the NO button ...

Страница 54: ...ginal 2 Place the original with its face down on the original glass and align it against the left rear corner of the glass A Original 3 Lower the Reversing Automatic Docu ment Feeder slowly When you want to copy originals with high transparency such as OHP films or tracing paper place a blank sheet of paper the same size as the original or larger over the original A Original B Blank sheet A A B ...

Страница 55: ...tomatic Document Feeder is not fully lowered Do not look fully at the original glass because intensive light may leak out during copying 2 Open the desired page of the original and place it face down Align it against the left rear corner of the glass When you want to use the 2 sided copying function or the dual page function on the book type originals align the center of the original on the yellow...

Страница 56: ...ls with holes or tears 6 Damp originals 7 OHP films or tracing paper 8 Coating paper coated with wax etc Use types of original 9 and 10 shown below with extra care 9 Originals which cannot be moved with the fingers or surface treated originals The sheets of such originals may not be able to be separated 10 Folded or curled originals should be smoothed out before being used If the scanning area or ...

Страница 57: ...iginals and press the START button on the control panel 1 Align all the originals Then place them face up and align the side guides to the original length Place the originals straight along the side guides Collate the originals in the order that you want them to be cop ied The top sheet of the originals will be fed first This mode is also available for one sheet originals Regardless of their sizes...

Страница 58: ...same way The same operation is performed whether you press the YES button 4 After all originals have finished being fed press the FINISHED but ton 1 Align the side guides to the original width 2 Insert the original with its face up and straight along the side guides The original will be pulled in automatically Be sure to let go of it when the sheet starts being pulled The menu of step 3 will be di...

Страница 59: ... in the copy mode of the previous job unless you set new parameters particularly for this job 3 Press the START button on the control panel Up to 10 jobs can be stored in the memory When an 11th job is placed on the original glass or the Reversing Automatic Docu ment Feeder and the START button is pressed Auto Start appears on the touch panel A maximum of 2000 LT sheets or up until the memory beco...

Страница 60: ...ng a job waiting to be copied To cancel auto jobs P 224 Deleting print jobs Canceling auto job Press the STOP button on the control panel to stop a job while originals are being scanned To restart the job press the START button To clear the job press the FUNCTION CLEAR button However the orig inals which have been scanned before the job is stopped are copied even though the FUNCTION CLEAR button i...

Страница 61: ...pt copying press the INTERRUPT button again The message Ready to resume job 1 appears and the interrupted job resumes Interrupt copying is automatically canceled after a certain period by automatic function clearing without the need to press the INTERRUPT button again The interrupted job Job 1 resumes after this automatic function clearing 1 Press the INTERRUPT button on the control panel The INTE...

Страница 62: ...llowing menu is displayed press the MEMORY CLEAR button on the touch panel During scanning The data scanned up to then is deleted During continuous copying Copying stops and the data scanned up to then is deleted If there is any copy job waiting this job will start 1 Press the STOP button on the control panel during scanning or continuous copying ...

Страница 63: ...he table below shows these pages To set tab paper on the bypass tray P 157 Setting tab paper on the bypass tray Bypass copying stops when the paper placed on the bypass tray runs out during copying even if the same size paper is in any of the drawers Copying is resumed when paper is supplied to the bypass tray When bypass copying has completed the FUNCTION CLEAR button on the control panel blinks ...

Страница 64: ...lace some sheets of paper with their copy side up on the bypass tray and align the side guides to the paper length The message Ready for bypass feeding appears Rear side of the side guides of the bypass tray has an indicator for paper height The height of the sheets must not exceed this indicator When using more than one sheet fan the sheets well before set ting them on the tray Do not push the sh...

Страница 65: ...ess the ENTER button on the touch panel Set other copy modes as required If a media type which is not same as the one you have set is selected here this may cause a paper jam or sig nificant image trouble 6 Press the START button on the control panel When you copy on OHP films remove the copied OHP films which have exited on to the receiving tray one by one When the films pile up they may become c...

Страница 66: ...s 1 and 2 of P 62 Making bypass copies on LD LT LG and ST R 2 Press the OTHER SIZE button on the touch panel 3 Press the button of the same size as the one of the paper you have set on the tray 4 Press the OTHER button for the media type If the paper size is not specified here some operations such as cleaning may slow down the copying ...

Страница 67: ...ess the ENTER button on the touch panel Set other copy modes as required If a media type which is not same as the one you have set is selected here this may cause a paper jam or sig nificant image trouble 7 Press the START button on the control panel When you copy on OHP films remove the copied OHP films which have exited on to the receiving tray one by one When the films pile up they may become c...

Страница 68: ... the bypass tray and align the side guides to the paper length The message Ready for bypass feeding appears Rear side of the side guides of the bypass tray has an indicator for paper height The height of the sheets must not exceed this indicator When using more than one sheet fan the sheets well before set ting them on the tray Do not push the sheets into the entrance of the bypass feeder it may c...

Страница 69: ...NTER button Recalling dimensions registered in the memory Press the desired memory number button from MEMORY 1 to MEMORY 4 to recall the dimension data registered previously and then press the ENTER button Maximum paper size to be set 297 mm 11 69 length x 432 mm 17 01 width To register the dimension data in the memory P 68 Registering non standard size in the memory Set other copy modes as requir...

Страница 70: ...d size paper 2 Press the memory number button from MEMORY 1 to MEMORY 4 you want to register the dimension 3 Key in each dimension and press the MEMORY button on the touch panel Key in its length in Length and press the SET button on the touch panel Set its width in the same manner Maximum paper size to be set 297 mm 11 69 length x 432 mm 17 01 width ...

Страница 71: ... Enlargement and Reduction Copying 75 3 Selecting Finishing Modes 81 Finishing modes and finishers optional 81 Sort Group copying 83 Rotate sort mode 85 Staple sort mode optional 86 Magazine sort saddle stitch mode booklet mode 88 Hole punch mode optional 91 Inserter mode optional 93 4 Duplex Copying 95 5 Original Mode 104 6 Copy Density Adjustment 105 ...

Страница 72: ...e original s 3 Confirm that automatic paper selection has been selected on the basic menu Automatic paper selection is selected by default at the installation of the equipment If Change direction of original or CHANGE DRAWER TO CORRECT PAPER SIZE appears perform the action accordingly Set other copy modes as required Even if the direction of the paper set in the selected drawer differs from that o...

Страница 73: ...71 3 2 Press the APS button 4 Press the START button ...

Страница 74: ...ze originals e g newspapers magazines When the desired size of paper is not set in any of the drawers place this size of paper in the selected drawer or place the paper on the bypass tray manually P 35 Placing paper in the drawer P 61 Bypass copying 1 Place paper in the drawer s When using the bypass tray be sure to specify the paper size 2 Place the original s 3 Press the drawer button representi...

Страница 75: ... combinations LD LG LT LT R 8 5 SQ COMP Note that the copied image may be dislocated depending on the combination 1 Place paper in the drawer s Bypass copying is not available 3 Press the Enlargement Reduction ZOOM button to enter the set ting menu of the original or paper size 4 Press the MIXED ORIGINAL SIZES button 2 Adjust the side guides to the widest original and then align the remaining orig...

Страница 76: ...f paper as that of originals P 70 Automatic magnification selection Copies all in one size P 75 Before using automatic paper selection be sure that all paper sizes corresponding to the original sizes have been set in the drawers In automatic magnification selection the copies cannot be enlarged from LT portrait to LD landscape LG landscape Set other copy modes as required 6 Press the START button ...

Страница 77: ...ether the originals have been set on the original glass or on the Reversing Automatic Document Feeder On the original glass 25 to 400 On the Reversing Automatic Document Feeder 25 to 200 Automatic Magnification Selection AMS The automatic magnification selection cannot be selected for the following originals Set their repro duction ratios in other ways Highly transparent originals e g OHP film tra...

Страница 78: ...MS button 5 Place the original s When the original is placed the equipment detects the original size then computes and displays the most appropriate reproduction ratio for the specified copy paper size If Change direction of original appears make the change accordingly Set other copy modes as required 6 Press the START button Specifying both original size and copy size separately 1 Place paper in ...

Страница 79: ...t by pressing the drawer button on the touch panel When the original size and copy paper size have been specified the enlargement reduction ratio is computed and displayed on the touch panel Set other copy modes as required When the original or copy paper is a standard size other than LD LG LT or ST you need to register this paper size in the selections of the OTHER button in advance See When a st...

Страница 80: ... LT and ST R is set Register the size of the placed paper to the OTHER button with the following procedure The registered paper size is automatically selected when the OTHER button is pressed 1 Press the OTHER SIZE button 2 Press the paper size button corresponding to the paper that has been set 3 Press the OTHER button ...

Страница 81: ...lowing buttons to set the desired reproduction ratio A Zoom Up and Down buttons The reproduction ratio changes by 1 every time it is pressed When you hold down either of them the ratio goes up or down automatically B One touch zoom buttons You can select the ratio from 400 200 100 50 and 25 The maximum ratio when the Reversing Automatic Document Feeder is used is 200 B A ...

Страница 82: ...argement and Reduction Copying Cont 3 5 Press the button representing the desired copy paper size The copy paper size can also be set by pressing the drawer button on the touch panel Set other copy modes as required 6 Press the START button ...

Страница 83: ...it DA ST850 Inserter Unit Finishing device Type of finishing mode Sort Group Rotate sort Staple sort Magazine sort Magazine sort Saddle stitch Saddle stitch Hole punch DA FS850 DA FS850 only Yes No Yes Yes No No No DA FS850 DA SP81 Yes No Yes Yes No No Yes DA FS850 DA ST850 Yes No Yes Yes No No No DA FS850 DA SP81 DA ST850 Yes No Yes Yes No No Yes DA FS855 DA FS855 only Yes No Yes Yes Yes Yes No D...

Страница 84: ...t 3 Name of each part in the Finisher optional 1 Tray 2 Sub tray 3 Upper cover 4 Inserter Unit DA ST850 5 Hole Punch Unit DA SP81 6 Saddle stitch unit 7 Saddle stitch tray DA FS855 2 Bin Saddle Stitch Finisher 3 1 1 2 2 1 1 2 2 5 4 6 7 DA FS850 2 Bin Finisher 3 5 4 ...

Страница 85: ...t the sub tray in advance The copied paper may fall or may not be sorted properly without the sub tray 1 Place paper in the drawer s 2 Place the original s 3 Press the finisher button on the basic menu When the original is placed in the Reversing Automatic Document Feeder the sort mode is automatically selected 5 4 3 2 1 5 4 3 2 1 5 4 3 2 1 5 4 3 2 1 5 4 3 2 1 5 4 3 2 1 4 4 4 4 4 3 3 3 3 3 5 5 5 5...

Страница 86: ...84 3 SETTING OF BASIC COPY MODES 3 Selecting Finishing Modes Cont 3 4 Press the SORT or GROUP button Set other copy modes as required 5 Press the START button ...

Страница 87: ...LT R Set the LT LT R size paper in the drawers in advance This mode cannot be used with automatic paper selection When the 2 Bin Finisher or 2 Bin Saddle Stitch Finisher is installed this mode cannot be used 1 Place paper in the drawer s 2 Place the original s 3 Press the finisher button on the basic menu 4 Press the ROTATE SORT button Set other copy modes as required 5 Press the START button ...

Страница 88: ...7 to 28 lb Bond Special paper such as OHP films or sticker label cannot be used for stapling Copies in different size cannot be stapled When the lengths of the copies are the same they can be stapled even if their sizes are different Example of selecting the FRONT STAPLE button Setting the staple sort mode 1 Place paper in the drawer s When using this mode in bypass copying specify the paper size ...

Страница 89: ...r of sheets can be stapled at a time in case of 17 to 20 lb Bond plain paper is shown below 2 Bin Finisher DA FS850 2 Bin Saddle Stitch Finisher DA FS855 For the tray loading capacity P 324 2 Specificatons of Options Two covers of 17 lb Bond to 110 lb Index can be added In this case the covers are included in the maximum number of sheets that can be stapled Paper size Number of sheets LT A4 B5 50 ...

Страница 90: ...ddle stitching The paper weight applicable for this mode is 17 to 28 lb Bond When placing portrait originals horizontal to you in the magazine sort mode set the Image Direction in the edit menu Otherwise the originals will not be copied in the proper page order P 148 14 IMAGE DIRECTION 1 When MAGAZINE SORT is selected 2 When MAGAZINE SORT SADDLE STITCH is selected 3 When SADDLE STITCH is selected ...

Страница 91: ...MAGAZINE SORT SADDLE STITCH is selected Place the first page of the originals first When SADDLE STITCH is selected In case of 12 page originals set them in the order of pages 12 1 2 11 10 3 4 9 8 5 then 6 7 4 Press the finisher button on the basic menu 5 Press the MAGAZINE SORT or MAGAZINE SORT SADDLE STITCH or SADDLE STITCH button The MAGAZINE SORT SADDLE STITCH button and the SADDLE STITCH butto...

Страница 92: ...paper with the highest weight To add one cover of 110 lb Index or more to the paper of 21 to 28 lb Bond the tray loading capacity is always 5 sets Paper size Paper weight Maximum number of sheets for saddle stitching Tray loading capacity LD LT R 17 20 lb Bond 15 Set of 11 15 sheets 10 sets Set of 6 10 sheets 20 sets Set of 2 5 sheets 25 sets 21 28 lb Bond 10 Set of 6 10 sheets 15 sets Set of 2 5 ...

Страница 93: ...lb Index Special paper such as OHP films or sticker label cannot be used for hole punching 1 Place paper in the drawer s When using this mode in bypass copying specify the paper size in advance P 61 6 Bypass Copying 2 Place the original s 3 Press the finisher button on the basic menu 4 Press the HOLE PUNCH button Set other copy modes as required 5 Press the START button When the Inserter Unit opti...

Страница 94: ...your requirements For details consult your service techni cian Number of punch holes and hole diameter Available paper sizes DA SP81E Japan and most of Europe 2 holes 0 26 dia LD LG LT LT R COMP A3 A4 A4 R B4 B5 B5 R FOLIO DA SP81N North America 2 3 holes switchable 0 32 dia 2 holes LG LT R 3 holes LD LT A3 A4 DA SP81F France 4 holes 0 26 dia 3 15 pitch LD LT A3 A4 DA SP81S Sweden 4 holes 0 26 dia...

Страница 95: ...ions on stapling and saddle stitching respectively P 87 Maximum number of sheets for stapling P 90 Available conditions for saddle stitching Setting paper on the Inserter Unit Paper size LD LG LT LT R COMP Media type Plain paper 17 20 lb Bond Thick paper 21 lb Bond 140 lb Index Recycled paper Special paper e g OHP film color paper Contact a Panasonic product distributor for details of the special ...

Страница 96: ...switch over The saddle stitch mode is available only when the 2 Bin Saddle Stitch Finisher optional is installed The hole punch mode and the staple mode can be used together The hole punch mode and the saddle stitch mode cannot be used together 3 Press the START button on the control panel of the unit The operation starts and the START button on the control panel of the unit blinks in green When t...

Страница 97: ...tting at installation 2 1 sided original 2 sided copy 3 2 sided original 2 sided copy 4 2 sided original 1 sided copy 5 Book type original 2 sided copy Duplex copying is available for plain paper 17 to 20 lb Bond thick 1 paper 28 lb Bond thick 2 paper 90 lb Index and thick 3 paper 110 lb Index 12 13 15 12 13 15 13 13 1 2 5 3 4 ...

Страница 98: ...1 Place paper in the drawer s 2 Place the original s 3 Confirm that the simplex duplex button on the basic menu is 1 1 SIMPLEX If 1 1 SIMPLEX is not shown press the simplex duplex button to display the next menu and then press the 1 1 SIMPLEX button on that menu Set other copy modes as required 4 Press the START button ...

Страница 99: ... 148 14 IMAGE DIRECTION 1 Place paper in the drawer s When using this mode in bypass copying specify the paper size in advance P 61 6 Bypass Copying 2 Place the original s 3 Press the simplex duplex button on the basic menu 4 Press the 1 2 DUPLEX button Set other copy modes as required 5 Press the START button When placing an original on the original glass follow steps 5 and 6 of P 46 Copying proc...

Страница 100: ... bypass copying specify the paper size in advance P 61 6 Bypass Copying 2 Place the original s 3 Press the simplex duplex button on the basic menu 4 Press the 2 2 DUPLEX button Set other copy modes as required 5 Press the START button When placing an original on the original glass follow steps 5 and 6 of P 46 Copying procedure continu ously ...

Страница 101: ...mode in the edit menu with 2 Sided Originals to 1 Sided Copies copies can be adjusted to the same direction P 148 14 IMAGE DIRECTION 1 Place paper in the drawer s 2 Place the original s 3 Press the simplex duplex button on the basic menu 4 Press the 2 1 SPLIT button Set other copy modes as required 5 Press the START button ...

Страница 102: ... copy in the same page configuration in which the original is The acceptable paper size for this function is LT only 1 Place paper in the drawer s When using this mode in bypass copying specify the paper size in advance P 61 6 Bypass Copying 2 Press the simplex duplex button on the basic menu 3 Press the BOOK 2 button ...

Страница 103: ...ht hand page and end at a right hand page Other copying types are selectable by pressing any of the RIGHT LEFT LEFT LEFT and LEFT RIGHT buttons e g If pages 2 to 6 of a book which opens to the left are to be copied select LEFT RIGHT The yellow indicator line for booklet copying moves to the center of the original glass E 6 F 7 A 2 B 3 ...

Страница 104: ...modes as required 7 Press the START button When the data of the opened pages have been scanned open the next page and set the booklet on the original glass again Repeat the procedures above until all the desired pages have been scanned If the last copy is only a single page press the COPY FINAL PAGE button on the touch panel before the scanning of this page is started 6 Open and place the first pa...

Страница 105: ...103 3 8 When all the pages have been scanned press the FINISHED button on the touch panel The scanned pages will be copied For setting image shift P 116 Creating a bookbinding margin ...

Страница 106: ...h text and photographs default setting at installation TEXT Original with text only or text and line art only PHOTO Original with photographs only 1 Place paper in the drawer s 2 Place the original s 3 Press the original mode button on the basic menu 4 Select and press the button for the most appropriate original mode for your original Set other copy modes as required 5 Press the START button ...

Страница 107: ... the density of the original In the manual copy density mode you can adjust the copy density manually according to the conditions of the original The automatic copy density mode is selected by default when the equipment is installed Automatic copy density mode 1 Place paper in the drawer s 2 Place the original s 3 Confirm that the AUTO button on the basic menu is selected If it is not press the bu...

Страница 108: ...y mode 1 Place paper in the drawer s 2 Place the original s 3 Press either the or button to adjust the copy density to the desired level The copied image becomes lighter as you press the button and darker as you press the button Set other copy modes as required 4 Press the START button ...

Страница 109: ...107 4 4 IMAGE ADJUSTMENT 1 Background Adjustment 108 2 Sharpness 109 ...

Страница 110: ...wer s 2 Place the original s 3 Press the IMAGE button to enter the image menu and then press the BACKGROUND ADJUSTMENT button 4 Press the LIGHT or DARK button to adjust the density and then press the ENTER button Select other copy modes as required 5 Press the START button Canceling the background adjustment There are 2 ways to clear the setting Press the DEFAULT button and then the ENTER button A...

Страница 111: ...mage menu and then press the SHARPNESS button 4 Press the SOFT or SHARP button to adjust the sharpness and then press the ENTER button When the sharpness level is adjusted to the SOFT side the moire fringes are suppressed If it is adjusted to the SHARP side the letters and fine lines become sharper Select other copy modes as required 5 Press the START button Canceling the sharpness adjustment Ther...

Страница 112: ...4 110 4 IMAGE ADJUSTMENT ...

Страница 113: ...IN1 4IN1 124 6 MAGAZINE SORT 127 7 EDITING 129 Trimming Masking 129 Mirror image 132 Negative Positive reversal 133 8 XY ZOOM 134 9 COVER SHEET 136 10 SHEET INSERTION 139 11 TIME STAMP 141 12 PAGE NUMBER 142 13 JOB BUILD 144 14 IMAGE DIRECTION 148 15 BOOK TABLET 150 16 ADF SADF 152 17 TAB PAPER 155 18 INSERTER 165 ...

Страница 114: ...g margin Select this setting when using Book type original 2 sided copy P 100 The Top or Bottom margin can be used in combination with the Right or Left margin or the Bookbinding margin When the Top or Bottom margin and Right or Left margin are used together the value of the margin width is determined by the value set last Creating a right or left margin 1 Place paper in the drawer s When using th...

Страница 115: ...idth of the margin is 7 mm 0 276 In duplex copying margins on the back are created on the other side of those in the front P 95 4 Duplex Copying If the Top or Bottom margin has already been set the value of the margin width is replaced by the one set in this step 6 Press the ENTER button Select other copy modes as required 7 Press the START button ...

Страница 116: ...op or bottom margin 1 Place paper in the drawer s When using this mode in bypass copying P 61 be sure to specify the paper size 2 Place the original s 3 Press the EDIT button to enter the edit menu and then press the IMAGE SHIFT button 4 Press the TOP or BOTTOM button ...

Страница 117: ...in is 7 mm 0 276 In duplex copying margins on the back are created on the other side of those in the front P 95 4 Duplex Copying If the Top or Bottom margin has already been set the value of the margin width is replaced by the one set in this step 6 Press the ENTER button Select other copy modes as required 7 Press the START button ...

Страница 118: ... copying The margin is created in the center inner margin Acceptable paper sizes for this function is LT only 1 Press the EDIT button to enter the edit menu and then press the IMAGE SHIFT button 2 Press the BOOK button 3 Adjust the margin width by pressing the 2 mm or 30 mm button and then press the ENTER button The default width of the margin is 14 mm 0 551 ...

Страница 119: ...117 5 4 Press the ENTER button Set Book type original 2 sided copy P 100 in duplex copying as well ...

Страница 120: ...is available only in the case of standard size originals 1 Place paper in the drawer s When using this mode in bypass copying P 61 be sure to specify the paper size 2 Place the original s 3 Press the EDIT button to enter the edit menu and then press the EDGE ERASE button 4 Adjust the width by pressing the 2 mm or 50 mm button and then press the ENTER button The default width of the white border is...

Страница 121: ...rase is set 2 After book center erase is set 1 Place paper in the drawer s When using this mode in bypass copying P 61 be sure to specify the paper size 2 Press the drawer button representing the desired paper size on the touch panel 3 Press the EDIT button to enter the edit menu and then press the BOOK CENTER ERASE button 1 2 ...

Страница 122: ... width of the erase margin is 10 mm 0 393 Select other copy modes as required 5 Place a book original on the original glass Align its center with the yellow guide line near the center of the original glass Do not place heavy objects 9 lb or more on the original glass and do not press on it with force Breaking the glass could injure you 6 Press the START button ...

Страница 123: ...copied on one sheet It is not necessary to move the original on the glass You can also place a pair of LT sized originals side by side and copy them on separate sheets of paper Acceptable paper sizes for this function is LT only 1 Place paper in the drawer s 2 Press the EDIT button to enter the edit menu and then the DUAL PAGE button 12 13 12 13 ...

Страница 124: ...argin P 112 Creating a right or left margin 4 Press the BASIC button to enter the basic menu and then select the copy size LT When using this mode in bypass copying P 61 be sure to specify the paper size Select other copy modes as required 6 Turn to the next page set the book again and then press the START button Repeat this step until all the originals have finished being scanned 5 Place the firs...

Страница 125: ...123 5 7 After all the originals have finished being scanned press the FIN ISHED button Press the COPY FINAL PAGE button if the last original is a 1 sided page ...

Страница 126: ...origi nals are copied onto a single sheet In addition duplex 2IN1 4IN1 modes are available where four eight originals can be copied to 2 sides of a single sheet of paper 2IN1 4IN1 2IN1 DUPLEX a Side 1 b Side 2 When a copy is turned with the line as a pivot originals are printed on Side 2 back face as shown 4IN1 DUPLEX a Side 1 b Side 2 When a copy is turned with the line as a pivot originals are p...

Страница 127: ...s the original press the ZOOM button on the basic menu to enter the following menu select the desired paper size and press the AMS button If the paper size is not changed paper of the same size as the original is selected 2 Place the original s 3 Press the EDIT button to enter the edit menu and then press the 2 IN1 4IN1 button 4 Select the type of image combination ...

Страница 128: ...126 5 USING THE EDITING FUNCTIONS 5 2IN1 4IN1 Cont 5 5 Press the 1 SIDE or 2 SIDE button Select other copy modes as required 6 Press the START button ...

Страница 129: ...utomati cally folded in half and stapled along their center line Example of copying with the 2 Bin Saddle Stitch Finisher optional The Magazine sort function has 2 procedures operating from the basic menu and operating from the edit menu When operating from the edit menu the margin width can be adjusted To operate from the basic menu P 88 Magazine sort saddle stitch mode booklet mode 1 Place paper...

Страница 130: ...he binding margin To staple the center line using the 2 Bin Saddle Stitch Finisher optional press the STAPLE ON button For the maximum number of sheets that can be stapled P 90 Available conditions for saddle stitching To adjust the width press the 2 mm or 30 mm button The default width of the margin is 2 mm 0 08 Select other copy modes as required 6 Press the START button ...

Страница 131: ...age editing is only available with standard size originals If the original and copy paper sizes are set incorrectly the image in the specified range may not be copied correctly 1 An example of trimming 2 An example of masking 1 Place paper in the drawer s When using this mode in bypass copying be sure to specify the paper size P 70 1 Paper Selection 2 Press the EDIT button to enter the edit menu a...

Страница 132: ...d align it with the original scales 5 Specify the area Using the original scale on the left and the inner top scale read the following 4 values X1 Distance from the top left to the left edge of the specified area X2 Distance from the top left to the right edge of the specified area Y1 Distance from the top left to the upper edge of the specified area Y2 Distance from the top left to the lower edge...

Страница 133: ...t the value which has been set press the RESET button Pressing it once makes the highlighted field move one position upward Highlight the field in which you want to rectify the value and then key in the correct one 7 Press the ENTER button after specifying the area 9 Press the START button 8 Place the original s with its face down Set the original face down with its bottom toward you and fit its t...

Страница 134: ...ed right and left 1 Place paper in the drawer s When using this mode in bypass copying be sure to specify the paper size P 70 1 Paper Selection 2 Place the original s 3 Press the EDIT button to enter the edit menu and then press the EDITING button 4 Press the MIRROR button Select other copy modes as required 5 Press the START button ...

Страница 135: ...or vice versa 1 Place paper in the drawer s When using this mode in bypass copying be sure to specify the paper size P 70 1 Paper Selection 2 Place the original s 3 Press the EDIT button to enter the edit menu and then press the EDITING button 4 Press the NEG POS button Select other copy modes as required 5 Press the START button ...

Страница 136: ...n the range of 25 to 400 When an original is placed on the Reversing Automatic Document Feeder the reproduction ratio is in the range of 25 to 200 1 Place paper in the drawer s When using this mode in bypass copying P 61 be sure to specify the paper size 2 Place the original s 3 Press the EDIT button to enter the edit menu and then press the XY ZOOM button 100 100 200 200 ...

Страница 137: ...horizontal and Y vertical direc tions Using the 25 and 400 buttons set the reproduction ratio for X and press the SET button Then set the reproduction ratio for Y 5 Press the ENTER button Select other copy modes as required 6 Press the START button ...

Страница 138: ...n the bypass tray or the Inserter Unit How ever the Inserter Unit cannot be used with TOP COPIED or TOP COPIED BACK BLANK When it is placed in the drawer for the cover sheets you must set the paper type cover sheet size and thick ness P 40 Drawer for special uses When it is placed on the bypass tray you must set the paper size and thickness P 61 6 Bypass Copying When using the Inserter Unit with T...

Страница 139: ... desired cover sheet button TOP BLANK To add a blank front cover sheet TOP COPIED To add a copied front cover sheet BOTH BLANK To add blank front and back cover sheets TOP COPIED BACK BLANK To add copied front and blank back cover sheets When 1 Sided Original to 2 Sided Copy with the TOP COPIED or TOP COPIED BACK BLANK button pressed is performed a 1 sided copy is made for a cover sheet ...

Страница 140: ... the START button When the Reversing Automatic Document Feeder is used the original is scanned and copying starts When the original is placed on the original glass perform steps 8 and 9 8 Press the YES button and place the next original Then press the START button Repeat this step until all the originals have finished being scanned 9 After all the originals have finished being scanned press the FI...

Страница 141: ...er P 40 Drawer for special uses Place the special sheets of paper in the drawer selected for sheet insertion on the bypass tray or the Inserter Unit However the Inserter Unit cannot be used with COPIED When using the Inserter Unit with BLANK P 165 18 INSERTER Both special sheets of paper and plain paper should be placed in the same direction and be of the same size 2 Place plain paper in the drawe...

Страница 142: ... on step 5 a copied sheet is inserted into the specified page When BLANK is selected a blank sheet is inserted into the page previous to the specified one Up to 50 pages can be specified for INSERT SOURCE 1 and INSERT SOURCE 2 When inserting multiple sheets one by one at specified pages repeat steps 6 and 7 Up to 15 pages are registered in the template P 193 8 After the specifying of all insertion...

Страница 143: ...py 1 Place paper in the drawer s 2 Place the original s 3 Press the EDIT button to enter the edit menu and then press the TIME STAMP button 4 Select the orientation Short edge or Long edge and position UPPER or LOWER of the date and time to be printed and then press the ENTER button Select other copy modes as required 5 Press the START button MM DD YYYY 14 54 MM DD YYYY 14 54 1 2 ...

Страница 144: ...add page numbers to the copies 1 Printed at the bottom center of a portrait copy 2 Printed at the top right of a landscape copy 1 Place paper in the drawer s 2 Place the original s 3 Press the EDIT button to enter the edit menu and then press the PAGE NUMBER button 3 2 1 3 2 1 1 2 ...

Страница 145: ...on TOP LEFT TOP CENTER TOP RIGHT BOTTOM LEFT BOT TOM CENTER or BOTTOM RIGHT of the page number to be printed and then press the ENTER button 5 Key in the starting page number and then press the ENTER button Select other copy modes as required 6 Press the START button ...

Страница 146: ...l number of scanned original pages reaches 2000 There are restrictions on the settings for JOB BUILD Settings not available for JOB BUILD common set tings for all jobs and changeable settings for each job See the following table to perform the setting Settings not available for JOB BUILD Common settings for all jobs Changeable settings per each job Automatic Paper Selection APS Book to 2 Image edi...

Страница 147: ...er P 73 When copying mixed size originals Select the drawer if you want to specify it 2 Press the EDIT button to enter the edit menu and then press the JOB BUILD button If the desired function button is not displayed press the Prev or Next button to switch the menu 3 Press the ENTER button Read the brief description of JOB BUILD on the touch panel JOB BUILD is set and the basic menu is displayed ...

Страница 148: ...iginals for the 1st job starts 6 After Press START button to copy after changing settings appears place the originals of the 2nd job Perform the settings for the 2nd job Note that copying will be performed in the same modes as those of the 1st job if the settings are not changed Press the SETTINGS button to confirm the settings 7 Press the START button The scanning of the originals for the 2nd job...

Страница 149: ...147 5 9 Press the JOB FINISH button on the basic menu The copying of the originals starts When copy and e Filing file functions are set storing starts ...

Страница 150: ... left Book portrait LD LG original etc is copied using this function with 2 Sided Originals to 1 Sided Copies copies can be adjusted to the same direction IMAGE DIRECTION 1 Set 2 No setting 1 Place paper in the drawer s 2 Place the original s 3 Perform the setting of 1 2 DUPLEX or 2 1 SPLIT P 95 4 Duplex Copying 4 Press the EDIT button to enter the edit menu and then press the IMAGE DIRECTION butt...

Страница 151: ...149 5 5 Press the ENTER button Select other copy modes as required 6 Press the START button ...

Страница 152: ... open to top Tablet and the opposite condition is available 1 Place paper in the drawer s 2 Place the original s 3 Perform the setting of 2 2 DUPLEX P 95 4 Duplex Copying 4 Press the EDIT button to enter the edit menu and then press the BOOK TABLET button Open to left originals are copied in open to top and open to top originals are copied in open to left by this operation If the desired function ...

Страница 153: ...151 5 5 Press the ENTER button Select other copy modes as required 6 Press the START button ...

Страница 154: ...t this mode for copying originals one by one In the single feed mode set the originals one after another Setting more than one original could cause a tilted image or a paper jam To set different size originals P 73 When copying mixed size originals Continuous feed mode 1 Place paper in the drawer s 2 Press the EDIT button to enter the edit menu and then press the SADF button If the ADF button is a...

Страница 155: ...edit menu and then press the ADF button If the SADF button is already displayed the single feed mode is set In this case skip to step 4 If the desired function button is not displayed press the Prev or Next button to switch the menu 3 Press the SADF button Select other copy modes as required ...

Страница 156: ...omatic Document Feeder The original is automatically pulled in and the following menu is displayed If there are more originals set them in the same way The same operation is performed whether or not you press the YES button 5 After all originals have finished being fed press the FINISHED but ton ...

Страница 157: ...ity Feeder The recommendation is to set in the 2nd drawer Be sure to set TAB PAPER for the drawer for special uses P 40 Drawer for special uses Only the LT A4 size can be used in this mode Preparing an original to copy on the tab of the tab paper LT A4 originals are used In Copy On Tab or Copied Tab Insert mode the image is shifted to copy the index of the original on the tab position 1 2 3 Origin...

Страница 158: ...Pull out the drawer Placing paper in the second drawer is recommended 3 Align the tab paper with the original 5 Close the drawer Check if the drawer for special uses is set to TAB PAPER 2 Insert the tab paper back guide into the slit of LT TAB or A4 TAB 4 Place the tab paper with its face down in the drawer front side Originals Sheets of tab paper 1st 2nd 3rd 4th 4th 3rd 2nd 1st 1st 2nd 3rd 4th ba...

Страница 159: ...er and when it is set on the bypass tray 1 Align the tab paper with the original 3 Set the size and thickness Be sure to select TAB PAPER for the paper type P 61 6 Bypass Copying 2 Place the tab paper with its face up on the bypass tray front side 4th 3rd 2nd 1st 1st 2nd 3rd 4th Originals Sheets of tab paper front side ...

Страница 160: ...ass tray respectively This setting is different between when the tab paper is set in the drawer and when it is set on the bypass tray 1 Press the EDIT button to enter the edit menu and then press the TAB PAPER button 2 Press the TAB EXTENSION button 3 Press the DRAWER button for setting tab paper in the drawer or the BYPASS FEED button for setting it on the bypass tray ...

Страница 161: ...is set in the drawer and when it is set on the bypass tray Measuring the tab width and shift width The tab width and the shift width can be measured by the scale on the left side and rear side of the original glass The marks of the original scale have a 2 mm 0 08 pitch Measuring the tab width Place tab paper on the original glass to measure the tab width Measuring the shift width Place the origina...

Страница 162: ... 2 Place tab paper in the drawer or on the bypass tray For placing tab paper in the drawer P 156 Setting tab paper in the drawer For placing tab paper on the bypass tray P 157 Setting tab paper on the bypass tray 3 Place the original s 4 Press the EDIT button to enter the edit menu and then press the TAB PAPER button If the desired function button is not displayed press the Prev or Next button to ...

Страница 163: ...paper is not performed Up to 15 pages are registered in the template P 193 1 Place tab paper in the drawer or on the bypass tray For placing tab paper in the drawer P 156 Setting tab paper in the drawer For placing tab paper on the bypass tray P 157 Setting tab paper on the bypass tray 2 Place the original s 3 Press the EDIT button to enter the edit menu and then press the TAB PAPER button If the ...

Страница 164: ...ing the tab paper and then press the SET button When 2 sheets of tab paper or more are inserted repeat step 5 The tab paper is inserted prior to a selected page Up to 50 sheets of tab paper can be inserted Up to 15 pages are registered in the template P 193 6 Press the ENTER button Select other copy modes as required 7 Press the START button ...

Страница 165: ...tab paper in the drawer P 156 Setting tab paper in the drawer For placing tab paper on the bypass tray P 157 Setting tab paper on the bypass tray 3 Place the originals Before placing them insert an original for tab paper prepared in step 1 prior to the desired page 4 Press the EDIT button to enter the edit menu and then press the TAB PAPER button If the desired function button is not displayed pre...

Страница 166: ...he SET button When 2 sheets of tab paper or more are inserted repeat step 6 Up to 50 sheets of tab paper can be inserted Up to 15 pages are registered in the template P 193 Check that the page number corresponds to the inserted page for tab paper in step 3 7 Press the ENTER button Select other copy modes as required 8 Press the START button ...

Страница 167: ...ack cover sheet can be inserted with its backside up See the Operating Instructions For User Functions for details When you want to insert a sheet and make a copy on it use the drawer or the bypass tray of the equip ment not the Inserter Unit Use the cover copying mode or the sheet insertion mode from the edit menu P 136 9 COVER SHEET P 139 10 SHEET INSERTION 1 Place paper on the Inserter Unit P 9...

Страница 168: ... Cont 5 4 Press the PAPER SIZE button If no paper is set on the Inserter Unit the PAPER SIZE button and the MEDIA TYPE button are not selectable 5 Press the button representing the paper size set on the Inserter Unit 6 Press the MEDIA TYPE button ...

Страница 169: ...VER or FRONT BACK COVER button then press the ENTER button When using these modes with the sheet insertion mode press the SHEET INSERT button before pressing the ENTER button Set other copy modes as required 9 Press the START button Selecting SHEET INSERT A blank sheet is inserted before the page specified 8 Press the SHEET INSERT button ...

Страница 170: ...pages can be specified To specify more than one page repeat this procedure Up to 15 pages are registered in the template P 193 10After you have finished specifying the pages press the ENTER but ton When using the sheet insertion mode with FRONT COVER or FRONT BACK COVER press the FRONT COVER or FRONT BACK COVER button before pressing the ENTER button Set other copy modes as required 11Press the ST...

Страница 171: ...FILING 1 e Filing 170 2 Creating User Boxes 172 3 Changing Data of User Boxes 174 4 Deleting User Boxes 177 5 Storing Documents in e Filing 179 6 Printing Stored Documents 183 7 Deleting Folders or Documents 188 ...

Страница 172: ... setting This is used to store a shared document that can be accessed by any users without restrictions User box Up to 200 boxes can be created Passwords can be set for each user box Up to 100 folders per one box can be created A maximum of 400 documents can be stored in one folder The maximum number of original pages is 1000 However it may be restricted depending on the amount of free space on th...

Страница 173: ... Downloader See the Operating Instructions For e Filing Function for details For setting the storing period of the documents in e Filing ask the network administrator Be sure to back up the data stored in e Filing regularly in case of a hard disk failure See the Operating Instructions For e Filing Function for details This chapter explains about when copied original data are stored to e Filing See...

Страница 174: ...ach user box You can create folders using TopAccess from a client PC See the Operating Instructions For e Filing Function for details Set up a user box following the procedure below 2 Select a blank box number between 001 and 200 and then press the SETUP button 3 Enter the box name When the BOX NAME button is pressed the letter entry menu P 26 is displayed Up to 32 letters can be entered 1 Press t...

Страница 175: ... entered To correct the entered password press the CLEAR button on the control panel When the SET button is pressed Retype Password becomes highlighted 5 Key in the password in Retype Password asterisk is displayed in Retype Password when the password is entered To correct the entered password press the CLEAR button on the control panel 6 Press the ENTER button The user box is created ...

Страница 176: ...ructions For e Filing Function for details 2 Select the desired box and then press the EDIT button If the desired box is not displayed press the Prev or Next button to switch the menu To display the applicable menu immediately key in the box number 3 Key in the password 5 digits for the selected box and then press the ENTER button If no password was set when the box was created skip to step 4 1 Pr...

Страница 177: ...to key in the 5 digit password asterisk is displayed in Password when the password is entered To correct the entered password press the CLEAR button on the control panel When the SET button is pressed Retype Password becomes highlighted 6 Key in the password in Retype Password asterisk is displayed in Retype Password when the password is entered To correct the entered password press the CLEAR butt...

Страница 178: ...176 6 e FILING 3 Changing Data of User Boxes Cont 6 7 Press the ENTER button The box settings are updated ...

Страница 179: ... and then press the DELETE but ton If the desired box is not displayed on the menu press the Prev or Next button to switch the menu To display the applicable menu immediately key in the box number 3 Key in the password 5 digits for the selected box and then press the ENTER button If no password was set when the box was created skip to step 4 1 Press the e FILING button on the con trol panel ...

Страница 180: ...178 6 e FILING 4 Deleting User Boxes Cont 6 4 Are you sure you want to delete this BOX appears Press the YES button to delete the box The box is deleted ...

Страница 181: ...canning function can be also stored in e Filing by installing the Printer Scanner Kit optional The stored data can be downloaded to the client PC as a JPEG PDF or TIFF file For details refer to the Operating Instructions For Scan Function 1 Place the original s Up to 100 folders can be created in one e Filing and a maximum of 400 documents can be stored in one folder The maximum number of original...

Страница 182: ...h you want to store the document and then press the ENTER button If the desired box is not displayed on the menu press the Prev or Next button to switch the menu When the password entry menu is displayed When the password entry menu is displayed the password is set in the selected user box Key in the password ...

Страница 183: ...list in the selected folder is displayed Press the ENTER button to store in this folder If you want to close the folder and go back to the box above press the CLOSE FOLDER button Creating the folder can be performed from the client PC using TopAccess For details see Operating Instructions For e Filing Function 7 Enter the document name When the DOCUMENT NAME button is pressed the letter entry menu...

Страница 184: ...tton 10Press the START button Storing the document starts When the original is placed on the original glass or on the Reversing Automatic Document Feeder in the Single original feeding mode the following menu is displayed If you have another original to be stored press the YES button After the last page has finished being scanned press the FINISHED button 11After all originals have finished being ...

Страница 185: ...rinting the stored document after changing the settings 2 Select the box in which the desired printing document is stored and then press the ENTER button If the desired box is not displayed on the menu press the Prev or Next button to switch the menu To display the applicable menu immediately key in the box number 3 Key in the password 5 digits for the selected box and then press the ENTER button ...

Страница 186: ...button Select the desired document on the menu 5 Press the PRINT button Printing starts To stop printing a stored document during the operation Select the job you want to stop from the print job menu or scan job menu and then press the DELETE button For details P 221 8 JOB STATUS Test printing A part of a document of several pages can be printed out 1 Follow steps 1 to 4 of P 183 Printing the whol...

Страница 187: ...the pages press the CLEAR button on the control panel To print all pages press the ALL PAGES button 4 Press the PRINT button Printing of the set pages starts To stop printing a stored document during this operation Select the job you want to stop from the print job menu or scan job menu and then press the DELETE button For details P 221 8 JOB STATUS ...

Страница 188: ...intings Key them in 3 Simplex printing duplex printing 4 Finishing mode Selecting the mode is limited depending on the installed optional equipment 5 Paper exit Available when the 2 Bin Finisher or 2 Bin Saddle Stitch Finisher both are optional is installed 6 Image shift position 7 Added date and time position 8 Page number position 1 Follow steps 1 to 4 of P 183 Printing the whole document 2 Pres...

Страница 189: ...RINT button Printing starts To stop printing a stored document during this operation Select the job you want to stop from the print job menu or scan job menu and then press the DELETE button For details P 221 8 JOB STATUS ...

Страница 190: ...he folder or document and then press the ENTER button If the desired box is not displayed on the menu press the Prev or Next button to switch the menu To display the applicable menu immediately key in the box number 3 Key in the password 5 digits for the selected box and then press the ENTER button If no password was set when the box was created skip to step 4 1 Press the e FILING button on the co...

Страница 191: ...e folder select the folder in which you want to delete the document and press the OPEN FOLDER button Select the desired document and press the DELETE button 5 Are you sure you want to delete this folder or Are you sure you want to delete this document appears Press the YES button to delete the folder or document The folder or document is deleted ...

Страница 192: ...6 190 6 e FILING ...

Страница 193: ...191 7 7 TEMPLATE 1 Template 192 2 Registering User Groups and Templates 193 3 Changing Data of User Groups and Templates 204 4 Recalling Templates 211 5 Deleting User Groups or Templates 216 ...

Страница 194: ...nctions To use scanning functions the Printer Scanner Kit optional is required To use Fax functions the optional Fax Unit is required The following illustration shows the outline of a template function 1 Register the combination of the functions to the template 2 Place the original 3 Recall the desired template and then make a copy 3 1 2 HDD 90 2004 3 15 2004 3 15 2004 3 15 2004 3 15 ...

Страница 195: ...public template group keying in the Admin Password is required USER GROUP Up to 200 groups can be registered It is useful if you register each department section or person as a user group Up to 60 templates can be registered in each group Passwords can be set for the user groups Registering a template in the public template group 1 Set every function you want to include in the combination e g Sett...

Страница 196: ...the PASSWORD button The letter entry menu is displayed 6 Key in the Admin Password 6 to 10 digits with the keys on the letter entry menu and the digital keys and then press the ENTER button The corresponding buttons of the template registered in the public template group are displayed 7 Press the blank key and then press the SAVE button ...

Страница 197: ...rs can be entered The following symbols cannot be used for NAME 1 and NAME 2 9 Enter the user name of the template as required When the USER NAME button is pressed the letter entry menu P 26 is displayed Up to 30 letters can be entered 10Key in the password in Password as required and then press the SET button to fix it Be sure to key in the 5 digit password asterisk is displayed in Password when ...

Страница 198: ...s recalled Press the ENABLE or DISABLE button When ENABLE is selected the icon is added to the template button The operation of the setting functions is automatically started by pressing the template button with the icon when the template is recalled How ever if a password is set for the template you need to key it in when an operation with the function set to the template is performed though auto...

Страница 199: ...ering the new user group 2 Press the REGISTRATION button on the touch panel 3 Select an unregistered user group between 001 and 200 and then press the ENTER button 1 Press the TEMPLATE button on the con trol panel ...

Страница 200: ...red When the USER NAME button is pressed the letter entry menu P 26 is displayed Up to 30 letters can be entered 6 Key in the password in Password as required and then press the SET button to fix it Be sure to key in the 5 digit password asterisk is displayed in Password when the password is entered To correct the entered password press the CLEAR button on the control panel When the SET button is ...

Страница 201: ...s the ENTER button The user group is registered Registering a template in the user group 1 Set every function you want to include in the combination e g Setting Image shift 90 reduction and 10 sets of copies of the copy function Up to 15 pages are registered in the template for each setting of SHEET INSERTION BLANK TAB INSERT and COPIED TAB INSERT for TAB PAPER and SHEET INSERT for INSERTER 2 Pres...

Страница 202: ...Select the desired user group and then press the ENTER button If the desired user group is not displayed press the Prev or Next button to switch the menu 5 Key in the password 5 digits for the selected user group and then press the ENTER button If no password was set when the user group was registered skip to step 6 ...

Страница 203: ...nter NAME 1 and or NAME 2 When both are entered NAME 1 is displayed in the upper side and NAME 2 is displayed in the lower side of the button When the NAME 1 or NAME 2 button is pressed the letter entry menu P 26 is displayed Up to 11 let ters can be entered The following symbols cannot be used for NAME 1 and NAME 2 8 Enter the user name of the template as required When the USER NAME button is pre...

Страница 204: ...n Password when the password is entered To correct the entered password press the CLEAR button on the control panel When the SET button is pressed Retype Password becomes highlighted 10Key in the password in Retype Password and then press the ENTER button to fix it asterisk is displayed in Retype Password when the password is entered To correct the entered password press the CLEAR button on the co...

Страница 205: ...ctions is automatically started by pressing the template button with the icon when the template is recalled How ever if a password is set for the template you need to key it in when an operation with the function set to the template is performed though automatic start is enabled 12Press the SAVE button The screen returns to the one of step 1 which is the menu before the TEMPLATE button on the cont...

Страница 206: ...lic group cannot be changed Changing the data of a user group 2 Press the REGISTRATION button on the touch panel 3 Select the user group you want to change and then press the EDIT button If the desired user group is not displayed on the menu press the Prev or Next button to switch the menu To display the applicable menu immediately key in the user group number 1 Press the TEMPLATE button on the co...

Страница 207: ...r group was registered skip to step 5 5 Enter the new name of the user group When the NAME button is pressed the letter entry menu P 26 is displayed Up to 20 letters can be entered 6 Enter the new user name of the user group When the USER NAME button is pressed the letter entry menu P 26 is displayed Up to 30 letters can be entered ...

Страница 208: ...ntered To correct the entered password press the CLEAR button on the control panel When the SET button is pressed Retype Password becomes highlighted 8 Key in the password in Retype Password and then press the ENTER button to fix it asterisk is displayed in Retype Password when the password is entered To correct the entered password press the CLEAR button on the control panel 9 Press the ENTER but...

Страница 209: ... in which the template to be changed was registered and then press the ENTER button If the desired user group is not displayed on the menu press the Prev or Next button to switch the menu To display the applicable menu immediately key in the user group number 1 Press the TEMPLATE button on the con trol panel ...

Страница 210: ... keys When the user group is selected Key in the password 5 digits for the selected user group If no password was set when the user group was registered skip to step 5 5 Select the template to be changed and then press the EDIT button If the desired template is not displayed on the menu press the Prev or Next button to switch the menu 6 Key in the password 5 digits for the selected template and th...

Страница 211: ...of the template When the USER NAME button is pressed the letter entry menu P 26 is displayed Up to 30 letters can be entered 9 Key in the new password in Password and then press the SET button to fix it Be sure to key in the 5 digit password asterisk is displayed in Password when the password is entered To correct the entered password press the CLEAR button on the control panel When the SET button...

Страница 212: ...f AUTOMATIC START for recalling the tem plate Press the ENABLE or DISABLE button When ENABLE is selected the icon is added to the template button The operation of the setting functions is automatically started by pressing the template button with the icon when the template is recalled How ever if a password is set for the template you need to key it in when an operation with the function set to th...

Страница 213: ...NABLE is selected for AUTOMATIC START when the template is registered operation of the setting functions is automatically started by pressing the template button When recalling a template in a public group 1 Place paper in the drawer s 2 Place the original s 4 Press the PUBLIC TEMPLATE GROUP 3 Press the TEMPLATE button on the con trol panel ...

Страница 214: ... the template button with the icon the operation of the registered setting functions is automati cally started 6 Key in the password 5 digits for the selected template and then press the ENTER button If no password was set when the template was registered skip to step 7 7 Confirm that Updated the template setting appears on the menu Select other copy modes as required 8 Press the START button ...

Страница 215: ... 4 Select the user group in which the template to be recalled is regis tered If the desired user group is not displayed on the menu press the Prev or Next button to switch the menu To display the applicable menu immediately key in the user group number 3 Press the TEMPLATE button on the con trol panel ...

Страница 216: ...ss the desired template button If the desired template is not displayed on the menu press the Prev or Next button to switch the menu If you press the template button with the icon the operation of the registered setting functions is automati cally started 7 Key in the password 5 digits for the selected template and then press the ENTER button If no password was set when the template was registered...

Страница 217: ...215 7 8 Confirm that Updated the template setting appears on the menu Select other copy modes as required 9 Press the START button ...

Страница 218: ...eted Deleting a user group 2 Press the REGISTRATION button on the touch panel 3 Select the user group you want to delete and then press the DELETE button If the desired user group is not displayed on the menu press the Prev or Next button to switch the menu To display the applicable menu immediately key in the user group number 1 Press the TEMPLATE button on the con trol panel ...

Страница 219: ...ress the ENTER button If no password was set when the user group was registered skip to step 5 5 Press the DELETE button The selected user group is deleted Deleting a template 2 Press the REGISTRATION button on the touch panel 1 Press the TEMPLATE button on the con trol panel ...

Страница 220: ...wing password and then press the ENTER button When the public group is selected Press the PASSWORD button and then key in the Admin Password 6 to 10 digits with the keys on the letter entry menu and the digital keys When the user group is selected Key in the password 5 digits for the selected user group If no password was set when the user group was registered skip to step 5 5 Select the template ...

Страница 221: ... in the password 5 digits for the selected template and then press the ENTER button If no password was set when the template was registered skip to step 7 7 Press the DELETE button The selected template is deleted ...

Страница 222: ...7 220 7 TEMPLATE ...

Страница 223: ...print jobs 227 Private print jobs 230 When using department code 233 3 Confirming Scan Job Status 236 4 Log List 237 Confirming job history in log list 238 Registering into address book from log lists 242 Printing journals send receive log list 244 5 Print Status Display 245 6 Error Code 248 ...

Страница 224: ...atus You can also start pause release delete and move the job in waiting For the status confirmation of the Fax job see the Operator s Manual for Facsimile Function The Printer Scanner Kit optional is necessary for the scanning function The FAX Unit optional is necessary for the Fax function The Printer Scanner Kit optional is necessary for the Internet Fax and Email functions The Printer Kit or t...

Страница 225: ...me the job was registered Paper Paper size to be printed Pages Number of pages to be printed Sets Number of sets to be printed Status Status of jobs or specified time for scheduled setting 4 jobs are displayed in 1 page Up to 250 pages 1000 jobs can be displayed When you want to confirm the 5th and following jobs press the Next button and when you want to return to the previous page press the Prev...

Страница 226: ...nd printed on the print job list Displaying print job list Deleting print jobs 1 Select the job you want to delete on the print job list then press the DELETE button If the subject job is not displayed on the page press the Prev or Next button to switch the page 2 Delete OK appears Press the DELETE button The job is deleted 1 Press the JOB STATUS button on the control panel The print job list is d...

Страница 227: ...o RESUME When the job is paused the next job is started Releasing print job Press the RESUME button A job once paused will not be printed out unless the RESUME button is pressed Moving print jobs The 11th job or later counting from the one in progress can be moved 1 Select the job you want to move on the print job list then press the MOVE button If the corresponding job is not displayed on the pag...

Страница 228: ...226 8 JOB STATUS 2 Confirming Print Job Status Cont 8 2 Select the position where you want to move the job The job comes right under the job you selected on the list ...

Страница 229: ...nd then select whether you print the rest of the documents or quit printing to change the setting on the proof print job list If you want to print the rest you can change the number of printouts For details of proof print see the Operating Instructions For Print Function Displaying proof print job list 2 Press the PROOF button The proof print job list is displayed 1 Press the JOB STATUS button on ...

Страница 230: ...nding job is not displayed on the page press the Prev or Next button to switch the page 2 Press the RELEASE button Printing starts The printing status can be confirmed on the print job list When you want to change the number of sets When you want to change the number of sets press the EDIT button and key in the desired number Then press the RELEASE button to start printing ...

Страница 231: ...ob you want to delete on the proof print job list and then press the DELETE button If the corresponding job is not displayed on the page press the Prev or Next button to switch the page 2 Delete OK appears Press the DELETE button The job is deleted ...

Страница 232: ...r Print Function Displaying private print job list 2 Press the PRIVATE button 3 Select the appropriate user name The letter entry menu P 26 is displayed Key in the password which has previously been set from the cli ent PC and then press the ENTER button You can key in the Admin Password 6 to 10 digits by pressing the ADMIN PASSWORD button instead of keying in the password previously set from the ...

Страница 233: ...nding job is not displayed on the page press the Prev or Next button to switch the page To select all jobs on the private print job list press the SELECT ALL button To clear the selection press the ALL CLEAR button 2 Press the RELEASE button Printing starts The printing status can be confirmed on the print job list ...

Страница 234: ...nt job list and then press the DELETE button If the corresponding job is not displayed on the page press the Prev or Next button to switch the page To select all jobs on the private print job list press the SELECT ALL button To clear the selection press the ALL CLEAR button 2 Delete OK appears Press the DELETE button The job is deleted ...

Страница 235: ...e jobs stored in the invalid queue can be printed when the correct department code is newly keyed in A print job whose number of pages exceeds that specified for a particular department code will not be printed out either In this case contact the administrator in your office Displaying invalid queues 2 Press the INVALID button The menu for the invalid queue is displayed 1 Press the JOB STATUS butt...

Страница 236: ...t department code again to print the subject job 1 Select the job you want to print on the menu for the invalid queue If the corresponding is not displayed on the page press the Prev or Next button to switch the page 2 Press the RELEASE button 3 Key in the correct department code and then press the ENTER but ton Printing starts The printing status can be confirmed on the print job list ...

Страница 237: ...ob you want to delete on the menu for the invalid queue then press the DELETE button If the corresponding job is not displayed on the page press the Prev or Next button to switch the page 2 Delete OK appears Press the DELETE button The job is deleted ...

Страница 238: ... job list The following information is displayed 4 jobs are displayed in 1 page Up to 250 pages 1000 jobs can be displayed When you want to confirm the 5th and the following jobs press the Next button and when you want to return to the previous page press the Prev button Deleting scan job Select the job you want to delete on the scan job list and then press the DELETE button To Where the scanned d...

Страница 239: ... Internet Fax or the log list of scan jobs The Printer Scanner Kit optional is necessary for the scanning function The FAX Unit optional is necessary for the Fax function The Printer Scanner Kit optional is necessary for the Internet Fax and Email functions The Printer Kit optional is necessary for printing from a client PC through the network When you press the JOB STATUS button on the control pa...

Страница 240: ...0 pages 120 jobs can be displayed When you want to confirm the 5th and the following jobs press the Next button and when you want to return to the previous page press the Prev button The following button is displayed RETURN Press this button to return to the log menu User Name Name of the senders of the copy print job Date Time Date and time the job was printed Paper Paper size printed Pages Numbe...

Страница 241: ...tons are displayed File No Order of job registered To Recipient s Fax number or Email address of Internet Fax Date Time Date and time the Fax or Internet Fax was sent Pages Number of pages of the Fax or Internet Fax sent Status Result is displayed as OK or in error codes For the error codes P 248 6 Error Code JOURNAL Press this button to print the history of sent jobs journal For details P 244 Pri...

Страница 242: ... No Order of job registered From Sender s Fax number or Email address of Internet Fax The recipient s name in the address book is displayed if registered Date Time Date and time the Fax Internet Fax or Email was received Pages Number of pages of the Fax Internet Fax or Email received Status Result is displayed as OK or in error codes For the error codes P 248 6 Error Code JOURNAL Press this button...

Страница 243: ... to 30 pages 120 jobs can be displayed When you want to confirm the 5th and the following jobs press the Next button and when you want to return to the previous page press the Prev button The following buttons are displayed To Where the scanned data are to be filed or sent Agent Agent by which performed Date Time Date and time the scan job was performed Pages Number of pages of job scanned or Emai...

Страница 244: ...ch have not yet been registered into the address book from the send receive or scan log list 1 Press the SEND or RECEIVE or SCAN button on the log menu The send or receive or scan log list is displayed 2 Select the job which includes the Fax number or Email address you want to register into the address book 3 Press the ENTRY button ...

Страница 245: ...AX NO Enter the Fax number 2ND FAX Enter the second Fax number E MAIL Enter the Email address CORP Enter the company name DEPT Enter the department name KEYWORD Enter a keyword with which you can search for the desired contact When you press any of the above the letter entry menu P 26 is displayed Enter the information with the but tons on this menu and the digital keys on the control panel 5 Pres...

Страница 246: ...send and receive logs 1 page or the 120 latest send and receive logs 3 pages can be printed out You can also select and print only 1 log For details see the Operator s Manual for Facsimile Function 1 Press the SEND or RECEIVE button on the log menu The send receive log list is displayed 2 Press the JOURNAL button The send receive log list is printed ...

Страница 247: ... but ton being used for the feeding of this printing is highlighted Releasing print job errors If the specified size of paper is not in the drawer when printing is to be performed from a client PC a print job error occurs The JOB STATUS button blinks and the following menu is displayed Follow the procedure below to release the error Printing by placing sheets of paper on the bypass tray 1 Press th...

Страница 248: ...inting is performed Press the JOB STATUS button Printing by placing appropriate size of sheets in the drawer 2 Press the drawer button whose size you want to change on the touch panel You can select the desired drawer with the paper source selection buttons 3 Place paper in the corresponding drawer 1 Press the blinking JOB STATUS button ...

Страница 249: ...he specified size of paper is not in the drawer you can release the error by selecting another size of paper already placed in another drawer instead of placing the specified size of paper in the drawer How ever a part of the image may not be printed if the size of the paper placed in the drawer is smaller than the specified one Press the drawer button whose size you want to use on the touch panel...

Страница 250: ...in 00E8 HDD Error Retry communications Internet Fax 1C10 System access abnor mality Turn the power OFF and then back ON Perform the job in error again If the error still occurs contact your service representative 1C11 Insufficient memory When there are running jobs perform the job in error again after the completion of the running jobs If the error still occurs turn the power OFF and then back ON ...

Страница 251: ...quiring fail ure Turn the power OFF and then back ON Perform the job in error again If the error still occurs contact your service representa tive 1C63 Terminal IP address unset Ask your administrator to set the IP address of the equipment 1C64 Terminal mail address unset Ask your administrator to set the Email address of the equip ment 1C65 SMTP address unset Ask your administrator to set the SMT...

Страница 252: ...artial Email in the RFC2046 for mat 3A50 3A52 HDD full error Ask the sender to resend the Email by separating it to several Emails If this error occurs because the paper empty occurs and too much waiting jobs are stored in the hard disc add the paper to activate other jobs 3A60 3A62 HDD full alert Ask the sender to resend the Email by separating it to several Emails If this error occurs because th...

Страница 253: ... the DNS and mail server set tings are correctly set If they are correctly set ask the sender to confirm thedestination address is correct 3D20 Exceeding maximum offramp destinations Ask the sender to specify up to 40 destinations for one offramp gateway job The equipment cannot perform the offramp gate way transmission for more than 40 destinations 3D30 Fax unit is not installed Make sure the Fax...

Страница 254: ...tact your service rep resentative 2C61 Failed to read AddressBook Turn the power OFF and then back ON Retry the job in error Reset the data in the Address Book and retry it If the error still occurs contact your service representa tive 2C63 2C64 Invalid Domain Address Ask your administrator to set the IP address 2C65 2C66 2C69 Failed to connect to SMTP server Make sure the SMTP server is correctly...

Страница 255: ...o create file Make sure that the access privilege to the storage directory is writable and the server or local disc has a sufficient space Then retry the scan 2D32 Failed to delete file Make sure that the access privilege to the storage directory is writable and the server or local disc has a sufficient space Then retry the scan 2D40 Failed to convert image file format Turn the power OFF and then ...

Страница 256: ...rn the power OFF and then back ON Delete the specified document If the specified document can not be deleted contact your service representative 2B50 Failed to process image Turn the power OFF and then back ON Retry the scan If the error still occurs contact your service representative 2B51 Failed to process print image Make sure that the Function List can be printed out Retry the print If the err...

Страница 257: ...inserted securely Or check if the trial period is expired 4031 HDD full for printing Too many jobs of Private print and department code print are stored in HDD 4032 Private print only error Jobs other than Private print cannot be printed Perform Private printing 4033 Printing data storing limitation error Printing with its data being stored to the HDD temporarily Proof print Private print Schedule...

Страница 258: ...ent code and user code at the same time Clear the limit counter A291 Limit over error Number of prints has exceeded the one specified with the user code Clear the limit counter A292 Limit over error Number of prints has exceeded the one specified with the department code Clear the limit counter Error code Problem What to do ...

Страница 259: ... if the mail server is operating properly Turn the power OFF and then back ON and perform the job in error again If the error still occurs contact your service representative 2504 HOST NAME error RFC 504 Check if the mail server is operating properly Turn the power OFF and then back ON and perform the job in error again If the error still occurs contact your service representative 2550 Destination...

Страница 260: ...8 258 8 JOB STATUS ...

Страница 261: ...259 9 9 BLINKING GRAPHIC SYMBOLS 1 Blinking Graphic Symbols 260 2 Drawer Display on the Touch Panel 261 3 Toner Related Symbols 262 4 Jam Symbols 265 5 Call Service Symbol 286 ...

Страница 262: ... area 3 Illustration of the equipment 4 Toner related symbol P 262 3 Toner Related Symbols 5 Jam symbol P 265 4 Jam Symbols 6 Call service symbol P 286 5 Call Service Symbol When one of the graphic symbols 4 to 6 blinks take the appropriate action referring to the indicated pages 6 1 2 3 5 4 ...

Страница 263: ...261 9 2 Drawer Display on the Touch Panel When the drawer runs out of paper the drawer display on the touch panel starts blinking Add paper to the drawer ...

Страница 264: ...runs out of toner the toner cover symbol blinks and the above message appears Approx 2000 sheets of copy are available after the toner cover symbol starts blinking Also the toner car tridge can be replaced during the copy process while the toner cover symbol is blinking Replace the toner cartridge according to the following procedure 1 Insert your fingers in the access on the front and open the to...

Страница 265: ...n the direction of the arrow 6 Install the toner cartridge to the toner cartridge holder Match the label orange on the equipment with the shutter orange on the toner cartridge then insert the toner cartridge to the end If you cannot insert the toner cartridge completely rotate it slightly to check the position and insert it again If the toner scatters wipe it off completely ...

Страница 266: ... cartridge symbol starts blinking and the above message appears Replace the toner cartridge P 262 Toner cover symbol Replace toner bag symbol When the toner bag installed in the equipment becomes full the replace toner bag symbol starts blinking Your service technician will replace the toner bag When the replace toner bag symbol blinks please con tact your service representative 7 Return the toner...

Страница 267: ...of the equipment paper exit area 6 Inside of the equipment paper transport area 7 Bypass tray 8 External Large Capacity Feeder optional 9 Inside of the equipment paper feed area 10 Inside of the equipment duplex unit area 11 Inside of the equipment reversing area 12 Saddle Stitch Unit of 2 Bin Saddle Stitch Finisher optional Procedure of clearing a paper jam When misfeeding occurs remove the misfe...

Страница 268: ... the External Large Capacity Feeder when clearing the jam Separating Installing and moving the finishing device When separating the finishing device from the equipment While placing your hand position A and pressing the button gently move the finishing device away from the equipment When installing the finishing device to the equipment While placing your hand position A and pressing the button gen...

Страница 269: ...the button gently separate the External Large Capacity Feeder When installing the External Large Capacity Feeder to the equipment While placing your hand position A and pressing the button gently install the External Large Capacity Feeder Reversing Automatic Document Feeder 1 Press the button on the Reversing Auto matic Document Feeder to open the upper cover A ...

Страница 270: ...ose the guide plate 2 Rotate the knob to remove any misfed originals 3 Open the guide plate to remove any mis fed paper 5 Open the original feeding tray and remove any misfed originals 6 Open the large size original exit tray and remove any misfed originals ...

Страница 271: ... close the upper cover of the Reversing Automatic Document Feeder 11Close the platen sheet and the Reversing Automatic Document Feeder 8 Open the Reversing Automatic Docu ment Feeder 9 Release the lock to open the platen sheet 10Remove any misfed originals in the reversing area ...

Страница 272: ...ypass tray External Large Capacity Feeder 1 Remove the paper from the bypass tray 1 While pressing the button gently sepa rate the External Large Capacity Feeder from the equipment 2 Turn the knob of the External Large Capacity Feeder to remove the paper ...

Страница 273: ...271 9 3 Remove the paper from the bypass cover 4 Open the drawer to remove the misfed paper 5 Close the drawer and install the External Large Capacity Feeder to the equipment ...

Страница 274: ...it If the Inserter Unit is not installed this pro cedure is not necessary 2 Bin Saddle Stitch Finisher Procedure for releasing the paper misfeed in the saddle stitch unit If the 2 Bin Saddle Stitch Finisher is not installed this procedure is not necessary 1 While pressing the button separate the finishing device from the equipment 2 Hole Punch Unit Open the cover of the Hole Punch Unit 3 Hole Punc...

Страница 275: ...unch Unit Close the cover of the Hole Punch Unit 5 Remove any misfed paper seen on the feeding area of the finishing device 6 Inserter Unit Pull the lever to open the jam access cover 7 Inserter Unit Remove the paper ...

Страница 276: ...OLS 4 Jam Symbols Cont 9 8 Close the jam access cover 11 Inserter Unit Close the lower cover 9 Inserter Unit Open the lower cover 10 Inserter Unit Remove the paper 12 Inserter Unit Open the paper feeding tray to remove the paper ...

Страница 277: ...e 2 Bin Fin isher or 2 Bin Saddle Stitch Finisher 14Pull the knob 1 to open the buffer roller cover and then remove the paper 15Pull the knob up in the rear side of the Finisher to open the guide 16Remove the paper then close the guide ...

Страница 278: ... 2 Bin Finisher or 2 Bin Saddle Stitch Finisher 21 Inserter Unit Return the paper feed tray of the Inserter Unit to its original position 17Pull the knob 2 up to open the buffer roller 18Remove the paper from the lower area 19Remove the paper from the paper exit side of the 2 Bin Finisher or 2 Bin Sad dle Stitch Finisher ...

Страница 279: ...ose the lower cover of the Inserter Unit 22 2 Bin Saddle Stitch Finisher Inserter Unit Open the lower cover of the Inserter Unit 23 2 Bin Saddle Stitch Finisher Open the guide plate 24 2 Bin Saddle Stitch Finisher Remove the paper and close the guide plate ...

Страница 280: ...er cover of the 2 Bin Sad dle Stitch Finisher 27 2 Bin Saddle Stitch Finisher Turn the right hand knob counterclock wise until it stops 28 2 Bin Saddle Stitch Finisher While pushing the left hand knob clock wise turn it to remove the paper 29 2 Bin Saddle Stitch Finisher Open the paper exit cover ...

Страница 281: ... Stitch Finisher Close the paper exit cover and the lower cover of the 2 Bin Saddle Stitch Finisher 30 2 Bin Saddle Stitch Finisher Remove the paper 32While pressing the button install the fin ishing device to the equipment ...

Страница 282: ...s procedure is not necessary External Large Capacity Feeder If the External Large Capacity Feeder is not installed this procedure is not necessary 1 External Large Capacity Feeder Press the button to separate the External Large Capacity Feeder from the equip ment 2 Open the paper feed cover 3 Remove the paper from the side of the drawer ...

Страница 283: ...281 9 5 Close the drawer and the paper feed cover 4 Open the drawer in which the paper has been set to remove the paper 6 Open the bypass cover 7 Remove the paper ...

Страница 284: ...External Large Capacity Feeder to the equipment P 266 for cautionary points regarding separation installation and moving of the options 10 Finishing device While pressing the button separate the finishing device from the equipment 11Open the exit cover 12Remove the paper from the cover side A Reverse unit B Guide plate B A ...

Страница 285: ...ve the paper from the middle of the reverse unit 14Open the front cover 15Turn the knob of the fuser unit counter clockwise to remove the paper 17 Finishing device While pressing the button install the fin ishing device to the equipment ...

Страница 286: ... the fuser unit cover slowly 18Turn the lever 90º clockwise to release the lock and then pull out the transfer transport unit Pull out the transfer transport unit it stops 19Open the fuser unit cover 20Turn the knob to remove the paper 22Open the duplexer guide ...

Страница 287: ...285 9 24Close the duplexer guide 26Close the front cover 23Remove the paper 25Push the transfer transport unit into the equipment and then turn the lever coun terclockwise to lock it ...

Страница 288: ... contact your service representative for maintenance or repair of the internal parts of the equip ment When the call service symbol blinks and Misfeed in copier Press HELP appears output is no longer pos sible Contact your service representative with the information of the displayed error code 1 2 ...

Страница 289: ...unit 292 4 Examine stapler 294 5 READY CHECK STAPLER 296 6 Examine stapler in the saddle stitch unit 297 7 READY CHECK SADDLE STITCH STAPLER 300 8 READY HOLE PUNCH DUST BIN IS FULL 301 9 POWER FAILURE 302 10 Time for periodic maintenance 303 11 Check paper size setting on control panel for drawer N 304 12 Reboot the machine 312 ...

Страница 290: ...fter this message has appeared Prepare a new toner cartridge before the toner runs out Replace the toner cartridge after Install new Black toner cartridge has appeared and the toner cover symbol blinks P 262 Toner cover symbol If this message does not disappear after the new cartridge has been installed perform the following proce dure to delete the message 2 Press the USER button 1 Press the USER...

Страница 291: ...289 10 3 Press the GENERAL button 4 Press the TONER NEAR EMPTY DETECTION button 5 Press the YES button ...

Страница 292: ...talled When the staples in the stapler of the Finisher run out this message appears Add staples to the cartridge according to the following procedure 1 Open the front cover of the Finisher 2 Lower the lever of the stapler to release the lock and then take out the staple car tridge 3 Remove the empty staple case from the cartridge ...

Страница 293: ...l the seal keeping the staples together before the sta ple case is attached in the cartridge 5 Pull out the seal fastening the staples upward 6 Install the staple cartridge to the stapler Insert the cartridge until the lever of the stapler goes up to be fixed securely 7 Close the front cover of the Finisher ...

Страница 294: ...le Stitch Finisher optional run out this message appears Replace the staple cartridge according to the following procedure 1 Open the lower cover of the 2 Bin Sad dle Stitch Finisher 2 Pull out the saddle stitch unit slowly 3 Pull the handle of the stapler of the sad dle stitch unit to release the lock Then rotate the stapler approx 60º clockwise The stapler is locked and fixed when it comes to a ...

Страница 295: ... Take out the empty cartridge and then install a new cartridge Replace both cartridges in one go 5 Pull out the handle of the stapler to release the lock and return to its original position 6 Insert the saddle stitch unit into the 2 Bin Saddle Stitch Finisher slowly 1 2 ...

Страница 296: ...ppears when the staples in the Finisher optional are jammed To remove them follow the procedure below 1 Open the front cover of the Finisher 2 Lower the lever of the stapler to release the lock and then take out the staple car tridge 3 Lower the guide holding the knob A ...

Страница 297: ... Remove any jammed staples with some thing sharp 5 Lift up the guide holding the knob to return it to its original position 6 Install the staple cartridge in the stapler Insert the cartridge until the lever of the stapler goes up to be fixed securely ...

Страница 298: ...e shown only when the 2 Bin Finisher optional is installed It appears when the sta ples in the stapler of the Finisher run out or when the staples in the Finisher are jammed Clear the error according to the procedure in P 290 2 Check staple cartridge or P 294 4 Exam ine stapler ...

Страница 299: ...e them follow the procedure below 1 Open the lower cover of the 2 Bin Sad dle Stitch Finisher 2 Pull out the saddle stitch unit slowly 3 Pull the handle of the stapler of the sad dle stitch unit to release the lock And then rotate the stapler approx 60º clock wise The stapler is locked and fixed when it comes to a near horizon tal position 1 2 ...

Страница 300: ...tch unit Cont 10 4 Take out the cartridge 5 Press 1 to release the lock and then pull up the shutter by holding knob 2 6 Remove any jammed staples 7 Return the shutter to its original position by pressing knob 2 Check that the latch of 1 is hung on the shutter 2 1 A 1 2 ...

Страница 301: ...2 Bin Saddle Stitch Finisher 8 Install the cartridge 9 Pull the knob on the stapler to release the lock and then pull the stapler down to its original position 10Insert the saddle stitch unit into the 2 Bin Saddle Stitch Finisher slowly 1 2 ...

Страница 302: ...to 6 of P 292 3 Check staple cartridge in the sad dle stitch unit Do not close the lower cover of the 2 Bin Saddle Stitch Finisher 2 Check the following 2 items to perform test stapling Whether the 2 Bin Saddle Stitch Finisher is securely installed in the equipment Whether any LD LG or LT R paper is set in the equipment 3 Close the lower cover of the 2 Bin Saddle Stitch Finisher The test stapling ...

Страница 303: ... dustbin in the Hole Punch Unit optional becomes full To dispose of the paper bits follow the procedure below 3 Dispose of the paper bits 4 Attach the hole punch dustbin 5 Close the cover of the Hole Punch Unit 1 Open the cover of the Hole Punch Unit 2 Pull out the hole punch dustbin ...

Страница 304: ...e appears when a job is interrupted due to a power failure etc The print or Fax job in progress at the time of a power failure may not be completed Confirm the job status by pressing the JOB STATUS button To clear this message press the FUNCTION CLEAR button twice ...

Страница 305: ...is required Contact your ser vice representative The following message also appears when such assistance is required Contact your service representa tive Time for periodic maintenance Fuser cleaning web Continuous use of the equipment without the fuser cleaning web being changed causes stains on the printed image ...

Страница 306: ...Check paper size setting on control panel for Bypass In case that a paper misfeed occurs and one of the above messages consequently appears another paper misfeed will occur if you just remove the jammed paper Instead be sure to follow the procedure below Make a note of the position of the jammed paper and the number of the drawer displayed in the mes sage in advance because guidance for removing t...

Страница 307: ...button on the touch panel to display the USER menu 3 Pull out the drawer mentioned in the message Then remove all paper in it 4 Close the drawer and then turn the power ON 5 Press the USER FUNCTIONS button on the control panel ...

Страница 308: ... paper size setting on control panel for drawer N Cont 10 7 Press the GENERAL button on the touch panel 8 Press the DRAWER button on the touch panel 9 Press the drawer button corresponding to the one mentioned in the message on the touch panel ...

Страница 309: ...32 4 Setting Copy Paper 11Place the removed paper and the original and then try to copy again During copying using the bypass tray 2 Remove the jammed paper P 265 4 Jam Symbols 1 Turn the power of the equipment OFF You cannot shut down the equipment 3 Remove all paper on the bypass tray ...

Страница 310: ...e paper size P 61 6 Bypass Copying 6 Place the original and try to copy again During printing from the FAX or Printer using a drawer 2 Remove the jammed paper P 265 4 Jam Symbols 4 Turn the power ON 1 Turn the power of the equipment OFF You cannot shut down the equipment 3 Pull out the drawer mentioned in the message Then remove all paper in it ...

Страница 311: ...e as the one you have checked at step 5 in the drawer mentioned in the message P 32 4 Setting Copy Paper 7 The job is resumed If you change the paper size again after the completion of the job check that the paper size placed in the drawer is the same as the one registered in the equipment for the corresponding drawer 4 Close the drawer and then turn the power ON ...

Страница 312: ... During printing from the Printer using the bypass tray Paper will not be fed out of the bypass tray during a FAX reception 2 Remove the jammed paper P 265 4 Jam Symbols 1 Turn the power of the equipment OFF You cannot shut down the equipment 3 Remove all paper on the bypass tray 4 Turn the power ON ...

Страница 313: ... 6 Place the paper of the size corresponding to the one shown next to the message Place Paper in the Bypass tray on the bypass tray 7 Press the START button 5 Press the JOB STATUS button on the control panel ...

Страница 314: ...the machine This message appears when the equipment cannot be operated normally because an error occurs but it may be released by rebooting the equipment Since the equipment cannot be shut down with the control panel reboot it with the power switch ...

Страница 315: ...313 11 11 MAINTENANCE 1 Daily Inspection 314 2 Simple Troubleshooting 315 ...

Страница 316: ...heet Clean the surface as follows depending on the staining Clean it with a cloth co packed Clean it with a soft cloth lightly moistened with water Clean it with a soft cloth lightly moistened with alcohol and then wipe it with a dry cloth Clean it with a soft cloth lightly moistened with watered down neutral detergent and then wipe it with a dry cloth Do not use solvents such as thinner or benzin...

Страница 317: ...ypass appear Match the size of the paper placed in the drawer or on the bypass tray and the one regis tered to the equipment P 304 11 Check paper size setting on control panel for drawer N Does the paper placed exceed the line indicated inside of the side guide Remove some of the sheets of paper and place them with the paper height not exceeding the line indicated P 35 Placing paper in the drawer ...

Страница 318: ...e displayed Wait until the equipment becomes ready P 27 Turning power ON Item to be checked Countermeasure Reference page Are there functions that cannot be combined set together See the copying function combi nation and image quality adjust ment combination matrices and set again P 327 4 Copying Function Combination Matrix Item to be checked Countermeasure Reference page Has the message Install n...

Страница 319: ...ustment function P 108 1 Background Adjust ment Are originals with high transpar ency used Place a blank sheet of paper with originals of the same size or larger over the original P 52 Sheet originals Item to be checked Countermeasure Reference page Does the entire original lie prop erly on the surface of the glass Place the original on the glass and then close the Reversing Automatic Document Fee...

Страница 320: ...11 318 11 MAINTENANCE ...

Страница 321: ...2 12 SPECIFICATIONS OPTIONS 1 DP 8540 7240 Specifications 320 2 Specificatons of Options 324 3 Packing List 326 4 Copying Function Combination Matrix 327 Combination Matrix 1 2 327 Combination Matrix 2 2 328 ...

Страница 322: ...FOLIO 8K 16K 16K R Bypass feeding Paper size within 3 94 11 69 Length 5 83 17 01 Width Acceptable paper weight 17 lb Bond 110 lb Index drawer and bypass feeding Warm up time Approx 130 sec First copy time LT DP 7240 less than 4 0 sec DP 8540 less than 3 5 sec Continuous copying speed P 322 Continuous copying speed Multiple copying Up to 9999 copies digital key entry Excluded image width Copy Leadi...

Страница 323: ...ons and the environment Specifications and appearance are subject to change without notice in the interest of product improvement Weight equipment only Approx 463 lb Space occupied 55 16 x 31 06 W x D paper exit tray bypass tray Storage capacity Max 2000 images 1 job ...

Страница 324: ...0 50 LT R A4 R B5 R Drawer 52 50 61 56 Bypass 38 38 42 42 LG COMP 13 LG B4 FOLIO Drawer 44 41 52 45 Bypass 34 34 38 38 LD A3 Drawer 37 34 43 37 Bypass 1 30 30 34 34 Thick 1 28 lb Bond LT ST R 8 5 SQ A4 A5 R B5 Drawer 72 72 85 85 Bypass 46 46 50 50 LT R A4 R B5 R Drawer 52 50 61 56 Bypass 38 38 42 42 LG COMP 13 LG B4 FOLIO Drawer 44 41 52 45 Bypass 34 34 38 38 LD A3 Drawer 37 34 43 37 Bypass 1 30 3...

Страница 325: ...s or less than 0 63 in height 13 20 lb Feeding speed 600 dpi 71 sheets min 300 150 dpi 83 sheets min 400 200 dpi 79 sheets min Acceptable originals LD ST R A3 A5 R ST and A5 are not acceptable Paper weight 13 34 lb 1 sided original 13 28 lb 2 sided original Power source Power supplied from the equipment ...

Страница 326: ... A3 A4 R B4 FOLIO 30 sheets 15 sheets 15 sheets Stapling position Rear Front Front diagonal Double Saddle stitch unit No Yes Stitch capacity LD LT R A3 A4 R B4 20 lb Bond 24 lb Bond 28 lb Bond 15 sheets 10 sheets 10 sheets Hole Punch Unit Optional Power source Supplied from the copier Dimensions 24 25 29 13 x 24 8 x 40 28 W x D x H Weight Approx 94 8 lb Approx 138 9 lb Power consumption 170 W max ...

Страница 327: ... LT A3 A4 Sweden DA SP81S 4 holes 0 26 dia 2 76 and 0 83 pitch LD LG LT R COMP A3 A4 A4 R B4 B5 B5 R FOLIO Model name DA ST850 Type Floor type Acceptable paper size LD LG LT LT R COMP A3 A4 A4 R B4 B5 FOLIO Acceptable paper weight 17 lb Bond 140 lb Index Maximum capacity 17 20 lb Bond 140 lb Index 100 sheets Height approx 0 47 Special paper 60 less than above Power source Supplied from the equipme...

Страница 328: ...g List Packing list Installation instructions Set up report Photoconductive drum Operator s Manual pocket Tray spacer of Reversing Automatic Document Feeder Tab paper back guide CD ROM 4 pcs Warranty Sheet Cleaning cloth Cleaning cloth pocket ...

Страница 329: ... NO NO NO NO NO NO NO NO NO NO NO NO NO NO NO NO NO NO 3 3 NO NO NO NO NO NO NO NO NO NO NO NO NO NO NO NO NO NO NO NO 3 3 NO NO NO NO NO NO NO NO NO NO NO NO NO NO NO NO NO NO NO NO 3 3 NO NO NO NO NO NO NO NO NO NO NO NO NO NO NO NO NO NO NO NO YES YES 4 YES YES YES NO NO NO NO NO NO NO NO NO YES NO NO YES NO YES YES YES NO NO NO NO NO NO NO YES YES YES YES YES YES NO NO NO NO NO YES 2 YES YES Y...

Страница 330: ...nto the file are the same as the ones for simplex copying 3 The function set later will be valid 4 The setting cannot be changed from 2nd job or later 5 Bookbinding margin is not available Job build Copy File Store to e Filing Copied Copy on tab Blank tab insert Copied tab insert Front cover Sheet insertion Tab paper Both blank Top copied back blank Blank Mask Nega Pos Top blank Top copied XY zoom...

Страница 331: ...ory in log list 238 Confirming print job status 223 Confirming scan job status 236 Continuing printing after proof printing 228 Continuous feed mode 55 152 Control panel 18 21 COPIED 139 COPIED TAB INSERT 155 COPY button 21 Copy density adjustment 105 COPY ON TAB 155 Copy paper types and sizes 33 Copying Function Combination Matrix 327 Copying mixed size originals 73 Copying procedure 46 COVER SHE...

Страница 332: ...112 114 116 Masking 129 Maximum number of sheets 51 Maximum number of sheets for stapling 87 MEMORY RX FAX communication lamps 21 Message 23 Message display 23 Mirror image 132 MONITOR PAUSE button 22 Moving print jobs 225 N Negative Positive reversal 133 Notice to users 5 O One touch zoom buttons 79 Operator s Manual pocket 18 Original cover 18 Original glass 18 Original mode 104 Original mode bu...

Страница 333: ... Sharpness 109 SHEET INSERT 165 SHEET INSERTION 139 Sheet originals 52 Shutdown 28 Simplex duplex button 23 Single feed mode 56 153 Sort copying 83 Specificatons DP 8540 7240 320 Options 324 Specifying both original size and copy size separately 76 Staple sort 81 Staple sort optional 86 START button 22 STOP button 22 Stopping copy operation 60 Storing documents in e Filing 179 Sub tray 82 T TAB PA...

Страница 334: ...332 INDEX Cont U Upper cover 82 User box 170 172 USER FUNCTIONS button 22 User group 199 213 X XY ZOOM 134 Z Zoom buttons 79 ...

Страница 335: ......

Страница 336: ...T LIMITED TO DIRECT INDIRECT SPECIAL INCIDENTAL OR CONSEQUENTIAL DAMAGES OR LOSS OF PROFITS SUSTAINED BY THE CUSTOMER IN CONNECTION WITH THE USE OR APPLICATION OF THIS PANASONIC MACHINE SEE YOUR DEALER FOR DETAILS OF DEALER S WARRANTY Panasonic Digital Document Company Unit of Panasonic Corporation of North America Two Panasonic Way Secaucus New Jersey 07094 http panasonic co jp pcc en Ko1005 6LE0...

Отзывы: